KAISDA K4 Manual de usuario

KAISDA
Instruction Manual
CAUTION: Reading the instructions carefully before using the KAISDA electric bike !

Contents
Safety instruction ----------------------------------------------------------Page 1
Te c h n i c a l i n s t r u c t i o n --------------------------------------P a g e 1
Meter operation -------------------------------------------------------------------Page 2
Battery:Further information and maintenance ---------------------------------Page 3
Charging ------------------------------------------------------------ Page 3
Installation Instruction ----------------------------------------------------------Page 4-7

1.Safety Instruction __________________
1. Thank you for purchasing the KAISDA E-BIKE. The E-BIKE features the most
recent innovation in technology.
2. For Safety reasons, it is most important that you read this user’s manual before
you operate the bike. Improper handling can reduce its riding performance and most
importantly, cause danger to your safe and healthy.
3. For handling and maintenance of the bicycle, please refer to the E-BIKE user’s
manual which is an integral part of this e-bike user’s manual!
4. Do not at any time dismantle or disassemble any of the above e-bike components!
5. Please check all parts are tighten and locked before riding.
6. Please make sure that the battery charger and charging plug are always kept dray
and never get wet.
7. The charger should only be cleaned with a dry cloth. Never use a wet cloth, oil or
any other liquid.
2. Instruction
-1-

3. Display operation
3.1. Open the Display
Long press Button show "OPEN" for 2-3 seconds to boot, short press button "+ -"1-
5 gear adjust the speed of the E-BIKE
3.2. Precautions for Operation
Pay attention to safe use.Do not attempt to untie the connector when connecting the
battery.
●Avoiding collision risk.
●Do not modify system parameters to avoid parameter clutter.
●Instrumentation error code should be repaired in time.
4. Battery related information and maintenance
1. How far can a fully charged battery go? It depends on load weight, road
conditions and battery capacity. However, under the same conditions, the
average speed can continue to travel for a long distance.
2. When storing batteries for an extended period of time (such as in winter), it is
important to place a fully charged battery on a dry, flat surface.
3. Note: when the battery is not in use, it should be charged every 2-3 months.
4.Warning:
4.1. Please keep the battery out of reach of children.
-2-

4.2. Do not attempt to turn on the battery.
4.3. If the battery is damaged in a crash or cycling accident, there is a risk of
electrolyte leakage. Beware of chemical burns!And immediately stop using
damaged batteries.
4.4 Do not touch the battery without a cloth or gloves, and make sure the acid
does not touch your eyes.
5. The charging method
1. When the battery of an electric bicycle needs to be charged, just put the bicycle in
the place where the power supply can reach it. First, connect the charging plug of the
charger to the charging seat on the battery, and then plug in the power plug of the
charger to charge.
2. The battery can be installed on the bicycle for charging, or it can be taken out and
placed in a convenient place for charging.
3. The red light means the battery is charging, and the green light means the battery
is fully charged (wait for 30 minutes after the green light of the charger is displayed
before unplugging it).Charging time depends on the battery capacity, the general
charging time is 4-6 hours.
4. Warning: Do not charge for more than 10 hours. Keep away from high temperature
environment and store in a cool place.
6 . Installation instructions
1. Open the carton of the electric bicycle, take out the electric bicycle, and cut off
the wrapping rope with tools.
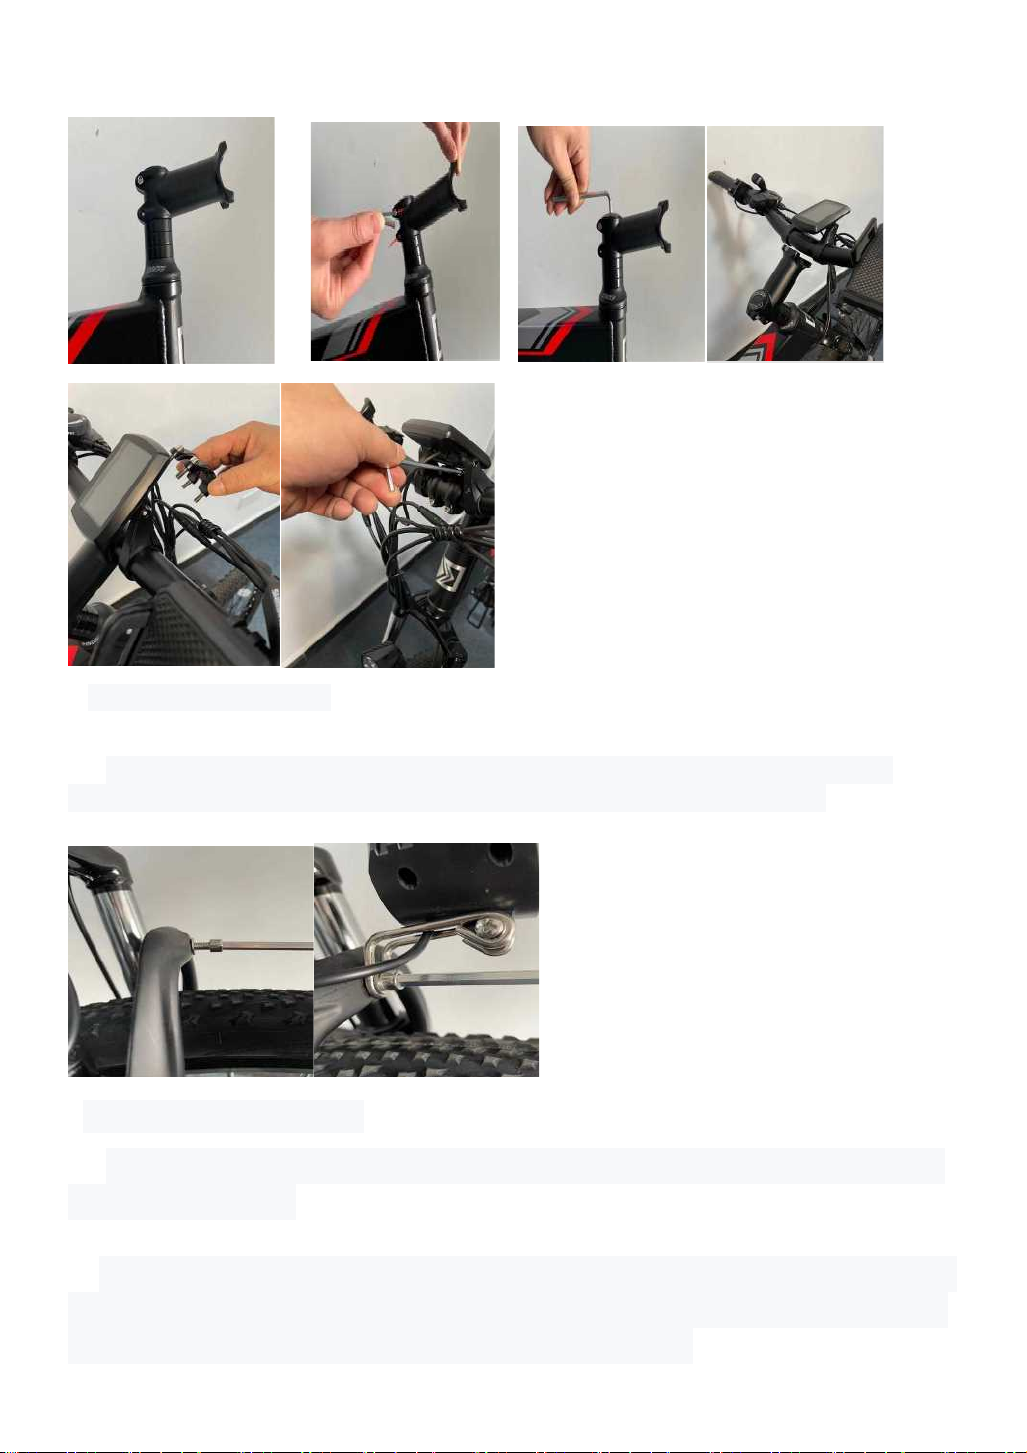
2. Handlebar installation:
2.1 Turn the riser clockwise until it is level with the frame.
3.Loosen the screws on both sides of the riser to adjust the tightness of the front fork
and the frame head pipe.
4.Adjust the proper tightness of the front fork with an M5 hexagon wrench.Tighten it
(2.2) after adjusting it.
2.4. Adjust the correct position of the handlebar, and then use the tool to lock the
lever cover.
-3-
2.1 2.2 2.3 2.4
5.Headlight installation
3.1 Loosen the headlight screw from the front fork;Install the headlight into the
screw hole of the front fork and tighten the screw with the hexagon tool.
4. Front wheel installation
4.1 Cut the wrap rope, remove the front wheel, remove the front fork guard bar and
the front wheel cover.
4.2 Make sure the front wheels are aligned with the rear wheels before intalled .First
pull the wheel up, place the disc brake disc into the front brake clamp, then use the
No. 15 wrench to tighten the front flower drum fixing screw.
-4-

4.3 Adjust the adjusting screw of the disc, so that the disc brake can rotate without
obvious friction.
5. Pedal installation:
Check the two pedals. The foot with "L" printed on the end of the core shaft should
be installed on the left side of the vehicle (without toothed disc) and rotate
counterclockwise. The foot with "R" is installed on the right side (with toothed disc)
and rotate clockwise, then use the No.15 wrench Tighten the foot core shaft (pay
attention to screw the foot up by hand first and then lock it with a wrench).
6. Saddle installation
6.1. Open the package, take out the seat cushion, seat rod, and then install the rear
reflector lamp on the seat rod.
6.2 Insert the seat rod into the frame.
6.3 Adjust the seat position to the height most suitable for your riding position and
tighten the quick disassembly (please make sure the quick disassembly lock is
tight).
-5-

7. Adjust angle of brake lever, meter, gear shifter and louder controller
on handle bar, then tighten them with tools.
8. Remove the battery
8.1 Insert the battery key into the keyhole.
8.2 To remove the battery, turn the key forward.
8.1 8.2
9. Accelerator installation instructions
9.1 Loosen the brake lever and shifting handle with tools and move forward to reserve
a certain installation space for thumb speed control;
9.2 Take out the thumb from the small box to adjust the speed and install the
handlebar;
9.3 Find an unplugged plug in front of the front of the car, and plug the thumb speed
control plug against it;
-6-
-6-
-6-

Kaisda electric bicycle installation and maintenance instructions, as well as any questions
about the product, please feel free to contact.
Detail Packing List
Model
Description
Quantity
K4
E-Bike
1
Tool (13 - 15 wrench, 9, 14-17 wrench, 11-
type screwdriver, M6, M5, M4, M3 hexagon
wrench)
1
Manual
1
Key
2
Charger
1
Pedal
1
saddle
1
Sea Post
Rear reflector
1
1
-7-

KAISDA
Bedienungsanleitung
VORSICHT: Lesen Sie die Anweisungen sorgfältig durch, bevor Sie das KAISDA-Elektrofahrrad verwenden!
Tabla de contenidos
Idiomas:
Otros manuales de Scooter de KAISDA


