JVC EF-S100FG Manual de usuario

SF-L100FG
EF-S100FG
PK-F100BG
(Fixed Polarized Screen)
(Ecran polarisé fixe)
(Screen Stand)
(Pied d’écran)
(Support bar)
(Barre de support)
100" Fixed Polarized Screen and Stand
Ecran polarisé fixe de 100” et pied
Instruction Manual
Mode d’emploi
BHU-30001-014
• Thank you for buying the 100”Fixed Polarized Screen
• SF-L100FG, EF-S100FG and PK-F100BG are sold
separately and are not included.
• Before installing and operating the unit, read this
instruction manual carefully for proper operation, and
retain this manual for your future reference along.
• A serial number is important for product quality control.
When you buy the unit, check if the serial number is
properly marked on the rear of the unit.
• Merci pour avoir acheté l’Ecran polarisé fixe de 100”
• Les SF-L100FG, EF-S100FG et PK-F100BG sont venus
séparément et ne sont pas fournis.
• Avant d’installer et d’utiliser l’appareil, lire attentivement
ce mode d’emploi pour s’assurer d’une utilisation correcte
et le conserver à titre d’information future.
• Le numéro de série est important pour le contrôle de la
qualité du produit. Lors de l’achat du produit, vérifier si le
numéro de série est correctement marqué au dos du
produit.

PRECAUTIONS FOR SAFE AND PROPER USE
Numerous symbols are employed as indication in the precautions for safety, precautions for handling, and in the indication to
the products. These are designed to prevent in advance any possible infliction of injury on you and other individuals and the
damage of properties through the proper use of the product. The symbols and meanings are shown below. Grasp the contents
of the symbols completely before reading this manual.
This symbol informs you of the presence of the contents that demands caution (including danger and warning).
Specifically prohibited contents (caution against electric shock in case of the left symbol) are illustrated in the
symbol.
This symbol informs you of prohibited actions. Specifically prohibited contents (prohibition of disassembly
in case of the left symbol) are illustrated in the symbol and its vicinity.
This symbol informs you of the contents that forces you to take some action or gives you some guidelines or
instructions. Specific contents of instructions (unplug the power cord from the outlet in case of the left symbol)
are illustrated.
Regarding Symbol Indications
Examples of Symbol Indications
WARNING
CAUTION
This represents the contents in which the probabilities for death or serious
injury are assumed if this symbol indication is ignored and the product is
erroneously handled.
This represents the contents in which the probabilities for injury to be inflicted
are assumed and the contents in which material damages to be sustained are
assumed if this symbol indication is ignored and the product is erroneously
handled.
– 2 –
English

– 3 –
WARNING
Never modify the screen. Otherwise, the damage
of the unit and injury can result.
Install all bolts and nuts on the product properly.
Otherwise, the damage of the unit and injury can
result.
Do not install the product on a tilted or unstable
surface or in places where it is subject to vibration
or shock. Drop or fall can result in injury.
Do not ride on the product. Motion and fall can
result in injury.
The screen itself weighs 20kg (mass) and has a
size of 2.082m x 1.574m; therefore, it is
recommended that two persons perform the
Fixed Polarized Screen and Screen Stand
Fixed Polarized Screen
Do not hang on or hock anything on the screen.
Drop or fall can result in injury.
If the wall on which the product is installed has an
insufficient strength, or if it is not installed
correctly, it may fall and cause injury or failure.
The wall must support a mass of 200kg.Contact
your dealer before installation.
Screen Stand
Fixed Polarized Screen and Screen Stand
Fixed Polarized Screen
Do not install the unit in a place where it is
exposed to direct sunlight, high heat or humidity,
or dust accumulates.
Do not touch the screen surface or write letters
or draw pictures on the screen. Ink and paints
on the screen cannot be wiped off.
Wipe off dust from the screen surface using a
dry cloth or a soft brush. Do not use benzine or
thinner. Otherwise, the screen may be
damaged.
If the screen is tarred or oiled, wipe it off with a
soft cloth moistened with a neutral detergent.
Screen Stand
Do not place heavy objects, or articles other
than the determined objects, on top of the
screen because this may disturb the balance
and cause the screen to fall and become
damaged.
After installation, secure the double-wheel
caster stoppers. Otherwise, the damage of the
unit and injury can result.
Do not attempt to move the screen with the two-
wheel casters locked because this may result in
damage to the floor, the casters or the screen.
Firmly insert the height adjustment stopper
handle into the hole in the slide pipe and make
sure the slide pipe is locked before using;
otherwise, tilting of the screen, injury or damage
to the screen may result.
Adjust the heights of the left and right side slide
pipes so that screen height is the same on the
left and right sides to prevent stressing the
screen. Stress can result in damage to the
equipment.
CAUTION
CAUTION
English

– 4 –
English
Accessories
115
70
115
70
15
1143
M6×10
M5×10 M5
10
SF-L100FG(Fixed Polarized Screen)
EF-S100FG(Screen Stand)
PK-F100BG(Support bar)
S-qScreen (One)
E-uM6 Hexagon nuts (2)
E-!0 Angle fixing
knobs (2)
E-iDouble-wheel
casters with stoppers (2)
P-qHorizontal screen stay (One) P-wAngle adjusting
plate (L) (One)
P-eAngle adjusting
plate (R) (One)
P-rHexagon head bolts
with washers M6×10 (4)
P-tHexagon head bolts
M5×10 (4) P-yHexagon nuts
(M5) (4)
E-!1 Nylon
washers (2)
E-oDouble-wheel casters
without stoppers (2)
E-!2 Spanners
(M5e•M6) (2))
E-!3 Spanners for caster
(M8) (One)
Instruction Manual
(this manual) (One)
E-yHexagon head
bolts with washers
M6×50 (2)
E-tHexagon
head bolts with
washers M6×40 (2)
E-rJoint pipe (B) (One)
E-eJoint pipe
(A) (One)
E-wStand base
(L) (One)
E-qStand base
(R) (One)
S-wWall fittings(4)
S-eConcrete
anchors (16)
S-rHexagon head
bolts (M6) (16) S-tWood
screws (16)
Instruction Manual
(this manual) (One)
1282 / 50.5(Recomended value)
– 5 –
English
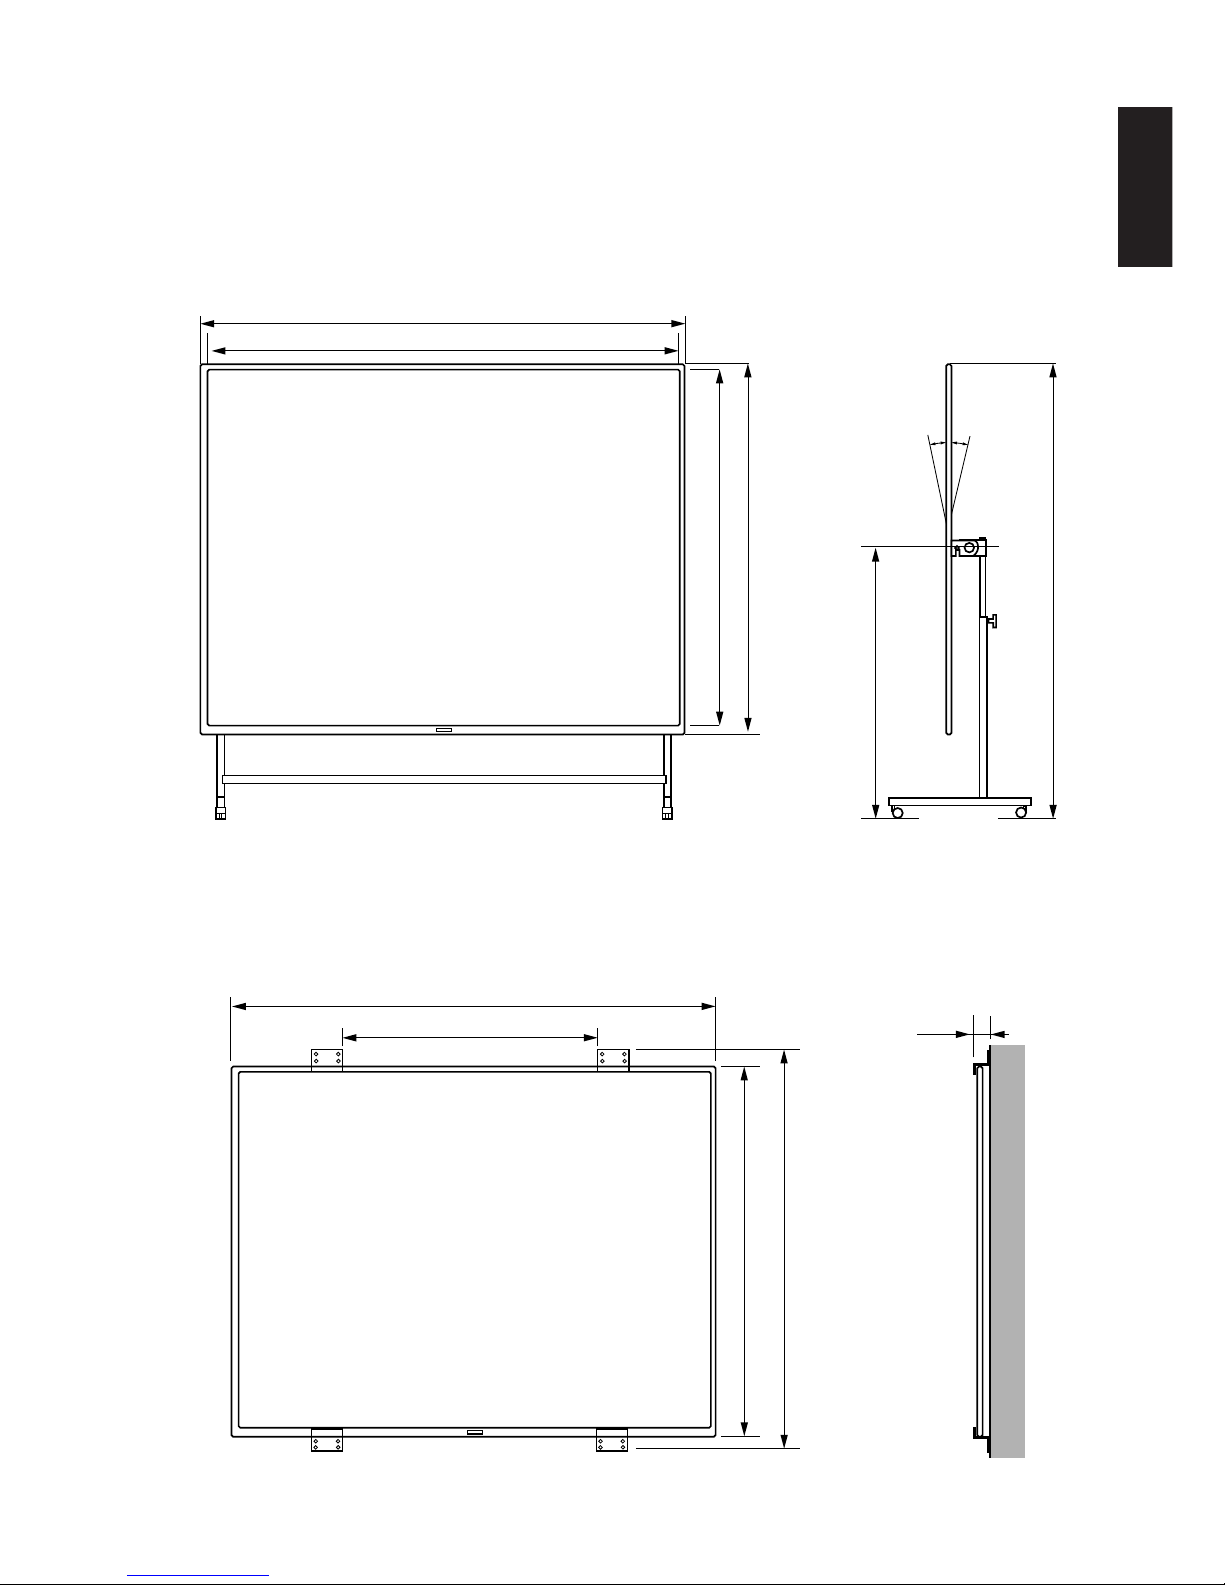
The screen can be either stand-mounted or wall-mounted.
Stand-mounted installation
SF-L100FG(Fixed Polarized Screen), EF-S100FG(Screen Stand), PK-F100BG(Support bar) are necessary.
(Unit : mm / inch)
Wall-mounted installation
SF-L100FG(Fixed Polarized Screen) is necessary.
(Unit : mm / inch)
Installation
Min.1937(~Max.2437)
/Min.76.3(~Max.96)
Min.1150(~Max.1650)
/Min.45.3(~Max.65)
1674 / 62
Approx. 1668 / 65.7
2082 / 82
2082 / 82
2032 / 80
10° 10°
1524 / 60
1574 / 62
26
/ 1.02

– 6 –
The screen itself weighs 20kg and has a width of 2m; therefore, it is recommended that transport, packing and
installation, etc., be performed by two persons to prevent damage to the screen.
Stand-mounted installation
SF-L100FG(Fixed Polarized Screen), EF-S100FG(Screen Stand) and PK-F100BG(Support bar) are necessary.
10-8
10-8
10-8
• Install P-wAngle adjusting plate(L) and P-eAngle adjusting plate (R) on the back of the S-qScreen
• Turn over S-qScreen with the logo mark facing downward. Install P-wAngle adjusting plate(L) on the left
plate and install P-eAngle adjusting plate (R) on the right plate attached to the screen and V frame using E-!2
Spanner.
Do not damage the screen surface.(Place a soft cloth or air cap on a flat surface and put the
screen on it.)
• Install the P-qHorizontal screen stay on the back of the screen, insert P-tHexagon head bolts into the
holes in P-wand P-eAngle adjusting plates from outwards and temporarily fix them with P-yHexagon
nuts.
• Tighten P-tBolts and P-yNuts with two spanners. Assembling the screen is now complete.
(1) Install Angle adjusting plate
(2) Install P-q Horizontal screen stay
P-e
E-!2
E-!2
P-q
P-t
P-r
P-w
E-y Hex nut
For M6
For M6
English
E-!2 Spanner
For M6

– 7 –
English
1
8−0
• Tilt the stand as shown above and insert E-i, E-oDouble-wheel caster into the
holes in the bottom of the stand bases (R) and (L), and tighten them with E-!3
Spanner for casters.
There are two casters with stoppers and two casters without stoppers.
Install them at the locations shown in the figure above.
Move : raise the lever.
Fix: Push the lever down.
• Place the E-qand E-wStand base as shown above and install E-eJoint
pipe (A).
• Install right and left E-tHexagon head bolts with washers temporarily.
• Place the E-qand E-wStand base as shown above and install E-rJoint
pipe (B).
• Install right and left E-yHexagon head bolts with washers and E-u
Hexagon nuts temporarily.
• Tighten the bolts and nuts with E-!2Spanners.
(3) Install E-eJoint pipe (A) and E-rJoint pipe (B) on E-qStand base (R) and
E-wStand base (L)
(4) Install E-i, E-oDouble-wheel caster
E-w
E-y
E-eE-q
E-t
E-r
E-!2
E-u
E-i,
E-o
E-!3
Up: Move
Down:
Fix

– 8 –
English
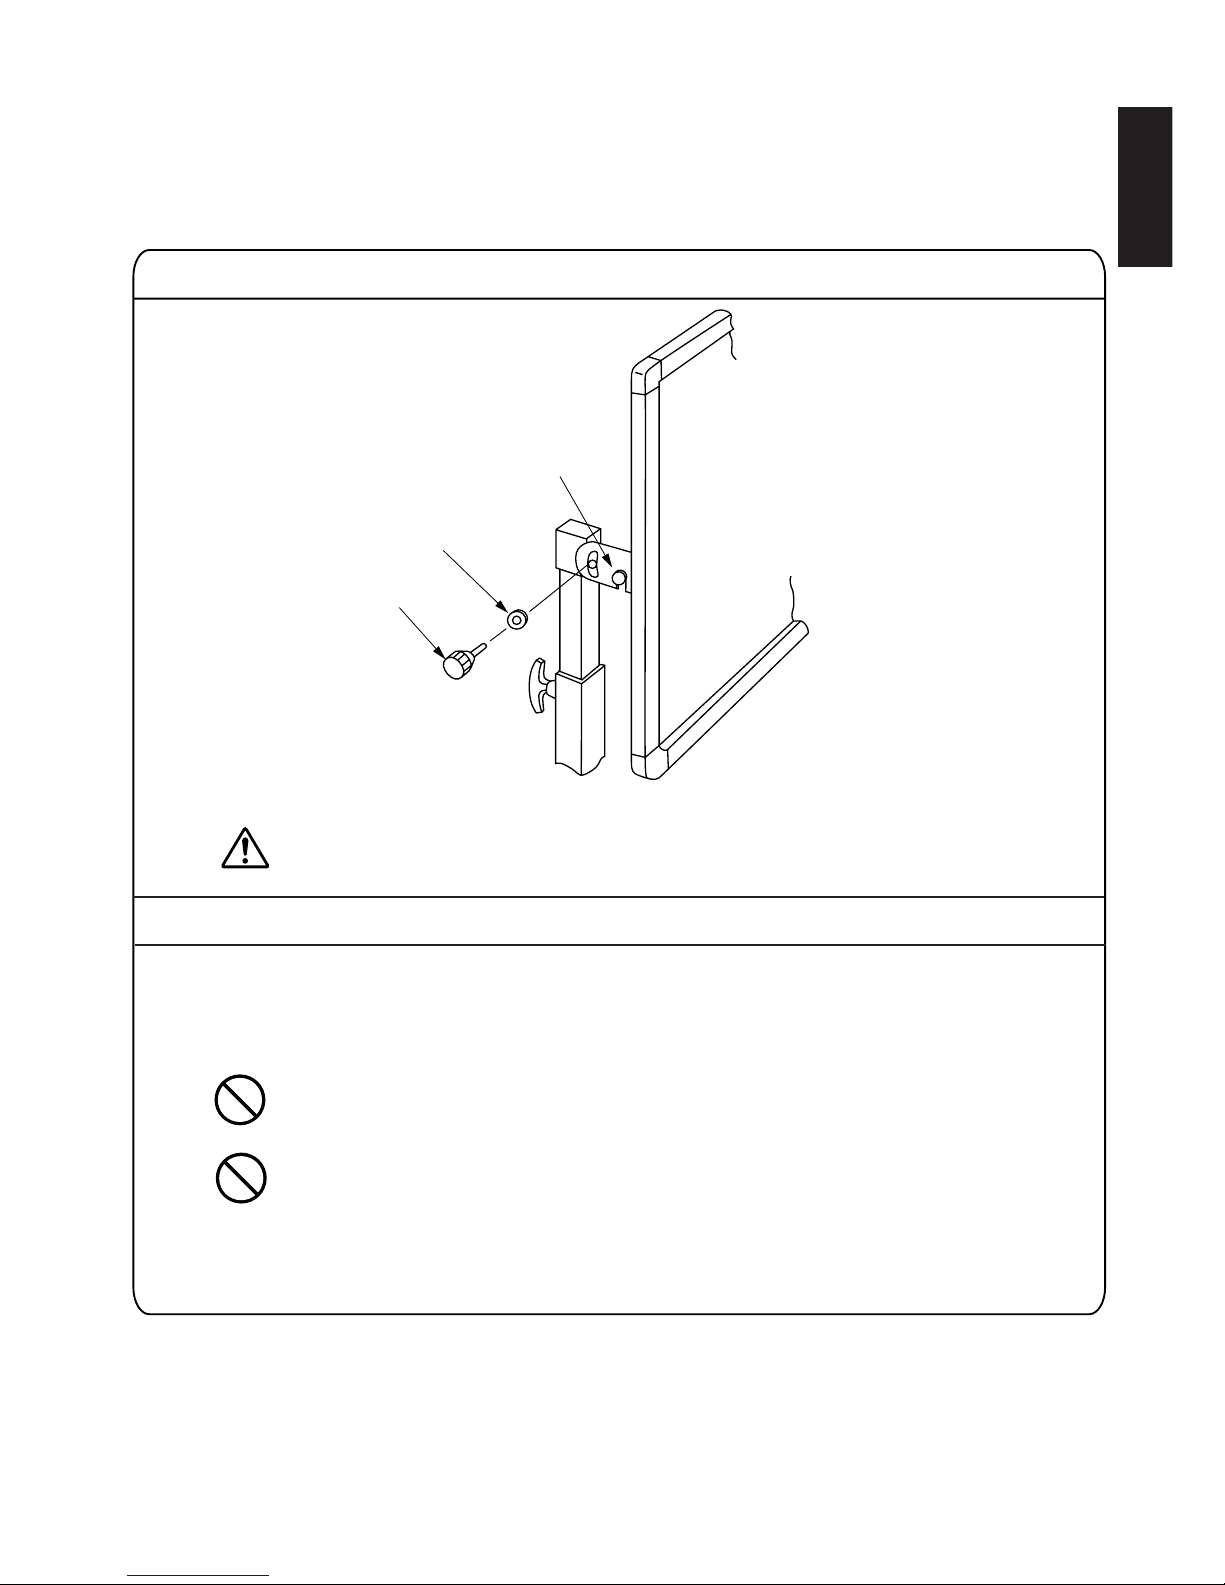
(2) Angle adjusting plate
Slide pipe
(9) Stand base (L) (7) Screen
Stopper handle
Slide pipe
•When the stopper handle is pulled in the direction of the arrow, the slide pipe moves up or down. Align the
hole in the slide pipe with the stopper handle position, return the stopper handle, and fix the slide pipe. The
heights of the right and left slide pipes must be the same.
•Fit the catch of the slide pipe to the notch of the Angle adjusting plate installed on the back of the screen.
• Install the right and left slide pipes at the same time.
• Lock the caster stoppers.
The screen itself is heavy, mass 20kg, so it is recommended that the work be performed by two persons.
The height of the slide pipe can be adjusted
by up to 500 mm at 50mm intervals.
(5) Ajust the height
(6) Install S-qScreen
S-q
– 9 –
English
•Install E-!1 Nylon washer on E-!0 Angle fixing knob and secure Angle adjusting plate.
Adjust the screen angle at this time.
•If the height is adjusted with the screen installed, adjust the height of each slide pipe by one pitch (50 mm)
at a time.
When the stopper is removed, the slide pipe will drop due to the weight of the screen;
therefore, when removing the slide pipe, always support the screen to prevent dropping,
injury or damage to the screen.
If the height is changed by more than two pitch at a time, the screen may be distorted and
damaged.
E-!1
E-!0
(7) Secure the knob
(8) Height ajustment

– 10 –
English
Wall-mounted installation
SF-L100FG (Fixed Polarizing Screen) is necessary.
In some cases, use of the wall-mount fixtures requires specialized knowledge; therefore, it is recommended that the installation work be
entrusted to a professional.
Installing the screen on a concrete wall.
(2) Install the concrete anchor
(1) Drill a hole
Be careful not to penetrate the wall when driving the
concrete anchors. A wall thickness of 40mm or more is
recommended
Drill a hole (diameter : 11mm depth : 30 mm) in a wall.
•Insert the S-eM6 concrete anchor into the hole and use a driving
rod to drive it in until flush with the wall surface. The driving rod is
not included and must be purchased separately.
(3) Attaching the wall-mount fixtures at the bottom of the screen
Fasten the S-wwall-mount fixtures wat the bottom of
the screen with eight S-rM6 hex head bolts.
Mount the S-qscreen on the S-wwall-mount fixtures.
The screen itself is heavy, mass 20kg, so
it is recommended that the work be
performed by two persons.
Este manual sirve para los siguientes modelos
2
Tabla de contenidos
Idiomas:
Otros manuales de Pantalla de proyección de JVC


