JVC KD-LX10 Manual de usuario

ENGLISH
LVT0393-001A
[J]
ESPAÑOL
FRANÇAIS
CD RECEIVER KD-LX10
RECEPTOR CON CD KD-LX10
RECEPTEUR CD KD-LX10
For customer Use:
Enter below the Model No. and
Serial No. which are located on
the top or bottom of the cabinet.
Retainthisinformationforfuture
reference.
Model No.
Serial No.
INSTRUCTIONS
MANUAL DE INSTRUCCIONES
MANUEL D’INSTRUCTIONS
For installation and connections, refer to the separate manual.
Para la instalación y las conexiones, refiérase al manual separado.
Pour l’installation et les raccordements, se référer au manuel séparé.
ATT
S
S
M
KD-LX10
SOURCE
BBE
MODE BAND
DISP
INTLOCALMONOSCM
10789 11 12
RPT RND
OFFSEL
EN00.KD-LX10[J]/f 99.12.25, 4:06 PM3

2
ENGLISH
INFORMATION (For U.S.A.)
This equipment has been tested and found to comply with the limits for a Class B digital
device, pursuant to Part 15 of the FCC Rules. These limits are designed to provide
reasonable protection against harmful interference in a residential installation. This
equipment generates, uses, and can radiate radio frequency energy and, if not installed
and used in accordance with the instructions, may cause harmful interference to radio
communications. However, there is no guarantee that interference will not occur in a
particularinstallation.Ifthisequipmentdoescauseharmfulinterferencetoradioortelevision
reception, which can be determined by turning the equipment off and on, the user is
encouraged to try to correct the interference by one or more of the following measures:
– Reorient or relocate the receiving antenna.
– Increase the separation between the equipment and receiver.
– Connect theequipment into anoutlet on acircuit different from thatto which thereceiver
is connected.
– Consult the dealer or an experienced radio/TV technician for help.
IMPORTANT FOR LASER PRODUCTS
Precautions:
1. CLASS 1 LASER PRODUCT
2. DANGER: Invisible laser radiation when open and interlock failed or defeated.Avoid direct
exposure to beam.
3. CAUTION: Do not open the top cover.There are no user-serviceable parts inside. Leave
all servicing to qualified service personnel.
4. CAUTION: This CD player uses invisible laser radiation, however, is equipped with safety
switches to prevent radiation emission when unloading CDs. It is dangerous to defeat the
safety switches.
5. CAUTION: Use of controls, adjustments or performance of procedures other than those
specified herein may result in hazardous radiation exposure.
How to reset your unit
Press the reset button on the front panel using a ball-point
pen or a similar tool.
This will reset the built-in microcomputer.
NOTE:
Your preset adjustments — such as preset channels or sound
adjustments — will also be erased.
BEFORE USE
* For safety....
• Do not raise the volume level too much, as this
will block outside sounds, making driving
dangerous.
• Stop the car before performing any complicated
operations.
* Temperature inside the car....
If you have parked the car for a long time in hot
or cold weather, wait until the temperature in the
car becomes normal before operating the unit.
EN02-05.LX10[J]/f 99.12.25, 4:06 PM2

3
ENGLISH
Thank you for purchasing a JVC product. Please read all instructions carefully before operation, to
ensure your complete understanding and to obtain the best possible performance from the unit.
CONTENTS
BASIC OPERATIONS .................................................... 5
RADIO OPERATIONS ...................................................6
Listening to the radio ..................................................................... 6
Searching a station automatically: Auto search ........................... 6
Searching a station manually:Manual search ............................. 7
Storing stations in memory ............................................................8
FM station automatic preset: SSM...............................................8
Manual preset.............................................................................. 9
Tuning into a preset station ......................................................... 10
CD OPERATIONS....................................................... 11
Playing a CD ................................................................................. 11
Playing a CD Text ......................................................................... 12
Locating a track or a particular portion on a CD ..................... 13
Selecting CD playback modes......................................................14
Prohibiting CD ejection ............................................................... 15
SOUND ADJUSTMENTS .............................................16
Adjusting the sound......................................................................16
Turning on/off the BBEII function ............................................... 17
Using the Sound Control Memory ..............................................18
Selecting and storing the sound modes..................................... 18
Recalling the sound modes........................................................19
Storing your own sound adjustments .........................................20
OTHER MAIN FUNCTIONS .........................................21
Setting the clock ............................................................................21
Controlling the volume automatically (Audio Cruise) ..............22
Changing the general settings (PSM) ......................................... 24
Assigning names to the sources ...................................................28
REMOTE OPERATIONS...............................................30
Installing the battery ....................................................................30
Using the remote controller ......................................................... 31
CD CHANGER OPERATIONS ......................................32
Playing CDs ................................................................................... 32
Selecting CD playback modes......................................................34
To be continued on the next page
EN02-05.LX10[J]/f 99.12.25, 4:06 PM3
4
ENGLISH
EXTERNAL COMPONENT OPERATIONS ..................... 36
Playing an external component ...................................................36
MAINTENANCE......................................................... 37
Handling CDs................................................................................37
TROUBLESHOOTING ................................................. 38
SPECIFICATIONS ....................................................... 39
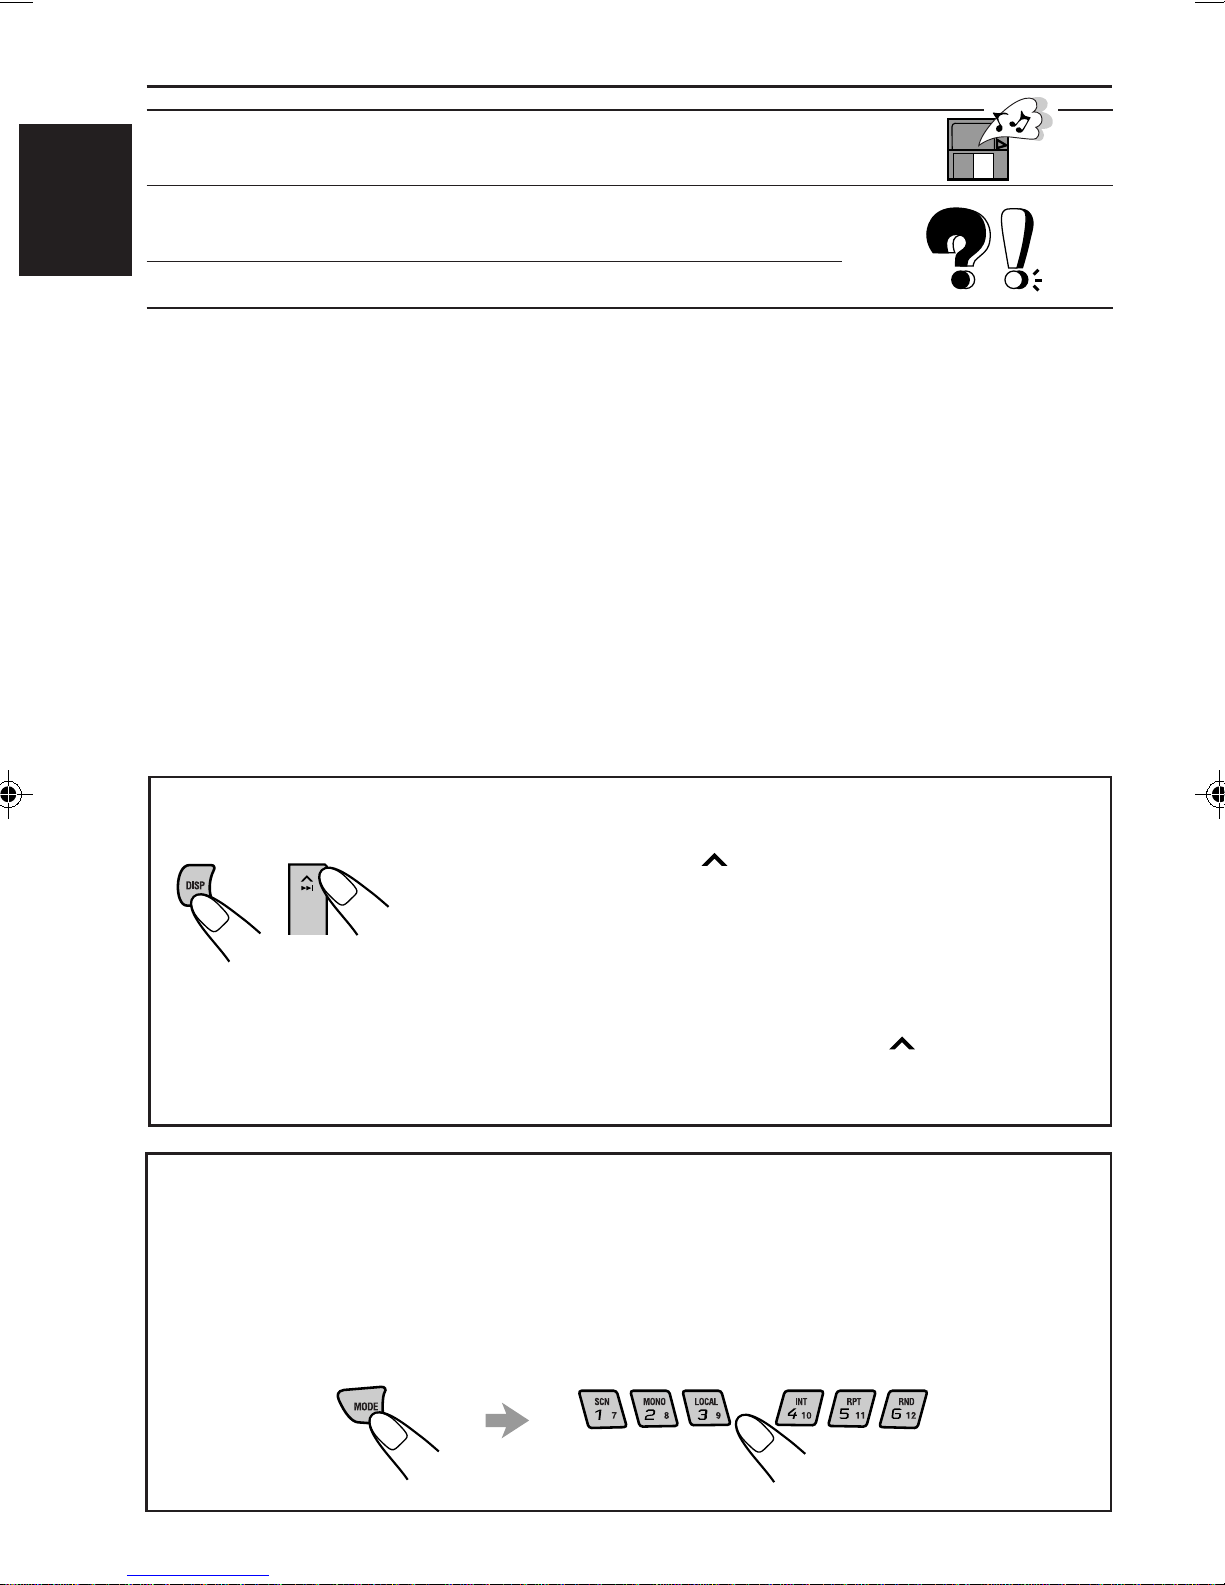
To activate the display demonstration
While holding DISP, press ¢until “DEMO”appears on the
lower part of the display.
Various functions and display illumination modes equipped for
this unit will be demonstrated repeatedly in sequence.
During the display demonstration, “DEMO” flashes on the lower
part of the display.
To turn off the display demonstration, press ¢again for a
few seconds while holding DISP.
• Thedisplaydemonstrationwillturnoffautomatically after1hour.
How to use the number buttons:
After pressing MODE, the number buttons work as different function buttons (while
“MODE” remains on the display).
To use these buttons as number buttons after pressing MODE, wait for 5 seconds
without pressing any number button so that“MODE” disappears from the display.
• Pressing MODE again also erases “MODE” from the display.
EN02-05.LX10[J]/f 99.12.25, 4:06 PM4

5
ENGLISH
BASIC OPERATIONS
Note:
When you use this unit for the
firsttime,setthe built-in clock
correctly, see page 21.
1
Turn on the power.
The display illuminates and the control panel comes out.
2
Select the source.
Each time you press the button, the source changes as follows:
=Tuner (FM or AM) =CD* =CD changer or External component**
=(back to the beginning)
To operate the tuner, see pages 6 – 10.
To operate the CD player, see pages 11 – 15.
To operate the CD changer, see pages 32 – 35.
To operate the external component, see page 36.
Notes:
*If a CD is not in the loading slot, you cannot select CD as the source to play.
** Without connecting the equipment and setting “EXT INPUT” correctly (see page 25), you
cannot select it as the source to play.
3
Adjust the volume.
4
Adjust the sound as you want (see pages 16 – 20).
To drop the volume in a moment
Press SOURCE (ATT) for more than 1 second while listening to any source. “ATT” starts
flashing on the display, and the volume level will drop in a moment.
To resume the previous volume level, press the button for more than 1 second again.
To turn off the power
Press and hold OFF/ 0until “SEEYOU” appears on the display.
12
3
Volume level meter
Equalization pattern (see page 16)
EN02-05.LX10[J]/f 99.12.25, 4:06 PM5

6
ENGLISH
RADIO OPERATIONS
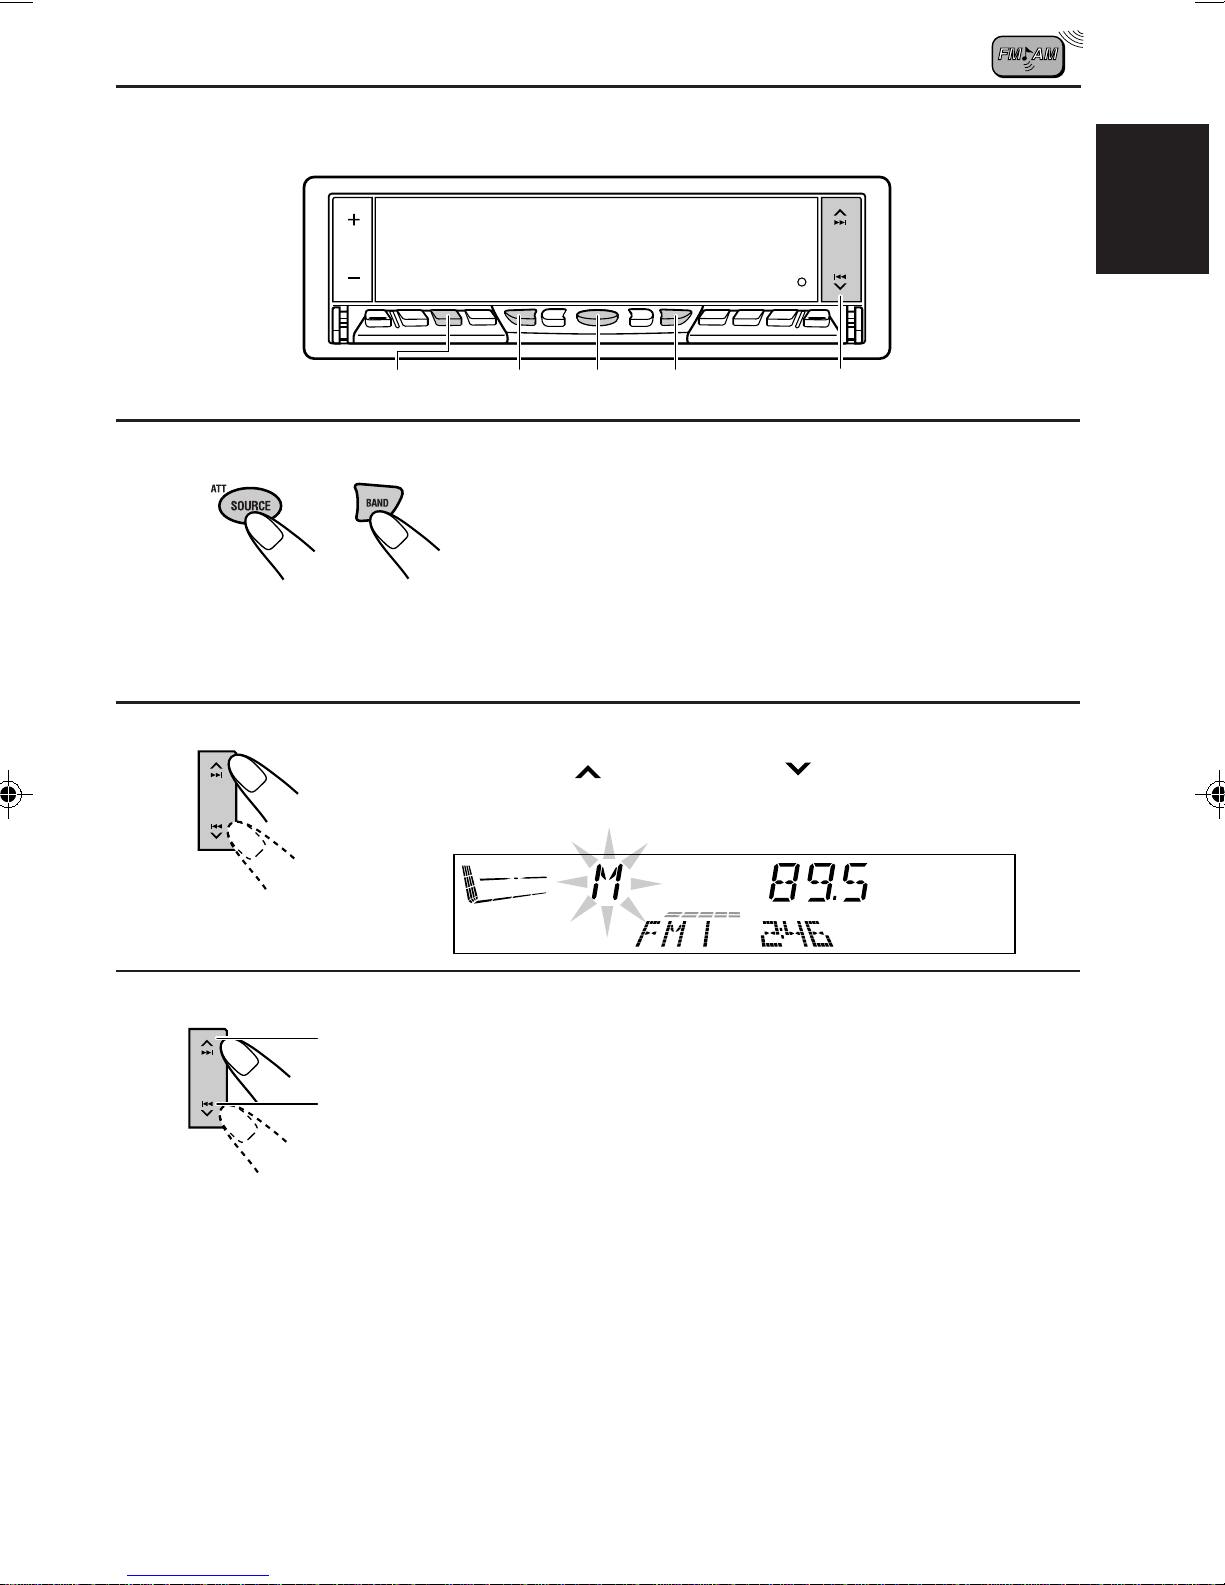
Listening to the radio
You can use either automatic searching or manual searching to tune into a particular station.
Searching a station automatically: Auto search
1
Select the band.
1Press SOURCE (ATT) to select the tuner as the source.
2Press BAND to select the band (FM1, FM2, FM3 or AM).
Each time you press the button, the band changes as
follows:
Note:
This receiver has three FM bands (FM1, FM2, FM3).You can use any one of them to listen
to an FM broadcast.
2
Start searching a station.
When a station is received, searching stops.
To stop searching before a station is received, press the same button you have pressed
for searching.
To tune in FM stations only with strong signals
This function works only while searching FM stations, including SSM preset (see page 8).
1Press MODE.
“MODE” appears on the lower part of the display, and the number buttons can work as
different function buttons.
2Press LOCAL, while “MODE”is still on the display, so that the LOCAL indicator lights up on
the display.
Each time you press the button, the LOCAL indicator lights up and goes off alternately.
12
2
1-
1
1-
2
LOCAL MODE
FM1 FM2 FM3 AM
To search stations of
lower frequencies
To search stations of
higher frequencies
Selected band appears.
EN06-10.LX10[J]/f 99.12.25, 4:07 PM6
7
ENGLISH
Searching a station manually: Manual search
1
Select the band.
1Press SOURCE (ATT) to select the tuner as the source.
2Press BAND to select the band (FM1, FM2, FM3 or AM).
Note:
This receiver has three FM bands (FM1, FM2, FM3). You can use any one of them to listen
to an FM broadcast.
2
Press and hold ¢or 4until “M” (Manual)
starts flashing on the display.
3
Tune into a station you want while
“M” is flashing.
• If you release your finger from the button, the
manual mode will automatically turn off after
5 seconds.
When an FM stereo broadcast is hard to receive:
1Press MODE while listening to an FM stereo broadcast (the ST indicator lights up while
receiving an FM stereo broadcast).
“MODE” appears on the lower part of the display, and the number buttons can work as
different function buttons.
2Press MONO (monaural), while “MODE” is still on the display, so that the MO indicator
lights up on the display.
The sound you hear becomes monaural but reception will be improved (the ST indicator
goes off).
Each time you press the button, the MO indicator lights up and goes off alternately.
12
To tune into stations
of lower frequencies
To tune into stations
of higher frequencies
2
1-
1
1-
2
MODE
MONO
EN06-10.LX10[J]/f 99.12.25, 4:07 PM7

8
ENGLISH
1
Select the FM band number (FM1, FM2 or
FM3) you want to store FM stations into.
1Press SOURCE (ATT) to select the tuner as the
source.
2Press BAND to select the band (FM1, FM2, or FM3).
2
Press and hold both buttons for more than
2 seconds.
Local FM stations with the strongest signals are searched and stored automatically in the
band number you have selected (FM1, FM2 or FM3).These stations are preset in the number
buttons — No. 1 (lowest frequency) to No. 6 (highest frequency).
When automatic preset is over, the station stored in number button 1 will be automatically
tuned in.
Storing stations in memory
You can use one of the following two methods to store broadcasting stations in memory.
• Automatic preset of FM stations:SSM (Strong-station Sequential Memory)
• Manual preset of both FM and AM stations
FM station automatic preset: SSM
You can preset 6 local FM stations in each FM band (FM1, FM2 and FM3).
12
“SSM” appears, then disappears when automatic preset is over.
1-
1
2 1-
2
FM1 FM2 FM3 AM
EN06-10.LX10[J]/f 99.12.25, 4:07 PM8

9
ENGLISH
Manual preset
You can preset up to 6 stations in each band (FM1, FM2, FM3 and AM) manually.
EXAMPLE: Storing an FM station of 88.3 MHz into the preset number 1 of the FM1 band
1
Select the band.
1Press SOURCE (ATT) to select the tuner as the source.
2Press BAND to select the FM1 band.
2
Tune into a station of 88.3 MHz.
See page 6 to tune into a station.
3
Press and hold the number button (in this example, 1)
for more than 2 seconds.
4
Repeat the above procedure to store other stations into other
preset numbers.
Notes:
• A previously preset station is erased when a new station is stored in the same preset number.
• Preset stations are erased when the power supply to the memory circuit is interrupted (for example,
during battery replacement). If this occurs, preset the stations again.
12
23 1-
1
1-
2
FM band number and “MEMO”
appear alternately for a while.
EN06-10.LX10[J]/f 99.12.25, 4:07 PM9

10
ENGLISH
Tuning into a preset station
You can easily tune into a preset station.
Remember that you must store stations first. If you have not stored them yet, see pages 8
and 9.
1
Select the band.
1Press SOURCE (ATT) to select the tuner as the source.
2Press BAND to select the band (FM1, FM2, FM3 or AM).
2
Select the number (1 – 6) for the preset station you want.
When using this unit in an area other than North or South America:
You need to change the AM/FM channel intervals. See “To change the AM/FM channel
intervals” on page 27.
12
1-
1
1-
2
2 2
EN06-10.LX10[J]/f 99.12.25, 4:07 PM10
Otros manuales para KD-LX10
1
Este manual sirve para los siguientes modelos
2
Tabla de contenidos
Otros manuales de Sistema estéreo para automóvil de JVC

JVC
JVC KWAVX800 - EXAD - DVD Player Instrucciones de montaje

JVC
JVC KD-R407 Guía

JVC
JVC KD-X252 Manual de usuario

JVC
JVC KD-DV5101 Guía

JVC
JVC CS-VP528 Manual de usuario

JVC
JVC KD-R721BT Guía

JVC
JVC Exad KW-AVX 700 Manual de usuario

JVC
JVC KW-XC404 Manual de usuario

JVC
JVC Car Cassette Deck KS-F500 Guía

JVC
JVC KD-PDR31 Guía de inicio rápido


