JVC KD-PDR61 Manual de usuario

ENGLISH
CD RECEIVER
KD-PDR61
For installation and connections, refer to the separate manual.
INSTRUCTIONS
GET0524-003A
[EX]
For canceling the display demonstration, see page 4.

ENGLISH
2
Thank you for purchasing a JVC product.
Please read all instructions carefully before operation, to ensure your complete understanding and to obtain the best
possible performance from the unit.
IMPORTANT FOR LASER PRODUCTS
1. CLA 1 LA ER PRODUCT
2. CAUTION: Do not open the top cover. There are no user serviceable parts inside the unit; leave all servicing to
qualified service personnel.
3. CAUTION: Visible and/or invisible class 1M laser radiation when open. Do not view directly with optical
instruments.
4. REPRODUCTION OF LABEL: CAUTION LABEL, PLACED OUT IDE THE UNIT.
Information for Users on Disposal of Old
Eq ipment
This symbol indicates that the product with
this symbol should not be disposed as general
household waste at its end-of-life. If you wish to
dispose of this product, please do so in accordance
with applicable national legislation or other rules in
your country and municipality. By disposing of this
product correctly, you will help to conserve natural
resources and will help prevent potential negative
effects on the environment and human health.
Warning:
If you need to operate the unit while driving, be sure to
look around carefully or you may be involved in a traffic
accident.
How to se the M MODE and SEL
b ttons
If you use M MODE or EL (select), the display and some
controls (such as the number buttons,
4 /¢ buttons, 5/∞ buttons, and the
control dial) enter the corresponding control mode.
Ex.: When you press number button 1 after pressing
M MODE, to operate the FM tuner.
To use these controls for original functions, press
M MODE again.
• However, pressing EL makes the unit enters a
different mode.
• Waiting for about 15 seconds (or 30 seconds for
Bluetooth sources) without pressing any of these
buttons will automatically cancels the control.
This symbol is only valid in
the European Union.
EN02-07_PDR61_003A_4.indd 2EN02-07_PDR61_003A_4.indd 2 12/31/07 11:09:28 AM12/31/07 11:09:28 AM

ENGLISH
3
How to reset yo r nit
• Your preset adjustments will also be erased (except the
registered Bluetooth device, see pages 14 and 15).
How to forcibly eject a disc
“Please Eject” appears on the display.
• Be care ul not to drop the disc when it ejects.
• I this does not work, reset your unit.
For security reasons, a numbered ID card is provided
with this unit, and the same ID number is imprinted on
the unit’s chassis. Keep the card in a safe place, as it will
help the authorities to identify your unit if stolen.
For safety...
• Do not raise the volume level too much, as this will
block outside sounds, making driving dangerous.
• top the car before performing any complicated
operations.
Temperat re inside the car...
If you have parked the car for a long time in hot or cold
weather, wait until the temperature in the car becomes
normal before operating the unit.
CONTENTS
INTRODUCTIONS
Preparation .................................................. 4
OPERATIONS
Basic operations ........................................... 5
• Using the control panel ............................... 5
• Using the remote controller (RM-RK50) ...... 6
Listening to the radio ................................... 7
Disc operations ............................................. 11
Listening to the U B device .......................... 13
EXTERNAL DEVICES
Using the Bluetooth
® devices ....................... 14
• Using the Bluetooth cellular phone ............ 16
• Using the Bluetooth audio player ............... 18
Listening to the CD changer ......................... 19
Listening to the iPod .................................... 20
Listening to the DAB tuner ........................... 22
Listening to the other external
components .............................................. 25
SETTINGS
electing a preset sound mode .................... 26
General settings — P M .............................. 28
Bluetooth settings ....................................... 33
REFERENCES
More about this unit .................................... 34
Troubleshooting ........................................... 38
Maintenance ................................................ 43
pecifications ............................................... 44
For detaching/attaching the control panel, see
page 42.
EN02-07_PDR61_003A_4.indd 3EN02-07_PDR61_003A_4.indd 3 12/31/07 11:09:32 AM12/31/07 11:09:32 AM

ENGLISH
4INTRODUCTIONS
Preparation
Cancel the display demonstration and set the clock
• ee also pages 28 and 29.
1T rn on the power.
2Enter the PSM settings.
3Cancel the display demonstrations
elect “Demo,” then “Off.”
Set the clock
elect “Clock Hr” (hour), then adjust the hour.
elect “Clock Min” (minute), then adjust the minute.
elect “24H/12H,” then “24Hours” or “12Hours.”
4Finish the proced re.
Changing the display information and pattern
When the power is turned off: Check the current clock time
Ex.: When tuner is selected as the source
Audio level meter display
(see “LevelMeter” on page 28)
This unit is equipped with the steering wheel remote control function.
• ee the Installation/Connection Manual (separate volume) for connection.
ource operation display
Ca tion on vol me setting:
Digital devices (CD/U B) produce very little noise
compared with other sources. Lower the volume before
playing these digital sources to avoid damaging the
speakers by sudden increase of the output level.
Ca tion:
If the temperature inside the car is below 0°C, the
movement of animation and text scroll will be halted
on the display to prevent the display from being
blurred. appears on the display.
When the temperature increases, and the operating
temperature is resumed, these functions will start
working again.
EN02-07_PDR61_003A_4.indd 4EN02-07_PDR61_003A_4.indd 4 12/31/07 11:09:33 AM12/31/07 11:09:33 AM

ENGLISH
5OPERATIONS
Basic operations
Using the control panel
9 • Volume control [Turn].
• Select the source [Press] *1.
TUNER = DAB *2 =CD *2 = USB *2 (or USB-
iPod) *2 = CD-CH *2/iPod *2 (or EXT IN) =
BT-PH NE *2 = BT-AUDI *2 = AUX IN =
(back to the beginning)
p • Select/adjust the sound mode.
• Enter the PS settings [Hold].
q • TUNER: Select preset station.
• DAB: Select preset DAB service.
• CD/USB/CD-CH: Select folder/track/disc (for
CD changer).
• USB-iPod: Select preset top menu items.
• BT-PH NE: Dial preset phone number *3.
w • Enter functions mode.
• BT-PH NE: Activate Voice Dialing [Hold].
e Change the display information and pattern.
r • TUNER: Select the bands.
• USB-iPod/BT-AUDI : Start/pause playback.
*1 Holding SOURCE will enter the Bluetooth menu.
*2 You cannot select these sources if they are not ready
or not connected.
*3 For storing preset phone num er, see page 18.
1 • DAB: Select DAB service
• CD/USB/CD-CH: Select folder.
• USB-iPod: Enter the main menu [Hold].
• iPod: Enter the main menu/Pause playback/
Confirm selection.
• BT-PH NE/BT-AUDI : Select a registered
device.
2 • Turn on the power.
• Turn off the power [Hold].
• Attenuate the sound (if the power is on).
3 Display window
4 USB (Universal Serial Bus) input jack
5 • Activate/deactivate TA Standby Reception.
• Enter programme type searching mode [Hold].
6 Flip down the control panel.
• To eject the disc, flip down the control panel
then press 0 on the unit.
7 AUX (auxiliary) input jack
8 • TUNER: Search for station.
• DAB: Search for DAB ensemble.
• CD/USB/CD-CH/USB-iPod/iPod: Select track.
• BT-AUDI : Reverse skip/forward skip.
EN02-07_PDR61_003A_f.indd 5EN02-07_PDR61_003A_f.indd 5 1/7/08 9:59:08 AM1/7/08 9:59:08 AM

ENGLISH
6
Installing the lithi m coin battery (CR2025)
Before sing the remote controller:
• Aim the remote controller directly at the remote
sensor on the unit.
• DO NOT expose the remote sensor to bright light
(direct sunlight or artificial lighting).
Warning (to prevent accidents and damage):
• Do not install any battery other than CR2025 or its
equivalent.
• Do not leave the remote controller in a place (such
as dashboards) exposed to direct sunlight for a long
time.
• tore the battery in a place where children cannot
reach.
• Do not recharge, short, disassemble, heat the battery,
or dispose of it in a fire.
• Do not leave the battery with other metallic
materials.
• Do not poke the battery with tweezers or similar
tools.
• Wrap the battery with tape and insulate when
throwing away or saving it.
Using the remote controller (RM-RK50)
Remote sensor
1 • Turns the power on if pressed briefly or
attenuates the sound when the power is on.
• Turns the power off if pressed and held.
2 • Changes the FM/AM/DAB bands with 5 U.
• Changes the preset stations with D ∞.
• Changes the folder of the MP3/WMA/WAV.
• While playing an MP3 disc on an
MP3-compatible CD changer:
– Changes the disc if pressed briefly.
– Changes the folder if pressed and held.
• While listening to an Apple iPod:
Connected to KS-PD100:
– Pauses or resumes playback with D ∞.
– Enters the main menu with 5 U.
(Now 5 U/D ∞/2 R/F 3 work as the menu
selecting buttons.)*
* 5 U : Returns to the previous menu.
D ∞ : Con irms the selection.
Connected to the USB inp t jack:
– Enter the main menu if pressed and held.
– elect the desired menu if pressed briefly.
– Fast skip in every layer of the main menu if
pressed and held.
3 Adjusts the volume level.
4 elects the sound mode (iEQ: intelligent equalizer).
5 elects the source.
6 For Bluetooth cellular phone:
– Answers calls if pressed briefly.
– Rejects calls if pressed and held.
7 • earches for stations if pressed briefly.
• Fast-forwards or reverses the track if pressed and
held.
• Changes the tracks if pressed briefly.
EN02-07_PDR61_003A_4.indd 6EN02-07_PDR61_003A_4.indd 6 12/31/07 11:09:36 AM12/31/07 11:09:36 AM

ENGLISH
7OPERATIONS
When an FM stereo broadcast is
hard to receive
1
2
Reception improves, but stereo effect will be lost.
• lights up on the display.
3 Exit from the setting.
Listening to the radio
1Select “TUNER.”
2Select the bands.
3Search for a station to listen—A to Search.
Manual earch: Hold either one of the buttons until “M” lights up on the display, then
press it repeatedly.
• When receiving an FM stereo broadcast with sufficient signal strength, lights up
on the display.
FM station a tomatic presetting
— SSM (Strong-station Seq ential
Memory)
You can preset up to six stations for each band.
1 While listening to a station...
2
3
Local FM stations with the strongest signals are
searched and stored automatically in the selected
FM band.
Continued on the next page
• While listening to an iPod (in menu selecting
mode):
Connected to KS-PD100:
– elects an item if pressed briefly. (Then, press
D ∞ to confirm the selection.)
– kips 10 items at a time if pressed and held.
Connected to the USB inp t jack:
– tart play back the selected folder directly if
pressed and held.
• Reverse skip/forward skip for Bluetooth audio.
EN02-07_PDR61_003A_4.indd 7EN02-07_PDR61_003A_4.indd 7 12/31/07 11:09:37 AM12/31/07 11:09:37 AM
ENGLISH
8
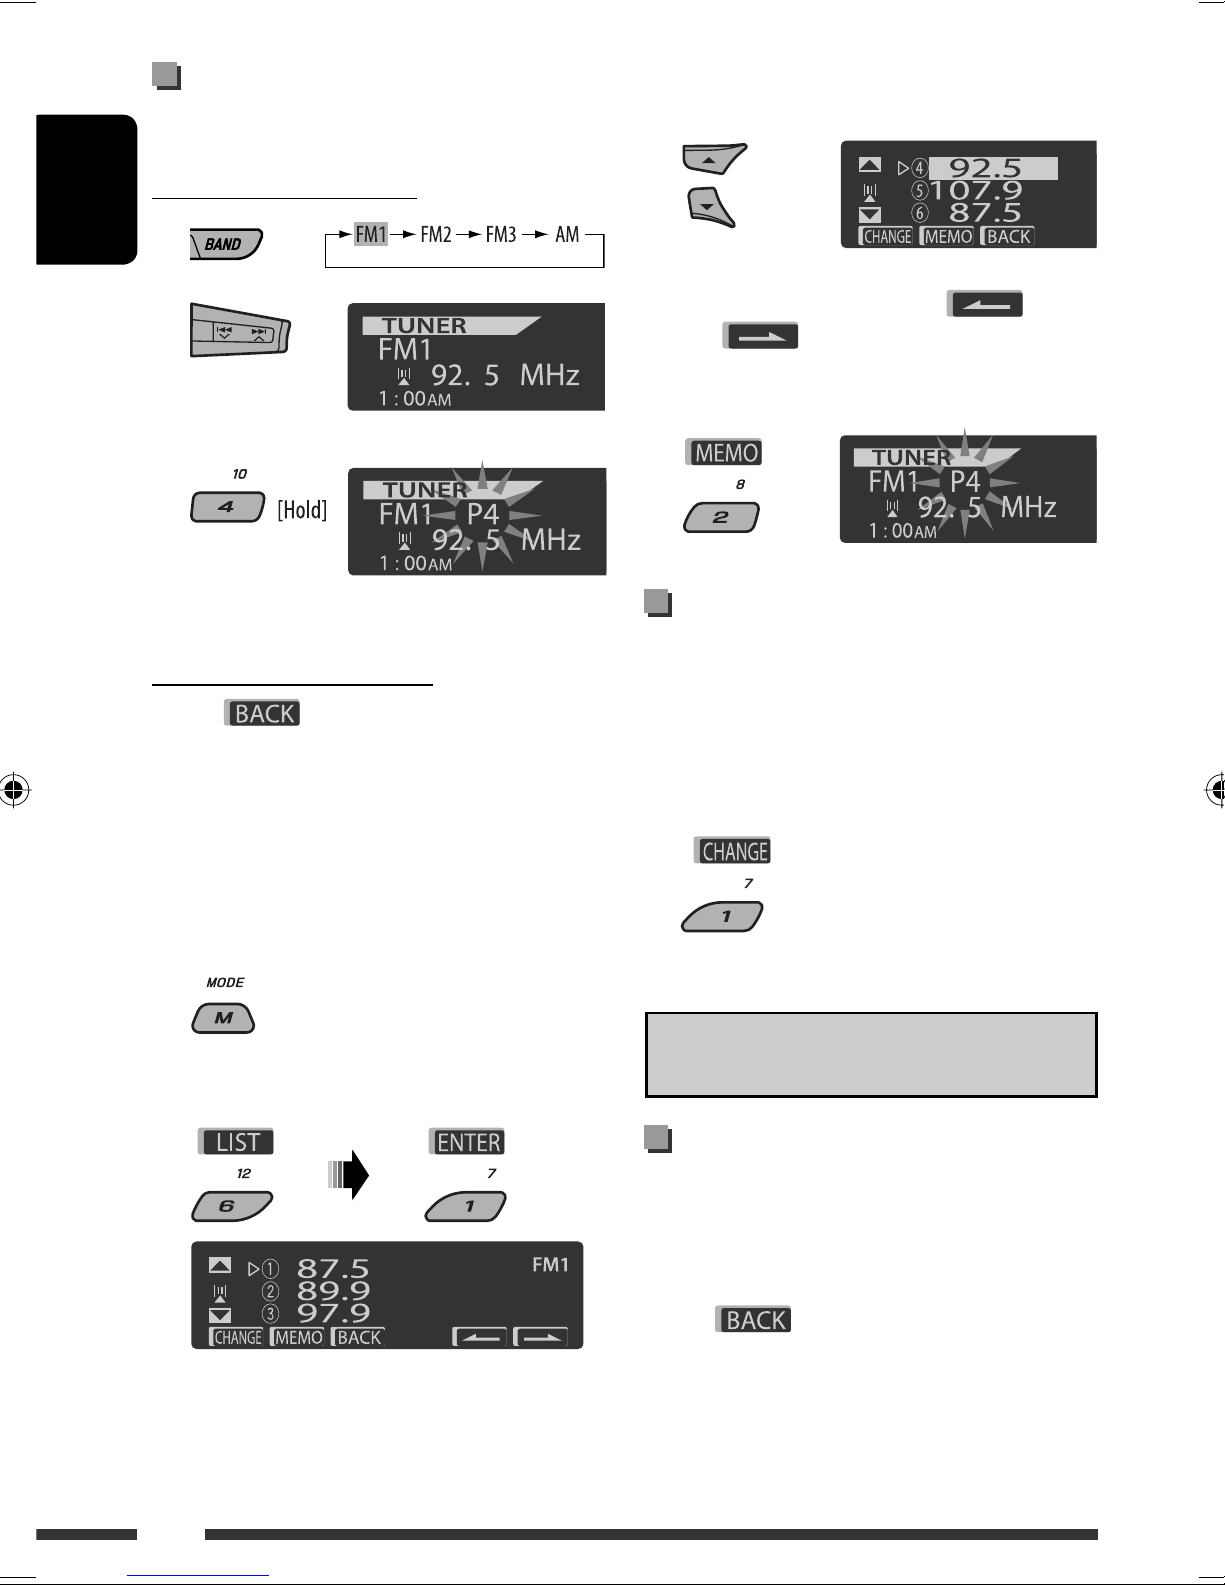
Manual presetting
Ex.: Storing FM station of 92.5 MHz into preset number
4 of the FM1 band.
Using the number buttons
1
2
3
Using the Preset Station list
When is shown on the display, you can
move back to the previous screen by pressing number
button 3.
1 Follow steps 1 and 2 of “Using the number
buttons” above.
By holding 5 / ∞, the Preset Station List will
also appear (go to step 4).
2
3 Display the Preset Station List.
4 Sele t the preset number you want to store
into.
You can move to the lists of the other FM bands
by pressing number button 5 ( ) or
6 ( ) repeatedly.
5 Store the station.
Listening to the preset station on
the Preset Station List
1 Display the Preset Station List, then sele t
the preset station you want to listen to.
2 Change to the sele ted station.
The following features are available only for FM RDS
stations.
Sear hing for FM RDS programme
— PTY Sear h
You can search for your favorite programmes being
broadcast by selecting the PTY code for your favorite
programmes.
When appears on the display, you can move
back to the previous display by pressing number
button 3.
Preset number flashes for a while.
EN08-15_PDR61_003A_4.indd 8EN08-15_PDR61_003A_4.indd 8 12/31/07 11:09:53 AM12/31/07 11:09:53 AM

ENGLISH
9OPERATIONS
When / appears on the display,
you can move to the other lists by pressing number
button 5 or 6 repeatedly.
1
2 Sele t “Sear h.”
The three preset PTY codes appears on the display.
3 Sele t a PTY ode.
You can select a PTY code from the
29 preset PTY codes or from the six
stored PTY codes.
To store your favorite programme types, see the
following.
4 Start sear hing for your favorite programme.
If there is a station broadcasting a programme
of the same PTY code as you have selected, that
station is tuned in.
Storing your favorite programme types
You can store six favorite programme types.
When appears on the display, you can move
back to the previous display by pressing number
button 3.
1
2 Sele t “Memory.”
3 Sele t a preset number (“Preset1”–
“Preset6”) you want to store into.
4 Sele t one of the PTY odes.
5 Store the sele ted PTY ode.
6 Repeat steps 3 to 5 to store other PTY odes
into other preset numbers.
7 Exit from the setting.
A tivating TA/PTY Standby
Re eption
TA Standby Re eption
Ex.: When “Classics” is selected in step 5
Continued on the next page
EN08-15_PDR61_003A_4.indd 9EN08-15_PDR61_003A_4.indd 9 12/31/07 11:09:59 AM12/31/07 11:09:59 AM

ENGLISH
10
either lights up or flashes on the display.
If lights up, the unit temporarily will switch to
Traffic Announcement (TA), if available, from any
source other than AM.
The volume changes to the preset TA volume level if
the current level is lower than the preset level (see
page 30).
If flashes, TA Standby reception is not yet
activated. Tune in to another station providing the
RDS signals.
To dea tivate TA Standby Re eption, press T/P
again. goes off.
PTY Standby Re eption
1
2
3 Sele t a PTY ode.
4 Exit from the setting.
either lights up or flashes on the display.
If lights up, the unit temporarily will switch
to your favorite PTY programme from any source
other than AM.
If flashes, PTY Standby reception is not yet
activated. Tune in to another station (or service)
providing the RDS signals.
To dea tivate PTY Standby Re eption, select “Off”
in step 2. goes off.
When a DAB tuner is connected, TA/PTY Standby
Reception also searches for services. (See also
page 23.)
The unit will not switch to Traffic Announcement or
PTY programme when a call connection is established
through “BT-PHONE.”
Tra ing the same programme—
Network-Tra king Re eption
When driving in an area where FM reception is not
sufficient enough, this unit automatically tunes in to
another FM RDS station of the same network, possibly
broadcasting the same programme with stronger
signals (see the illustration below).
Programme A broadcasting on different frequency
areas (01 – 05)
When shipped from the factory, Network-Tracking
Reception is activated.
To hange the Network-Tra king Re eption
setting, see “AF-Regn’l” on page 30.
When the DAB tuner is connected, refer to “Tracing
the same programme—Alternative Frequency
Reception (DAB AF)” on page 24.
Automati station sele tion—
Programme Sear h
Usually when you press the number buttons, the preset
station is tuned in.
If the signals from the FM RDS preset station are not
sufficient for good reception, this unit, using the AF data,
tunes in to another frequency broadcasting the same
programme as the original preset station is broadcasting.
The unit takes some time to tune in to another
station using programme search.
See also page 30.
EN08-15_PDR61_003A_4.indd 10EN08-15_PDR61_003A_4.indd 10 12/31/07 11:10:01 AM12/31/07 11:10:01 AM
Otros manuales para KD-PDR61
1
Tabla de contenidos
Otros manuales de Receptor de coche de JVC


JVC
JVC KS-FX12 Manual de usuario

JVC
JVC KD-G321 Manual de usuario

JVC
JVC KW-XC55 Manual de usuario

JVC
JVC KW-R600BT Manual de usuario

JVC
JVC EXAD KW-AVX900 Manual de usuario

JVC
JVC KD-G116 Manual de usuario

JVC
JVC KS-FX915R Manual de usuario

JVC
JVC EXAD KD-LHX501 Manual de usuario

JVC
JVC KD-G431E Manual de usuario

JVC
JVC KD-G322 Manual de usuario


