Jrco Tine Rake Dethatcher Manual de usuario
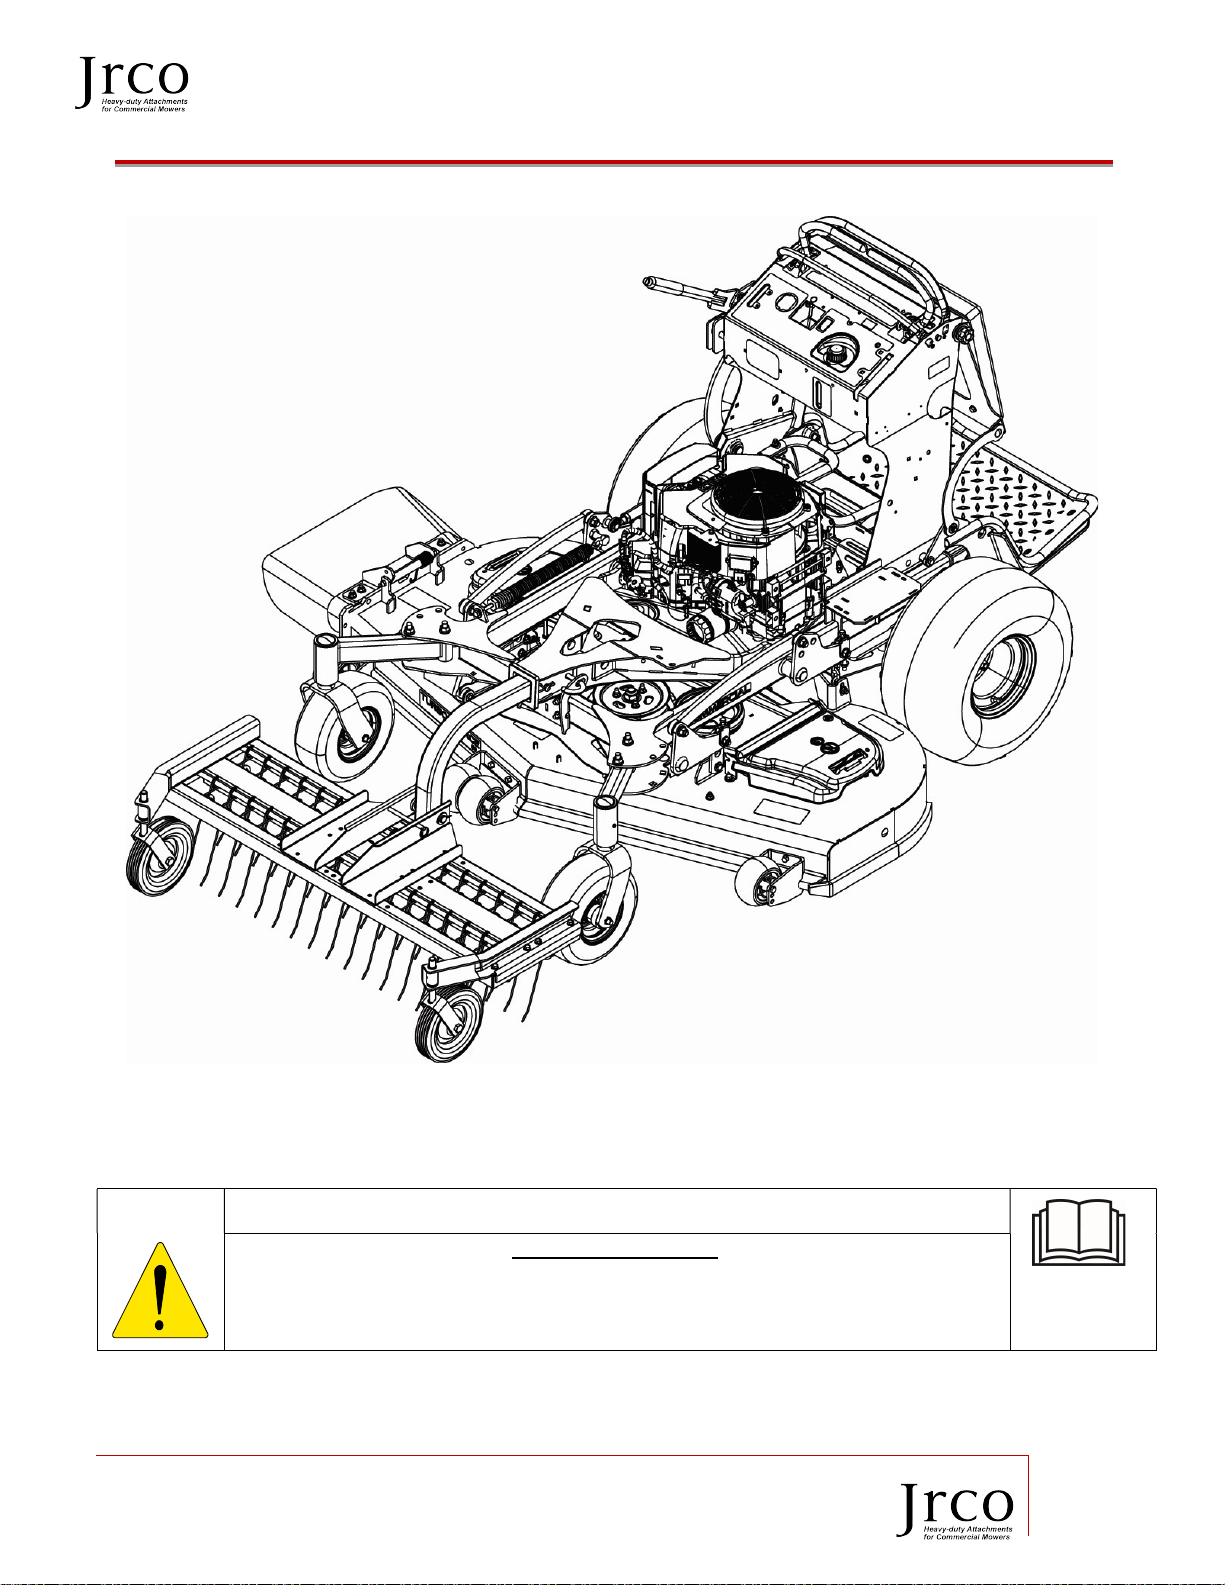
Operator’s Manual Tine Rake Dethatcher
20195 South Diamond Lake Road, STE 100
Rogers, MN 55374
800.966.8442
www.jrcoinc.com
1
p/n 8239.JRC
WARNING
READ AND UNDERSTAND
THE
OPERATOR’S MANUAL
COMPLETELY BEFORE U
SING
THIS ATTACHMENT. ASSEMBLE, TEST AND USE ONLY IN ACCORDANCE WITH THE
OWNER’S MANUAL INSTRUCTIONS.

Operator’s Manual Tine Rake Dethatcher
20195 South Diamond Lake Road, STE 100
Rogers, MN 55374
800.966.8442
www.jrcoinc.com
2
Table of Contents
1 Introduction ................................................................................................................................................................ 3
1.1 ... Application ............................................................................................................................................................................3
1.2 ... Navigating This Manual ..................................................................................................................................................3
1.3 ... Operation References/Terminology ..........................................................................................................................3
1.4 ... Owner Assistance ................................................................................................................................................................3
1.5 ... Model Identification ..........................................................................................................................................................4
1.6 ... Further Assistance .............................................................................................................................................................4
2 Assembly and Set-up ............................................................................................................................................... 5
2.1 ... Packing List ...........................................................................................................................................................................5
2.2 ... Parts Breakdown ................................................................................................................................................................6
2.3 ... Tools Required .....................................................................................................................................................................7
2.4 ... Power Unit Requirements ...............................................................................................................................................7
2.5 ... Unpacking Your Attachment .........................................................................................................................................8
2.6 ... Torque Requirements .......................................................................................................................................................8
3 Assembly ...................................................................................................................................................................... 8
3.1 ... General Assembly ................................................................................................................................................................8
3.2 ... Wheels to Yokes Assembly ..............................................................................................................................................8
3.3 ... Side plate and Lift Tube attachment .........................................................................................................................9
4 Attach Dethatcher to Reciever Hich .................................................................................................................. 9
5 Adjustments ............................................................................................................................................................. 10
6 Operation Instructions ........................................................................................................................................ 11
6.1 ... Before Operation.............................................................................................................................................................. 11
6.2 ... Operator Safety ................................................................................................................................................................ 11
6.3 ... Operation ............................................................................................................................................................................ 12
7 Storage Instructions ............................................................................................................................................. 13
7.1 ... Storing Your Tine Rake Dethatcher ........................................................................................................................ 13
8 Removing Rake ....................................................................................................................................................... 13
8.1 ... Removing Your Tine Rake Dethatcher .................................................................................................................. 13
9 Field Use Set-up and Instructions ................................................................................................................... 13
10 Specifications ........................................................................................................................................................... 13
11 Maintenance Instructions .................................................................................................................................. 14
11.1 . General ................................................................................................................................................................................. 14
11.2 . Replacing Tines ................................................................................................................................................................ 14

Operator’s Manual Tine Rake Dethatcher
20195 South Diamond Lake Road, STE 100
Rogers, MN 55374
800.966.8442
www.jrcoinc.com
3
1 Introduction
JRCO takes pride in its attachments and have designed and engineered quality, commercial built attachments
designed to help you efficiently and effectively be more productive at tasks.
1.1 Application
JRCO front-mount dethatchers are available in a 46 width for the Toro Multi Force standup mower with the 2”
hydraulic lifting receiver.
The Tine Rake Dethatcher is the ultimate spring clean-up tool. Use the rake for the first mowing of the spring to
remove thatch, embedded leaves and debris. The patented tines lift thatch without damaging healthy turfgrass
and at the same time comb matted grass giving the lawn a clean, hand-raked appearance.
After a hot summer, use Tine Rake Dethatcher to surface aerate the soil. This promotes root development and
makes room for thicker turfgrass. Use the dethatcher during seeding operations to rake in seed and accelerate
germination. Finally, use Tine Rake Dethatcher for the last mowing of the fall leaving a picture-perfect, clean
lawn.
Whether you mulch or bag, the Tine Rake Dethatcher can be used throughout the growing season as a tool to
control thatch accumulation and reduce the chance of turf disease.
The Tine Rake Dethatcher quickly attaches to the JRCO mount bar with clevis pins.
1.2 Navigating This Manual
1. Use this manual to help familiarize yourself with safety, assembly, operation, adjustments,
troubleshooting, maintenance, specifications and warranty information. It is very important that you
read this manual and follow the instructions to ensure safe operation of the attachment.
2. Please visit www.jrcoinc.com for updated information.
1.3 Operation References/Terminology
References throughout this manual referred to as “Right” or “Left” are determined by being seated face-
forward on Mower and facing the direction the unit will operate while in use.
1.4 Owner Assistance
Please complete the Warranty/Product Registration at the time of purchase. You will need to fill out and mail
warranty card or you may visit our website www.jrcoinc.com and complete our online registration form. We
require this information so we can keep you up to date with any important information about your attachment
and provide you with the best customer service possible.
Operator’s Manual Tine Rake Dethatcher
20195 South Diamond Lake Road, STE 100
Rogers, MN 55374
800.966.8442
www.jrcoinc.com
4
The parts and components used on your JRCO Attachment have been specifically engineered for JRCO
Attachments and should only be replaced with JRCO parts. Contact your local JRCO Dealer for replacement
parts or contact our customer service department for assistance in parts, locating your local servicing dealer
and more. Your local dealer is equipped and trained to handle service and repair for your attachment.
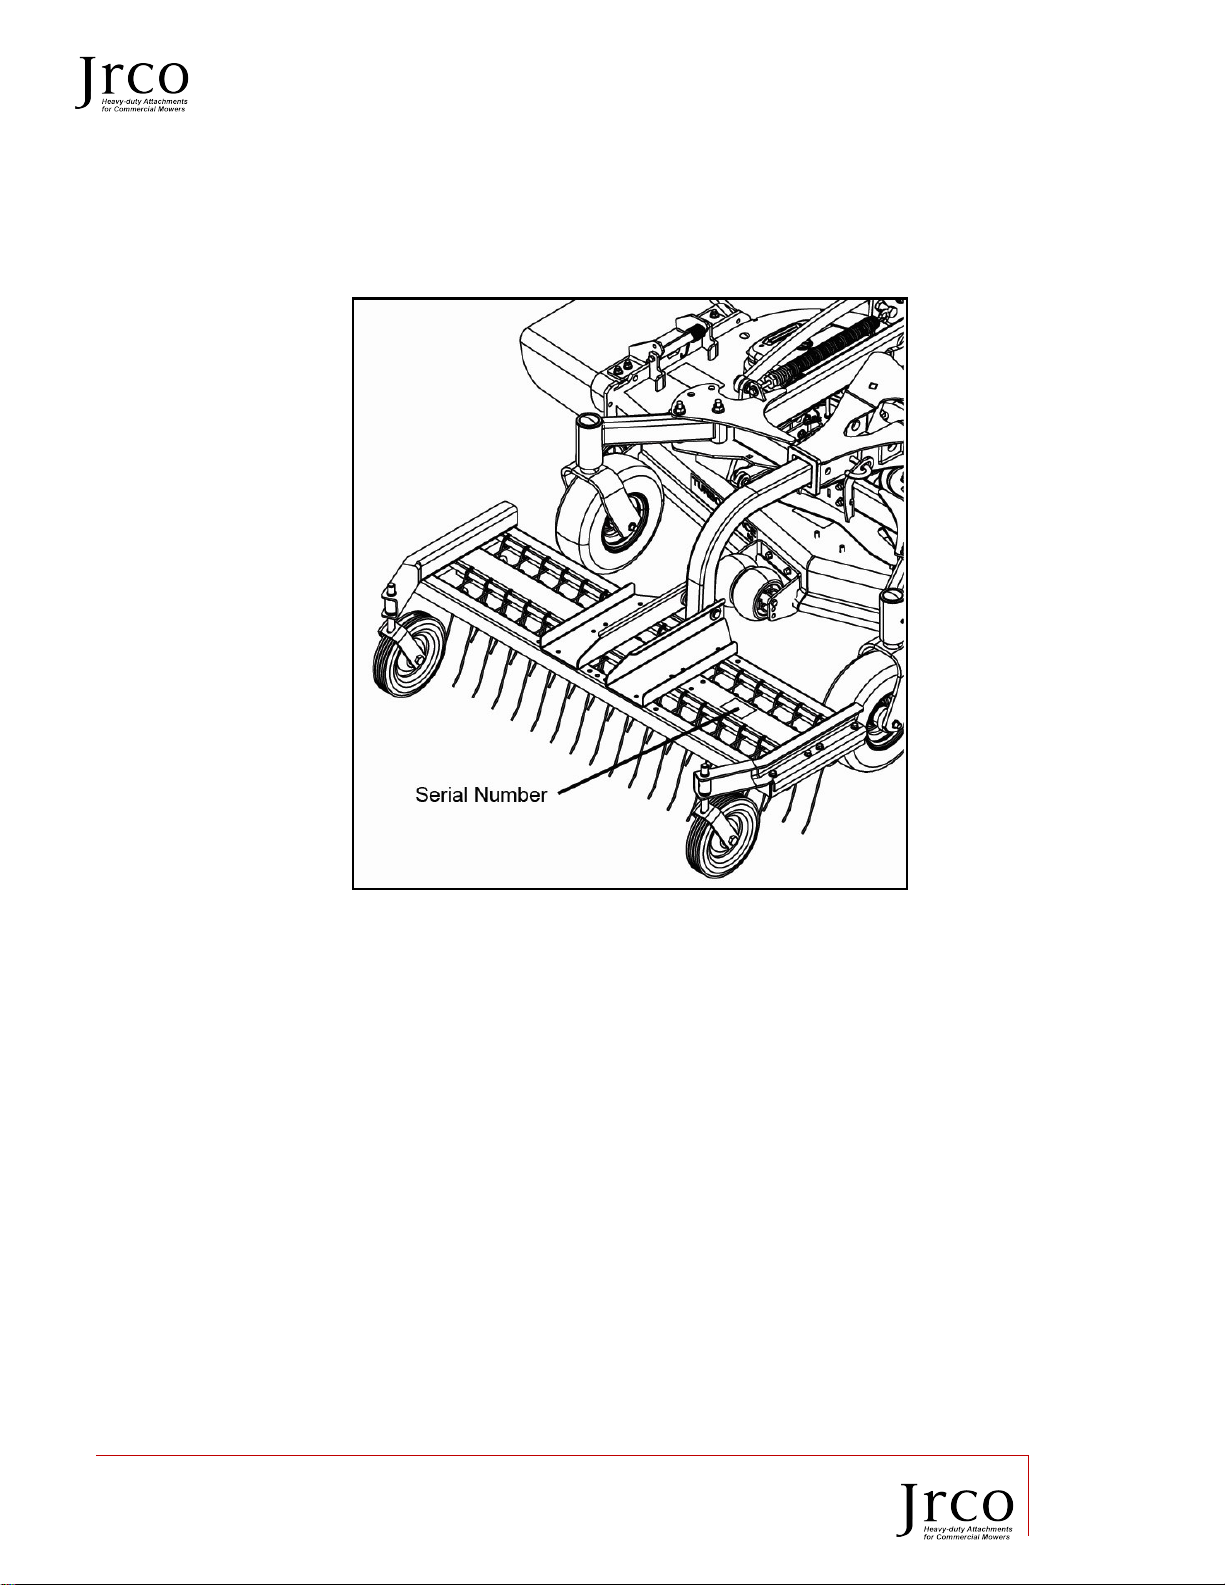
1.5 Model Identification
Please fill in your model and serial number below for future reference. This will help assist in prompt service
when ordering parts and service for your local JRCO Dealer.
Model No.__________________________________ Serial No. ________________________________________
Refer to the image above for location of your serial number plate:
1.6 Further Assistance
Your dealer and all of us at JRCO want you to be pleased with your attachment. Should you require further
assistance or have questions regarding your attachment, please contact your local dealer where you purchased
your attachment. If you are unable to satisfy your needs by your local dealer, please contact us at:
JRCO
20195 South Diamond Lake Road, STE 100
Rogers, MN 55374
800-966-8442
www.jrcoinc.com
Operator’s Manual Tine Rake Dethatcher
20195 South Diamond Lake Road, STE 100
Rogers, MN 55374
800.966.8442
www.jrcoinc.com
5
2 Assembly and Set-up
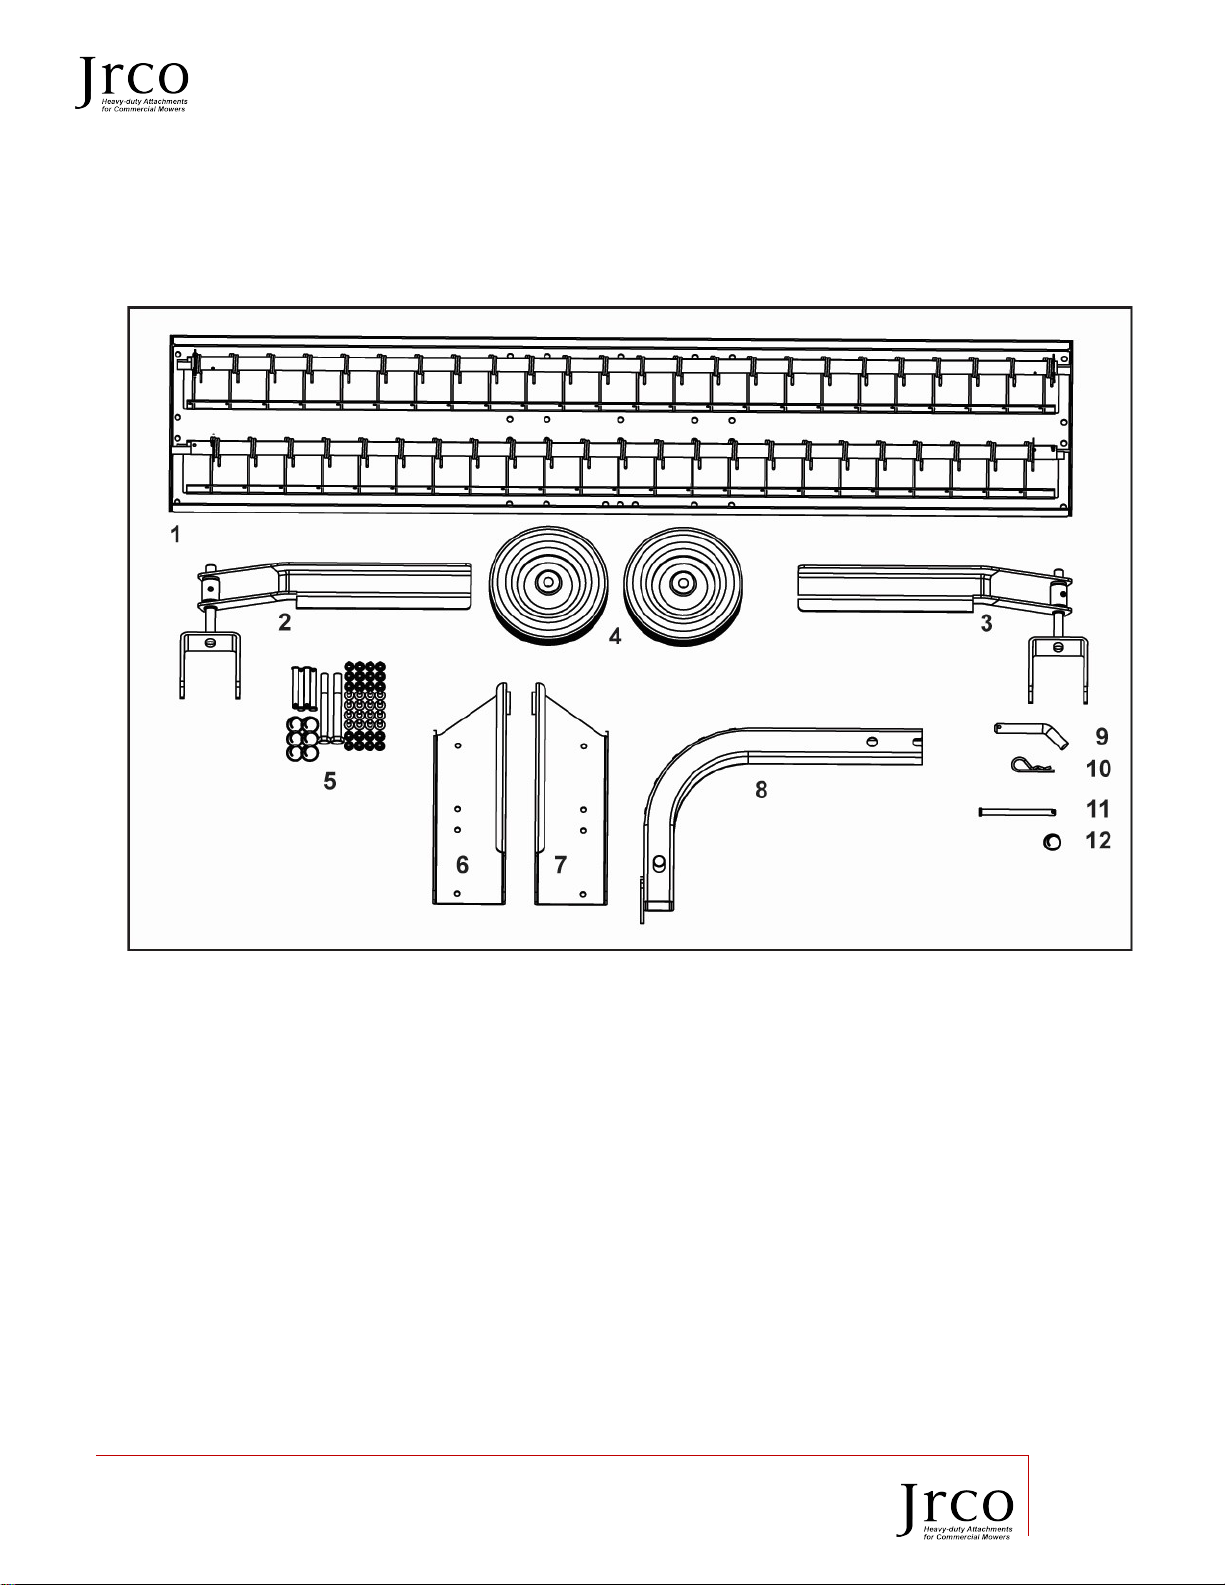
2.1 Packing List
1. Deck assembly 35 tines for 46” and 47 for
60”
2. Yoke/Wheel brace (left)
3. Yoke/Wheel brace (right)
4. Wheel
5. Hardware bag – Rake Assembly
6. Mount Side Plate (Right)
7. Mount Side Plate (Left)
8. Lift Tube, 2” Square
9. Hitch Pin
10. Hairpin Cotter
11. Clevis Pin, 5”
12. Circle cotter
Operator’s Manual Tine Rake Dethatcher
20195 South Diamond Lake Road, STE 100
Rogers, MN 55374
800.966.8442
www.jrcoinc.com
6
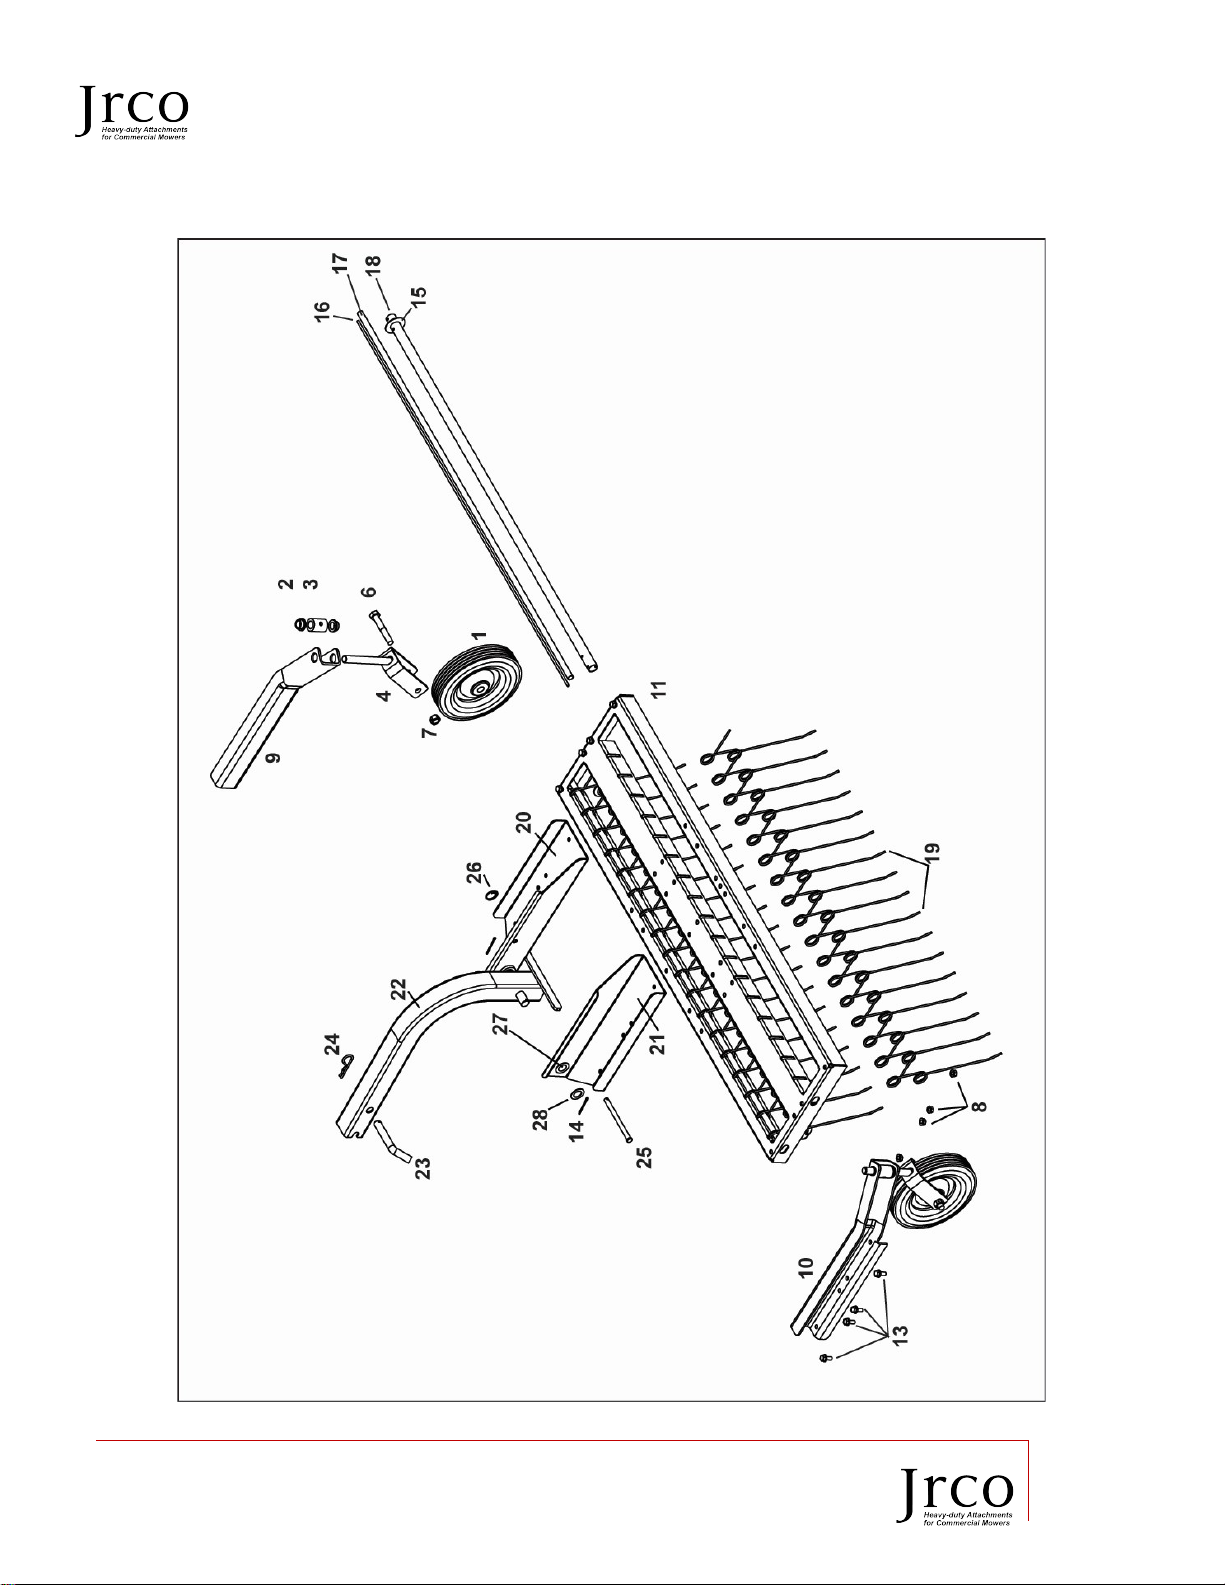
2.2 Parts Breakdown

Operator’s Manual Tine Rake Dethatcher
20195 South Diamond Lake Road, STE 100
Rogers, MN 55374
800.966.8442
www.jrcoinc.com
7
Ref Part No. Description Qty
1 4679.JRC Wheel 1.75 x 8 2
2 4683-2.JRC 5/8” Oilite flange bushing 4
3 4661S.JRC Shaft collar w/set screw 2
4 4673.JRC Yoke 2
6 7282.JRC
½-13 x 3” Hex bolt 2
7 4233.JRC 1/3-13 Two-way locknut 2
8 7247.JRC 5/16-18 Serrated flange nut 16
9 (7389L).JRC Left wheel brace assembly
w/bushing
1
10 (7389R).JRC Right wheel brace assembly
w/bushings
1
11 4617.JRC 46” Deck – 35 Tine 1
4617-1.JRC 60” deck – 47 Tine 1
4617-2.JRC 36” Deck -27 Tine 1
13 7232.JRC 5/16-18 x ¾” Serrated flange
bolt
16
14 7251.JRC 1/8 x 1 ½” Cotter pin 4
15 4638-1.JRC
7/8” Machine bushing 4
16 4623.JRC 46” Tine rod 2
4623-1.JRC 60” Tine rod 2
17 4622.JRC 46” Tine tube 2
4622-1.JRC 60” Tine tube 2
18 4621.JRC 46” Stabilizer tube 2
4621-1.JRC 60” Stabilizer tube 2
19 4624DD.JRC Tine Double-double loop 46” 35
Tine Double-double loop 60” 47
20 8231L.JRC Mount Side Plate - Left 1
21 8231R.JRC Mount Side Plate - Right 1
22 8230.JRC Lift Tube 1
23 8235.JRC Hitch Pin 1
24 3045.JRC Hairpin Cotter 1
25 8237.JRC Clevis Pin, 5” 1
26 4110.JRC Circle Cotter 1
27 7873.JRC ¾” Nylon Bushing 2
28 7818.JRC ¾”Machine Bushing 2
2.3 Tools Required
Socket Wrench: ½”, & ¾”
Open or Box End Wrench: ½”, & ¾”
Allen Wrench: 5/32”
2.4 Power Unit Requirements
The Tine Rake Dethatcher is designed to be attached to a JRCO Mount on the 52” or 60” Toro Multi-force stand-
up mower with the hydraulic lift 2” receiver hitch.
Operator’s Manual Tine Rake Dethatcher
20195 South Diamond Lake Road, STE 100
Rogers, MN 55374
800.966.8442
www.jrcoinc.com
8
2.5 Unpacking Your Attachment
CAUTION
SHARP EDGES.
Sharp tines, eye poke hazard
Wear safety Glasses
Your Tine Rake Dethatcher will ship in 1 box. Carefully set the box on a flat working area. Carefully unbox the
attachment and verify that all fasteners and components are included. (see packaging list on page 5)
2.6 Torque Requirements
Please reference the Torque Chart below for correct values when assembling your attachment.
5/16” Serrated Flange Nut/Bolt 20 ft lb
3/8” HH Capscrew 3/8-16 x 3” 30 ft lb
3 Assembly
3.1 General Assembly
This attachment is shipped partially assembled. If purchased from a JRCO Dealer, the dealership may assist in
assembly of attachment. Review all safety and assembly instructions in this manual before assembly.
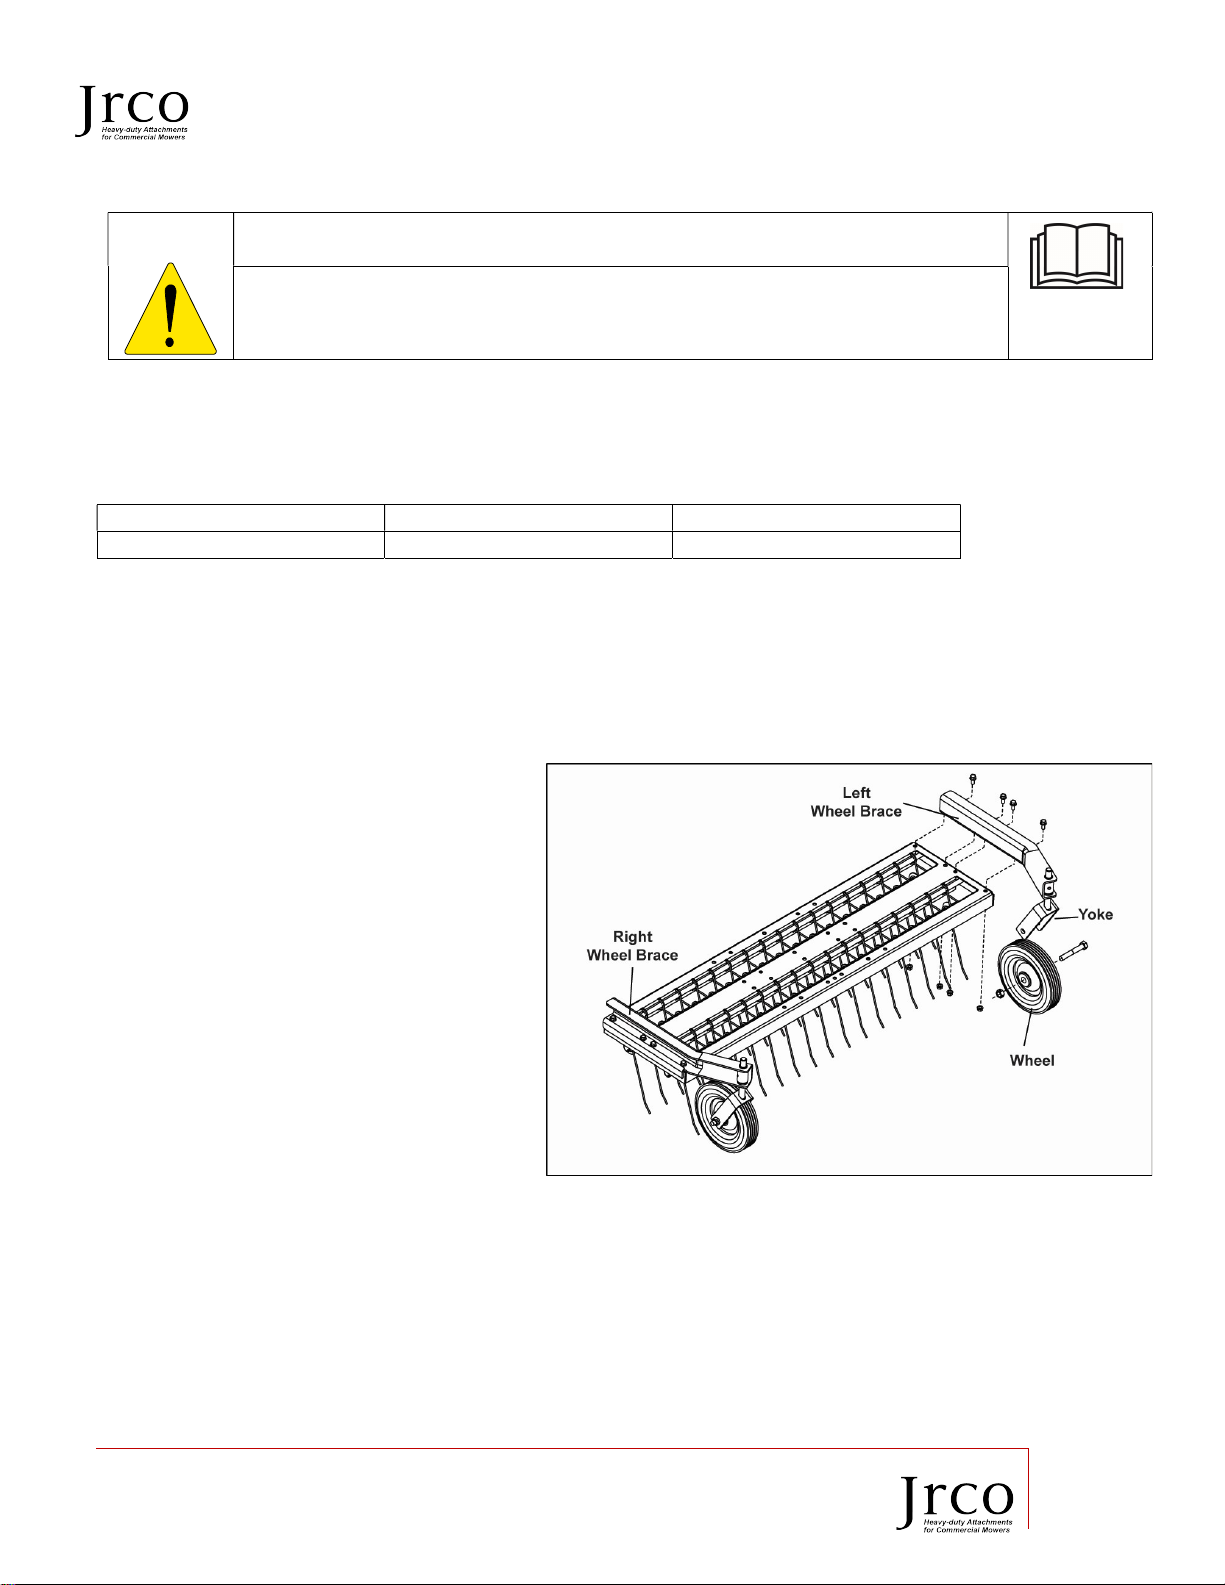
3.2 Wheels to Yokes Assembly
1. Position the rake as shown. The
front of the rake is identified by a
three-hole pattern in the center.
2. Fasten the left and right wheel
braces to the rakes, using four 5/16
x ¾ serrated flange bolts and nuts
per side, as shown.
3. Attach the wheels to the yokes.
4. Place the wheel in the yoke, and
secure with a ½ x 3 hex head bolt
and 2-way locknut.
IMPORTANT: Do not over tighten. Leave enough space for wheels to spin in yokes.
Operator’s Manual Tine Rake Dethatcher
20195 South Diamond Lake Road, STE 100
Rogers, MN 55374
800.966.8442
www.jrcoinc.com
9
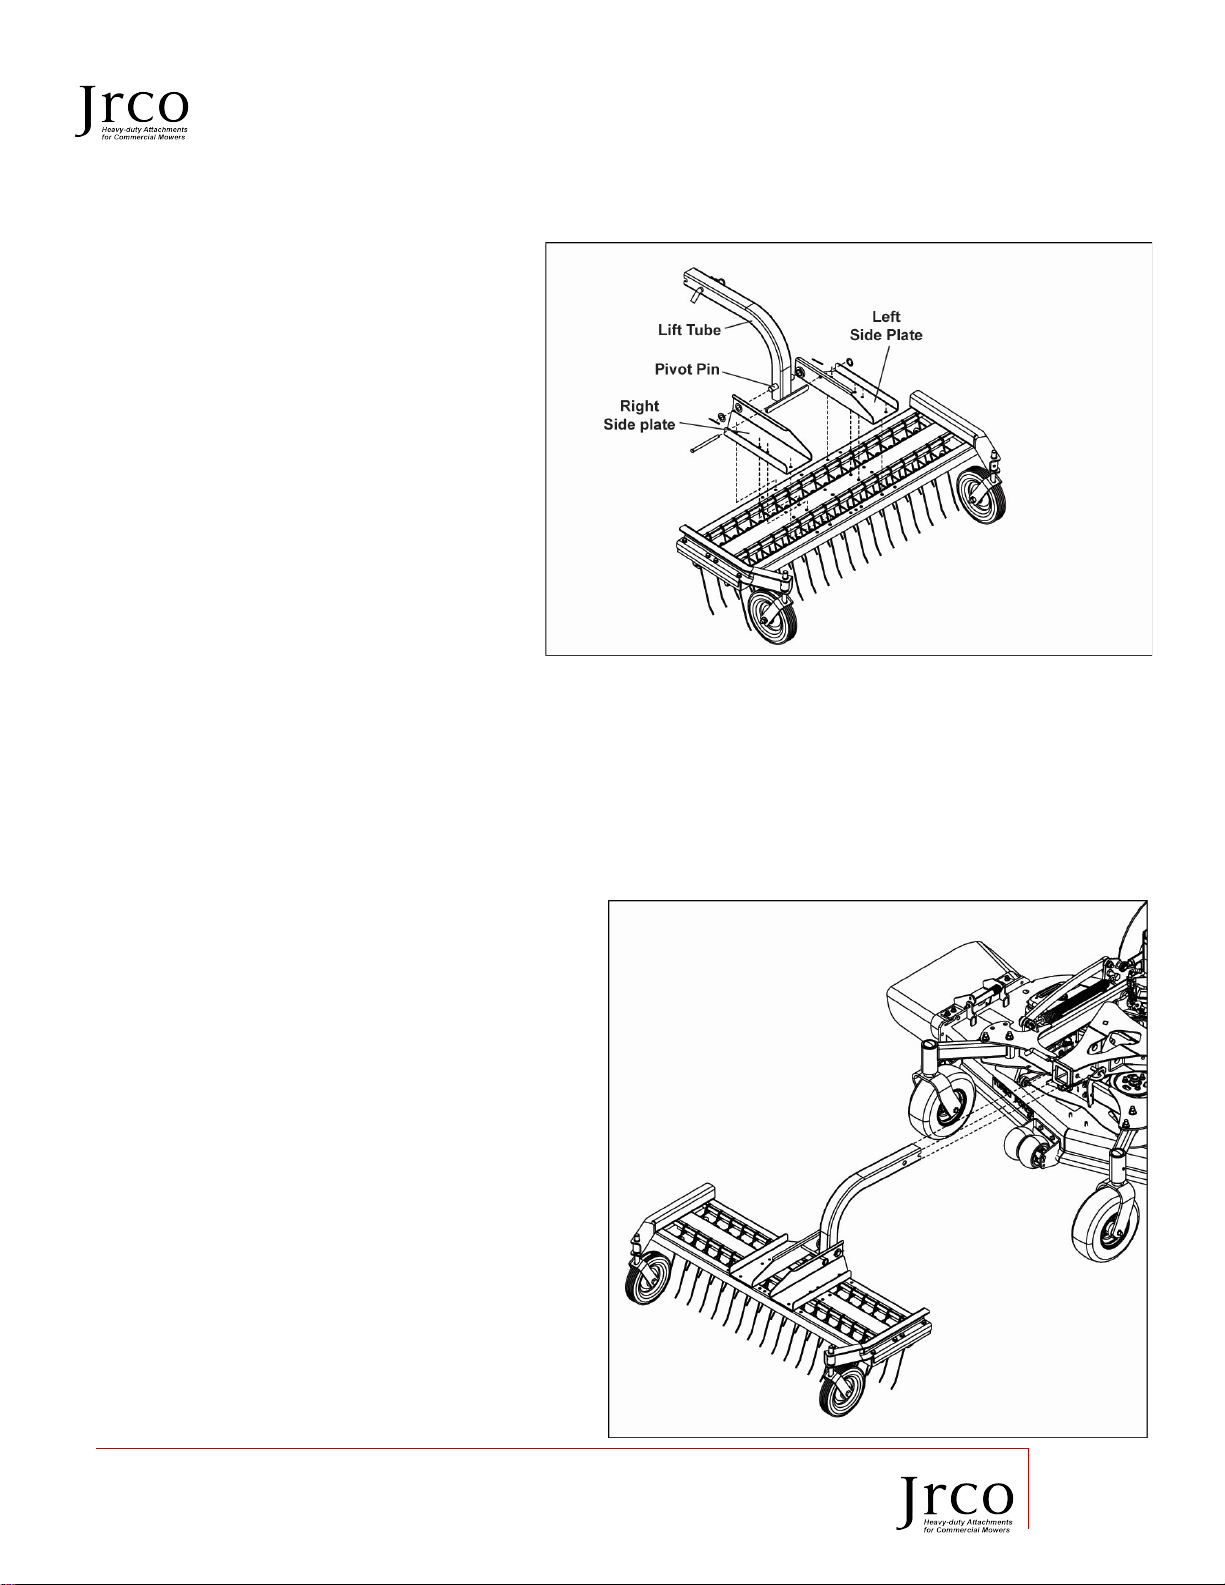
3.3 Side plate and Lift Tube attachment
1. Attach Left Side plate to dethatcher
in the holes shown, using four 5/16
x ¾” serrated flange nuts and bolts.
2. Apply a light coat of dry lube
(silicone spray or eq) to the pivot
pin.
3. Insert the pivot pin of the Lift Tube
into the bushing on the Right Side
Plate. Place a machine bushing on
the pin and secure with a cotter pin.
4. Place the Right Side Plate on the
other end of the pivot pin, and
secure with machine bushing and
cotter pin.
5. Secure the Right side plate with four
more 5/16 x ¾ serrated flange bolts
and nuts.
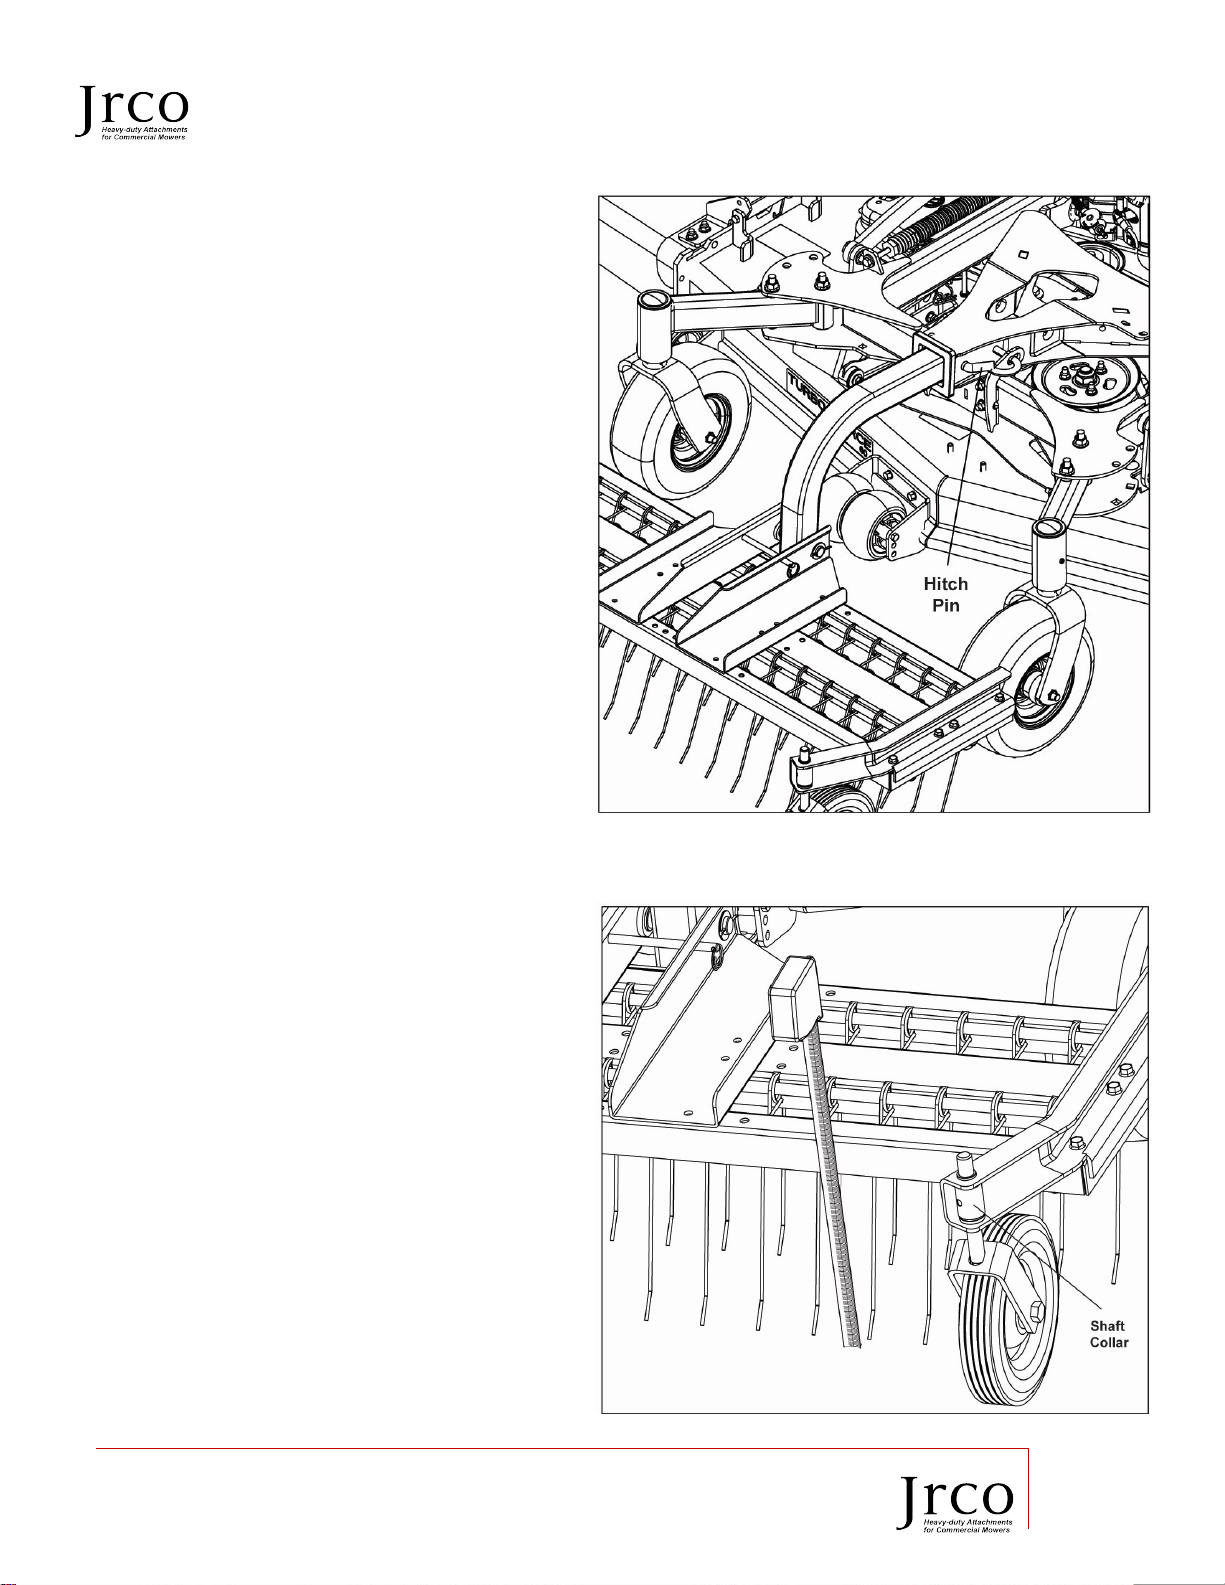
4 Attach Dethatcher to Reciever Hich
1. Raise the hydraulic lift approximately
2” from bottom stop.
2. Insert 2” lift tube into the receiver
hitch.
Operator’s Manual Tine Rake Dethatcher
20195 South Diamond Lake Road, STE 100
Rogers, MN 55374
800.966.8442
www.jrcoinc.com
10
3. Secure with 5/8 hitch pin and hairpin
cotter.
4. Insert 3/8 x 5” clevis pin in hole in
between side plates. Secure with
circle cotter. This pin will be used
later, when folding the dethatcher for
transport.
5 Adjustments
1. Adjust the height of the dethatcher with
the rake on level, paved ground.
2. Level the dethatcher by adjusting the
shaft collars on each caster assembly. Use
a 5/32” allen wrench to loosen set screws
in shaft collars and adjust each wheel. The
caster may need to be rotated to locate
the set-screw. The top of the rake deck
should be 9 ½” from the ground.
3. When adjusted properly, the tips of the
tines should be approximately ¾” from a
hard surfaced ground. When the
dethatcher is on turf, the tines will engage
the grass and work back and forth lifting
and flicking dead grass and thatch.
Tabla de contenidos
Manuales populares de Maquinaria agrícola de otras marcas

GSi
GSi PNEG-2314 Manual de usuario

Checchi & Magli
Checchi & Magli TEXDRIVE Manual de usuario

Amazone
Amazone Cenius 4003-2TX Manual de usuario

MASSEY FERGUSON
MASSEY FERGUSON MF 9313S Manual de usuario

Cima
Cima BLITZ Instrucciones de funcionamiento y mantenimiento

Amazone
Amazone CombiDisc 3000 Instrucciones de instalación


