Janser Master Mobile hydrauli Manual de usuario

update: 01/2012 - Signatory
Janser GmbH
Böblinger Street 91
71139 Ehningen
GERMANY
Phone +49 / 7034 / 127-0
Fax +49 / 7034 / 8838
E-mail: info@janser.com
Internet: www.janser.com
PROFESSIONAL
FLOORING
TECHNOLOGY
MASTER MOBIL
hydraulic
USER INSTRUCTIONS
Order-No.: 111 800 000


Hydraulic Stripper
MASTER-MOBIL
TABLE OF CONTENT
OPERATING INSTRUCTIONS 3
Chapter Page
1Rules for Save Operation
1.1 Electric Connection 4
1.2 Personal / Staff 5
1.3 Usage 5
2Product Information
2.1 Technical Description 6
2.2 Technical Specifications 6
2.3 Accessory / Components 6
3 Transportation
3.1 Loading/Unloading 7
4Setup / Adjustment
4.1 Hydraulic Fluid Level 8
4.2 Speed Control 8
4.3 Additional Top-Weight 9
4.4 Blade 10/11
5Operation
5.1 Actuators 12
5.2 Initial Operation Phase 12
5.3 Types of Tearouts13
5.4 Subfloor Surfaces 14
6Maintenance
6.1 Inspection Procedure Hydraulic 14
6.2 Adding or Changing Hydraulic Fluid 14
7 Spare Parts15-20
Declaration of conformity att

MASTER-MOBIL
Hydraulic Stripper
OPERATING INSTRUCTIONS
4
1 RULES FOR SAVE OPERATION
1.1 Electric Connection
Commandment Warning / Caution Hint / Clue Forbiddance/
Prohibition
Always disconnect power plug before servicing.
Maintenance, replacement or adjustment of hydraulic fluid or other parts can cause serious injury or
death to the user or other persons, if the machine is connected to the power supply system.
Keep the cable away from the blade to avoid damage of the cable.
Run over or damage of the cable can cause an electric shock.
The machine is constructed for inside-usage only.
Danger of electric shock. Do not expose the machine to water or rain.
Connection: power supply system – machine
Only to the given ranges on the type plate.
Check before usage.
Connection: cable – machine only with authorized cable.
Europe Cable – Type: HAR HO5VV-3x2,5 mm²
Connector / Plug – Type: 2P+T16A-250V
Using cables with to little average or excessive length can cause damage to persons and objects.
Elektctrical equipments like cables or plugs must be controlled / renewed by an authorized
electrician.
Risk of injuries or fatalities by wrong electrical connection
Never operate with a damaged cable or connector.
Replacement of worn or damaged cables or connectors has to be effected by a specialist or a similar
qualified person.
Improperly connecting the grounding wire can result in risk of electric shock.
Check with a qualified electrician if your in doubt as to whether the outlet is properly grounded. Do
not modify the plug provided with the tool. Never remove the grounding prong from the plug. Do not
use the tool if the cord or plug is damaged. If the plug will not fit the outlet, have a proper outlet instal-
led by a qualified electrician.
Do not use machine when cable is damaged
Don't move the machine by dragging the cable. Utilization with a damaged cable can cause an elec-
tric shock.
Non observance of the symbols, which you can see in the instruction manual or on the machine, may
result in serious injury or death for the user and other persons.
Read, understand and follow all the clues / hints, which are situated in the machine or in the instruc-
tion manual.

Hydraulic Stripper
MASTER-MOBIL
1 RULES FOR SAVE OPERATION
OPERATING INSTRUCTIONS 5
1.2 Staff
The operator has to be instructed to the use of the machine before operating.
Non observance of the instruction manual before commissioning, adjustment or maintenance could
cause serious injury to personal or objects.
Read unexceptionally all security statements. Be sure that type plate, security symbols as
commandments, warnings, precautions and the directives are mounted / fixe to the machine.
Non observance of the directives inside this manual may cause serious injury or damage.
Always wear eye-protection, protective suit, dust-mouthguard / dust respirator and ear-protec-
tion during the usage of the machine. The noise that appears while removing flooring can be so
intense that at long term use it may cause injury of the auditory tube. Working without appropriate
security equipment, as for instance a protective suit, can injure eyes and body. Arising airborne dust
may be inhaled when wearing no mouthguard.
Keep arms, feet and clothes away from the operating machine parts.
Moving parts of the machine can cause serious injury or damage.
1.3 Usage
Fluid under pressure is dangerous and can cause serious injury.
Leaking hydraulic fluid is not only unsightly, it's hazardous. In addition to making workplace floors slippery and
dangerous, leaks also contaminate the environment. Our system runs at or below 83 bar. Never look for a leak
when unit is under pressure. Only check and service when not under pressure.
Fluids under pressure can cause serious injury. If fluid punctures the skin, even if no pain is felt, a serious emer-
gency exists. Obtain medical assistance immediately. Failure to do so can result in loss of the injured part or
death.
Escape of hydraulic fluid
Pinhole: It can be almost invisible escaping from a pinhole, and it can pierce the skin into the body. Do not touch
a pressurized hydraulic hose assembly with any part of your body. Leak: Keep hoses and fittings tight. Only
check and service when not under pressure.
Never check for leaks over hose or hydraulic connections with any part of your body. Instead, use a piece of
cardboard to locate a pressurized leak. For drips (low pressure leaks), use a rag to clean the area and determine
where the leak originates.
Flammability of hydraulic fluids
With the exception of those compromised primarily of water, all hydraulic fluids are flammable when
exposed to the proper conditions (including many "fire-resistant" hydraulic fluids). Leaking pressurized
hydraulic fluids may develop a mist or fine spray that can flash or explode upon contact with a cause
of ignition. These explosions can be very severe and could result in serious injury or death.
Precautions should be taken to eliminate all ignition sources from contact with escaping fluids, sprays
or mists resulting from hydraulic failures. Sources of ignition could be electrical discharges (sparks),
open flames, extremely high temperatures, sparks caused by metal-to-metal contact.

Hydraulic Stripper
MASTER-MOBIL
2PRODUCT INFORMATION
OPERATING INSTRUCTIONS
6
2.1 Technical Description
Hydraulic-Technology applied on the tried and tested Stripper-Features:
- Compared with other Strippers the "MASTER-MOBIL Hydraulic" works extremely quietly,
allowing use in "working" environments
- Very easy operation achieved through automatic drive with forward and backward function
- Removeable weights for easier transport
- Virtually maintenance-free hydraulic components
2.2 Technical Specifications
Dimensions
Height H1 104 cm
H2 50 cm
Length L1 80 cm
L2 62 cm
Wheel Ø22 cm
Width W1 30 cm
Weight
Machine 93 kg (200 lbs)
Additional Top-weight 24 kg (52 lbs)
Motor
Power Supply 230V/50Hz
Motor Power 0,75 kW
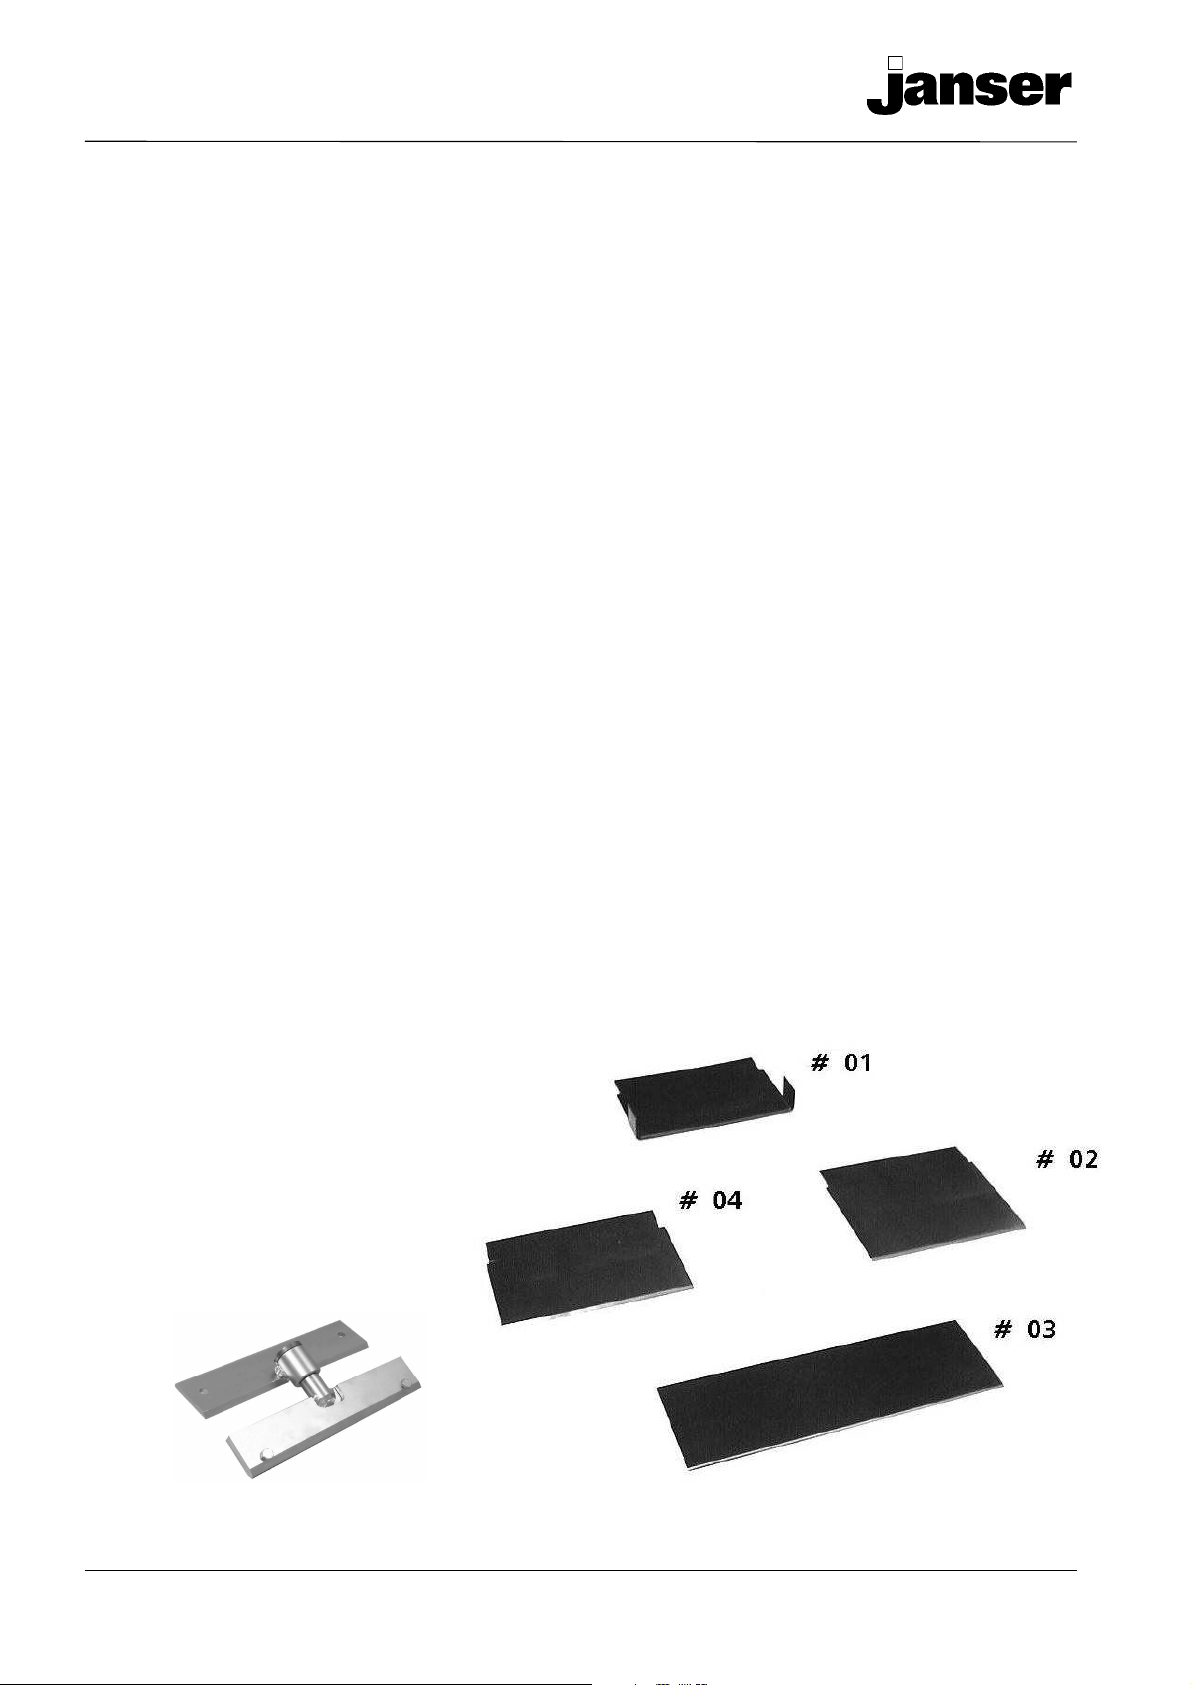
2.3 Accessories
Standard
- Blades
#01, 152 x 102 x 1,6 mm Order-Nr.: 111 800 101
#02, 152 x 127 x 1,6 mm Order-Nr.: 111 700 102
#03, 254 x 76 x 1,6 mm Order-Nr.: 111 800 103
#04, 145 x 102 x 1,6 mm Order-Nr.: 111 800 104
- Extension Cable 10,0 m
- Assembly tools
Optional
- Additional Top-Weigh 24 kg Order-No.: 111 800 420
- Loading Ramp (Aluminium, Lenght 2m foldable) Order-No.: 111 700 900
- Swivel Head Attachement for permanent contact to the surface Order-No.: 111 800 040
L1
Ø
W1
H1
H2
L2

Hydraulic Stripper
MASTER-MOBIL
OPERATING INSTRUCTIONS 7
3TRANSPORTATION
3.1 Loading / Unloading
Always remove all counterweights and blades before loading or unloa-
ding.
See figure 3.2 - A
Easy loading when not driving or using a ramp. Location on lifting
bails centrally locates the balance of the machine to safely pick-up the
machine.
1. Use a rope, a hook system or a chain through the eyelets
which are located on top of the machine.
2. Raise machine with a fork lift or a winch.
Keep hands and feet out from under machine.
See figures 3.2 - B and 3.2 - C.
Make sure the ramp is clean and dry, free of grease or oil.
1. Attach ramp securely to back of vehicle, making sure there is
good contact.
2. Position machine at back of ramp, respectively at head of
ramp.
3. Engage power switch and drive onto vehicle, respectively
drive out of vehicle.
Lowering handle may be necessary for proper clearance into the back
of smaller cars.
Make sure ramp is secure before using. Failure to do so could cause
ramp to fall away from truck, causing damage to the machine and/or
injury to the operator.
The Loading Ramp can fold up on the half for easier transport
See figure 3.2 - D
3.21 Lifting bail
3.21 Loading Ramp
FIGURE 3.2 A
FIGURE 3.2 B
FIGURE 3.2 C
FIGURE 3.2 D

Hydraulic Stripper
MASTER-MOBIL
OPERATING INSTRUCTIONS
8
4SETUP
4.1 Hydraulic fluid
4.2 Speed control
When the machine is sitting in a normal operating position without
a blade, fluid should be ca. 2,5 cm (1") from the top of the tank.
Check fluid level if there has been a leak, damaged or ruptured
hose or a loose fitting.
Change the complete fluid once a year
4.1.1 Hydraulic fluid level
To add fluid, unscrew the filler port cap from top of the machine.
See figure 4.1 - A
To change fluid, remove the filler port cap. Remove drain plug
from side of machine.
See figure 4.1 - B
Acontainer approximately ca. 5 litres in size will be needed to
drain fluid into.
Machine has a straining system, but add fluid through a
filter or funnel with a screen to keep fluid clean.
Speed control knob can be adjusted while the machine
is running
Turning speed control knob counter clockwise
will make the machine run faster.
Turning speed control knob clockwise
will make the machine run slower.
4.1.2 Adding or changing hydraulic fluid
FIGURE 4.1 A
FIGURE 4.1 B
Store Hydraulic Fluid in a dry, secured place!
Only use Hydraulic Oil or Compatible Fluid like IS032.
Non-compatible fluids could cause damage to unit or serious injury.

Hydraulic Stripper
MASTER-MOBIL
OPERATING INSTRUCTIONS 9
4SETUP
4.3 Additional Top Weight
See figue 4.3 - A
Use the addtiional Top-Weight only as needed.
It is not necessary to have the top-weight on to use
machine.
The weight is heavy, use caution when removing or
remounting.
Fitting the weight
See figure 4.3 - B
Put the weight on the handle on the top of the machi-
ne and mount it with the fixing bolts
The fixing key is attached on the guide bar of the
machine
FIGURE 4.3 A
FIGURE 4.3 B

MASTER-MOBIL
Hydraulic Stripper
OPERATING INSTRUCTIONS
10
4SETUP
4.4 Blade
Proper blade size and placement, depending on material and sub-floor type,
affects performance.
- The harder a job comes up, for best results, use a smaller blade.
- Start with a narrow blade, then increase the blade size to optimize the cutting pass.
- Narrower blades work easier than wider blades.
- Narrower blades usually clean the floor better.
- Normally bevel on blade is up for concrete. Bevel down for wood or soft sub-floors.
4.4.1 Blade Choice
Blade #01: 152 x 102 x 1,6 mm (6 x 4 x 0.062")
self-scoring blade for vinyl, carpet, linoleum, cork and other floors
Blade #02: 152x127x1,6 mm (6 x 5 x 0.062")
small for hard to remove surfaces e.g. epoxy, parquet, tough coatings
Blade #03: 254 x 76 x 1,6 mm (10 x 3 x 0.062")
ultra high quality spring steel for long blade life between sharpening.
Works for all glued down floors
Blade #04: 145 x 102 x 1,6 mm (6 x 4 x 0.062") especially for linoleum
Optional Attachment
Blade Holding Device:
Swivel Head
for permanent contact to
the surface
4.4.2 Blade Versions
Tabla de contenidos
Otros manuales de Máquina de piso de Janser