J&D MAnufacturing JD-MV1 Manual de operación
MANUAL
JD-MV1
Manual Variable
Speed Control
JD-MV1
ON
OFF
LO
1
2
3
456
7
8
9
10
SPEED
Installation / User’s Guide

JD-MV1
Page 2
This guide will inform the electrician on proper wiring and installation procedures
and, will also inform the user on how to use the JD-MV1 controller.
The manufacturer recommends that the following installation instructions be
followed to as closely as possible, and that all work be performed by a certified
electrician. Failure to do so may void the warranty.
Description
The JD-MV1 controller is designed to control manually a variable speed output.
An ON/OFF Switch is used to activate or not the output and a Speed Selector is
used to adjust the speed of the variable output. The controller operates on
115/230V and 50/60Hz.
The JD-MV1 comes in a PVC non-corrosive enclosure that is protected from dust
and humidity. The JD-MV1 is covered by a complete two-year warranty.
Unpacking
Unpack the JD-MV1 module and inspect contents for damage. Should the
contents appear to be damaged, contact your local distributor to return the
material.
The package should contain the following standard items:
1 JD-MV1
1 Installation / User’s guide
Mounting hardware required
This is the list of the mounting hardware needed, which is not included with the
product:
Screws (to mount the module on the wall)
Screwdriver
Soldering iron kit or approved sealed connectors

JD-MV1
Page 3
General installation guidelines
JD-MV1
-It is recommended to install the unit in a hallway to limit the JD-MV1 exposure to
noxious gases.
-In order to avoid condensation problems inside the JD-MV1, it is recommended to
install the module on an inside wall. If it is not possible, use spacers to have an air
gap between the wall and the controller.
-It is required to install the JD-MV1 right side up with the cable entry holes facing
down.
-The enclosure is watertight, but do not spray water or submerge the JD-MV1 in
water. Cover it carefully with plastic when cleaning the room.
-The JD-MV1 should be installed in easy-access location but away from damaging
elements (heat, cold, water, direct sunlight…).
-Do not drill the face, the side, the top or the underside of the control.
-Do not install the JD-MV1 near high-voltage equipment, power supply or transformer.
Electrical cables
-All electrical cables must be installed according to local wiring codes.
-All cable shields must be connected to the shield terminal on the cord to which the
cable is connected. The shield is needed to protect the JD-MV1 against any
electromagnetic interference generated by lightning or nearby operating machinery.
-Never use the shield as a conductor.
-Connect only one end of the shield to the JD-MV1.
-Use separate conduits for the low voltage cables and the high voltage cables. There
must be at least 1 foot (30 cm) between low-voltage and high-voltage conduits.
-If a low voltage cable has to cross over a high voltage cable, make this crossing at
90°.
-All cable connections must be soldered or done with approved sealed connectors.
-It is prohibited to use overhead cables outside the building.
JD-MV1
Page 4
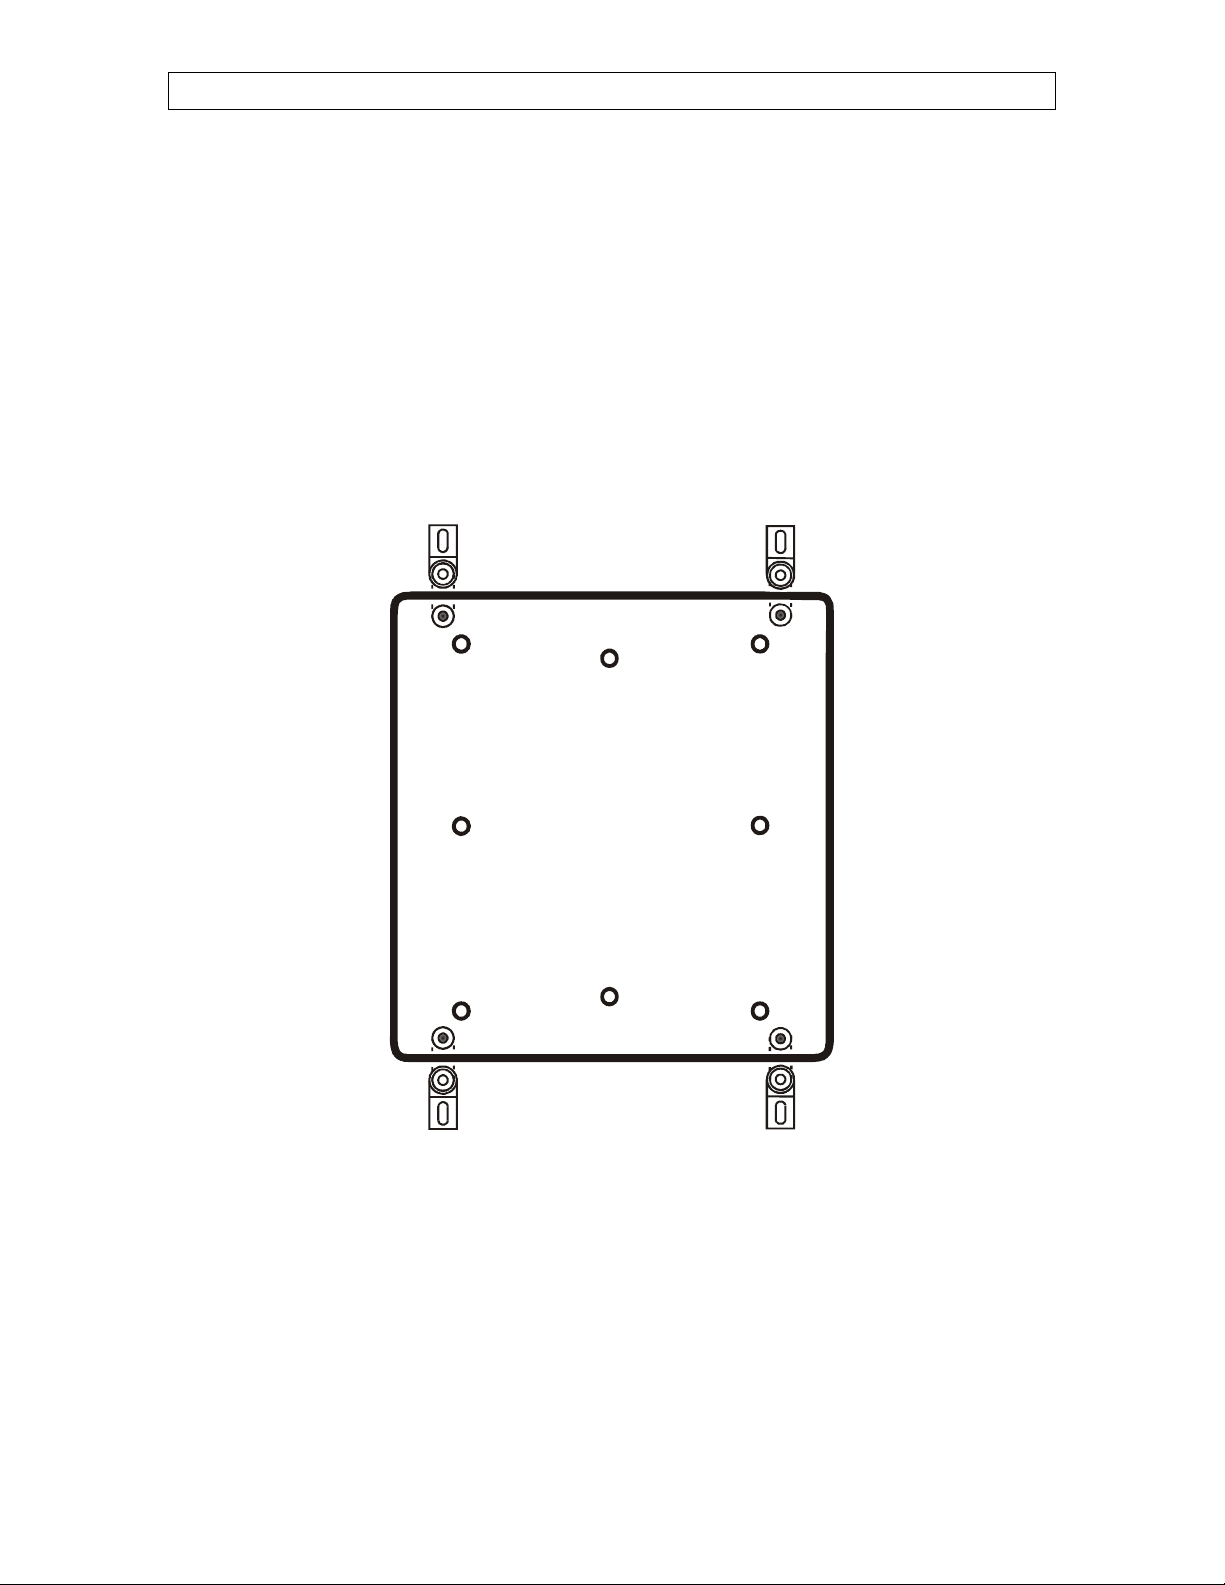
Mounting
-The enclosure must be mounted in a location that will allow the cover to be
completely opened.
-Fasten the four brackets to the four mounting holes on the back of the enclosure
using the four screws provided with the brackets.
-Then mount the enclosure on the wall by inserting screws through the brackets’
adjustment slots, into the wall. Make sure to position the enclosure so that all wires
extend out of the bottom section of the enclosure.
-The bracket slots serve to adjust the position of the controller.
-Once you have adjusted the controller position, tighten the four mounting screws.
(see figure 1).
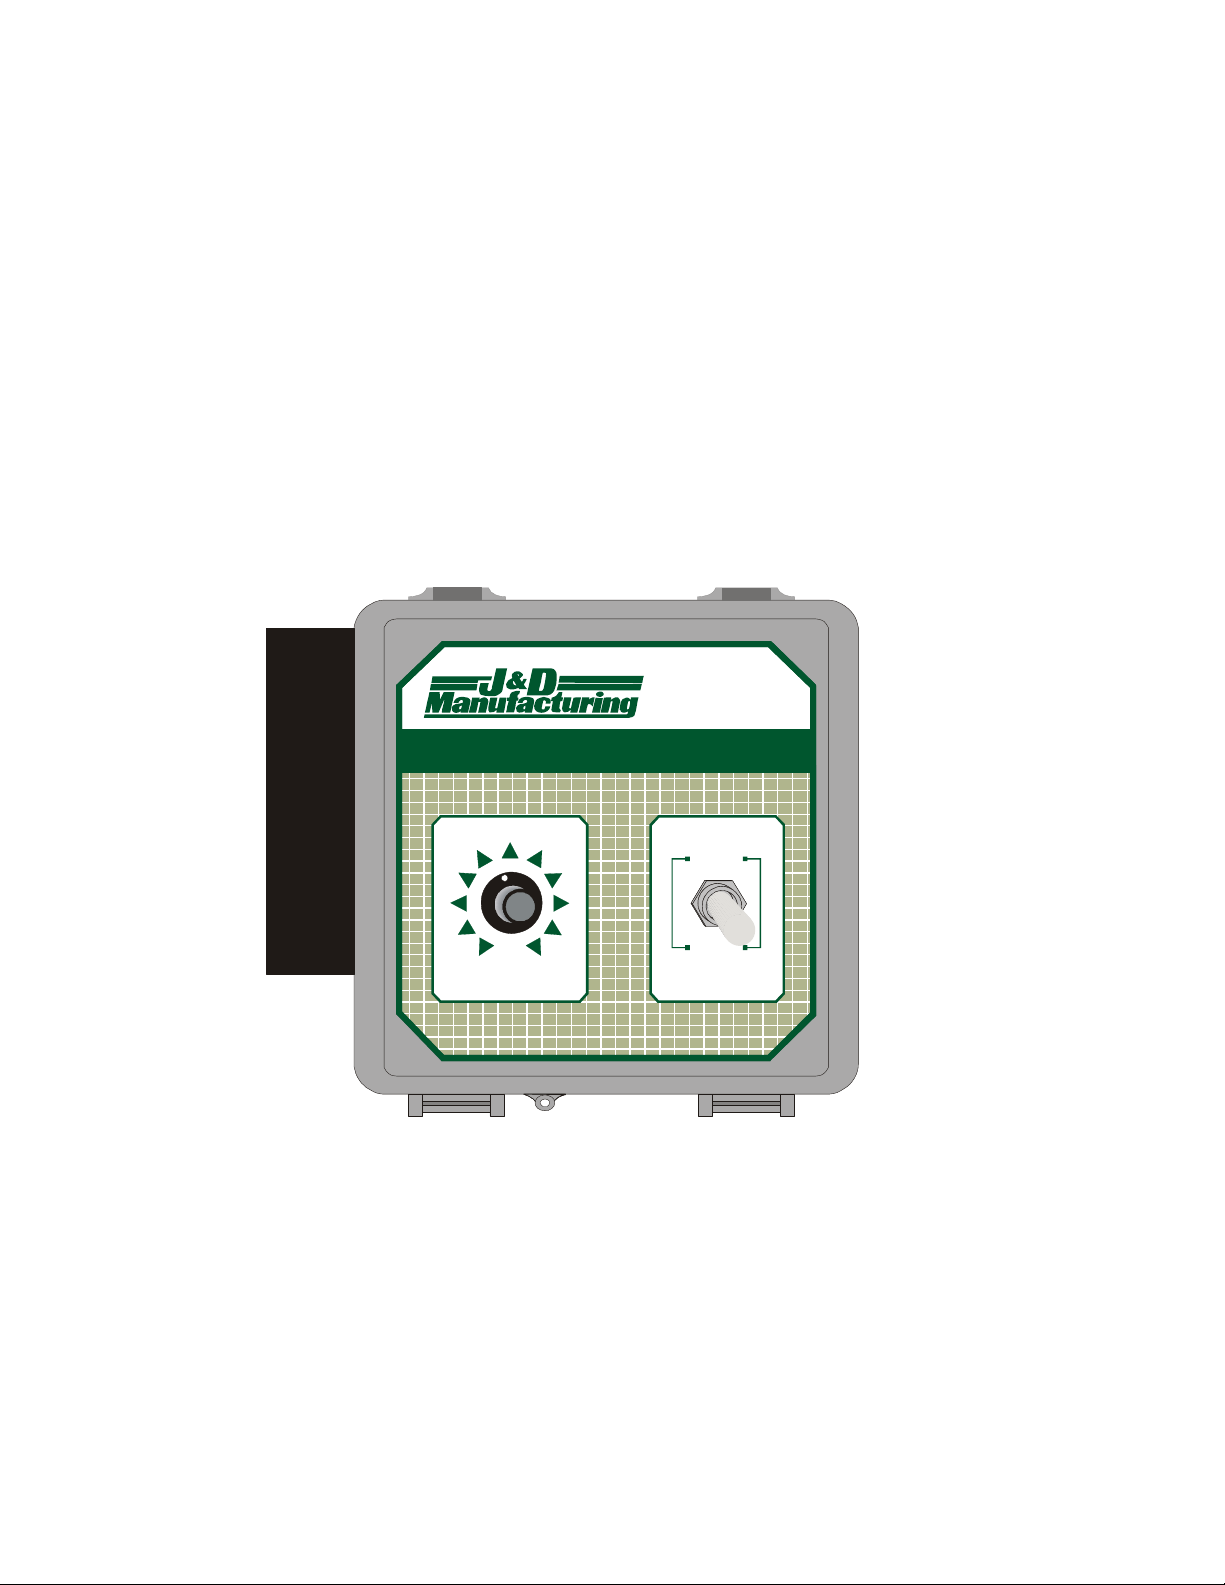
FIGURE NO. 1 Mounting Position and Devices

JD-MV1
Page 5
Wiring Procedure
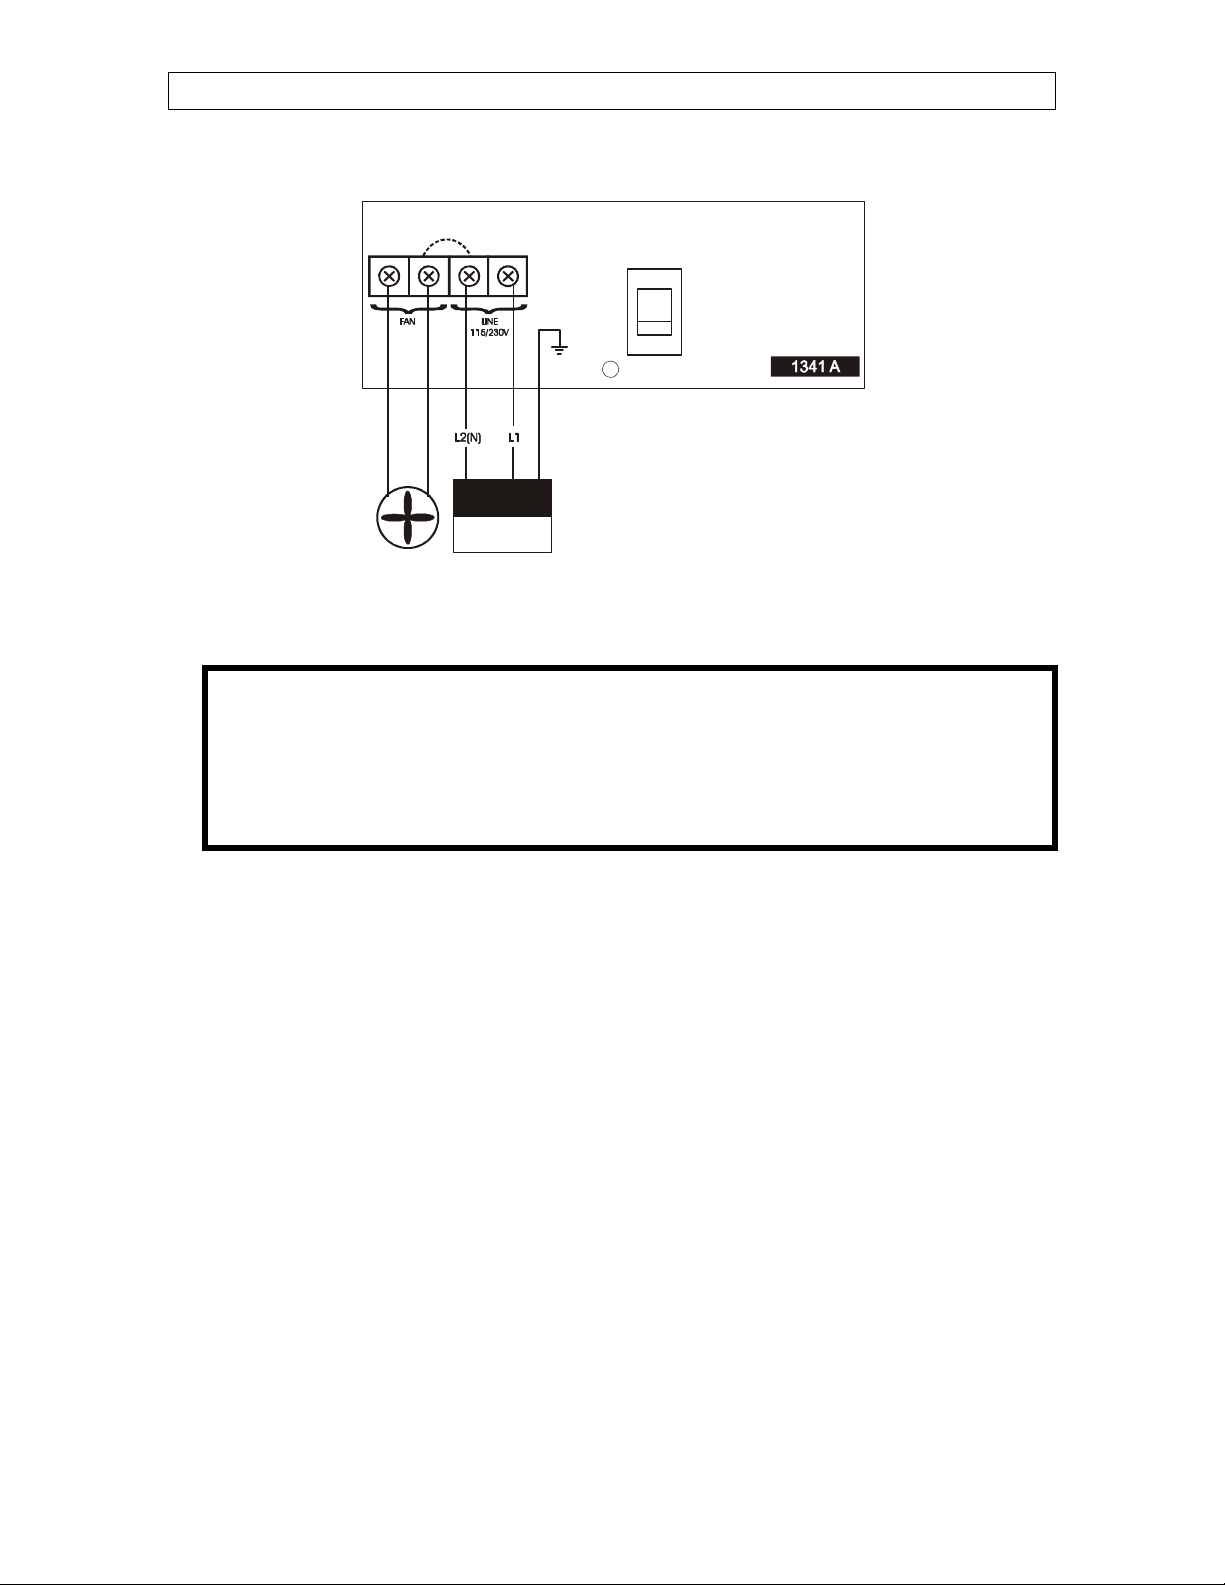
1. Open the JD-MV1 controller enclosure.
2. Verify the technical specifications to know which wire to use.
3. Connect the equipment to the 2 black terminal block identified as FAN as shown
in figure 2.
4. Connect the power source to the 2 black terminal block identified as LINE as
shown in figure 2.
5. Make sure that the voltage selector switch is set to the correct voltage before
powering up the JD-MV1 (refer to figure 3 for the location of the switch).
6. Power up the JD-MV1 controller. Verify that the controller operates correctly.
7. Close the JD-MV1 enclosure. Don’t forget to put a security screw or a padlock.
JD-MV1
Page 6
Figure 2: Wiring Diagram
WARNING!
aTo avoid electric shock, disconnect power source prior to
installation or troubleshooting.
aMake sure that the voltage selector switch is set to the correct
voltage before powering up the controller.
230V
LINE
VOLTAGE
115/230
VAC
JD-MV1
Page 7
Using the JD-MV1
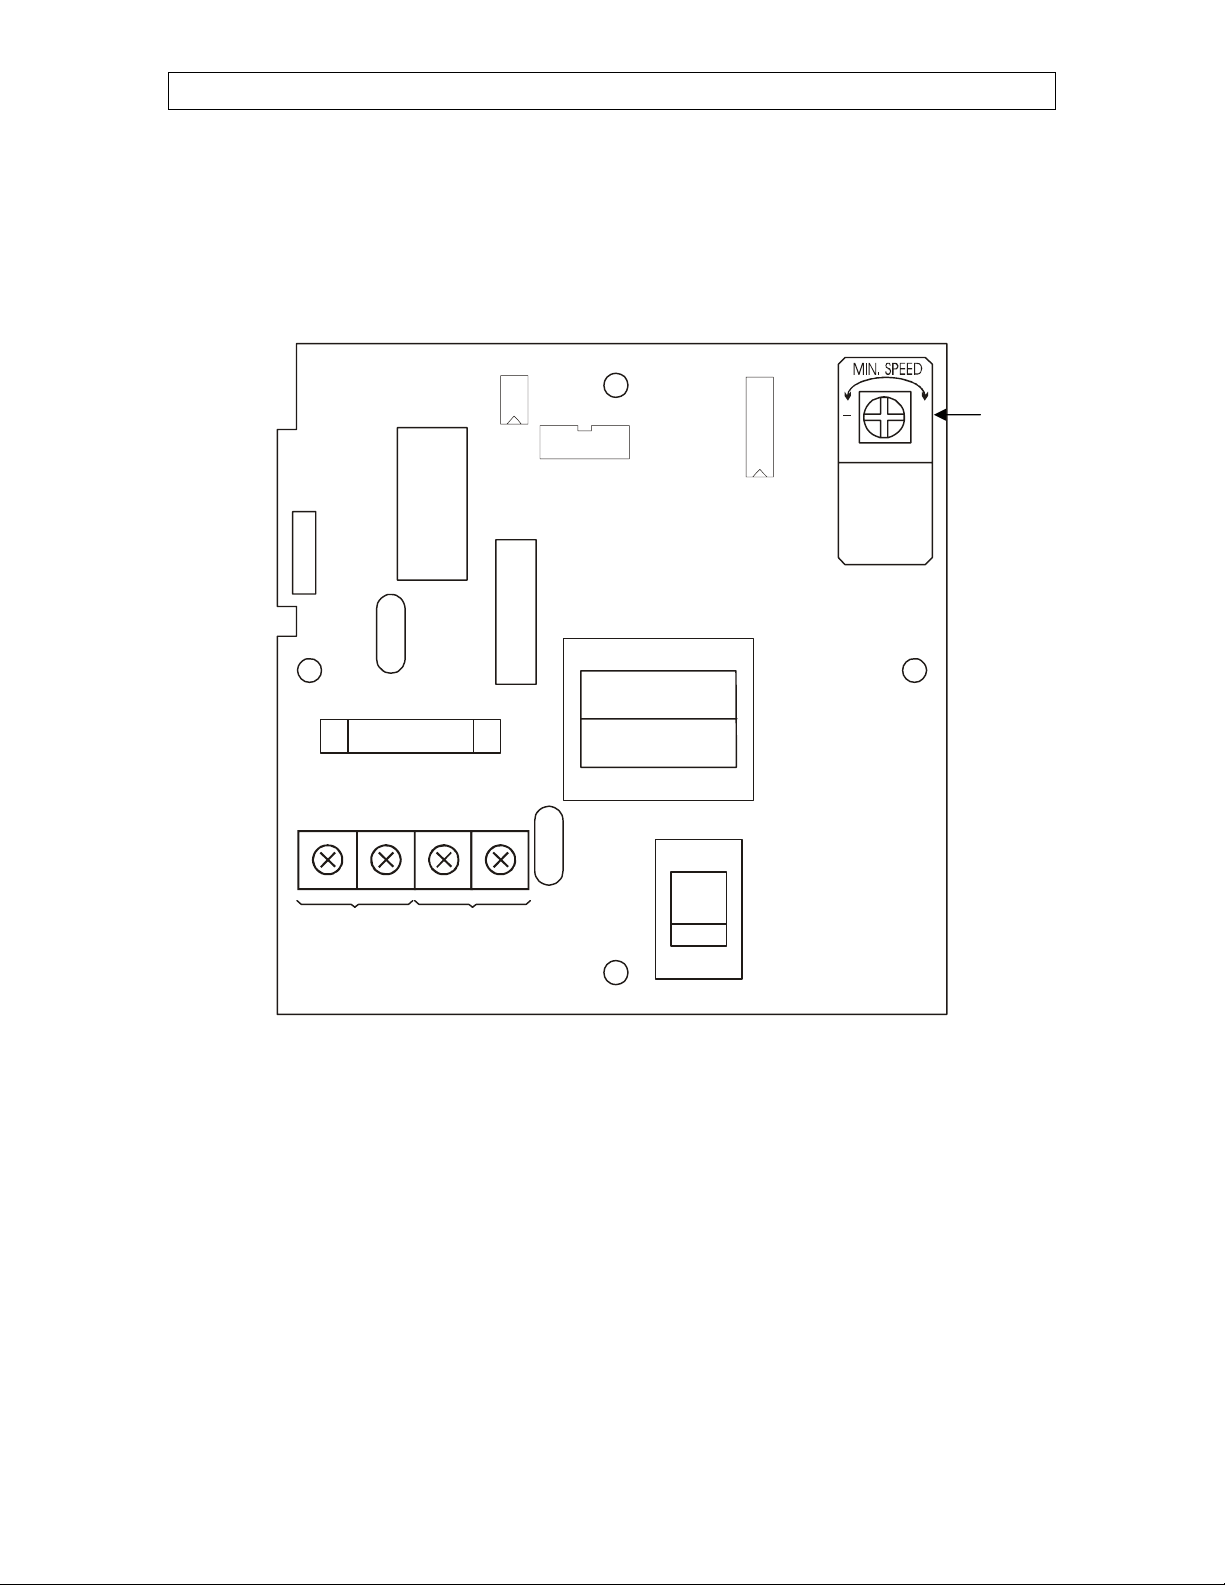
With the JD-MV1 you can manually control a variable output. Refer to figures 3 and 4
for the location of the different switches and selectors of the controller.
Figure 3: Electronic Board and component location
15A/250V
230V
FAN LINE
115/230V
1341 A REV.2
+
1. Minimum Speed Potentiometer
This potentiometer is used to adjust the Minimum Speed of the fan. That
Minimum Speed will be the speed of the output when the Speed Selector is set to LO.
[1]
JD-MV1
Page 8
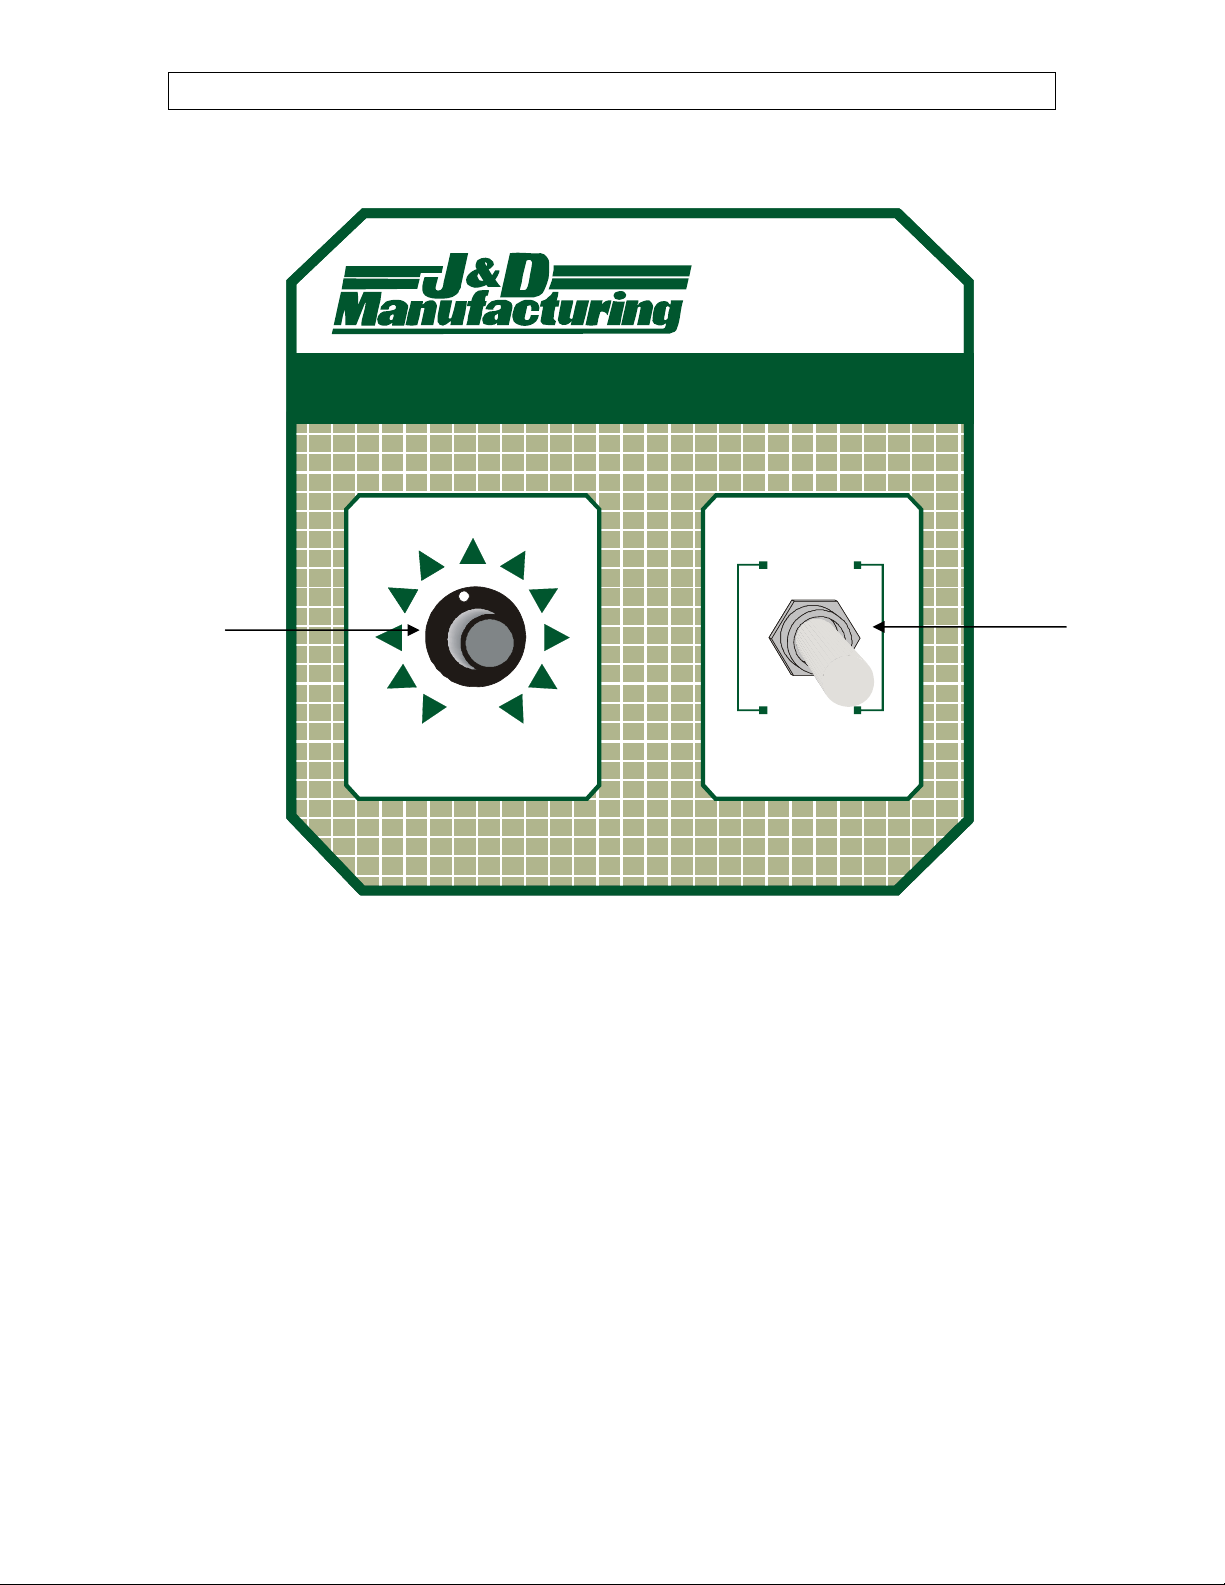
Figure 4: JD-MV1 Faceplate
JD-MV1
ON
OFF
LO
1
2
3
456
7
8
9
10
SPEED
1. Speed Selector
This selector is used to set the speed at which the output will run.
2. ON/OFF Switch
This switch is used to activate or not the variable output.
[2]
[1]
JD-MV1
Page 9
The JD-MV1 controller will make the fan modulate according to the Speed Selector
and the ON/OFF Switch on the faceplate (refer to figure 4). It is also possible to
adjust the Minimum Speed with the potentiometer located inside the controller box
on the electronic board (refer to figure 3). That Minimum Speed will be the speed of
the output when the Speed Selector is set to LO.
Here is a description of the JD-MV1 operation.
- To turn on or off the variable output, use the ON/OFF Switch located on the
faceplate (refer to figure 4)
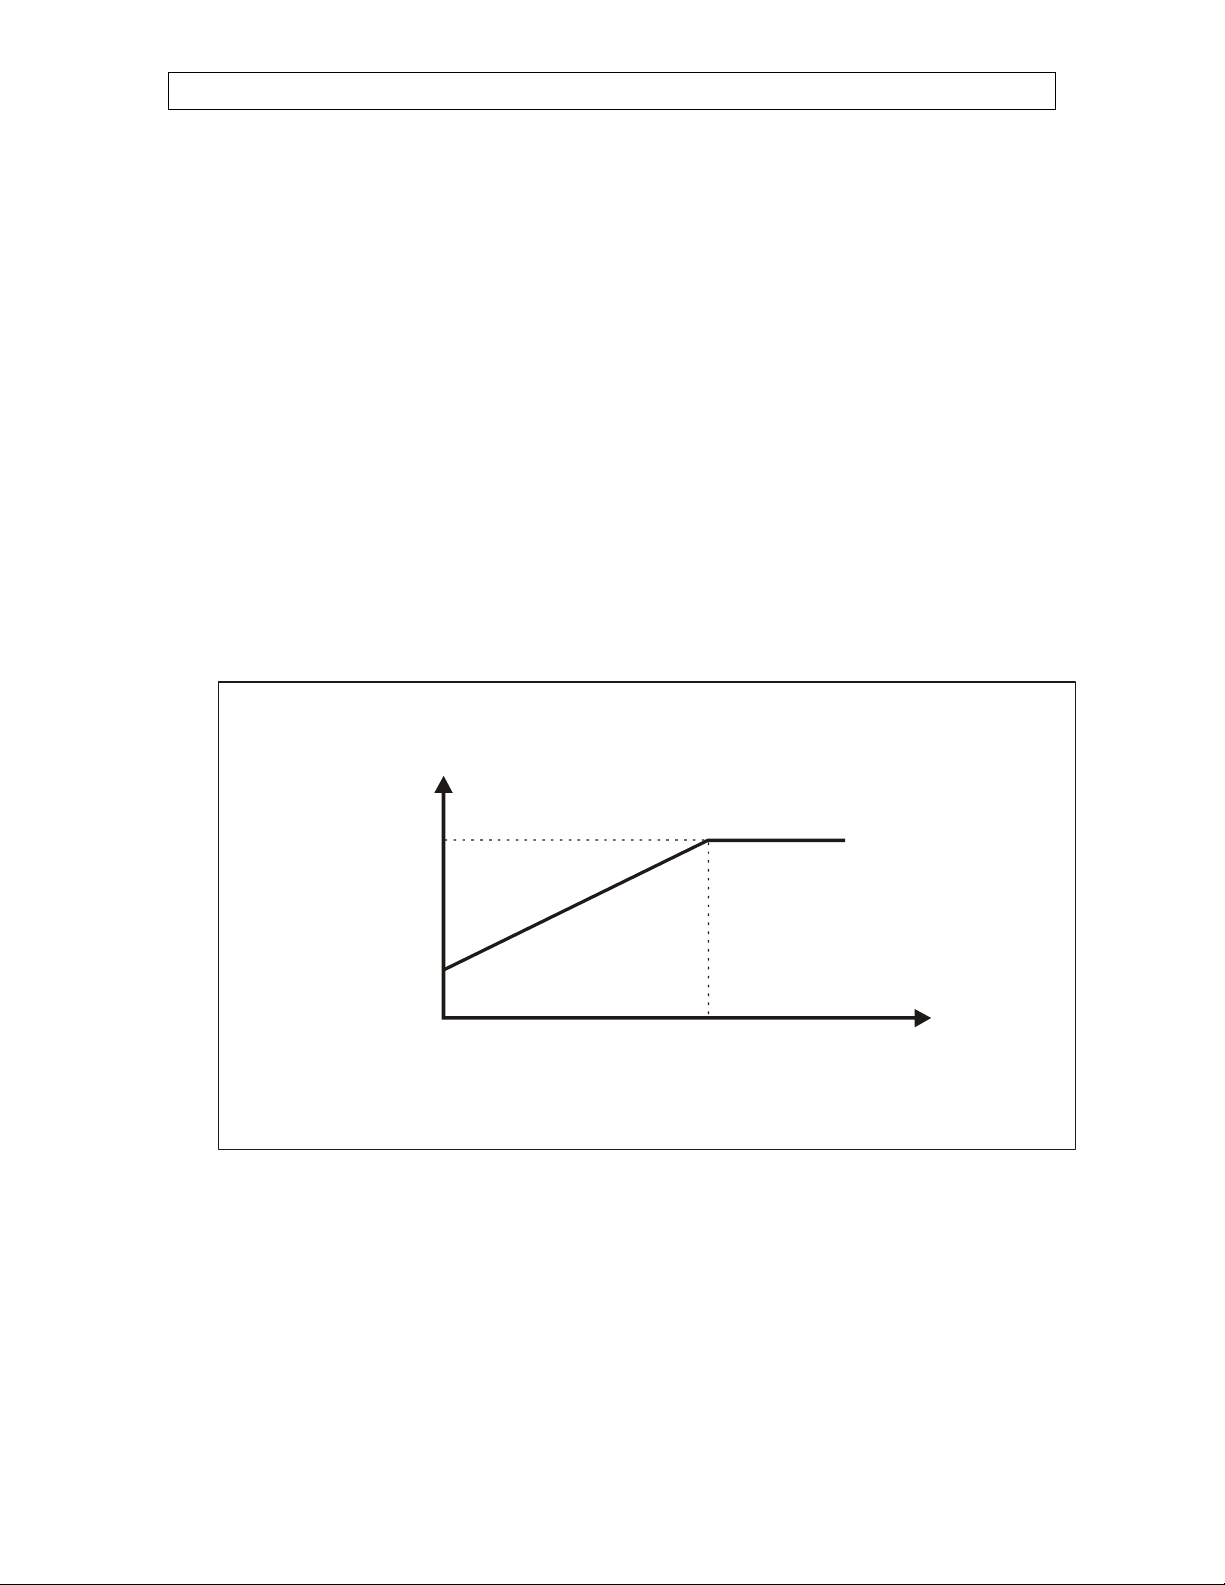
-With the ON/OFF Switch turned on, use the Speed Selector to increase or
decrease the variable output speed. When the Speed Selector is set to LO, the
Minimum Speed set by the potentiometer inside the controller will be used (refer
to figure 3).
Figure 5: Logic Diagrams
Output Speed
100%
Minimum
Speed
10
Speed Selector
LO
JD-MV1
Page 10
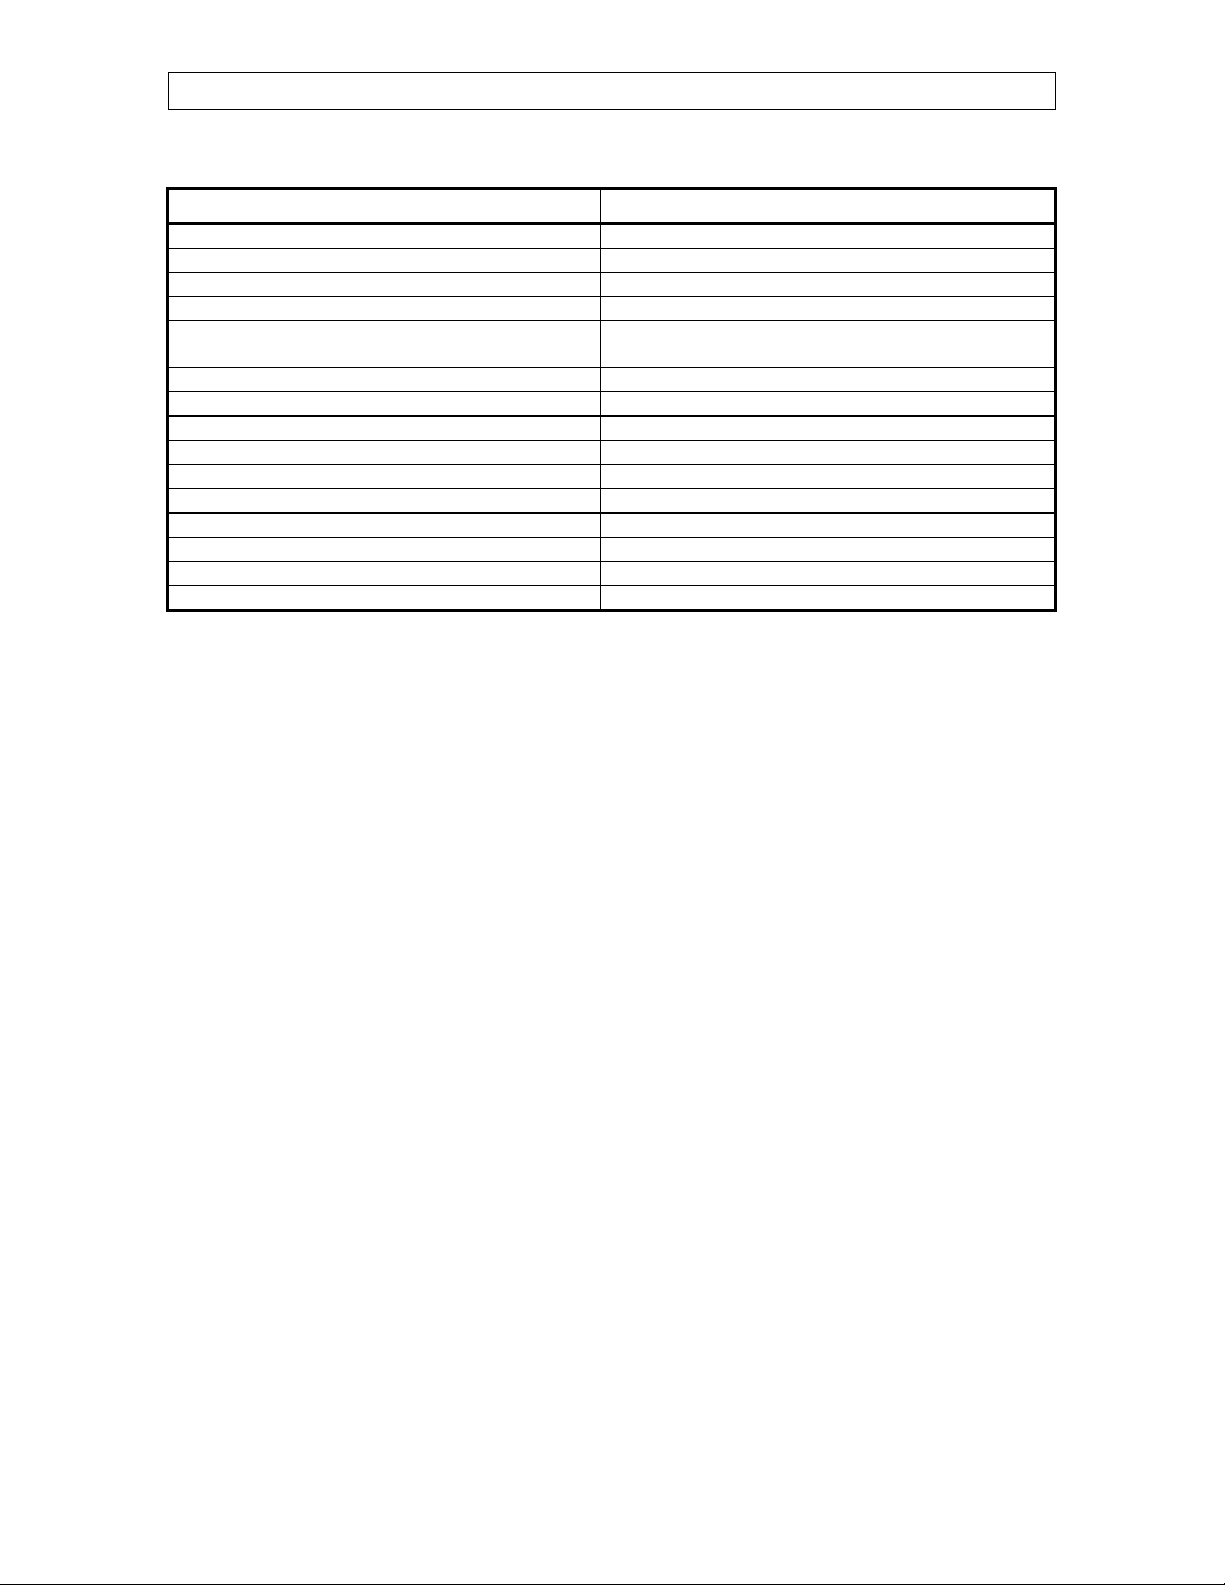
Specifications
DESCRIPTION VALUE
Storage temperature -4°F to 131°F (-20°C to 55°C)
Operating temperature 32°F to 113°F (0°C to 45°C)
Humidity 90% maximum Non-condensing
Weight 1,4 lb (0,6 kg)
Size 5 15/16” x 5 15/16” x 3 9/16” (15 cm x 15 cm x
10 cm)
Protection index IP 66
Warranty 2 years
POWER SUPPLY
Operational voltage range (SW1 @ 115V) 92 to 125VAC
Operational voltage range (SW1 @ 230V) 184 to 250VAC
Operational frequency range 45 to 65 Hz
VARIABLE OUTPUT
Maximum Allowable Current (Fuse value) 15A, 250VAC
Recommended maximum current for fans 12FLA
Minimum load 300mA @ 230VAC
Tabla de contenidos
Otros manuales de Sistema de control de J&D MAnufacturing


