jacarta interSeptor Pro-XP Manual de usuario

© Copyright 2022. Jacarta Ltd. All rights reserved.
interSeptor Pro-XP
User Manual
Version 1.2

interSeptor Pro-XP
2
Copyright
© Copyright 2022. Jacarta Ltd. All rights reserved.
Trademarks
All trademarks belong to their respective proprietors.
Electronic Emission Notice
Federal Communications Commission
This equipment has been tested and found to comply with the limits for
a Class B digital device, pursuant to Part 15 of the FCC Rules. These limits
are designed to provide reasonable protection against harmful
interference when the equipment is operated in a commercial
environment.
CE Notice
This device complies with the EMC directive of the European Community
and meets or exceeds the following technical standard:
RoHS
This device is RoHS compliant.

Safety Information
3
Safety Information:
•Only install the unit in a temperature-controlled indoor area free of
conductive contaminants. Do not place the unit near liquids or in
an excessively humid environment.
•Do not allow liquids/foreign objects to enter the unit.
•The unit does not contain any user-serviceable parts.
•Do NOT open the unit.
•Before shipment, the unit must be completely switched off and
unplugged and all connections must be removed.
•Before connecting the interSeptor Pro-XP to the power supply,
ensure that the rating of the power source is consistent with the
rating of the power adapter of the interSeptor Pro-XP.
•Follow the instructions in the full interSeptor Pro-XP manual to
connect the power adapter and avoid improper use of the
equipment.
•Do not use any organic solutions or corrosive detergents to clean
the exterior of the equipment. To clean the equipment, first turn
off the power. Use a cloth that has been very lightly dampened in
water to clean the exterior.
•Do not use the equipment in the following environments:
i. Humidity higher than 80%.
ii. Temperature higher than 50°C or lower than 0°C.
iii. Near objects which transmit strong electromagnetic waves (e.g.
TV’s or radios).
iv. Locations that are subject to violent vibrations.
v. Locations that are damp or that come into contact with water.

interSeptor Pro-XP
4
Table of Contents
Electronic Emission Notice..................................................................2
Safety Information .............................................................................3
1Introduction.................................................................................6
1.1 Features .......................................................................................6
1.2 Package Contents.........................................................................7
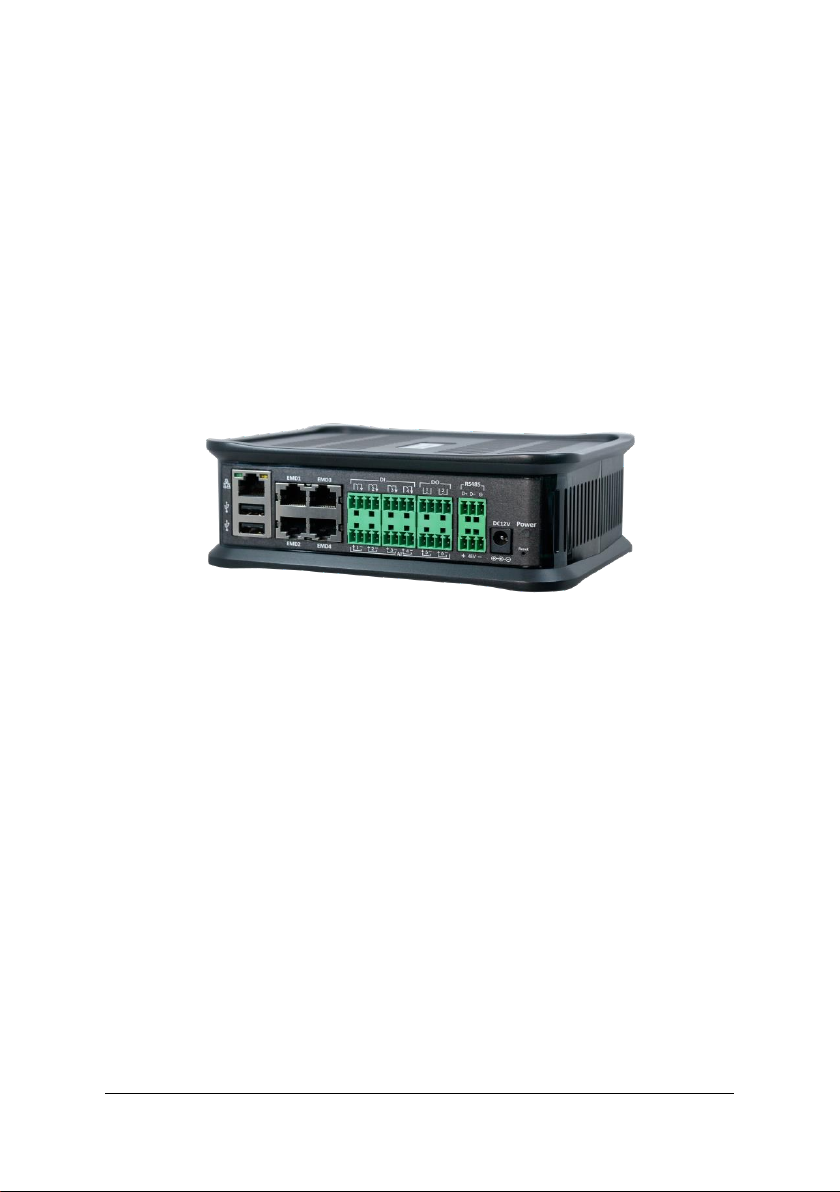
1.3 Front View.................................................................................... 8
1.4 Rear View.....................................................................................8
2Installation ..................................................................................9
3Managing interSeptor Pro-XP via Web Browser...........................10
3.1 Initial Configuration ...................................................................10
4Device Monitoring .....................................................................12
4.1 Comprehensive View –Dashboard.............................................12
4.2 Detail Information......................................................................13
4.3 Identification..............................................................................14
4A Device Management..................................................................15
4A.1 Device Configuration..................................................................15
4A.2 Schedule of Device.....................................................................23
5General Settings.........................................................................25
5.1 System Configuration.................................................................25
5.1.1 Preference .........................................................................25
5.1.2 Web Setting....................................................................... 27
5.1.3 Upload and Download ......................................................27
5.2 Network Setting .........................................................................28
5.3 Event Notification ......................................................................30
5.4 Authentication Configuration ....................................................33
5.5 Protocol Setting..........................................................................35

Table of Contents
5
5.6 MODBUS Setting ........................................................................39
6Alert & Logs ...............................................................................39
6.1 Alert Table..................................................................................39
6.2 System/Sensors Event Log .........................................................40
6.3 History Log .................................................................................40
6.4 Clear & Save Log.........................................................................41
7Advance
7.1 Multi-Language Setup................................................................41
7.2 Wireless Configuration...............................................................43
7.3 SMS Configuration .....................................................................44
7.4 Detail Configuration...................................................................46
8External Links.............................................................................47
9Technical Specification ...............................................................48

interSeptor Pro-XP
6
1Introduction
The interSeptor Pro-XP is an advanced Environmental Monitoring
System designed to monitors various sensors, such as temperature/
humidity, water leak, smoke, security, power, etc. and provide alerts
should problems be detected.
1.1 interSeptor Pro-XP Features
•Monitor up to 32 x Temperature/Humidity Sensors (4 x 8,
daisy-chained)
•Monitor up to 68 x Go-Probe Alarm Sensors (water, smoke,
security, power, etc.)
•Monitor up to 6 x Analogue Sensors
•Monitor up to 4 additional Dry-Contact Sensors
•2 x Digital Outputs for Alarm Beacon, etc.
•Monitoring via web browser, SNMP, Modbus
•Email Alerts
•Syslog Alerts
•SNMP Traps
•Optional GSM modem for SMS alerts (SIM card required)
•Event Logs
•Export/Import configuration facility
•Supports both Modbus RTU and TCP/IP
•RADIUS Authentication
•TLS 1.2 Support
•DHCP/BOOTP
•Alerting ‘Matrix’
•Mobile-friendly web user interface
•DIN Rail Mounting to facilitate space saving and ease of
installation

7
1.2 Package Contents
interSeptor Pro-XP
Temperature/Humidity Sensors x 2
12V/2A DC power adapter
RJ45 to RJ45 male cable *2 for T/H
connection to the Pro-XP
Terrminal Block connector
6 x 4pin / 2 x 3pin
Quick Installation Guide

interSeptor Pro-XP
8
1.3 Front View
Figure 1-1 interSeptor Pro-XP front view
1.4 Rear View
Figure 1-2 interSeptor Pro-XP rear view
Note: You can use a screw with the following size to fix the
DIN Rail Mounting Kit: M3x0.5 , length: 6~8mm

9
2Installation
Please refer to your QUICK INSTALLATION GUIDE for the initial set-
up instructions for your interSeptor Pro-XP
2.1 Powering the interSeptor Pro-XP
Connect the power connector
Note: You can select to use either the power adapter or
the 48V DC power source to supply power to the
interSeptor Pro-XP.
Upon successful connection, you can configure the interSeptor Pro-XP
via the web browser from any workstation connected to the same
network of the interSeptor Pro-XP. For further details, please refer to
Chapter 3.

interSeptor Pro-XP
10
3Managing interSeptor Pro-XP via Web
Browser
3.1 Initial Configuration
1. Select “Network setting” from “General Settings”of the main
menu to setup the network configuration parameters.
2. Login to become Administrator (default Username: iStry3 ;
Password: admin)
3. Enter the inSentry3 IP address.
4. Enter the inSentry3 Gateway Address in the network.
5. Enter the inSentry3 Subnet Mask of the network.
6. Click “Apply” to save the settings.
7. Enter “Date and Time” from General Settings > System
Configuration> Preferences and enter the appropriate date and
time information in the specified format.
Tabla de contenidos
Manuales populares de Hardware de red de otras marcas

Matrix Switch Corporation
Matrix Switch Corporation MSC-HD161DEL Manual de usuario

B&B Electronics
B&B Electronics ZXT9-IO-222R2 Manual de usuario

Yudor
Yudor YDS-16 Manual de usuario

D-Link
D-Link ShareCenter DNS-320L Manual de usuario

Samsung
Samsung ES1642dc Instrucciones de uso

Honeywell Home
Honeywell Home LTEM-PV Instrucciones de montaje


