IVT SNWB-163-RC Manual de usuario
www.ivt-ht.com | tools for every use
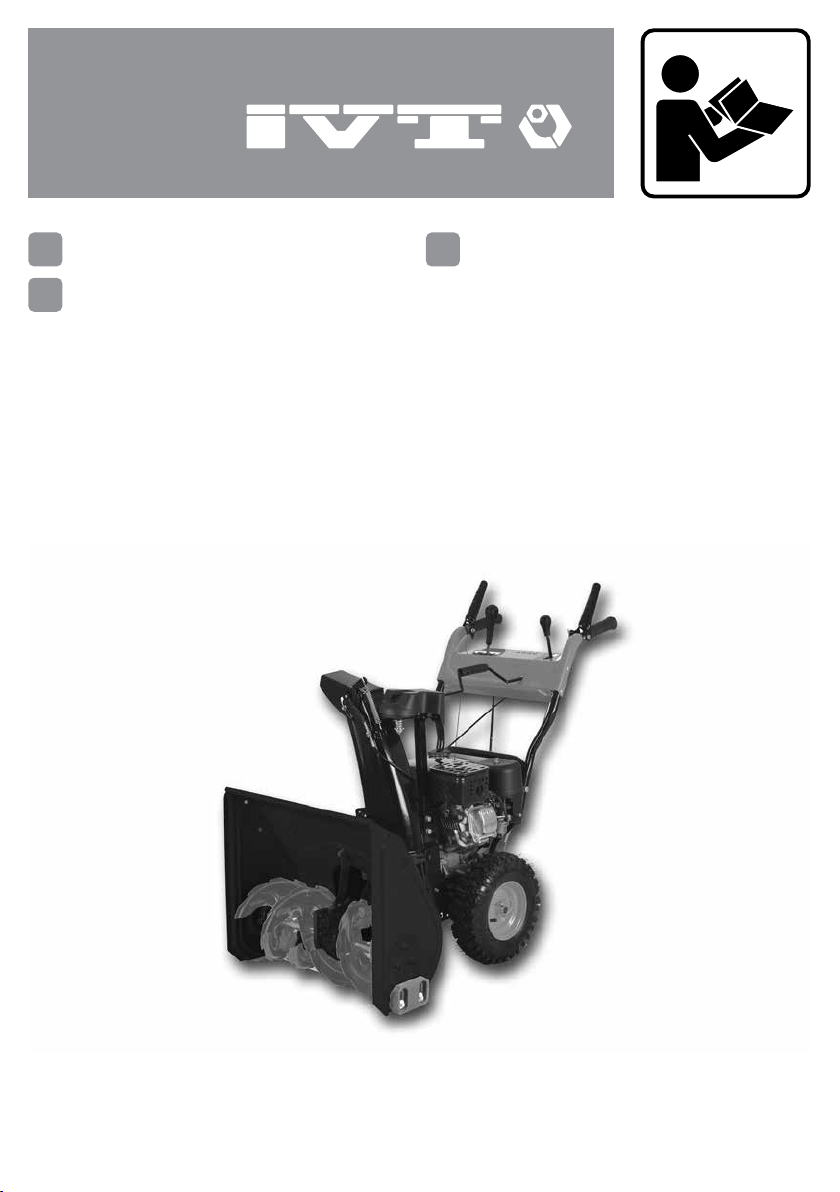
SNWB-163-RC
EN Snow blower
RU Снегоочиститель
KZ Қар тазалағыш машина

2
EN CONGRATULATION!
Dear customer,
IVT team would like to thank you for your choice and for
the condence you put in our product.
Our aim is always to offer an innovative, high-class-
strong and prize-adequate product to the customer.
We wish you’ll get much satisfaction from all your do-it-
yourself activities, by using this tool.
Your IVT Swiss SA Team
NOTE: Illustrations, gures, photos and contents might
vary slightly due to our program of continuous product
improvements.
RU ПОЗДРАВЛЯЕМ!
Уважаемый Покупатель,
Коллектив компании IVT благодарит вас за оказанное
доверие и выбор в пользу нашей продукции.
Мы стремимся к тому, чтобы у наших покупателей
была возможность пользоваться только
современными, прочными и высококачественными
продуктами.
Надеемся, что с нашими инструментами вы получите
истинное удовольствие от работы.
С уважением, коллектив IVT Swiss SA
ПРИМЕЧАНИЕ: Рисунки, количественные
данные, фотографии и содержание инструкции
могут изменяться в силу постоянного
усовершенствования нашей продукции.
KZ ҚҰТТЫҚТАЙМЫЗ!
Құрметті сатып алушы,
IVT компаниясының ұжымы Сізге бізге сенім
артқаныңыз үшін және біздің өнімімізді таңдағаныңыз
үшін алғыс білдіреді.
Біз Сіздерге инновациялық, жоғарғы классты және
жоғары сапалы өнімді тиімді бағамен ұсынуға үнемі
ұмтылып келеміз.
Біздің құралдарыңызбен сіз өз жұмысыңыздан
рахаттанасыз деп үміттенеміз.
Ізгі ниетпен, IVT Swiss SA ұжымы
ЕСКЕРТУ: Суреттер, сандық мәліметтер және
нұсқаудың мазмұны біздің өнімнің үздіксіз жетілуіне
байланысты өзгеруі мүмкін.

3
4
710 6 2 4 111
3
5
89
SNWB-163-RC
5
2
2
11
7
6
[F1]
[F2]
[F3] [F4]

6
EN
Instruction manual
TOOL SPECIFICATIONS
Model SNWB-163-RC
Rated power [W] 3200
Engine power [HP] 5.5
No-load speed [RPM] 3600
Displacement [cc] 163
N° of cylinders 1
N° of strokes 4
Type of engine cooling air-cooled
Employed fuel unleaded gasoline
Fuel tank capacity [L] 3.6
Fuel consumption [g/kWh] 380
Starting system recoil starter
Driving mode self-propelled
Engine manufacturer Zongshen
Clearing width [mm] 535
Intake height [mm] 510
Throwing distance [m] 11
Throwing operation remote control
Throwing direction [°] 190
Numbers of gears 4 forward / 1 reverse
Adjustable snow deection [°] 50
Vibration level [m/s2]8.199 (K=1.5)
Sound pressure level [dB(A)] 91.7 (K=3)
Sound power level [dB(A)] 107 (K=3)
Weight [Kg] 54
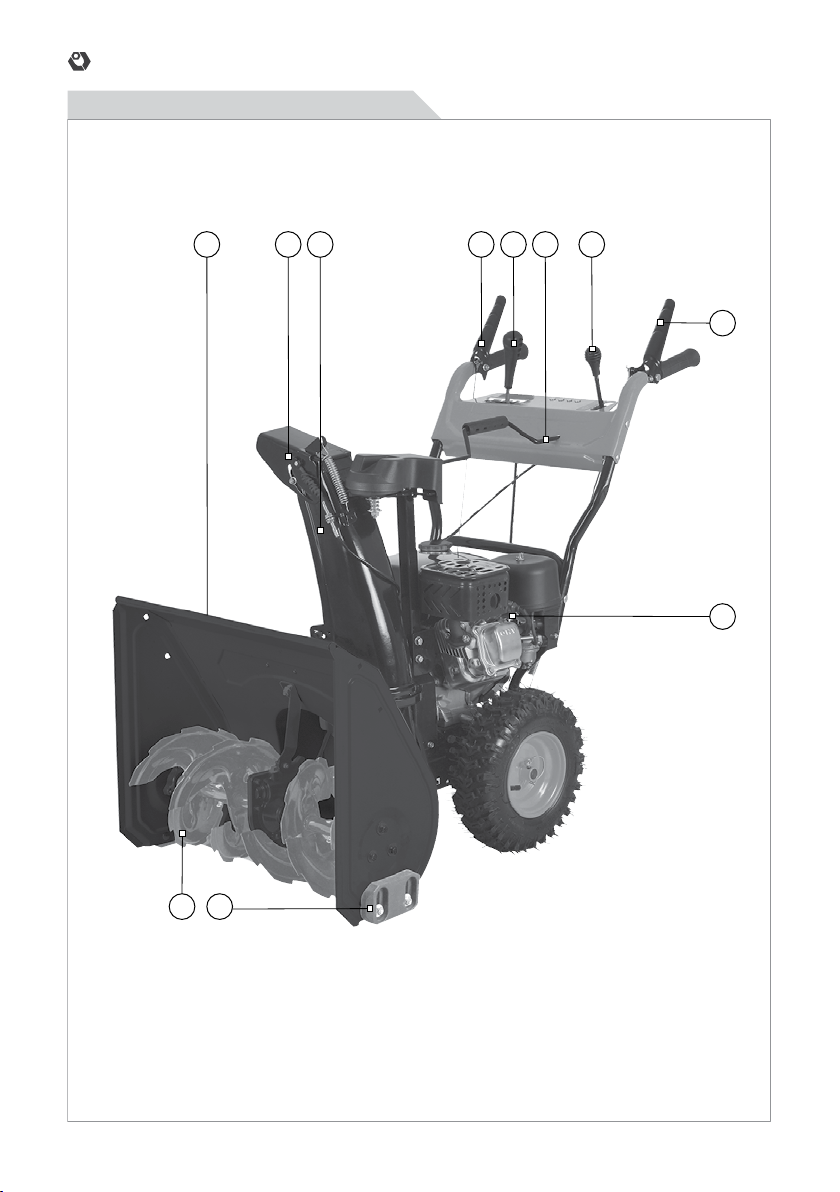
PART LIST
1. Drive control
2. Shift lever
3. Auger control
4. Chute directional control
5. Engine
6. Discharge chute
7. Chute deector
8. Skid shoe
9. Auger
10. Clean-out tool
11. Chute deector control
CONTENT OF THE BOX
Instruction manual (1 pc), dashboard (1 pc), discharge
chute (1 pc), chute deector (1 pc), chute connecting
rod (1 pc), handles (2 pc), hardware assortment.
INTENDED USE
This tool is intended for sweeping the snow from paths
and streets.
SAFETY REGULATION FOR THE USE
General safety rules
The following listed safety instructions should serve you
for the right use of the tool and for the protection of your
own safety, therefore, please read this very carefully.
When passing this tool to a third person, these
instructions must be handed too.
Retain this user’s manual and all other literature
supplied with your tool for any future reference.
Comply with all the safety information and the warnings
on the tool.
Be familiar with the controls and the proper use of the
tool before attempting to use it and above all, make sure
you know how to stop to use it in case of emergency.
Following these simple instructions will also maintain

7
EN
Instruction manual
your tool in good working order.
∙The tool must be assembled correctly before use.
∙Only use the tool for its designed purposes.
∙On the tool, there may be also decals and further
indications about the safety equipment to use that
must be considered. The prevention of accidents is
dependent upon the awareness, common sense and
proper training of everyone involved in the operation,
transport, maintenance and storage of the tool.
∙Never leave the tool unattended.
∙Never allow children to use the tool. Children
should be supervised to ensure that they do not play
with the tool.
∙Keep children and pets away. All onlookers should
be kept at a safe distance away from the tool when it
is in use.
∙The user is responsible for third parties while
working with the tool.
∙People who aren’t acquainted with the operating
instructions, children, juveniles who have not yet
reached the minimum age for using this tool and people
under the inuence of alcohol, drugs or medication
are not allowed to use the tool. Local regulations may
restrict the age of the operator.
WARNING! The consumption of
alcohol, medication and drugs, plus
states of illness, fever and fatigue will
affect your ability to react. Do not use
this tool in any of these situations.
∙Make sure that all the protective devices (if present)
are tted and are in good condition.
∙Never operate the tool with defective safety devices
or guards (if present), or without safety devices in place.
∙Inspect the entire tool to look for loose parts (e.g.
nuts, bolts, screws, etc.) and for any damage. Check
at frequent intervals if screws and bolts (if present)
are properly tight to be sure the equipment is in safe
working condition. Repair or replace them, if necessary,
before using the tool. Serious injury to the operator and
to the bystanders could result if there’s any damage to
the tool.
∙While using the tool, dress properly. Do not
wear loose clothing or jewelery that could become
caught by the tool. Wear suitable working clothes. It is
recommended that legs and feet are covered, to protect
them from eventual ying debris. Do not work barefoot
or wearing open sandals. Long air should be tided back.
∙Keep handles and grips dry, clean and free from
oil and grease.
∙Use proper protective equipment. Use safety
glasses and safety gloves. Also use a dust mask during
pulverulent operations or if exhaust gases are present.
When necessary, use also non-slipping boots or shoes,
hardhat and earplugs. If the noise level exceeds 85
dB(A), ear protection is obligatory.
WARNING! Use personal protective
equipment! Safety devices and
personal protective equipment protect
your own health and the health of
others and ensure a trouble-free
operation of the tool.
∙Do not start to use the tool if it is in an inverted
position or it is not in the right working order.
∙Ensure that you have a good stand, while you
operate with the tool. Keep proper footing and balance
at all times.
∙Keep work area clean. Cluttered areas invite
injuries. Before use, all foreign bodies must be removed
from the working area, also pay attention to foreign
objects during operation.
∙Do not force the tool.
∙Only work in daylight or sufciently good articial
light. Never operate the tool without good visibility.
∙Be careful not to drop the tool or hit it against
obstacles.
ATTENTION! Stay alert. Watch what you are doing.
Distraction can cause you to lose control. Use
common sense.
Gasoline engine safety rules
WARNING! Petrol is highly ammable.
Handle fuel with care.
∙Store fuel in containers specically designed for
this purpose.
∙Refuel outdoors only and do not smoke while doing
this operation.
∙Add fuel before starting the engine.
∙Always allow mufer to cool before lling fuel tank.
∙Never remove the cap of the fuel tank or add fuel
while the engine is running or when the engine is still
hot.
∙If petrol is spilled, do not attempt to start the engine,
but move the machine away from the area of spillage
and avoid creating any source of ignition until petrol
fumes have dissipated.
∙Clean up spilled fuel before restarting.
∙Replace all fuel tanks and container caps securely.
∙Do not run the engine indoor or in a conned space:
dangerous carbon monoxide fumes can collect. Exhaust
fumes are dangerous.

8
EN
Instruction manual
WARNING! Exhaust contains
poisonous carbon monoxide, a
colourless and odourless gas.
Breathing exhaust can cause loss of
consciousness and may lead to death.
Provide an adequate ventilation to
keep exhaust gas level as low as
possible.
∙Never store the equipment with fuel in the tank
inside a building where fumes can reach an open ame
or spark.
∙To reduce re hazard, keep the engine, silencer,
battery compartment and petrol storage area free of
vegetative material and excessive grease.
∙The exhaust system gets hot enough to ignite
some materials. Keep ammable materials away from
the device.
∙The mufer becomes very hot during operation and
remains hot for a while after stopping the engine. Be
careful not to touch the mufer while it is hot. Let the
engine cool before storing the machine indoors.
∙Remove adjusting keys or wrenches before starting
the machine.
WARNING! During the use of certain
gasoline tools, some dust containing
chemicals known to cause cancer,
may occur.
Some of these chemicals are: lead from lead based
paints, crystalline silica from bricks and cement and
other masonry products, arsenic and chromium from
chemically treated lumber and other dangerous
products. If dust is present, your risk from these
exposures varies, depending on how often you do this
type of work.
To reduce your exposure to these chemicals, any
time you do pulverulent operations, work in a well
ventilated area and work with approved safety
equipment, such as dust masks that are specially
designed to lter out microscopic particles.
∙If the machine strikes a foreign body, examine the
device for signs of damage and carry out any necessary
repairs before restarting and continuing to work.
∙If the machine starts to vibrate abnormally, switch
off the motor and check for the cause immediately.
Vibration is generally a warning of trouble.
∙Always turn off the machine and wait until the
machine completely stops whenever you leave
the machine, before carrying out maintenance,
before changing accessories, checking, cleaning,
troubleshooting or working on the machine.
∙It is forbidden to move or modify any of the internal
parts of the machine.
Specic safety rules
CAUTION! This machine is capable
of amputating hands and feet and
throwing objects. Failure to observe
the following safety instruction could
result in serious injury or death.
Training
∙Thrown objects can cause serious personal injury.
Plan your snow-throwing pattern to avoid discharge of
material toward roads and bystanders.
∙Keep bystanders, helpers and pets at least 20
meters from the machine while it is in operation. Stop
machine if anyone enters the area.
∙Exercise caution to avoid slipping or falling,
especially when operating in reverse mode.
Preparation
∙Thoroughly inspect the area where the equipment
is to be used. Remove all doormats, newspapers, sleds,
wires and other foreign objects, which could be tripped
over or thrown by the auger.
∙Disengage all clutch levers before starting the
engine.
Operation
∙Never attempt to make any adjustments
while engine is running, except where specically
recommended in the operator’s manual.
∙Let engine and machine adjust to outdoor
temperature before starting to clear snow.
∙Do not put hands or feet near rotating parts, in
the auger housing or chute assembly. Contact with the
rotating parts can amputate hands and feet.
∙The auger control is a safety device. Never bypass
its operation. Doing so makes the machine unsafe and
may cause personal injury.
∙The controls must operate easily in both directions
and automatically return to the disengaged position
when released.
∙Never operate with a missing or damaged chute
assembly. Keep all safety devices in place and working.
∙Exercise extreme caution when operating on or
crossing gravel surface. Stay alert for hidden hazards
or trafc.
∙Exercise caution when changing direction and
while operating on slopes.
∙Plan your snow-throwing pattern to avoid discharge
towards windows, walls, cars etc. Thus avoiding
possible property damage or personal injuiry caused by
a ricochet.

9
EN
Instruction manual
∙Never direct discharge at children, bystanders and
pets or allow anyone in front of the machine.
∙Do not overload machine capacity by attempting to
clear snow at too fast of a rate.
∙Always be sure of your footing and keep a rm hold
on the handles. Walk, never run.
∙Disengage power to the auger when transporting
or not in use.
∙Never operate machine at high transport speeds on
slipper surface. Look down and behind and use care
when in reverse.
∙If the machine should start to vibrate abnormally,
stop the engine, disconnect the spark plug wire and
ground it against the engine. Inspect thoroughly for
damage.
∙Disengage all controls and stop engine before
you leave the operating position (behind the handles).
Wait until the auger comes to a complete stop before
unclogging the chute assembly, making any adjustments
or inspections.
∙Never touch a hot engine or mufer.
∙Only operate the controls while the engine is
running.
∙Never put your hand in the discharge or collector
openings. Always use the clean-out tool provided to
unclog the discharge opening. Do not unclog chute
assembly while engine is running. Shut off engine
and remain behind handles until all moving parts have
stopped before unclogging.
UNPACKING
When unpacking, check to make sure that all
components are included. Refer to the drawings on this
manual. If any parts are missing or broken, please call
an IVT assistance center.
CONTROL EXPLANATION
Drive control (1)
The drive control is located on the right handle. Squeeze
the drive control to engage the wheel drive. Release to
stop.
Shift lever (2)
The shift lever is used to determine both ground speed
and direction of travel. It can be moved into different
positions.
∙Forward: your machine has some forward speeds,
with position number one being the slowest speed.
∙Reverse: your machine has some reverse speeds,
with position number one being the slowest speed.
WARNING! Always release drive
control before changing speeds.
Auger control (3)
The auger control (3) is located on the left handle.
Squeeze the auger control (3) to engage the augers (9).
Release to stop the snow throwing action (drive control
must also be released).
Chute directional control (4) and chute deector
control (11)
The chute direction control (4) is located before the
panel of the snow blower, while chute deector control
(11) is located on the panel.
∙Rotate the chute directional control (4) right or left
to change the direction of snow out.
∙Move the chute deector control (11) back and front
to adjust the distance of snow throwing.
Skid shoe (8)
The space between the shave plate and the ground can
be adjusted by positioning the skid shoes (8).
Clean-out tool (10)
Clean-out tool (10) helps you to clean out the clogged
chute assembly, never use your hands.
Shut off the engine (5) and remain behind handles until
all moving parts have stopped before unclogging.
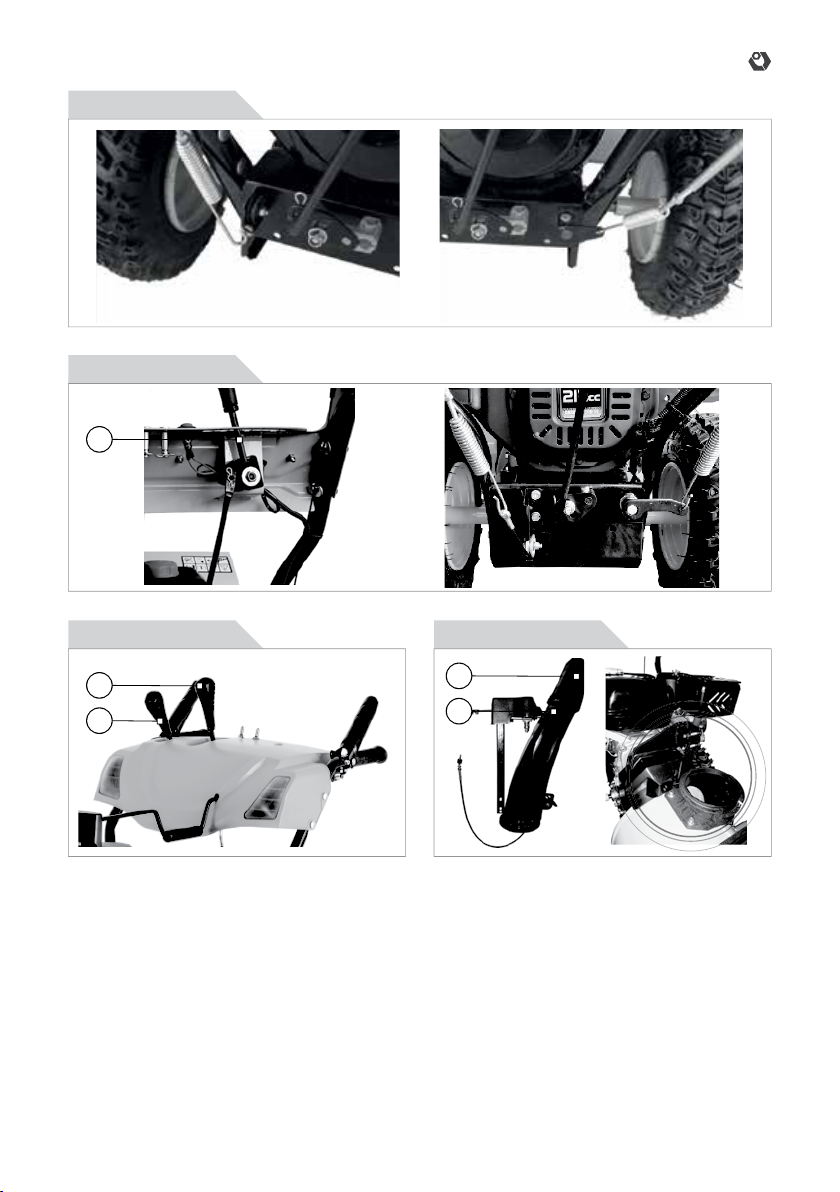
ASSEMBLY INSTRUCTIONS
Drive and auger control cable assembling [F1]
∙Connect the moving control cable and auger control
cable to the right opening.
Dashboard assembling
∙Put the dashboard to the lower handle of the
machine, and assemble them together with the bolts.
Shift lever (2) assembling [F2]
∙Pull out the shift lever (2) out from the dashboard.
∙Insert the angle side of shift lever (2) into the hole
on the lever to connect it to the transmission, and secure
it in place with the B pin.
∙Bring the other side of the shift lever (2) to the hole
on the bottom part of the gear lever and secure it in
place with the B pin.
Control handles assembling [F3]
∙Assemble the control handles to the panel. Bigger
one for shift lever (2) and smaller one for chute deector
control (11).
10
EN
Instruction manual
Discharge chute (6) assembling [F4]
∙Put discharge chute (6) to the machine, let chute
end to the right position on chute seat. Make sure the
chute support bar is inserted into the seat.
∙Fix the chute support bar to the seat by two bolts
and nuts.
∙Insert the chute connecting rod end to the hole in
the panel, then connect the other end with the chute. Fix
them with bolts.
∙See chute deector control cable’s end. Release
the two nuts on the cable end. Then screw tight the two
nuts on the cable to x it in the panel.
PRE-OPERATION CHECK
WARNING! Before using your
machine for the rst time, be sure
that it is properly assembled. Check
that all parts are properly attached
and undamaged. If you are unsure
about the assembly or condition of
any of your machine parts, please call
customer service. Check that all parts
are attached and undamaged. Check
that all fasteners are tight.
∙Check engine oil level with machine on level ground
and add gasoline
∙Keep the area of operation free from foreign objects
that can be thrown by the auger (9) and or impeller
blades. Perform a thorough inspection of the area since
some objects may be hidden from view by surrounding
snow.
Wheel control
Before each use of your machine, check the wheel
pressure.
Over-inating could cause a wheel to burst and
cause severe bodily injury. The pressure can be
checked using an ordinary wheel pressure gauge.
Fill the wheels using a portable air compressor or
other compressed air source.
CAUTION! DO NOT OVER-INFLATE
THE WHEELS.
STARTING/STOPPING THE ENGINE (5)
Starting the engine (5) (a cold engine)
1. Turn the fuel valve lever to the ‘open’ position.
2. Turn the On/Off switch to the ON position (or insert
key into ignition switch if provided).
3. Place the throttle lever on ‘run position’ ( ).
4. Fully move the choke lever to ‘closed position’ (
), if the engine (5) is cold.
5. Push the primer pump (if present) repeatedly few
minutes to prime the machine (ATTENTION! Avoid over
priming!).
NOTE: Do not use primer pump to start a warm engine.
6. Grasp the recoil starter handle and pull rope out
slowly until it pulls slightly harder. Let rope rewind
slowly. Pull recoil starter handle rapidly. Do not allow
the handle to snap back. Allow it to rewind slowly while
keeping a rm hold on the recoil starter handle.
7. As the engine starts and begins to operate evenly,
slowly move the choke control back to ‘open position’
( ) slowly. Allow a brief warm-up until engine runs
smoothly.
Stopping the engine (5)
When nished using your machine, perform the
following steps to shut it down.
1. Run the engine (5) for a few minutes to help dry off
any moisture on the engine (5). Stop the auger (9) by
releasing the left control handle.
2. Place the throttle lever on ‘slow position’ ( )
3. Set the engine (5) switch to the OFF position
(remove the ignition key if provided). This will stop the
engine (5).
4. Move the fuel valve lever to the OFF position.
5. Remove snow from the machine surfaces.
WARNING! Never store your machine
for extended periods of time with fuel
in the tank. Fuel stabilizer can be
added to the fuel to extend its shelf
life for storage.
OPERATING INSTRUCTIONS
∙Start your clearing path by throwing snow in a back
and forth motion. To clear in the opposite direction,
stop your machine and pivot it on its wheels to face the
opposite direction. Make sure to overlap clearing paths.
∙If the machine hits an obstruction or picks up a
foreign object during use, stop the motor, remove the
obstruction, and inspect it for damage. Repair or replace
any damaged parts before restarting and operating with
machine.
∙Determine the direction of the wind. If possible,
move in the same direction as the wind so that the snow
is not thrown against the wind, back into your face and
on the just cleared path.
∙Do not walk in front of your running machine.
∙Do not direct discharged snow towards bystanders.
∙Do not apply additional man-made load to the
engine since this may damage the engine.
Tabla de contenidos
Idiomas:
Otros manuales de Soplador de nieve de IVT


 Manual de usuario")


