iStarUSA WL-21701 Instrucciones de montaje

WL-21701/21708/21716 User Reference Manual
Revision 1.3 (080717)

2
L
LC
CD
DK
Ke
ey
yb
bo
oa
ar
rd
dD
Dr
ra
aw
we
er
rS
Sp
pe
ec
ci
if
fi
ic
ca
at
ti
io
on
nf
fo
or
r
Chassis
External Chassis
Industrial Metal Frame
Display
LCD
17”, 19" Diagonal
Resolution
1280 x 1024
Color
16M colors
Brightness
300 Nits
Contrast
500:1
Viewing Angle
160 H, 160 V
Protection
Tempered Glass
KVM Switch
Ports
1 port (WL-21701), 8 ports (WL-21708), and
16 ports, (WL-21716)
Video Signal
VGA D-Sub 15
Keyboard Signal
USB (WL-21701), PS/2 or USB Combo
Mouse Signal
Control Button
Port Switch
LCD Control
4x
Power
1x Front Standby, 1x Rear Main
Operating system
OS
DOS/Windows/Netware
SCO/Linux/HP Unix/Solaris
Input Peripheral
Keyboard
105 Key Cherry Switch Keyboard
*Optional 117-Key for Sun System
Pointing Device
Integrated TouchPad
Pointing Device Button
2x Button
*Optional 3x Button for Sun System
Environmental Specification for WL-21701/21708/21716
Environmental
Specification
Operating Temp
0° C - 50° C
Relative Humidity
20-80% (non-condensing)
Shock
10G operating, all axes
Vibration
1.25G @ 10-100Hz operating, all axes
Compliance
CE & FCC Class-A
Safety
UL
Power
Power supply
50W 110VAC ~ 220VAC Auto Switching
Dimensions
H
44mm
W
442.4mm
D
600mm
Weight
Net weight
30.5LB (Chassis Weight)
Transport Case
Packaging
Padded foam with box
WL-21701/21708/21716
WL-21701/21708/21716
(WL-21708 and WL-21716)
1x (WL-21701), 8x (WL-21708), and 16x
(WL-21716)

Rack Dense Chassis Solution
The integration of data and video, and voice communication in computers and the
subsequent technological advances have spawn many sophisticated CTI applications that
have become accessible and affordable to the small and mid-sized business. The
increasing CTI applications coupled with the growing demand for corresponding hardware
and systems have created a dilemma: How does one pack the growing number of
equipment into existing space.
1U slim industrial monitor keyboard, the WL Series, is the solution for compacting more
computing power into limited space. This revolutionary monitor keyboard combines a
spectacular display coupled with a keyboard with built-in pointing device in a compact unit
that measures only 1U in height. Occupying a fraction of the space of traditional monitor
and keyboard units, the installation of the WL Series leaves ample space for other critical
components. With built-in analog-to-digital conversion board, the WL Series can be connected
to any standard VGA graphics card for immediate on-screen display. The monitor
keyboard unit has a built-in slide rail and mounts easily onto any 19" rack mount cabinet.
Instant Setup
Setting up is no hassle. WL Series enables you to be up- and- running in minutes without
complicated setup. Our all-in-one design has integrated keyboard, mouse, and display into
a total package for your convenience.
LCD Display Information
The WL Series has built-in high resolution LCD screens. With our engineering advancement,
LCD can be tilted and retracted fully effortlessly. The WL Seriesis integrated with 17” or 19”
high brightness, high contrast and fast response LCD screen.
KVM Information
The WL-21701 is a single port USB keyboard/mouse connection for connecting to your
single server or existing KVM switch box. The WL-21708/21716comes with built in 8 ports or
16 ports KVM switch. It supports both PS/2 and USB keyboard/mouse connection without
having to deal with unwanted adapter. Simple cable solution will carry the VGA signal
without input device signal to help rid of unwanted mess. The KVM has integrated OSD
and hot key to help control and manage the switch connecting to multiple systems to better
productivity in a space saving solution.
OS Configuration
The WL-21701/21708/21716 will allow you to connect to multiple servers running on different
platforms and operating systems. The unit has integrated extra support function key and
extra mouse button to better accommodate a wider variety of needs . **Special optional
upgrade to allow 117 keys and 3 mouse button for Sun system OS specific.
1.0 Introduction

2.1 Insert the LCD Keyboard Drawer into the rack cabinet in the desired position.
2.2 Attach the 2x rear support bracket and extending into the proper length of the cabinet depth.
And secure the 2x bracket on each side with the supplied screw.
2.0 Installation/Operation Features of the EMP

2.3 Secure the rear and front rack mounting to properly mount and fix its position into the cabinet.
2.4 Connect the AC power cable into rear of the drawer unit.
2x

6
2.5 Connect the host cable to the rear of the drawer. For the WL-21701, USB type can be connected
to its single port. For WL-21708/21716 both PS/2 and USB type can be use with the KVM, just
choose the desire type to match with your system, the KVM accepts both..
Refer to Section 3
for further detail. (*WL-21708 Shown)
2.6 You can turn on the drawer unit main power on the back of the chassis.

2.7 To open the drawer, unscrew the 2 thumb screw on either side of the front of the unit and pull
drawer outward using the handle bar in the center of drawer.
2.8 Once the drawer is fully extended, lift up the LCD panel and tilt back, this will allow you to view
the LCD and access the keyboard/touchpad.

2.9 To turn on the power for the LCD panel, the power button located beneath the LCD can be
use to independently turn on/off. LCD screen adjustment button is also located here.
2.10 To return the drawer back to the unit, fold screen down and push in the 2 tap located on each
side of the rail then push the drawer back in.
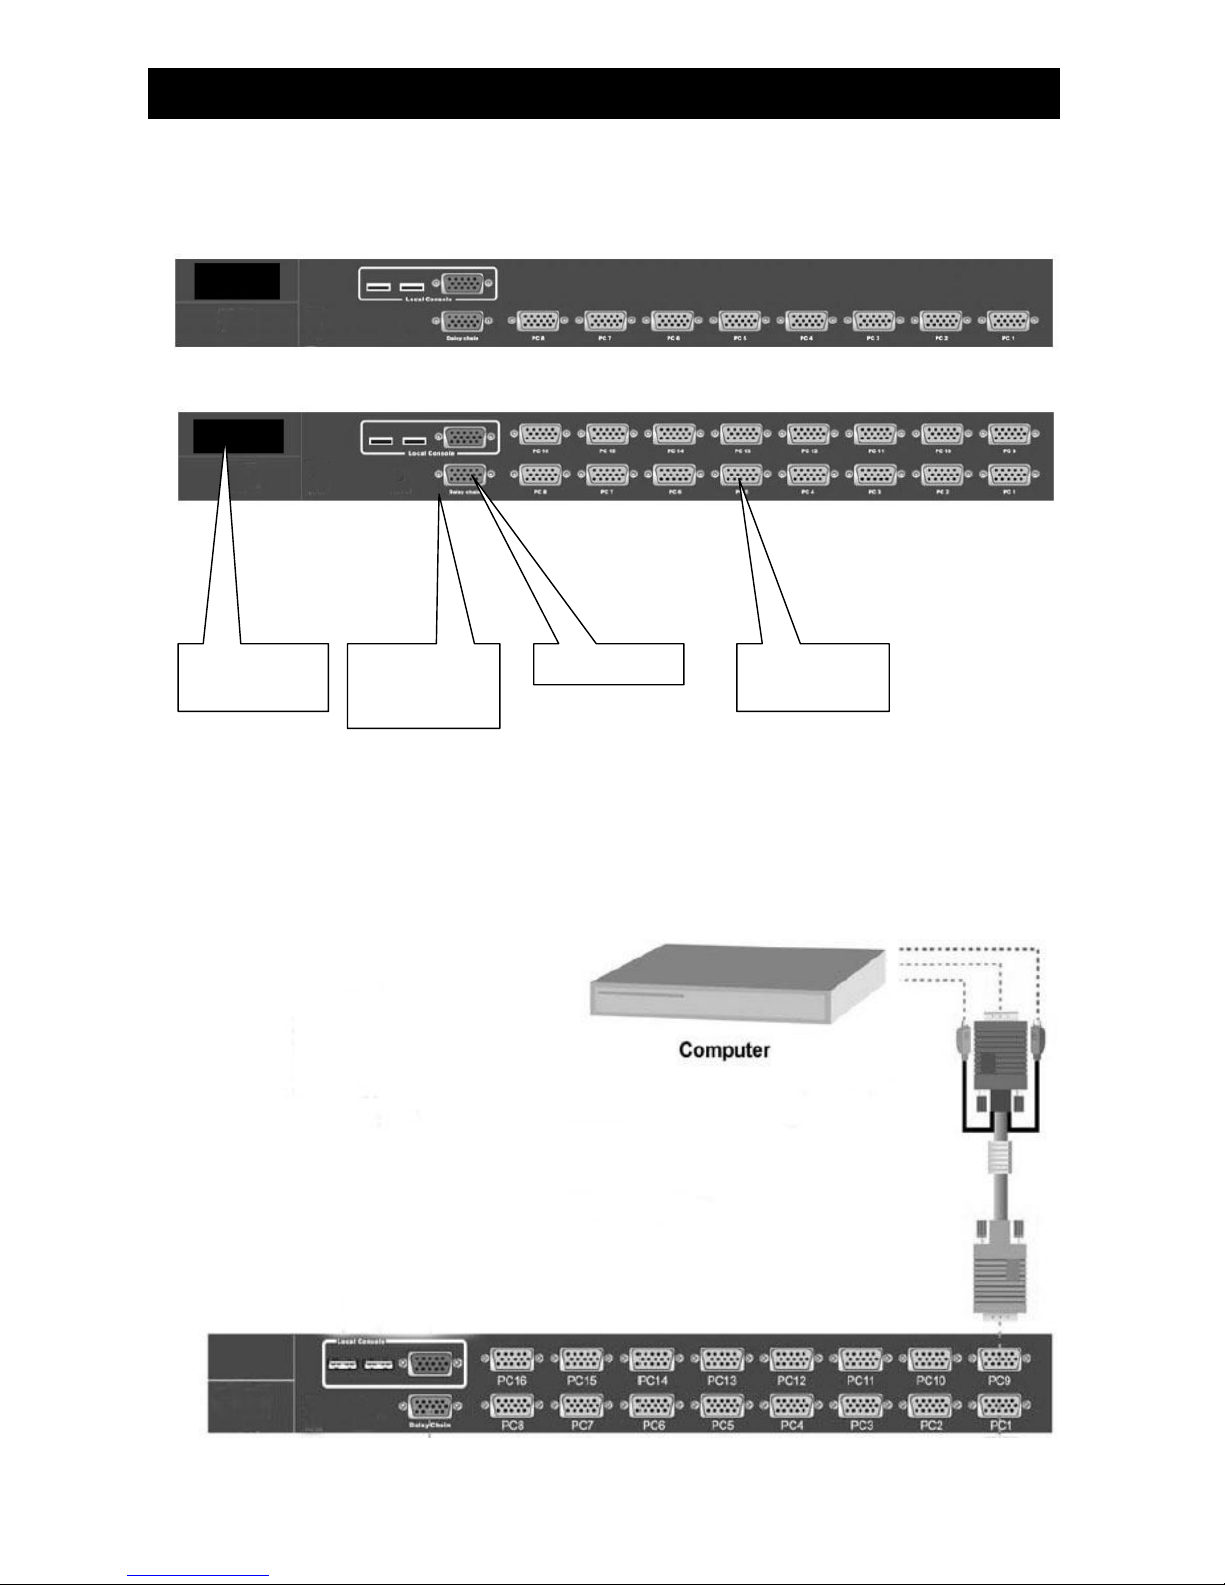
3.1 The rear section of the unit will have a series of connections for connecting to systems
8 Ports
16 Ports
3.2 Connecting KVM Ports for Host using PS/2 connection. Connect single ended D-Sub end to
KVM port and other end composing of VGA D-Sub, PS/2 Keyboard (Green) and PS/2 Mouse
(Purple) to corresponding ports on the system.
3.0 KVM Connection (WL- 21708/21716 Model Only)
AC Power
Plug
Daisy Chain
Local Console
Keyboard /
Mouse Port
KVM Ports for
Host

3.3 Connecting KVM Ports for Host using USB connection. Connect single ended D-Sub end to
KVM port and other end composing of VGA D-Sub and USB to corresponding ports on the
system.
3.4 You can connect a local console port to operate the KVM bypassing the built-in LCD and
keyboard/touchpad through the rear local console port. Connect the VGA D-Sub connector
and USB keyboard and USB mouse to the port marked.
Este manual sirve para los siguientes modelos
2
Tabla de contenidos
Manuales populares de Cajón de LCD de otras marcas

Acnodes
Acnodes KD 8228 Manual de usuario

Ameriwood
Ameriwood 9524328PCOM Manual de usuario

Kesseböhmer
Kesseböhmer TANDEM solo Manual de usuario

Crystal Image Technologies
Crystal Image Technologies RMD-151-A Series Manual de usuario

APW Wyott
APW Wyott Ease Extreme HDX-1-120 Manual de usuario

NTI
NTI RACKMUX-V17-N Manual de usuario


GRASS
GRASS DWD XP Manual de usuario

StarTech.com
StarTech.com DuraView RACKCONS1701 Manual de usuario

Fisher & Paykel
Fisher & Paykel IZONA CoolDrawer RB36S Manual de usuario

Synergy Global Technology
Synergy Global Technology LCD1U17-44 Manual de usuario

Fujitsu
Fujitsu RC25 Manual de usuario

Acnodes
Acnodes RK 1000B Manual de usuario