IROAD TR10 Manual de usuario

Read user manual carefully in order to protect
the user's safety and ensure the accurate use of the product.
IROAD TR10
USER GUIDE

BEFORE USING
USER INFORMATION
PRECAUTION
............................ 1
................................... 2~3
LCD MENU
LIVE SCREEN
MAIN SCREEN
PLAYBACK
CAMERA
TIME
SOUND
ADAS
EVENT
VOLTAGE
MEMORY
SECRET MODE
LCD
INFO
.................................. 17~18
..................................... 19
............................................ 20
............................................... 21
..................................................... 22
................................................. 23
.............................................. 24~25
............................................ 26~27
........................................ 28~29
.............................................. 30
..................................... 31
................................................ 32~33
..................................................... 34
DEDICATED PC VIEWER
DEDICATED PC VIEWER
LIST OF RECORDINGS &
FRONT/ REAR PALYBACK
BACKUP
SETTINGS
....................... 35
..................... 36
................................................ 37
............................................ 38
PRODUCT INFORMATION
PRODUCT OVERVIEW
PACKAGE COMPONENT
NAME OF EACH PART
SPECIFICATION
............................ 4
......................... 5
............................. 6
..................................... 7
SET UP
INSTALLATION
UNINTERRUPTED FUSE CABLE
................................... 8~9
........... 10
USING THE DEVICE
PRODUCT OPERATION
BUTTON SCENARIO
RECORDING MODE
VOICE GUIDANCE
VIDEO FOLDERS IN SD MEMORY CARD
FIRMWARE UPDATE
......................... 11
............................. 12
.............................. 13
................................. 14
. 15
............................. 16
TROUBLESHOOTING ... 39
INDEX

1. USER INFORMATION
THANK YOU FOR CHOOSING JAEWONCNC IROAD VEHICLE RECORDER.
User Manual includes the guidelines to manage your product properly. Please read the instructions carefully before using your product.
The Manual will guide you through on the instructions for the device.
The Manual is based on IROAD TR10 model. Please be informed that there might be some unintended errors.
Contents of the instructions might be modified without prior notice.
- Please visit our website at www.iroadkr.com
Global website address( Global - www.iroadkr.com / Singapore - www.iroad.sg / HongKong - www.iroad.hk / Malaysia - www.iroad.my )
- Please download the dedicated viewer, latest firmware and other product information from the IROAD website.
- JAEWONCNC is not responsible for any problem caused by illegal use of the product.
- Though this product records and saves footages in the event of accident, it does not guarantee every single accident scenes are fully recorded.
- If the impact on the vehicle is minor, the accident scene may not be recorded as the impact sensor is unable to detect minor ones.
- The recordings obtained from the product might be used as a proof of accident. However,
JAEWONCNC will not be responsible for any gain or loss caused by the accident.
GUARANTEE AND SUPPORTING
- The Manuall is legally protected by copyrights, all copyrights reserved to JAEWONCNC.
- The Manual is reserved by JAEWON CNC. No one is allowed to make an unauthorized duplication, revision and publication of this manual.
- IROAD is the trademark of JAEWON CNC. The JAEWON CNC has rights to IROAD (Name, Design, and Brand Image).
Any unauthorized use of IROAD is prohibited and is punishable by law.
COPYRIGHTS AND TRADEMARK

2. PRECAUTION
- Please make sure to use recommended / stable voltage only.
Otherwise, misuisng your product will cause the proudct error, fire accidents, explosion or damage to the vehicle.
- Do not arbitrarily disassemble and modify the product. Otherwise, it might cause damage of the product and electric shock.
It should be considered user's fault and void the warranty.
- Make sure that the power cable is not damanged when attaching other electronic gadgets on the vehicle,
otherwise it can cause product failure or danger of electric shock, and please use qualified power cable which is produced by JAEWON CNC.
- It is highly recommended not to arbitrarily connect the uninterrupted power cable to vehicle as it can cause malfunction of the product
by different conditions of vehicle and surrounding environments. (Please contact professional engineer if you need to install it)
VOLTAGE RELATED ISSUES
- Do not mount dash cam on where sight might be disturbed. It may cause an accident.
- Connect all the cables provided into right slots. That may be parts of the problem.
INSTALLATION
- Do not use dash cam while driving. Please park your vehicle in safe place for use
- Do not force a product or its lens because it may cause product malfunction.
- Keep the device away from flammable or explosive stuff causing explosion and fire.
- Do not cover the device with fabric or other tools. Malfucntion or fire would cause once it is overheated.
- When the device is used for too long, it may cause skin burns.
- The quality of image could deteriorate while the car is passing through tunnel or at very dark night with no light.
- Recording quality might be reduced by excessive tint.
- Image quality could deteriorate when the temperature of the device exceeds the optimal operating temperature.
THE RIGHT USE

3. PRECAUTION
- Please turn off the dash cam when exposed to direct sunlight or used for too long. Otherwise, malfunction or breakdown would occur.
- Please check whether the device is working before driving a car.
- Do not remove SD card or turn off the power cable during the firmware update. It may cause malfunction or loss of data.
MANAGEMENT
- There is the lifetime of memory card which is expendable.
Some errors could occur if the lifetime of memory card reached or being stayed in high temperature environment.
Periodic maintenance is required.
- The device must be turned off when inserting / removing memory card.
It may cause to lose data or malfunction of memory card if the memory card is removed or inserted during product.
- Keep memory card in case all the time when not in use.
- Please avoid places where are humid and very hot.
- Genuine IROAD memory card is recommended. Failure to use a genuine one may cause error or malfunction of product.
Memory card is expandable and the memory card's warranty is 6 month period.
(It may cause to reduce life cycle of memory card if using with constant power cable)
- Please regularly format the memory card twice a month for stability.
(Format function supported by a dedicated viewer is recommended.)
- Record files and TR10 program are only accessible in TR10. Any other files will be deleted to keep stability.
(Please use the SD card for the product only, otherwise it will be deleted.)
- It takes up to 5 minutes depending on the memory capacity to use SD Card.
Please do not remove the SD card while the device is running.
MEMORY CARD AND PRECAUTION

4. PRODUCT OVERVIEW
High Definition Vivid FHD
Front : Full HD 1920x1080p 30frames
Rear : Full HD 1920x1080p 30frames
3.5inch Touch LCD
3.5inch Touch Panel
Easy to use with GUI
SAFEGUARD for All Yours Safety
Automatic low voltage cutoff function is embedded
in the device for the safety of the car battery.
Uninterrupted Power
High Intensity Security LED
High intensity LED makes it possible to check
outside whether product is working.
Various Recording Modes
Automatic parking mode and motion detection function,
24 hours recording mode.
Night Vision
Record the brightest and the cleanest images
even in low light environments.
ADAS
Advanced Driver Assistance System
LDWS, FCWS, FVDW
Time Lapse -Long Parking Recording
Compressa the video while parking in a constant frame (1FPS),
Low capacity, Long Parking Recording
Hyper Lapse - Long Driving Recording
Compress the video while driving in a constant frame (1FPS),
Low capacity, Long Driving Recording
Dedicated PC Viewer
Playback recorded data,
set various functions on dedicated PC Viewer.
Voice Recording & Voice Guidance
High Quality Sound Recording
Clearer Voice Guidance by Built in Speaker
External GPS
Driving information through external GPS.
Time, Driving Path, Direction with recorded video.
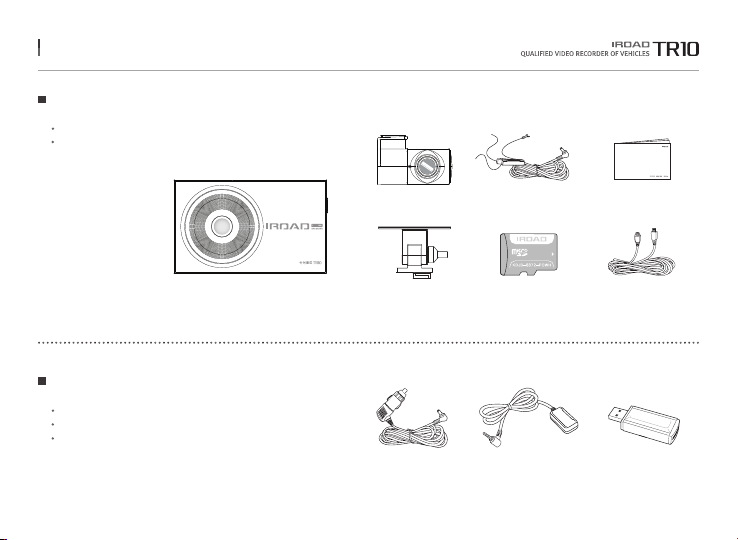
5. PACKAGE COMPONENT
Front Camera
Rear Camera Uninterrupted
Fuse Cable
IROAD Genuine
Micro SD
Rear Camera Cable
User Manual
All pictures shown are for illustration purpose only.
Actual product may vary due to product enhancement.
Users are able to purchase the optional components from IROAD website.
External GPS AntennaCigar Jack Power Cable
Cradle
Basic Components
Optional Components
SD Card Reader
All pictures shown are for illustration purpose only.
Actual product may vary due to product enhancement.
Read user manual carefully in order to protect
the user's safety and ensure the accurate use of the product.
IROAD TR10
USER GUIDE

6. NAME OF EACH PART
1Front Camera Lens
2Security LED
3Transparent Cradle
4Cradle Screws
53.5 inch Touch LCD
12 Rear Camera Cable Slot
13 Security LED
14 Rear Camera Lens
15 Transparent Cradle
11 Micro SD Card Slot
7Power Connector
8Rear Camera Cable Slot (V-IN)
9External GPS Connector
10 Power Button
6Power LED
11
10
12
3
1
2
15
13 14
78 9
5
6
4

7. SPECIFICATION
Model
Image Sensor
Resolution / Frame / Viewing Angle
LCD
ADAS
Audio Input
Video / Audio Compression
Vibration Sensor
External GPS Sensor
Capacity
Recoding Modes
Uninterrupted Power
Power Supply
Operating Temperature
LED
Viewer
IROAD TR10
2.0 Mega Pixel Image Sensor
Front : Full HD 1920x10800p 30fps, Rear : Full HD 1920x10800p 30fps / Front : 140˚, Rear : 135˚
3.5 inch Touch Panel
LDWS, FCWS, FVDW
Embedded MIC
H.264 / PCM
3-axis acceleration sensor (Start recording when it senses external impact)
Synched with Google map, Inform the location and travelling speed of the vehicle.
Micro SD 32GB~128GB
Driving / Event(Impact), Parking / Motion Detection, Time Lapse, Hyper Lapse
Low voltage cut off, overheating prevention is embedded.
DC 12V / 24V
-20 ~ 60˚c
Security LED embedded
IROAD PC Viewer : Windows 7/8/10 (32bit/64bit support)
The function is able to be changed for firmware upgrade or product enhancement without prior notice, please visit website regularly.

8. INSTALLATION
Use dry fabric to wipe out the spot
where the product will be attached on the windscreen.
Make sure to install the product on
where sight is not disturbed.
1. Use soft cloth to wipe out the spot where the product will be attached.
(Wipe out with soft cloth or tissue)
2. Attach product.
(Remove the protective film from the adhesive tape of front/rear camera)
3. Connect the cable of rear camera.
(Connect the rear camera cable V-IN slot)
Placing Cameras
Mounting a Cradle for Front Camera
Product Installation
Tuck a transparent cradle( ① ) into
the main body( ) and then push the cradle in.
1
2
1
2
The function is able to be changed for firmware upgrade or product enhancement without prior notice, please visit website regularly.
Tabla de contenidos
Otros manuales de Cámara de salpicadero de IROAD

IROAD
IROAD NX7 Manual de usuario

IROAD
IROAD V7 Manual de usuario

IROAD
IROAD X11 Manual de usuario

IROAD
IROAD X6 Manual de usuario

IROAD
IROAD QX2 Manual de usuario

IROAD
IROAD N9F Manual de usuario

IROAD
IROAD V9 Manual de usuario

IROAD
IROAD T8 Manual de usuario

IROAD
IROAD T10S2 Manual de usuario

IROAD
IROAD Q7 Manual de usuario


