Intex ZX100 Manual de usuario

(77IO) ZX100 AUTOMATIC POOL CLEANER ENGLISH SIZE: 4.875” X 7.25” PANTONE 295U 06/22/2022
77
A
English
IMPORTANT
SAFETY RULES
Read, understand, and follow
all instructions carefully before
installing and using this product.
Keep for future reference.
ZX100 Automatic
Pool Cleaner
Don’t forget to try these other fine Intex products:
pools, pool accessories, inflatable pools and in-home
toys, airbeds and boats available at fine retailers or
visit our website.
Due to a policy of continuous product improvement,
Intex reserves the right to change specifications and
appearance, which may result in updates to the
instruction manual without notice.
OWNER’S MANUAL
For illustrative purposes only.
©2022 Intex Marketing Ltd. - Intex Development Co. Ltd. - Intex Recreation
Corp. All rights reserved/Tous droits réservés/Todos los derechos reservados/
Alle Rechte vorbehalten. Printed in China/Imprimé en Chine/Impreso en China/
Gedruckt in China.
®™ Trademarks used in some countries of the world under license from/®™ Marques utilisées dans certains pays sous
licence de/Marcas registradas utilizadas en algunos países del mundo bajo licencia de/Warenzeichen verwendet in
einigen Ländern der Welt in Lizenz von/Intex Marketing Ltd. to/à/a/an Intex Development Co. Ltd., Hong Kong &
Intex Recreation Corp., P.O. Box 1440, Long Beach, CA 90801 • Distributed in the European Union by/Distribué dans
l’Union Européenne par/Distribuido en la unión Europea por/Vertrieb in der Europäischen Union durch/Intex Trading B.V.,
Ettenseweg 46, 4706 PB Roosendaal – The Netherlands • Distributed in the UK by Unitex Service (UK) Limited,
21 Holborn Viaduct, London EC1A 2DY, UK.
www.intexcorp.com 077-*A*-R0-2306

(77IO) ZX100 AUTOMATIC POOL CLEANER ENGLISH SIZE: 4.875” X 7.25” PANTONE 295U 06/22/2022
77
A
SAVE THESE INSTRUCTIONS
Page 2
Warnings................................................................................. 3
Parts Reference...................................................................... 4
Set Up Instructions................................................................ 5-10
Debris Net Cleaning............................................................... 11-12
Troubleshooting Guide.......................................................... 13-14
Long Term Storage................................................................ 15
General Aquatic Safety.......................................................... 15
Limited Warranty.................................................................... 16
TABLE OF CONTENTS

(77IO) ZX100 AUTOMATIC POOL CLEANER ENGLISH SIZE: 4.875” X 7.25” PANTONE 295U 06/22/2022
77
A
SAVE THESE INSTRUCTIONS
Page 3
WARNING
•TO REDUCE THE RISK OF INJURY, DO NOT PERMIT CHILDREN TO
USE THIS PRODUCT.
•REMOVE THE PRODUCT FROM THE POOL WHILE THE POOL IS
OCCUPIED OR IN USE.
• TURN OFF OR UNPLUG THE FILTER PUMP BEFORE ADJUSTING,
CLEANING OR SERVICING.
•REMOVE THE PRODUCT FROM THE POOL BEFORE PLACING A
POOL COVER OVER THE POOL.
•STORE THE PRODUCT AND ACCESSORIES IN A DRY AND SAFE
PLACE INDOORS.
• FOR POOL AND FILTER PUMP PROBLEMS REFER TO THEIR
RESPECTIVE OWNER'S MANUAL FOR ADVICE.
•
THIS DEVICE IS INTENDED TO BE USED ONLY FOR THE PURPOSES
DESCRIBED IN THE MANUAL.
FAILURE TO FOLLOW THESE WARNINGS MAY RESULT IN PROPERTY
DAMAGE, SERIOUS INJURY OR DEATH.
IMPORTANT SAFETY RULES
Read, Understand and Follow All Instructions Carefully
Before Installing and Using this Product.

(77IO) ZX100 AUTOMATIC POOL CLEANER ENGLISH SIZE: 4.875” X 7.25” PANTONE 295U 06/22/2022
77
A
SAVE THESE INSTRUCTIONS
Page 4
NOTE: Drawings for illustration purpose only. Actual product may vary. Not to scale.
REF. NO. DESCRIPTION QTY. SPARE PARTS NO.
1CLEANER TOP 1 13200
2 GEAR MODULE 1 13201
3 DEBRIS NET 1 13202
4 CLEANER BASE 1 13203
5 CAP SEAL O-RING 3 12861
6 MICRO-SCREEN 1 12860
7 PRESSURE RELEASE VALVE 1 13199
8 SWIVEL JOINT 1 13226
9HOSE COLLAR NUT 2 12863
10 HOSE 1 12862G
11 HOSE ELBOW 1 13227
12 BRUSH SUPPORT 2 13136
13
BRUSH (WITH 2 EXTRA) 4 13135
14 INLET CONNECTOR ADAPTOR 1 12486
PARTS REFERENCE
Before assembling your product, please take a few minutes to check the
contents and become familiar with all the parts.
1
5
2
3
4
12
13
89
6 5
7 11 9
10
5
14

(77IO) ZX100 AUTOMATIC POOL CLEANER ENGLISH SIZE: 4.875” X 7.25” PANTONE 295U 06/22/2022
77
A
SAVE THESE INSTRUCTIONS
Page 5
Please read, understand, and follow all instructions carefully before installing and
using this product.
General
The auto cleaner is designed to clean the pool as follow:
• The brushes from the auto cleaner remove the fine dirt from the floor.
• The fine sediments and debris on the floor are agitated by the auto cleaner
movement. This allows the filtration system to filter out the fine sediments
suspended in the water, while the auto cleaner pick up the heavy debris
on the floor.
• The movement of the auto cleaner around the pool prevents the water from
stagnating. Thus helping circulate the pool water through the filtration system.
IMPORTANT PREPARATION INFORMATION
SETUP INSTRUCTIONS
Dirt in the pool
• The Auto Cleaner operates from the pressure side of the pool water return
connector (water flowing from the filter pump to the pool). If the Auto Cleaner
is attached to the pool “outlet” (water flowing from the pool to the filter pump)
connector, it will not work.
• The Auto Cleaner will not work if there is an Intex Saltwater System or Ozone
Generator connected to the same water circulation line as the Auto Cleaner.
Disconnect these sanitation devices from the water circulation
line before
installing the Auto Cleaner. Once the Auto Cleaner has finished
cleaning the
pool, disconnect, remove the Auto Cleaner from the pool, reinstall and resume
the sanitation device operation.
(77IO) ZX100 AUTOMATIC POOL CLEANER ENGLISH SIZE: 4.875” X 7.25” PANTONE 295U 06/22/2022
77
A
SAVE THESE INSTRUCTIONS
Page 6
• The Auto Cleaner must be connected to an Intex filter pump with a system
flow rate between 1600 - 3500 gallons/hour (6056 - 13248 liters/hour). Not
suitable for non-Intex filter pumps.
• For Intex®above ground frame pools.
•
Up to 26 ft (7.92 m) round shape. Up to 18 ft (5.49 m) for Easy Set Pools.
•
Up to 32 ft x 16 ft (9.75 m x 4.88 m) rectangular/oval shape. Not suitable
for non-Intex pools.
• First assemble your filter pump and then set up the auto cleaner.
• If using a sand filter, ensure the sand media is clean by backwashing it first.
Run the sand filter pump for 10-15 minutes before connecting the auto cleaner
to the water return connector. If sand enters the auto cleaner, it may cause
damage to the gear module.
• The auto cleaner will not work if the filter pump is not operating.
• Operating pool water temperature requirement: 25~45 °C (77~113 °F).
Exceeding this range will reduce the performance and life expectancy of the
Auto Cleaner.
Before setup, make sure that:
•
The filter pump is turned off, and disconnect the power cord from the electrical
outlet.
• The pool is free from objects that will hinder the auto cleaner free movements
by removing the ladder, surface skimmer, water sprayer (if applicable), floats
or any other objects from the pool.
• The pool wall or floor are free from algae. Algae will
block the flow of water
into the cleaner and hinder the auto cleaner movement.
See your local pool
supply specialist for algae treatment solutions.
1. From inside of the pool, unscrew the nozzle from the water return connector.
See Fig. 1.
NOTE: The device operates from the pressure side of the pool water return
connector (water flowing back from the filter pump to the pool).
SETUP INSTRUCTIONS (continued)
1
Threaded
Strainer
Connector
Nozzle

(77IO) ZX100 AUTOMATIC POOL CLEANER ENGLISH SIZE: 4.875” X 7.25” PANTONE 295U 06/22/2022
77
A
SAVE THESE INSTRUCTIONS
Page 7
SETUP INSTRUCTIONS (continued)
2. Check your filtration system pump flow rate and adjust the pressure release
valve (7) button as follow:
• For pump flow rate between 2100-2800 gph (7950-10600 L/h): press
button for “DOWN” position.
• For pump flow rate greater than 2800 gph (10600 L/h) but not exceeding
3500 gph (13248 L/h): button shall be in the “UP” position. If the button
is already in the “DOWN” position, press button once to return it to the
“UP” position. See Fig. 2.
3. Make sure the micro-screen (6) is inside the pressure release valve (7), then
screw the pressure release valve set to the threaded strainer connector, from
inside of the pool. See Fig. 3.
NOTE: For Intex small pools with 1-1/4” (32mm) inlet strainer connector
fitting, screw the inlet connector adaptor (14) to the inlet strainer connector
first, then screw the pressure release valve set to the adaptor (14).
4. Push in and screw one end of hose with the collar nut (9) to the swivel joint
(8) first, then screw the swivel joint (8) to the pressure release valve (7).
See Fig. 4.
3
Threaded
Strainer
Connector
7
6
7
7
14
For 1-1/2” (38 mm)
connector fitting
For 1-1/4” (32 mm)
connector fitting
6
2
Button “DOWN”
Button “UP”
Press button
7

(77IO) ZX100 AUTOMATIC POOL CLEANER ENGLISH SIZE: 4.875” X 7.25” PANTONE 295U 06/22/2022
77
A
SAVE THESE INSTRUCTIONS
Page 8
SETUP INSTRUCTIONS (continued)
5. Extend the hose (10) to the furthest opposite side of the pool wall or to the
furthest corner of the pool so that it overhangs the wall, and then cut the
excess hose with a scissor. See Fig. 5.
Note:
Unscrew (clockwise direction) the hose collar nut (9) from the other end
of the hose (10) before cutting the excess hose. Screw (counter-clockwise
direction) the hose collar nut (9) back onto the main hose (10) after cutting.
6. Brush assembly. See Fig. 6.
NOTE: Remove the brushes from underneath the device when vacuuming
large debris or leaves on the pool floor.
6
13
12 3
Press
5
Rectangular
pool/Oval pool
Circular pool
Pool inlet
Pool inlet 10 10 9
9
4
8
10
7

(77IO) ZX100 AUTOMATIC POOL CLEANER ENGLISH SIZE: 4.875” X 7.25” PANTONE 295U 06/22/2022
77
A
SAVE THESE INSTRUCTIONS
Page 9
SETUP INSTRUCTIONS (continued)
8. Open the hose elbow (11) in half, bend the hose (10) at an angle next to the
collar nut (9) attached to the auto cleaner, wrap the hose elbow over the hose
and collar nut, and close the hose elbow. Make sure the hose elbow is securely
locked. See Fig. 8.
7. From outside of the pool, connect the other end of hose with the hose collar
nut (9) to the auto pool cleaner water inlet. Vertically insert the hose collar nut
(9) into the water inlet, while pushing down the hose collar nut, turn the hose
collar nut clockwise to tighten the hose. To remove the hose, while pushing
down the hose collar nut, turn the collar nut counter-clockwise. See Fig. 7.
7
Press Clockwise direction Screw
9. Hold the cleaner vertically. Slowly lower
the device into the water to evacuate the
air inside the cleaner and the cleaner will
gradually sink to the bottom of the pool
floor. Stretch out the hose by slowly
pulling the auto cleaner across the pool
to the opposite side. Make sure the hose
is stretched out in order to prevent any
entanglement. See Fig. 9.
9
8
9
10
11
11
10
9

(77IO) ZX100 AUTOMATIC POOL CLEANER ENGLISH SIZE: 4.875” X 7.25” PANTONE 295U 06/22/2022
77
A
SAVE THESE INSTRUCTIONS
Page 10
SETUP INSTRUCTIONS (continued)
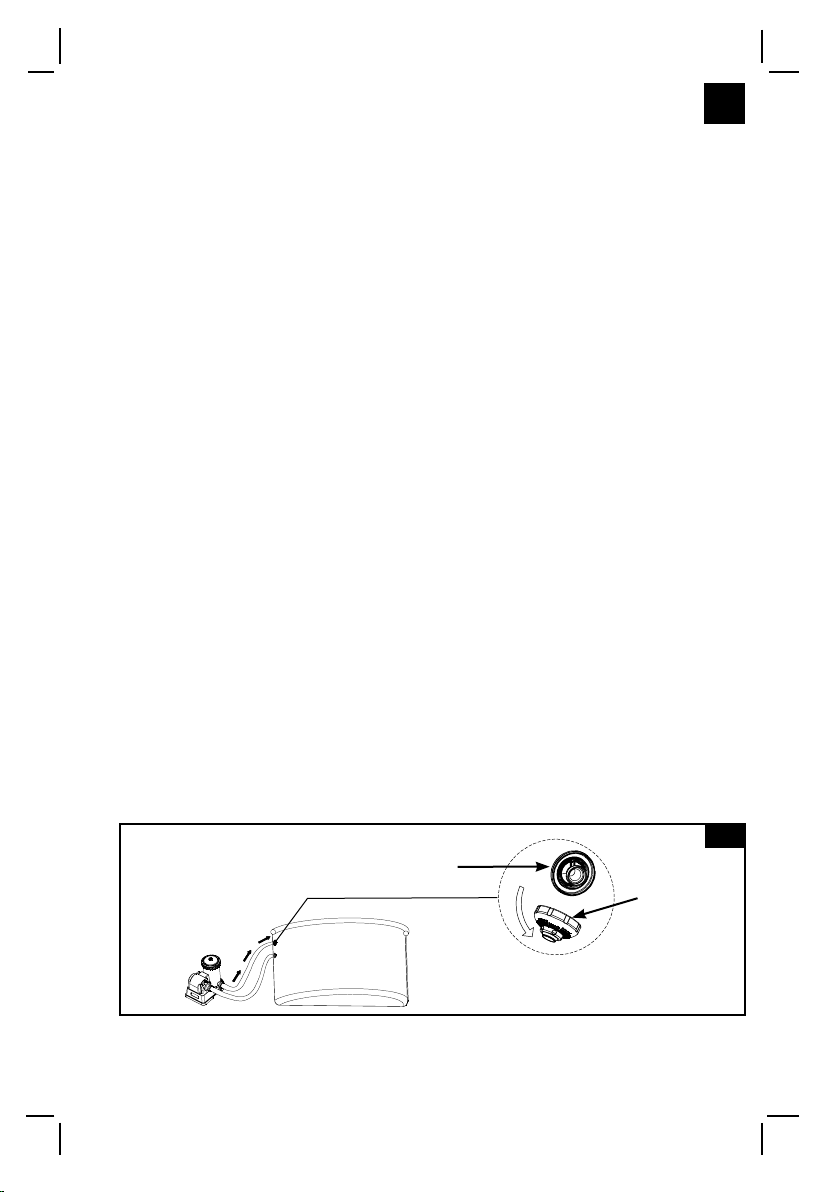
10.
Turn on the filter pump and make sure water is flowing through the micro-screen
(6) and the pressure release valve (7). The auto cleaner is now moving and
vacuuming the pool floor and pool wall. See Fig. 10.
Note: The cartridge filter pump or sand filter pump will clean the pool water.
It’s essential to clean or replace the filter cartridge or backwash sand media
frequently to keep the water clean.
If the Auto Cleaner is paired up with a sand filter pump, the system flow will
diminish and the pressure will rise as indicated by the sand filter pump
pressure gauge reading (from green to yellow zone), this is normal. Disconnect
the Auto Cleaner from the pool and check if the sand filter pressure gauge
reading will drop back to the green zone. Refer to the sand filter pump manual
for more details.
10
67
If the auto cleaner starts to stir the debris, sediments on the pool floor,
you will require to clean or replace the filter cartridge more frequently as
the fine sediments are retained by the cartridge. In the case of a sand
filter pump, backwash the sand media more frequently. Also clean the
debris net (3) frequently.
IMPORTANT NOTE
Tabla de contenidos
Otros manuales de Aspiradora de piscina de Intex

Intex
Intex ZX300 Manual de usuario

Intex
Intex 100PO Manual de usuario

Intex
Intex L ZS6220 Manual de usuario

Intex
Intex CL2508P Manual de usuario

Intex
Intex Auto Cleaner Manual de usuario

Intex
Intex Krystal Clean Poolwater 6220 Manual de usuario

Intex
Intex Auto Cleaner Manual de usuario

Intex
Intex ZX50 Manual de usuario

Intex
Intex 35IO Manual de usuario

Intex
Intex Deluxe Maintenance Kit Manual de usuario


