In-situ RuggedReader Manual de usuario

1
Welcome
Congratulations on purchasing the RuggedReaderTM handheld computer
with Microsoft®Windows MobileTM 2003 software for Pocket PCs.
The immersible and shock-resistant design of the RuggedReader
allows you to work in harsh outdoor environments. You can run your
Pocket PC applications in blazing heat, subzero cold, driving rain,
dusty job sites—anywhere you could never take a handheld before.
Contents
Welcome ........................................................................ 1
Device Hardware.......................................................... 2
Setting up your RuggedReader................................... 3
Working with your RuggedReader............................. 5
Connecting to your PC............................................... 13
Microsoft Pocket Outlook.......................................... 17
Companion Programs ............................................... 18
Caring for your RuggedReader ................................ 20
Hardware Specifications............................................ 21
Safe Use of your RuggedReader ............................... 22
Troubleshooting RuggedReader ............................... 23
Regulatory Information............................................. 29
Declaration of Conformity ........................................29
Reference Materials ................................................... 31
Rugged
Reader
Getting Started Guide

2
Front Panel Back Panel
Top View- without Cap Bottom View
Note: Be sure to read the warranty and safety information in the
manual prior to using your RuggedReader.
Calendar
(button 2)*
Contacts
(button 3)*
Power
Navigation pad
Removable CF-Cap covers
two CompactFlash card slots
Enter
PowerBoot Module
Latches
Stylus
holder
CF-Cap
External
Power
Serial USB
Device Hardware
CompactFlash card slots
*Assignable application buttons;
see Settings.
Inbox
(button 4)*
Start Menu
(button 1)*

3
Setting up your RuggedReader
1. Attach the PowerBoot
The PowerBoot ModuleTM for your
RuggedReader is shipped unattached. To
attach the PowerBoot, turn the latches
counter-clockwise until they are parallel to
the stylus holder, with the arrows pointing
towards the communication ports located
at the bottom of the PowerBoot.
Firmly slide the
PowerBoot onto
the main unit as shown. Pressure should
be applied downward and forward as the
PowerBoot is positioned.
Use the stylus to lock the PowerBoot
latches, by turning them clockwise one half
turn until they are pointed away from the
communication ports.
2. Attach the hand strap
To connect the hand strap to your
RuggedReader, hold the hand strap
clip at a 45 degree angle and push the
clip onto the RuggedReader bracket.
Repeat the process with the other end
of the hand strap.
3. Charge your RuggedReader
Connect the AC adapter to the
external power port on your
RuggedReader. Charge for at least
12 hours before using. For best
results, turn the RuggedReader off
while charging.

4
Battery life varies greatly depending on the application and
environment. At moderate or high temperatures with no display light,
usage over 30 hours is possible. In typical use, with default display
light setting and two CompactFlash®memory cards installed, you can
expect 15 to 20 hours of battery life. At cold temperatures (-20C or
less) with heavy use of display light and/or non-memory CompactFlash
cards (e.g. wireless LAN), battery life may be only a few hours.
The keys to extended battery life are managing the display light,
keeping the batteries warm in cold environments, and using
CompactFlash cards that use power conservatively.
4. Align the touch screen
When the RuggedReader first turns on (or after a hard reset), the touch
screen will require calibration. Tap the screen to set it up. Using a
stylus, tap the targets firmly and accurately at each location until the
screen is aligned.
5. Turning your RuggedReader on and off
One of the most convenient features of the RuggedReader is “instant
on.” There is no waiting for it to start up or shut down. To start
working immediately, press the power button. (“Instant on” does not
occur on the first boot up.) When you have finished working, turn off
your RuggedReader by pressing the power button.
6. Using the CF Expansion Slots
To use the CompactFlash expansion slots,
you must first remove the CF-CapTM . To do
this, unscrew the two screws on the top of
the CF-Cap. Slide the cap off the main unit.
Gently insert a CompactFlash card or device
into one of the two CF slots. Do not force
the card into the slot. Cards must be inserted with the face toward the
display side of the RuggedReader. Replace the CF-Cap and tighten the
screws to reseal.
Note: Be sure to reattach the CF-Cap when you are finished. The
RuggedReader is NOT sealed when the cap is off. Water damage
caused by improper installation of the cap is not covered by
warranty.

5
Working with your RuggedReader
Using the Stylus
The touch screen on your RuggedReader works like a mouse on a PC.
Use the stylus to navigate and select objects on the screen.
Tap: Tap the screen with the stylus to select or open an item. Tapping
is equivalent to clicking an item with the mouse on your PC.
Touch and hold: When you touch and hold, a circle of red dots
appears around the stylus to indicate that a pop-up menu will soon
appear. Touching and holding is equivalent to right-clicking your PC
mouse button.
Drag: Hold the stylus on the screen and drag across the screen to
select text and images. Drag in a list to select multiple items.
RuggedReader Memory
The RuggedReader has built-in non-volatile, Nand flash storage.
The content of this storage is retained no matter what happens to
battery power or other environmental conditions. You should keep
your data and programs in this storage area. Built-in storage is 64
MB. Approximately 16 MB of this storage is used by the Pocket PC
operating system. The balance is available for your use. There is also
64 MB of volatile RAM; about 58 MB is available to run programs and
to store temporary data.
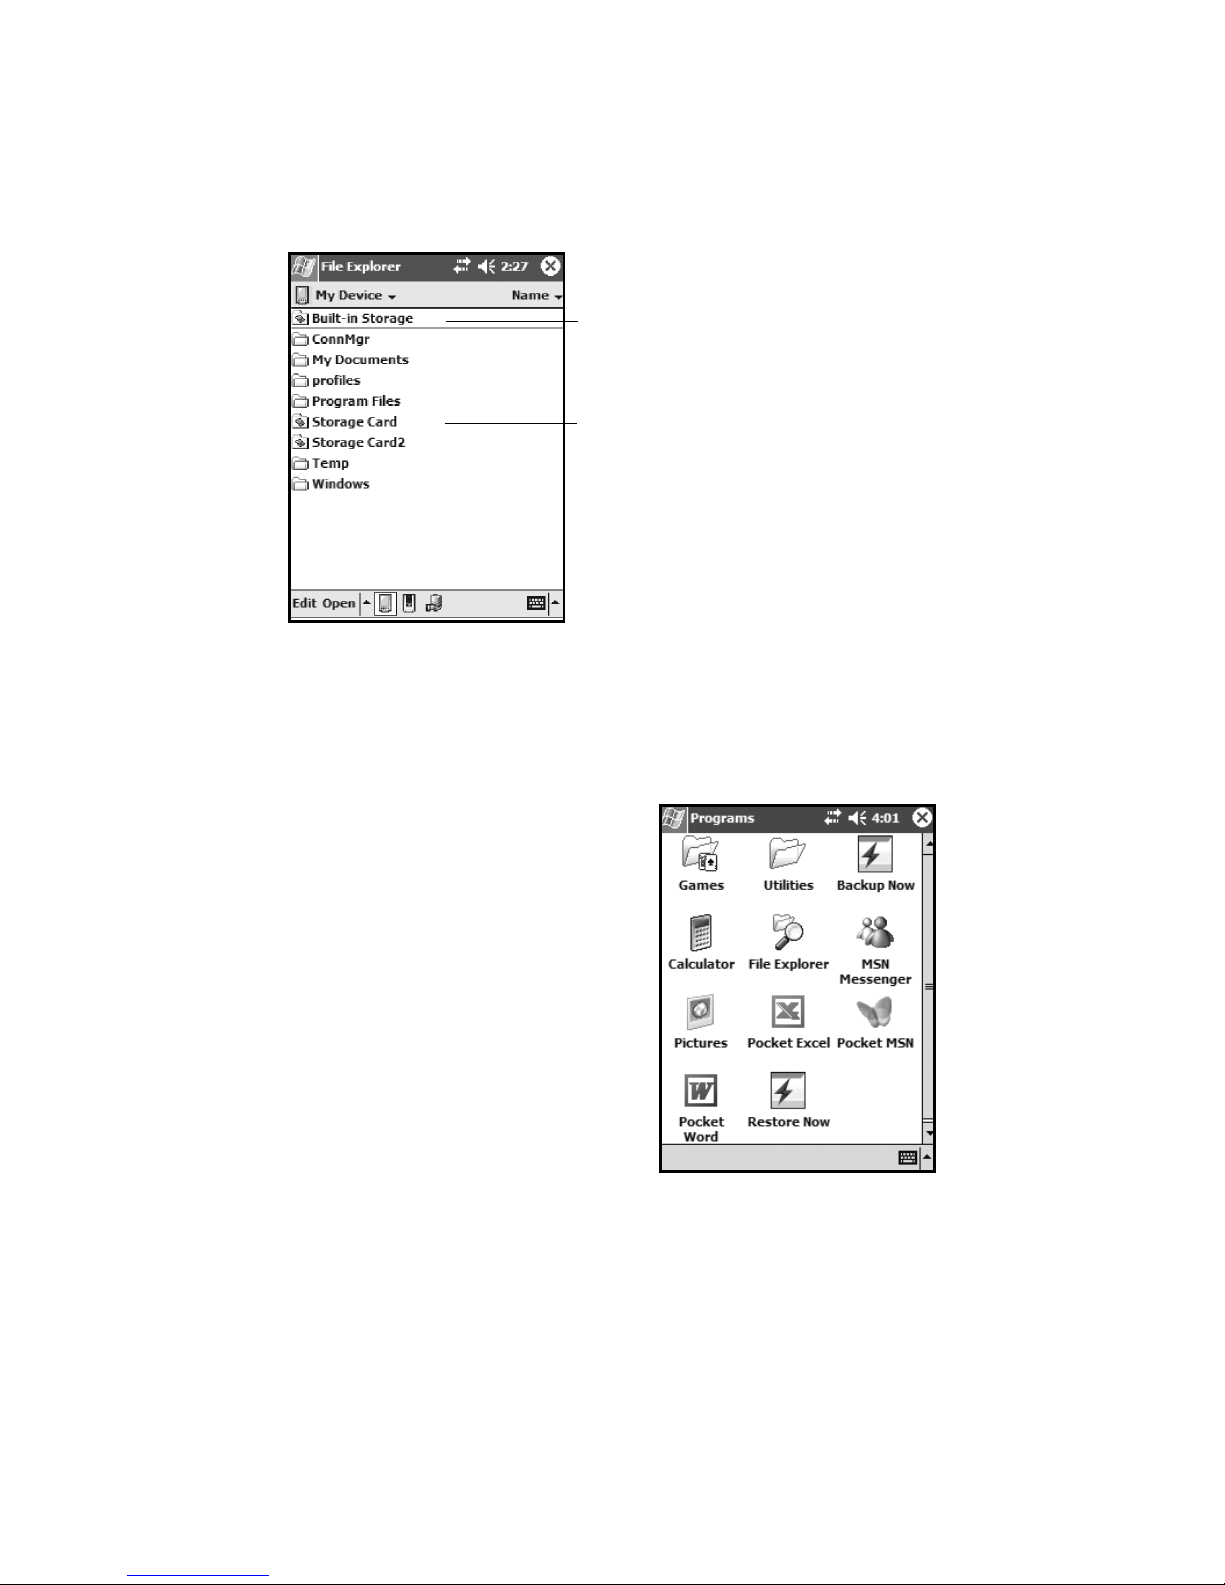
If you need additional memory, third-party CompactFlash memory
cards can be used with your RuggedReader. They work the same way
as built-in storage except that they are removable. The picture on the
next page shows how these different kinds of memory appear within
File Explorer (Start / Programs / File Explorer). The non-volatile built-
in storage is at the top of the list.
6
Some data and some programs do not give you the option of keeping
them in built-in storage. Your Pocket Outlook data and CompactFlash
card drivers are two examples of this type of information. Should you
experience a hard reset, this data will be lost. To prevent this type of
loss you should frequently use the built-in backup software to back up
all of this information to built-in storage.
Backup and Restore
Run Backup Now (Start / Programs /
Backup Now).
This easy-to-use program takes all
information that might be lost during a
hard reset and stores it safely in built-
in storage in a folder called System
in a file called backupimg. When the
RuggedReader goes through a hard
reset, it automatically checks for the
presence of this file and gives you an
opportunity to restore the most recent
backup.
The Pocket Backup program can be configured to give you a great deal
of flexibility for both backup and restore including scheduled backups.
You can find it in the Utilities folder of the Start / Programs area.
Built-in Storage: The contents are found in this
folder in File Explorer.
Storage Cards: If CompactFlash memory cards are
present, the contents are found in these folders in
File Explorer.
RAM: All other files and folders displayed by File
Explorer are stored in RAM and will need to be
backed up.

7
Power Button Features
The power button turns the RuggedReader on and off and can perform
a number of additional useful tasks.
Turn Backlight on/off -- Hold down the power button for about
1 second to manually toggle the backlight state. Note: Manually
turning the backlight off disables auto turn on with screen taps or
button presses until the backlight is manually turned back on or the
RuggedReader is turned off and back on.
Power Menu -- Hold down the power button
for about 3 seconds to bring up a screen with a
menu and a countdown in progress. Continuing
to hold the power button will cause a soft reset
when the countdown reaches zero. Releasing
the power button allows access to this menu.
Tap an option or press power again to exit.
Clean touch screen - Disables the touch screen.
After cleaning, press enter to enable touch screen and exit.
Align touch screen - Use a stylus to align the touch screen.
Soft reset - See the description below.
Exit - Takes you back to the previous screen.
Soft Reset -- A soft reset is comparable to rebooting your PC, which
stops all running programs. It is occasionally used when installing new
software.
To perform a soft reset, use the power menu or hold the power button
down for about eight to ten seconds. (The power menu may or may not
appear.)
Hard Reset -- A hard reset should be avoided if at all possible. It
should only be used if a soft reset fails to resolve an issue. Some
software programs store database information in RAM which would be
erased during a hard reset. So it is strongly recommended that you back
up your data before you perform a hard reset. See Backup and Restore.
To perform a hard reset, hold down the power button and application
button 1 (Start Menu) at the same time for about eight to ten seconds.
(The power menu may or may not appear.) When the message
“Booting - - - ->” appears in the display, release the buttons. If a
backup has been performed, the RuggedReader will prompt to restore.
!
Clean touch screen
Release power button to use menu.
Continue to hold power button to
soft reset in countdown seconds.
Align touch screen
Exit
Soft reset
5

8
The Today Screen
The center of the Today screen provides information that you need for
the day. Tap an item to view or edit details.
At the top of the screen are status icons. Tap an icon to view details or
change options. (These icons appear at the top of every screen on your
RuggedReader, and not only the Today screen.)
When you turn on your RuggedReader for the first time each day (or
after four hours of inactivity), the Today screen displays. You can also
view it by tapping and then Today.
Tap to go to
a program.
Tap to change date, time, or
time zone.
Tap to change owner information.
Your day at a glance. Tap to
open the associated program.
Tap to view connection status
Tap to create a new item.
Tap to view notification information.
Tap to view network status and options.
Tap to change volume or mute all sounds.
Touch and hold to change time format.

9
The Command Bar
At the bottom of the screen is the command bar. You can use its menus
and buttons to perform tasks in programs. Depending upon which
program you are using, the buttons may vary from those depicted.
The Start Menu
From the Start Menu, you can select programs, settings, and help
topics. To display the Start Menu, from the top of any screen, tap .
Tap to switch to a program that you recently used.
Tap to switch to a program.
Tap to see more programs.
Tap to change device settings.
Tap to see a Help topic for the current screen.
Tap to select menu
commands.
Tap to select button
commands.
Tap to display the
input panel.

10
Pop-up Menus
You can use pop-up menus to quickly select an action for an item. To
access a pop-up menu, tap and hold the stylus on an item name.
Text Input Panels
Use the input panel to enter information in any program on your
RuggedReader. You can type using the standard Keyboard or the Recon
Keyboard. You can write using Block Recognizer, Letter Recognizer,
or Transcriber. The characters appear as typed text on the screen.
Select the input panel that is easiest for you to use.
To change input panels, tap the arrow next to the Input Panel icon and
then tap the input panel that you want.
Touch and hold to display the pop-up menu.
Lift the stylus and tap the action you want.
Tap outside the menu to close it without
performing an action.
Tap to change input panel options
Tap to select an input panel.
Tap to change input panel.
Tap icon to open the selected input panel.
Options
Block Recognizer
Keyboard
Letter Recognizer
• Recon Keyboard
Transcriber
Otros manuales para RuggedReader
2
Tabla de contenidos
Otros manuales de Portátil de In-situ


