IMOU F Series Manual de usuario

Quick Start Guide
Version 1.0.1

Contents
Quick Start Guide ______________________________________________________________1
Packing List_______________________________________________________________11
Product Appearance ________________________________________________________12
Operation by Imou App ______________________________________________________23
Device Installation __________________________________________________________34
Kurzanleitung _________________________________________________________________5
Lieferumfang ______________________________________________________________51
Überblick _________________________________________________________________52
Bedienung über Imou-App ___________________________________________________63
Installation des Geräts_______________________________________________________74
Guía de inicio rápido ____________________________________________________________9
Contenido ________________________________________________________________91
Apariencia del producto______________________________________________________92
Funcionamiento usando la aplicación Imou _____________________________________103
Instalación del dispositivo ___________________________________________________114
Guide de démarrage rapide _____________________________________________________13
Contenu de l’emballage_____________________________________________________131
Différentes faces du produit _________________________________________________132
Fonctionnement avec l’application Imou ________________________________________143
Installation de l’appareil_____________________________________________________154
Snelstartgids _________________________________________________________________17
Paklijst__________________________________________________________________171
Kenmerken van het product _________________________________________________172

Bediening via de Imou App __________________________________________________183
Installatie van het apparaat __________________________________________________194
Guida introduttiva _____________________________________________________________21
Contenuto della confezione__________________________________________________211
Come si presenta il prodotto _________________________________________________212
Funzionamento tramite app Imou _____________________________________________223
Installazione dispositivo_____________________________________________________234
Guia de Início Rápido __________________________________________________________25
Lista da embalagem _______________________________________________________251
Aspeto do produto _________________________________________________________252
Operação pela Aplicação Imou _______________________________________________263
Instalação do dispositivo ____________________________________________________274
1
Quick Start Guide
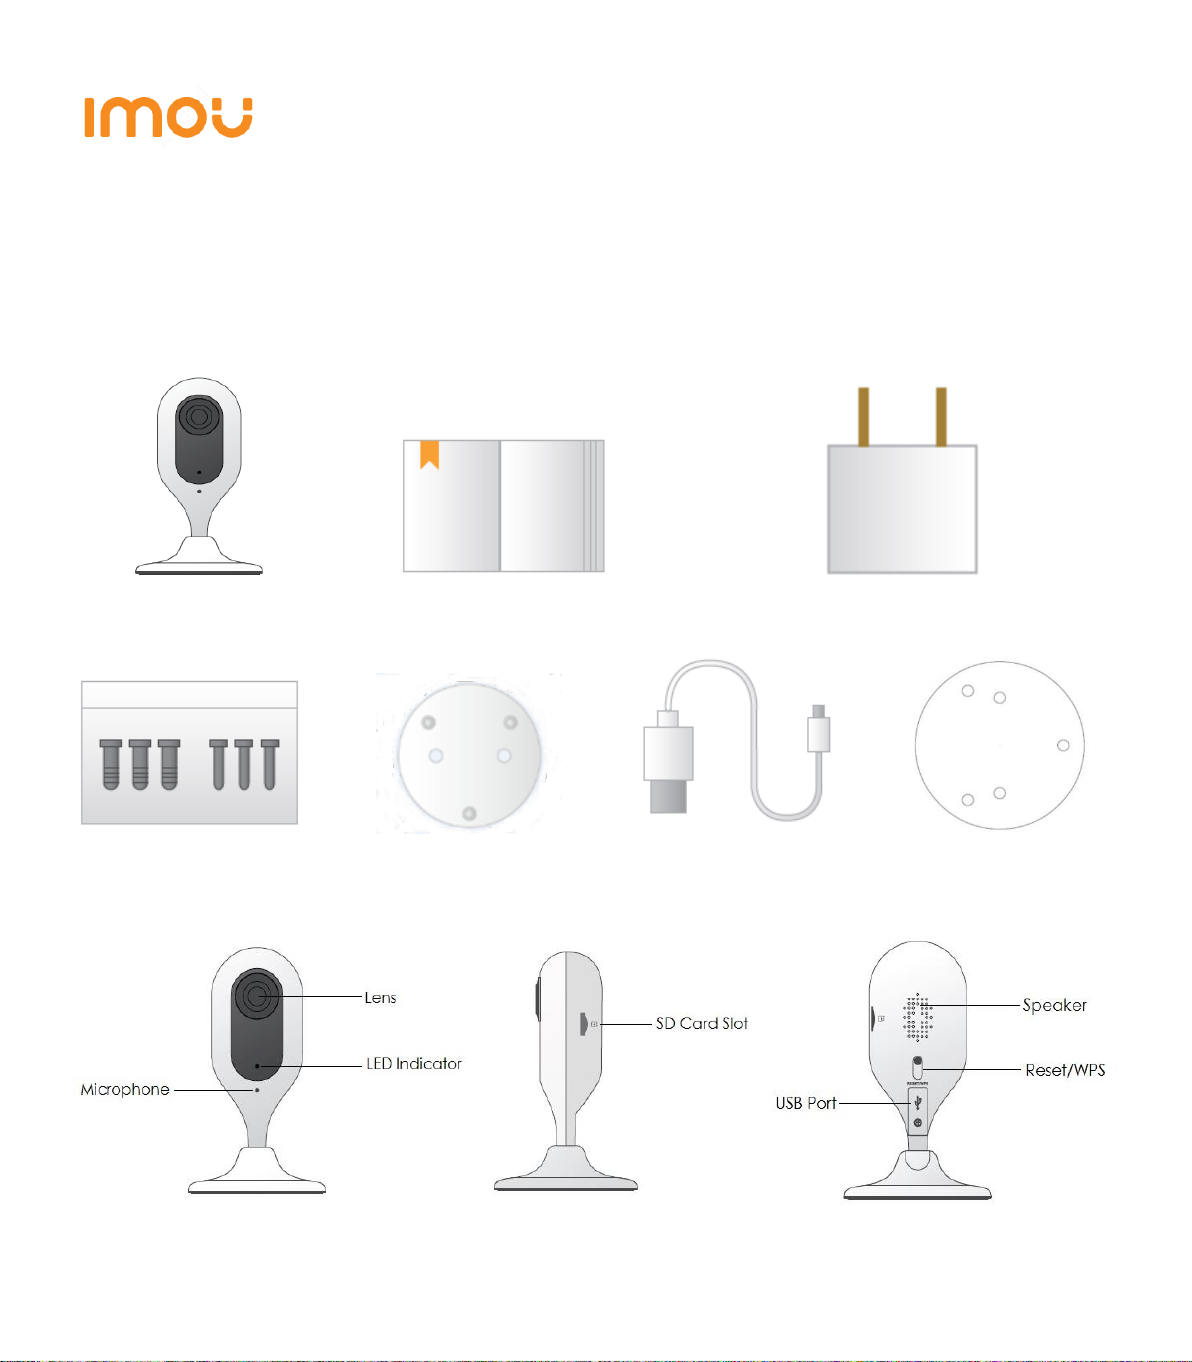
Packing List1
Device *1 QSG *1 Power Adapter *1
Screw Package *1 Quick Installation Board *1 USB *1 Installation Position Map *1
Product Appearance2
Figure 2-1 Figure 2-2 Figure 2-3

2
Note
To reset, long press for 10 seconds till the light is off; to enable WPS, just press the
button.
Please refer to Table 2-1 for more details about status of indicator light.
Indicator light status
Device status
Red light stably on
Booting
Green light slow flashing
Booting completed, await Wi-Fi config, enter
smart config status;
Green light quick flashing
Wi-Fi smart config in progress, including
WPS (Wi-Fi Protected Setup), management
frame, etc.
Green light stably on
Wi-Fi connection succeeded, operate
normally.
Red and green lights flash alternately
Device upgrade
Red light slow flashing
Network disconnection
Red light quick flashing
Device fail to boot up; SD card does not work
Table 2-1
Operation by Imou App3
Step 1 Power on your camera with power adapter.
Step 2 Connect your smartphone to your Wi-Fi network, scan “Imou” QR on the
packing box, download and install Imou App.
Step 3 Run Imou App, and register account for first use.
Step 4 Follow the steps below to add your camera (Figure 3-1).

3
Figure 3-1
Note
- If you have more cameras, please follow step 4 to add them one by one.
- If you want to change the Wi-Fi signal, please reset the camera to factory default
and repeat step 4 to add the camera.
Device Installation4
Note
Please make sure the mounting surface can sustain at least 3X weight of the
camera.
Step 1 Dig holes on the proper mounting surface according to the hole sites of
installation position map.
Step 2 Knock the expansion bolts into the holes.
Step 3 Use self-tapping screws to install the quick installation board and fix it well.

4
Step 4 Connect the device to power.
Step 5 Adjust the device monitoring
angle and stick the device on the
quick installation board.
Disclaimer
This quick start guide is for reference
only. Minor difference might be found
in user interface.
All the designs and software here are
subject to change without prior written notice.
All trademarks and registered trademarks mentioned are the properties of their
respective owners.
Please visit our website or contact your local service engineer for more
information.
If there is any uncertainty or controversy, please refer to our final explanation.

5
Kurzanleitung
Lieferumfang1
1 x Gerät 1 x Kurzanleitung 1 x Netzteil
1 x Befestigungsmaterial 1 x Montageplatte 1 x USB-Kabel 1 x Montageschablone*1
Überblick2
Abbildung 2-1 Abbildung 2-2 Abbildung 2-3
WPS/Rücksetztaste
Lautsprecher
USB-Anschluss
SD-Kartenschlitz
LED-Anzeige
Mikrofon
Objektiv
WPS/Rücksetztaste
Lautsprecher

6
Hinweis
Zum Zurücksetzen halten Sie die WPS/Rücksetztaste für 10 Sekunden gedrückt, bis
die Anzeige erlischt. Um WPS zu aktivieren, drücken Sie die Taste einmal kurz.
Nähere Informationen zum Status der LED finden Sie unter Tabelle 2-1.
Anzeigestatus
Gerätestatus
Rote LED leuchtet
Gerät fährt hoch
Grüne LED blinkt langsam
Hochfahren beendet, WLAN-Konfiguration
läuft, letzte Konfiguration wird aufgerufen;
Grüne LED blinkt schnell
WPS-Verbindung (das Gerät versucht, eine
WLAN-Verbindung über WPS herzustellen).
Grüne LED leuchtet
WLAN erfolgreich verbunden, Betrieb
normal.
Rote und grüne LED blinken
abwechselnd
Geräteaktualisierung
Rote LED blinkt langsam
Keine Verbindung zum Netzwerk
Rote LED blinkt schnell
Gerät startet nicht, Fehler mit der SD-Karte
Tabelle 2-1
Bedienung über Imou-App3
Schritt 1 Verbinden Sie Ihre Kamera mit dem mitgelieferten Netzteil
Schritt 2 Verbinden Sie Ihr Smartphone mit Ihrem WLAN-Netzwerk, scannen Sie
den “ Imou” QR-Code auf der Verpackung, laden Sie die Imou-App herunter
und installieren Sie sie.

7
Schritt 3 Starten Sie die Imou-App und registrieren Sie sich
Schritt 4 Führen Sie die folgenden Schritte aus, um Ihre Kamera hinzuzufügen
(Abbildung 3-1).
Abbildung 3-1
Hinweis
- Wenn Sie mehrere Kameras haben, folgen Sie Schritt 4, um sie nacheinander
hinzuzufügen.
- Wenn Sie das WLAN ändern möchten, setzen Sie die Kamera auf die
Werkseinstellungen zurück und wiederholen Sie Schritt 4, um die Kamera
hinzuzufügen.
Installation des Geräts4
Hinweis
Vergewissern Sie sich, dass die Montagefläche mindestens das 3-fache Gewicht
der Kamera tragen kann.
Otros manuales para F Series
9
Este manual sirve para los siguientes modelos
1
Tabla de contenidos
Idiomas:
Otros manuales de Cámara IP de IMOU


