Ikon 3413 Guía

RANGEHOODS COOKTOPS WASTE DISPOSALS
KITCHEN/LAUNDRY SINKS BATHROOM BASINS

1 Device description
1.1 The device
Fig. 2: Description of the extractor hood
1 Cooking eld suction
2 Induction cooking eld
3 Engine box
4 Circulation fan box (special accessories)
1.2 Operating unit
Fig. 3: Touch control LED electronics
1 Unlocking 3 LED display
2 Decrease exhaust air fan power level 4 Increase exhaust air fan power level
5 Delayed shut-o automatic
2

1.3 Scope of delivery
Control electronics housing
Extractor hood body
Engine box
1 Electronics box
1 Glass cover
2 Stainless steel cover
3 Cooking eld suction
1 Engine box
2 Assembling the accessories
3
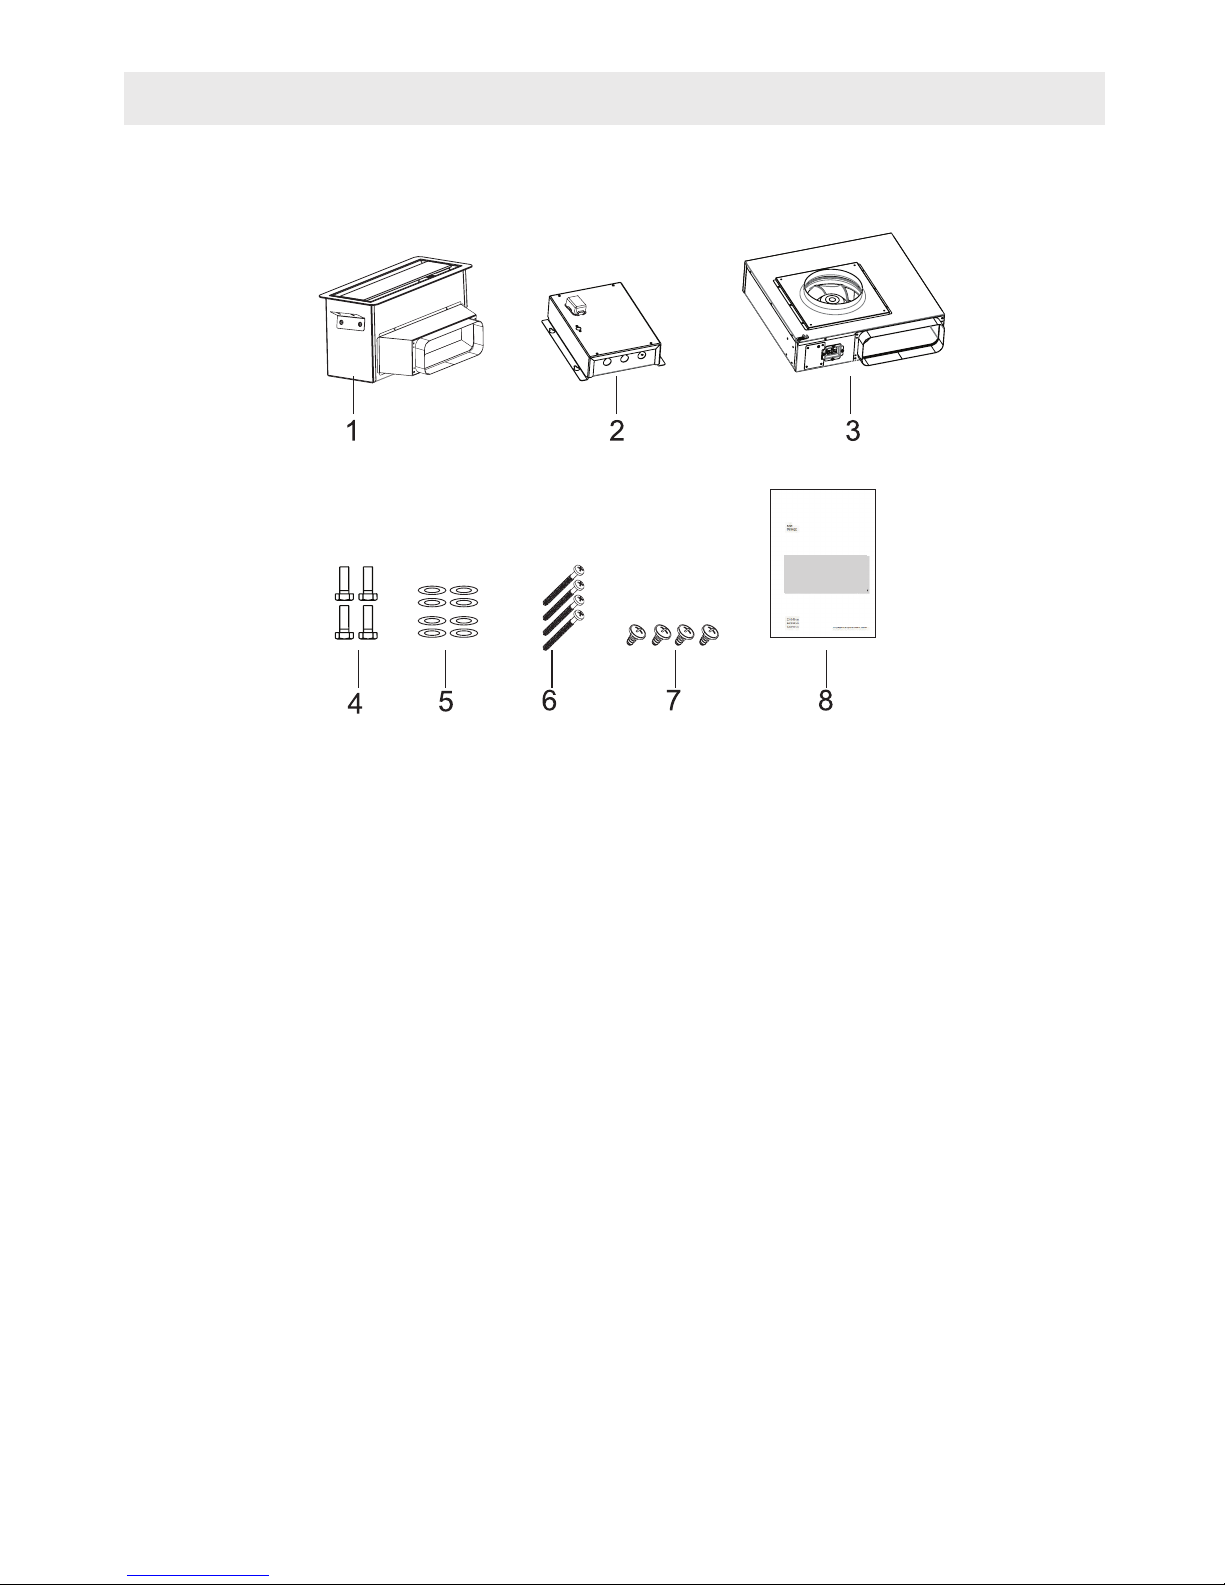
Fig. 4:Scope of delivery
1 Cooking eld suction
2 Electronics box
3 Engine
4 Metric
5 Washers
6 Screws
7 Screws
8 Operation manual
4

2 For your Safety
2.1 Symbols in these instructions
Safety instructions
Tips and recommendations
Special safety instructions
Safety instructions are labelled with symbols in this manual.
The safety instructions are introduced by signal words that
express the extent of the hazard.
To draw attention to special dangers, the following symbols
are used in safety instructions:
DANGER!
This combination of symbol and signal word
indicates an immediately dangerous situation
which will lead to death or serious injuries if not
avoided.
WARNING!
This combination of symbol and signal word
indicates a possibly dangerous situation which
may lead to death or serious injuries if not avoid-
ed.
CAUTION!
This combination of symbol and signal word
indicates a possibly dangerous situation which
may lead to minor or light injuries if not avoided
will.
PLEASE NOTE!
This combination of symbol and signal word
indicates a possibly dangerous situation which
may lead to material damage if not avoided.
This symbol highlights useful tips and recom-
mendations as well as information for ecient
and trouble-free operation.
5

Safety instructions within
handling instructions
Further tags and labelling
Safety instructions may in particular refer to certain han-
dling instructions. Such safety instructions are embedded
in the handling instructions to avoid distraction while pre-
paring and performing the required steps and actions. The
above-described signal words will be used.
Beispiel:
1. Loosen the screw.
2.
Close the lid carefully.
3. Tighten the screw.
The following signs and highlighting are used for identifying
handling instructions, result descriptions, bullet lists, refer-
ences, and other elements in these operating instructions:
CAUTION!
If not handled correctly the lid might get
jammed!
Warning signs Type of danger or hazard
Warning - Danger caused by
electrical voltage
Warning of highly combustible
substances.
Warning of a danger zone
Labelling Explanation
Step-by-step handling instructions
Results of handling instructions
Reference to sections of this manual and
other relevant documents
Bullet lists without a determined order
6

2.2 Intended use
2.3 Children and persons with reduced physical, sensory, or
mental capabilities
2.4 Fire hazard!
The extractor hood is intended for suctioning of any vapour
and steam caused by cooking or frying or preparing other-
wise food on an electric or gas range in private households.
The device is not intended for any commercial usage or any
outdoor usage.
Any diering usage is deemed deviating from the intended
purpose and therefore prohibited. We accept no liability for
any damages incurred by any usage that deviates from the
intended purpose.
Specically, the following shall be prohibited:
• Outdoor usage or usage in any commercial context
• Any arbitrary modications or repairing of the device
• Operation without metal grease lter
• Flambéing of food beneath the hood
• Exhaust air fan operation without window ip switch
while simultaneously using any replace, furnace, or
oven operated with ambient air
• Usage for air condition/ventilation purposes, in partic-
ular using the device in non-stop operation instead of a
ventilating fan or appropriately and regularly airing the
concerned room
This appliance can be used by children aged from 8 years
and above and persons with reduced physical, sensory, or
mental capabilities or lack of experience and knowledge if
they have been given supervision or instruction by a person
responsible for their safety concerning the use of the appli-
ance in a safe way and understand the hazards involved.
Children must not play with the device.
• Do not allow children to play the with packaging ma-
terials. Danger of suocation.
• Cleaning and user maintenance may not be per-
formed by children, unless they are older than 8 years
and supervised by a person responsible for their safety.
• Keep the appliance and the power cable out of reach
of children that are 8 years or younger.
• Keep children away from the device’s lamps until these
have cooled down. Danger of burning and serious injuries.
• Do not ambé any food beneath the device.
• Deep frying of any food requires your constant monitor-
ing.
• Clean the device surface regularly, to remove any fat
residues.
7

Fig. 5: Fireplace, furnace, or
oven operated with ambient air
Fig. 6: Using a window ip switch
• Clean the metal grease lter at least every other week to
prevent the built-up of fat residues on the metal grease
lter. These residues may catch re or ignites sponta-
neously. Replace the metal grease lter regularly and/or
if needed.
• To avoid generating excessive heat, do never operate
any cooking zone without a pot or pan or other cookware
on it.
• Never use open re near the devise.
• Never leave hot oil or fat unattended. Do never use wa-
ter when trying to extinguish any re caused by oil or fat.
Simultaneously using the device in the exhaust air fan
operation modus while operating any replace, furnace, or
oven operated with ambient air (such as heating applianc-
es red by gas, oil, wood or coal, instant-on water heat-
ers, water boilers or chimneys), consumes the ambient air
of the kitchen and the adjoining rooms (Fig. 5). This may
cause toxic combustion gases from the chimney or the
exhaust air shaft to ow back into the living areas inside
the apartment. Danger of suocation.
Therefore, you must in particular make sure of:
Employing a window ip switch to allow fresh air owing
in from the outside (Fig. 6).
A fresh air/ exhaust air wall sleeve does not provide su-
cient air supply. Please consult your competent chimney
sweeper who will evaluate the air supply and consumption
in your apartment.
The underpressure inside the room where the replace,
furnace, or oven is located must not be less than 4 Pa.
When using the device in the circulation fan operation mo-
dus, you do not need pay any particular attention to the air
supply and consumption in your apartment.
The device is powered by electricity; therefore, the danger of
an electric shock persists. Therefore, you must in particular
make sure of that:
• If an additional socket is required to connect the device,
you need to engage a professional electrician to perform
the respective installation.
• You will never touch the plug with wet hands.
• You will pay special attention to prevent the bending or
jamming of the power cable.
8

2.7 Transportation
2.8 Defect
2.9 Cleaning
• You will pull the mains plug out of the socket in order to
disconnect the device.
• You will only operate the device, if the voltage value stat-
ed on the nameplate coincides with the voltage available
at your socket. The inappropriate voltage may severely
damage the appliance. If you have any questions, please
consult a professional electrician.
• While transporting the device in your car, make sure that
is properly secured to protect all passengers from harm
or injury.
• Use the original packaging, when transporting the de-
vice. Retain the packaging for such situations.
• If the device is faulty or damaged, do not attempt to re-
pair it yourself.
• Any faulty or damaged power cable or plug must be
replaced to prevent any risk of electric shock. Call the
customer service department (see numbers “Hotline (for
Germany, Austria, and Benelux)” on page 3).
• In order to prevent the danger of electric shock, do never
turn a faulty or damaged device on.Pull out the mains
plug from the socket or switch o the fuse inside the fuse
box. Call the customer service department (see numbers
“Hotline (for Germany, Austria, and Benelux)” on page 3).
• Always replace defect lamps to prevent overloading the
remaining lamps.
• Do not you any aggressive or abrasive cleaning agents,
since those may damage the device surface.
• For stainless steel surfaces, use a stainless steel clean-
er. Always clean along the sanding direction of the mate-
rial.
• Do not you any sharp or pointed object, since those may
scratch the device surface.
• Do not use a high pressure or steam cleaner, since the
penetrating humidity may cause an electric shock.
• Observe the cleaning intervals for metal grease lters
indicated in this operating manual. Otherwise, the risk of
re hazard will occur.
9

3 Operating
3.1 Ensuring safe control and operation
3.2 Turning on/o the fan
3.2.1 About the control unit
Switching on the fan
Turn the fan on when you start cooking and wait
10-15 after you nished, before turning o the
device.
This will ensure the best possible removal of
cooking vapours.
WARNING!
Risk of injury due to improper operation!
Improper operation will cause the danger of seri-
ous injuries and property damage.
– Check the device before every use. A faulty or
damaged device must not be used.
– Do not place any objects on the device, since
they may fall down.
– Do never operate the device without the metal
grease lter. Risk of re hazard.
– Switch the device always on, to prevent corro-
sion damages caused by condensation.
Fig. 7: Fan On/O
You may turn the fan on/o using the control unit or the re-
mote control.
1. While not in operation, the device digital display re
mains in standby and appears as a dot. As soon as any
button is pressed, a ashing “L” (i.e. lock) appears 3x on
the digital display.
2. After that, press and hold down the timer button until
“0’” appears on the digital display (Fig. 7/1).
The fan has been unlocked
3. After unlocking the fan, you may complete the setup
using the “+/-” button for adjustment the operation speed
(Fig. 7/2,4).
Now setting up the fan operation speed is completed.
10
Tabla de contenidos
Otros manuales de Quemador de Ikon


