iHome SMARTDESIGN Series iC50 Manual de usuario
Model: iC50
Instruction manual - US English
Size: 102 x 150 mm
Date: Feb 07, 2011
Mat’l: 128gsm matte finish paper
Color: Black text on white background
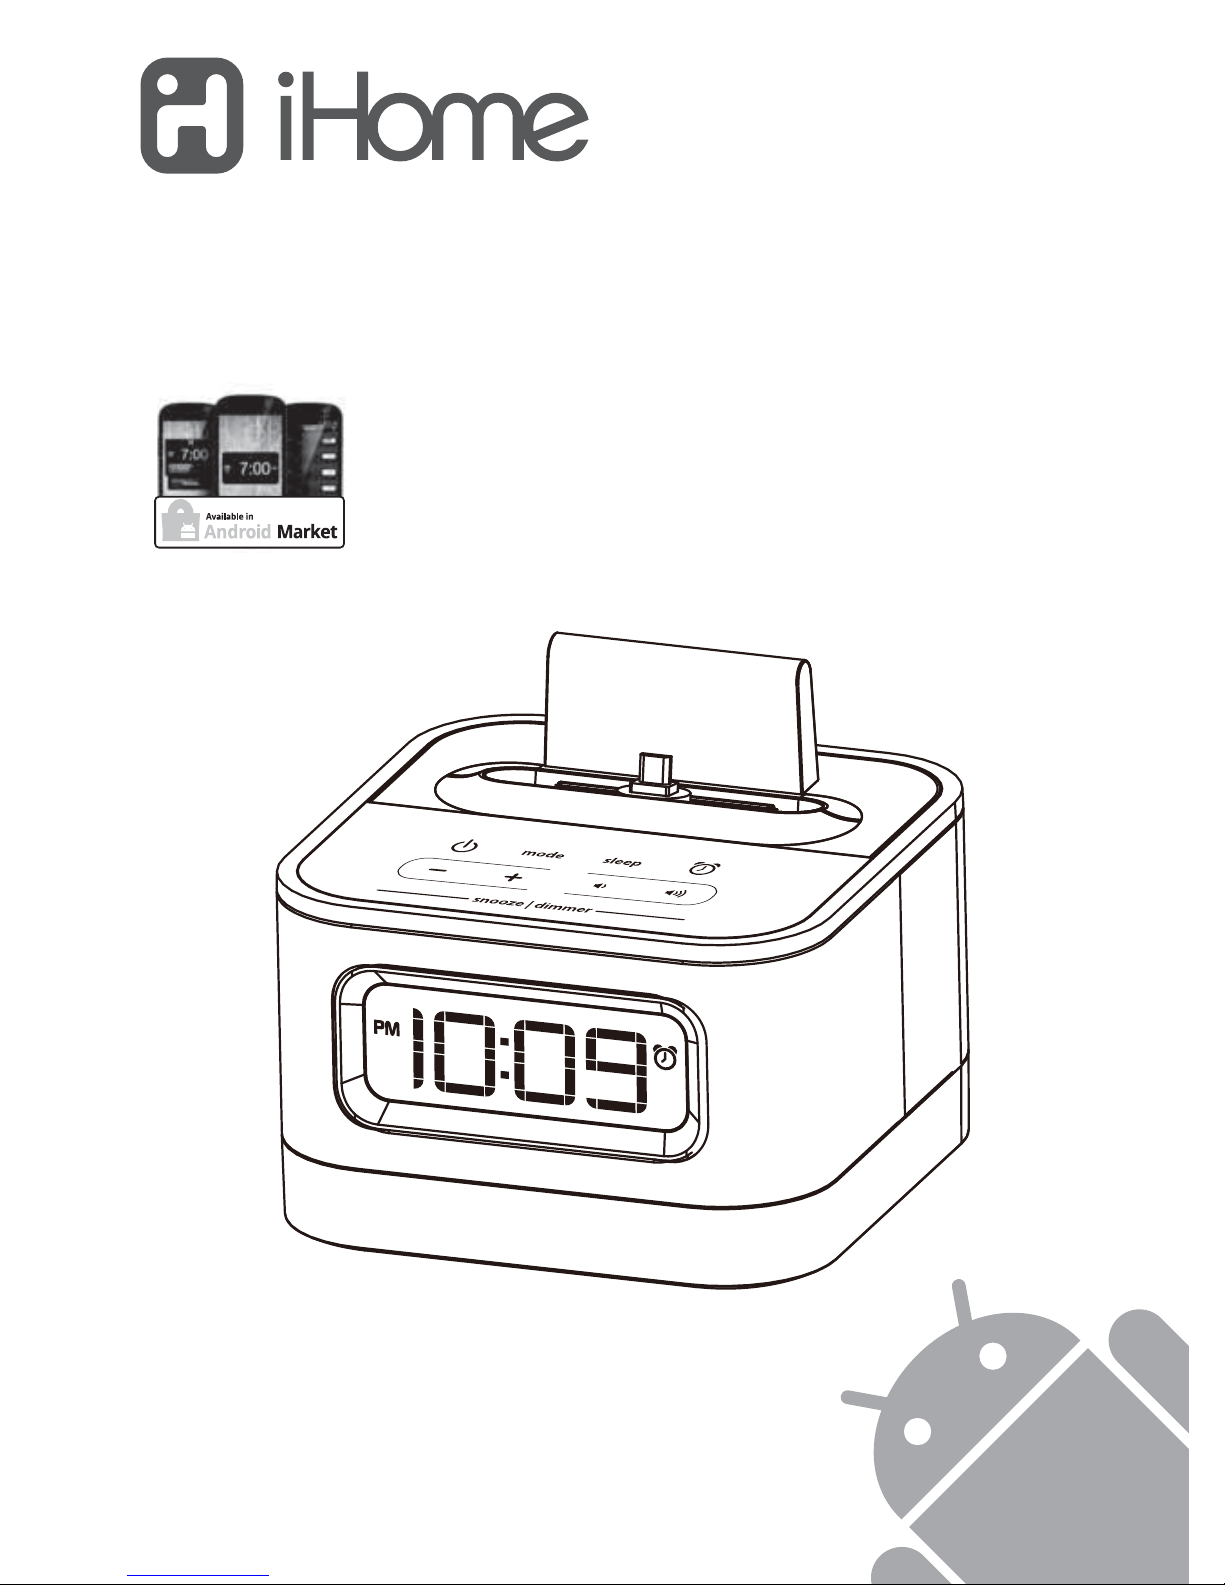
Cover
Warranty
Model iC50
Charging alarm clock
radio speaker for your
Android™ phone and
other device
QUESTIONS? Visit www.ihomeaudio.com
SMARTDESIGN
for android™
free alarm app
works with
search “iHome Sleep”

1
12
34
standard
USB plug
micro
USB plug
WELCOME
Thank you for choosing the SmartDesign Series for Android
featuring SmartSlide™ docking to charge your Android device in any
position. This user guide will get you up and running quickly and
provide helpful hints to maximize enjoyment. For more information
about this and other iHome products, please visit
www.ihomeaudio.com Note that details on using iHome apps for
Android with this unit are not covered in this booklet. For
information on using iHome apps for Android, please visit
www.ihomeaudio.com/apps
GETTING STARTED
This unit ships with the following items. Please check to see that all
items are present.
1 iC50 speaker system
2 SmartSlide™ USB to micro USB cable
3 Stereo audio cable w/ 3.5 mm plug ends
4 100-240V Universal AC power adaptor

FEATURES & FUNCTIONS
Aux line-in Jack
Connection
compartment
Device rest
Mode button
Power On/Off
button
Reverse & Forward
buttons Volume control buttons
Charging switch
SmartSlide™ insert
USB port
Sleep button
Alarm button
FM antenna
Snooze/Dimmer button
2
Back panel
Display
Top panel
DST Switch
DC Jack Time set button
Time Display
Buzzer Volume Indicator
PM Indicator
FM Radio
Indicator
Buzzer/Radio
Indicator
Alarm
Indicator
AUX-In
Indicator
Low Backup Battery Indicator
Sleep Indicator
DST Indicator

BACKUP BATTERY
The iC50 ships with a CR2450 battery installed for backup to provide
continuous alarm operation and clock settings in the event of a power failure.
Remove the pull tab from the battery compartment on the bottom of the unit
before use. If a power failure occurs or the AC cord is accidentally
disconnected, the display backlight will not remain lit, but current time and
alarm time settings will be temporarily maintained. Otherwise, you must reset
the time and alarm settings.
Note: The Battery Low icon is located at the right side of clock display.
When the backup battery is low and needs to be replaced, the Battery
Low icon will flash. To replace, follow steps below:
3
CONNECTING TO AC POWER
7.5V 2.5A
RESET
RESET
TEST
TEST
This unit operates on AC power
using the included 100V-240V
universal AC adaptor for charging
and playing devices .
Place unit on a stable surface. Plug
the power adaptor into the AC jack
on back of the unit and the other
end into a working wall socket. You
can now charge devices connected
to the USB port.

4
BACKUP BATTERY (CONTINUED)
1. Please make sure the AC adaptor is connected. Otherwise all settings
may be lost during battery replacement.
2. Use a Phillips screwdriver to open the backup battery compartment
door located on the bottom of the unit.
3. Remove the exhausted battery. Insert a
new CR2450 battery by easing it under the
tabs in the battery well and pressing down.
Make sure the side marked + is facing up.
Close the compartment door.
4. Close the battery compartment door and
tighten the battery door screw.
Note: Make sure you dispose of battery
properly (see your local regulations).
WARNING: Lithium batteries can explode or cause burns if disassembled,
shorted, recharged, exposed to water, fire, or high temperatures. Do not
place loose batteries in a pocket, purse, or other container containing metal
objects, mix with used or other battery types, or store with hazardous or
combustible materials. Store in cool, dry, ventilated area. Follow applicable
laws and regulations for transport and disposal.

SMARTSLIDE™ DOCK
This unit features a SmartSlide™ dock insert (patent pending), which allows
you to dock and charge your Android device whether the micro USB port is
located on the left, right or bottom of the Android device.
5
2. Drop the micro-USB
cable through the
insert.
3. Place the connector at
the end of the track.
Rotate the connector
(up to 180°) to face
the same
direction as
your device.
1. Lift the dock
insert from unit.

6
Charging your Android Device
Make sure your Android device’s firmware is up to date before use
(consult the user manual of your Android device). Carefully dock your
Android device onto the SmartSlide dock. Once the SmartSlide cable is
connected to both your Android device and the unit’s USB port, monitor the
Android device to observe its charging status. If it does not appear to be
charging, move the USB Circuit Switch located in the connection compart-
ment to the other position ( or ) and reconnect the charging device
again. NOTE: unit will only charge while connected to power with AC
adaptor.
4. Slide the connector
onto the track.
5. Plug in the micro USB
cable and wrap the
cord. (also a good
time to insert the
audio cable, described
on pg. 7)
6. Snap in the docking
insert again. Unit is
now ready to charge
your device.

PLAYING MUSIC
LINE-IN JACK
Connect one end of the included stereo 3.5mm audio cable into the
line-in jack located in the connection compartment and the other end
into the headphone jack on your AndroidTM phone or other audio device.
If the headphone jack is on the bottom of the Android device, guide
plug through the SmartSlide. If headphone jack is elsewhere, guide the
audio cable up through the notch in the rear of the docking insert and
connect to your device. Press the Power Button on the unit. Next,
press the Mode Button as needed until the audio icon appears on the
display. Put your audio device in play mode. Press the Volume
Buttons on the unit to adjust listening level. When you are through
listening, stop or pause play on your audio device. In about 3 minutes,
the icon will disappear and the unit will shut off.
TIP: To turn on unit automatically, connect the audio cable to already-
playing Android; the unit will power on when the audio is detected. 7
Guide cable through dock
or back of insert to connect
plug to headphone jack on
your Android device

SETTING THE TIME
The unit features a Daylight Saving Time (DST) Button for quickly adjust-
ing the time at the start or end of Daylight Saving Time. Press and release
the DST Button at any time to toggle between On (adds one hour) and Off
(subtracts one hour). When set to On, a DST icon appears on the
display.
1. Press and hold the Time Set Button located on the back of the unit until
the hour flashes in the display.
2. Press the +or –Buttons to set the hour. Make sure you are setting the time
to the correct AM or PM time. The PM indicator appears at the upper left
of the display; there is no AM indicator. NOTE: The time can be set to
standard 12 hour time (AM and PM) or to 24 hour time (sometimes called
“military time”). To toggle between 12 and 24 modes, press and release the
Alarm Button (located on top of the unit) at any time during time
setting mode.
3. Press and release the Time Set Button to confirm the hour setting. The
minutes will begin flashing. Press the +or –Buttons to set the minutes,
then press and release the Time Set Button to confirm the current setting
and exit time setting mode.
SETTING AND USING THE ALARM
SETTING THE ALARM
This unit lets you wake to FM radio or built-in buzzer alarm. The alarm
will sound for 60 minutes or until reset/turned off.
1. Press and hold the Alarm Button until the alarm time display flashes.
2. Press the +or –Buttons to adjust the display to the desired alarm time (hold
for rapid adjustment). Remember to set the correct AM or PM alarm time.
8

SETTING AND USING THE ALARM
(CONTINUED)
3. Press the Alarm Button to confirm the alarm time. The wake-to
indicator will flash on the display. Press the +or –Buttons to toggle
between wake to buzzer and wake to radio settings.
Wake to Buzzer: If wake to Buzzer is selected, press the +or –Buttons to
choose HI or LO buzzer alarm volume.
Wake to Radio: If wake to Radio is selected, press the +or –Buttons to select
the desired radio station (press and hold to scan to next clear
station). Press the Alarm Button to confirm radio station
selection. Next, press the +or –Buttons to adjust the wake-up
radio volume (can be set from 5- 40).
4. Press the Alarm Button to exit and confirm alarm settings. An alarm
icon will appear on the display, indicating that the alarm is set and armed.
TIP: Download the FREE iHome Sleep app from the Android Market to enable
your Android music as wake to alarm source!
Reviewing and Resetting the Alarm
Press the Alarm Button at any time to review the current alarm settings.
To toggle the alarm on or off, press the Alarm Button as needed. When
the alarm icon is displayed, the alarm is armed/on.
Press the Power Button or Alarm Button when the alarm is sounding
to reset it to come on again at the same time the next day. Press the
Alarm Button again to turn off/disarm the alarm. The alarm icon will
disappear.
SNOOZE FEATURE
You can interrupt the alarm by pressing the Snooze/Dimmer Button while
the alarm is sounding. The alarm will resume at the end of the set snooze
time. The snooze duration time is adjustable. To change the snooze time
from the default (9 minutes), press and hold the Snooze/Dimmer Button
during normal operation (when alarm is not sounding) until the snooze time
flashes in the display. Press the +or –Buttons to adjust the time between 1 and
29 minutes), then press the Snooze/Dimmer Button to confirm.
9
4
Tabla de contenidos
Otros manuales de Altavoces de acoplamiento de iHome


