ICON Pixels Series Manual de usuario

N16549
Pixels Series 5.5"/6.5"/8" Active Studio Monitor System
PX-T5A 2
PX-T6A 2
PX-T8A 2
ixels

WARNING: To reduce the risk of fire or electric shock, do not expose this unit to
rain or moisture
Important Safety Instructions
1. Read this manual thoroughly before using this unit.
2. Keep this manual for future reference.
3. Take notice of and comply with all warnings included in the user's manual or indicated
on the appliance.
4. Follow all instructions included in this manual.
5. Do not expose this unit to rain or moisture. Avoid having water or other liquids spilled
on this unit.
6. When cleaning the cabinet or other parts of this appliance, use only a dry or slightly
damp soft cloth.
7. Do not block any ventilation openings or interfere with the proper ventilation of this unit.
Install in accordance with the manufacturer's instructions.
8. Do not use or store near any heat sources such as radiators, heat registers, stoves, or
other heat-producing appliances.
9. Do not interfere with the safety purpose of the polarized or grounding-type plug. A
polarized plug has two blades with one wider than the other. A grounding-type plug h
as two blades and a third grounding prong. These are designated for your safety. If the
provided plug does not fit into your outlet, consult an electrician.
10. Protect the power cord from being walked on or otherwise damaged by items placed
on or against them. Particular attention should be given to the plugs, receptacles, and
the point where the cord exits the appliance.
11. To avoid the risk of electrical shock, do not touch any exposed wiring while the unit is
in operation.
12. Only use attachments/accessories specified by the manufacturer.
13. Unplug this unit and all connected electrical equipment during lightning storms or when
left unused a long period of time.
14. Refer all servicing to qualified service personnel. Servicing is required when the
appliance has been damaged in any way or fails to operate normally.

Introduction
What's in the package
Register your ICON ProAudio product to your personal account
Features
Front Panel Layout
Rear Panel Layout
Setting Up your PX-T G2 Active Studio Monitor System
Background on the PX-T G2 Active Studio Monitor System
Positioning the PX-T G2
Speaker Orientation
Reflection
Connecting your PX-T G2 Active Studio Monitor System
PX-T G2 Quick Connections
Operating your PX-T G2 Active Studio Monitor System
PX-T G2 Control and Connectors Panels
Powering the PX-T G2
Things that go hum!
Front Panel Controls
The Rear Panel: The Ins and the Outs
Specifications
Services
Contents
2
3
4
6-7
1
1
5
6
7
7
9-10
8
8
9
11
12
6
10
9
9
9

Introduction
What's in the package?
2 2 2
PX-T5A / PX-T6A or PX-T8A Active Studio Monitor System
Users' Manual
Power Cable
TM
"Vasorb " x 4pcs.
1
Thank you for purchasing the ICON PX-T series active studio monitor system.
We sincerely trust this product will provide years of satisfactory service, but if
anything is not to your complete satisfaction, we will endeavor to make things
right.
In these pages, you'll find a detailed description of the features of the PX-T,
step-by-step instructions for its setup and use, and full specifications.
Please register the product on our website at the below link www.iconproaudio.
com/registration:
You'll also find a warranty card enclosed---please don't forget to fill it out and
mail it so that you can receive online technical support at: www.iconproaudio.com.
And so we can send you updated information about these and other ICON
products in the future. As with most electronic devices, we strongly recommend
you retain the original packaging. In the unlikely event the product must be
returned for servicing, the original packaging (or reasonable equivalent) is required.
With proper care , your PX-T will operate without any trouble for many years. We
recommend that you record your serial number in the space provided below for
future reference.

Register your ICON ProAudio product to your
personal account
1.Check serial number of your device
Please go to http:// iconproaudio.com/registration or scan the QR code
below.
Input your device’s serial number and the other information on the
screen. Click“Submit”.
A message will pop up showing your device information such as
model name and its serial number - Click “Register this device to my
account” or if you see any other message, please contact our after-
sales service team
2.Log in to your personal account page for existing user or sign
up for new user
Existing user: Please log into your personal user page by inputing
your user name and password.
New user: Please click “Sign Up” and fill in all the information.
3.Download all useful materials
All your registered devices under your account will show on the
page. Each product will be listed along with all its available files
such as drivers, firmware, user manual in different languages and
bundled software etc. for download.
Please make sure you have download the necessary files such as
driver before you begin device installation.
2

Features
The ICON PX-T series Active Studio Monitor system provide a smooth response
that is accurate and pleasant to listen to. Here are some of its main features:
Compact high performance active studio monitor
R-Type Transformer for super clean output
Active 2-Way Monitor System with complex Active Crossover design
High, Mid and Low range contour control
High-Pass Filter - Flat, 60Hz & 80Hz selectable
The ideal solution for near-field monitoring in any recording or broadcasting facility
Designed for use in stereo as well as multichannel setups
Tuned by top-skilled acoustic engineer's ear to fulfill any requirements in real
recording studio environments
TM
ICON's "Vasorb " monitor stands are included
Build-in Bi-Amp power module for low and high frequency drivers
2
PX-T5A : 60-watts on LF and 30-watts on HF
2
PX-T6A : 80-watts on LF and 30-watts on HF
2
PX-T8A : 100-watts on LF and 30-watts on HF
Mid/Woofer
ICON 5"/6"8" polypropylene with paper dustcap
Low loss SBR surround with low creep and long time reliability
Progressive spider to achieve soft clipping and low distortion even under extreme load
Dual magnet ferrite magnet system with extended height for superb bass reproduction
Aluminum short circuiting ring
Very rigid die-cast aluminum chassis with very open geometry for optimized air-flow
to eliminate compression
Tweeter
High-end 1" dome tweeter
Soft fabric dome and surround with wide-dispersion optimized geometry
Big surround to reduce distortion
Low loss ferrofluid-free magnet system for open and detailed sound
Robust and very rigid design
Diffraction optimized smooth front baffle design
Extended front baffle dimensions to eliminate any vibration or sound radiation from
the enclosure
3

Front Panel Layout
1" silk dome tweeter
Smooth high frequency response produced from silk dome, neo-
dymium magnet with ferrofuild plus heat sink cooling for high output
Low frequency driver
Heavy duty extended range low frequency transducer.
Power LED
Orange LED glows when the unit is powered on and ready for
operation.
Finish
Durable spray finish
"Vasorb (TM)" monitor rubber feet
ICON large rubber feet keep enclosure in place even at high sound
pressure levels.
1
2
3
4
5
5
4
3
2
1
4

Rear Panel Layout
Hi-Pass filter control
3-position switch used to adjust the Hi-Pass filter from Flat, 60Hz & 80Hz
1
2
3
4
7
8
Hi, Mid and Low range contour control
3-position switch used to adjust the Hi, Midrange and Low response
providing customized voicing from hi-fi to agreesive midrange.
Volume
Controls the amount of output level
XLR balanced input
Balanced, line level input is connected here via standard XLR cable.
Voltage Selector
110V / 220V input voltage selector
Power Switch
Turns the unit on/off.
5
1/4" TRS balanced input
Balanced TRS (Tip, Ring, Sleeve) 1/4" plug used to connect balanced
or unbalanced line level signals.
9
AC inlet
Connect the supplied IEC power cable here.
6
RCA unbalanced input
Used to connect signals from unbalanced, -10dBV devices.
Tuned port
Quiet port design offering linear extended low frequency response.
10
Input
Balanced
Risk of electrical shock
Do not open
Risque de shock electrique
Ne pas ouvrir
CAUTION
CAUTION: TO REDUCE THE RISK OF FIRE OR ELECTRIC SHOCK
DO NOT REMOVE BOTTOM COVER.
NON SERVICABLE PARTS INSIDE.
DO NOT EXPOSE THIS EQUIPEMNT TO RAIN OR MOISTURE.
REFER SERVICING TO QUALIFIER PERSONNEL
S/N
Flat
HOT
Rear panel may become too hot to touch. Leave
enough space for proper ventilation.
Warning
This equipment is capable of delivering sound
pressure levels considerably higher than 90dB,
which may cause permanent damage.
Hi-Pass
Balanced
Unbalanced
EQ
60
Hz
80
Hz
-2
HF
0 +2
2
PX-T5A
Pixels Series 5.5" Active Studio Monitor System
Min Max
Volume
N16549
MADE IN PRC
Ixels
ACTIVE STUDIO MONITOR
~115V T2AL 60Hz
~230V T1AL 50Hz
AC in
Voltage
Selector
220V
-2
LF
0 +2
-2
MF
0 +2
Power
ONOFF
5
6
7
1
3
8
9
10
4
2
5

Setting up your PX-T G2 Active Studio Monitor System
Background on the PX-T G2 Active Studio Monitor system
The PX-T G2 is a near filed studio monitor featuring a custom design
with 5.5", 6.5" or 8" copolymer. low frequency driver and a 1" silk tweeter
employing a ferrofluid-cooled voice coil and neodymium magnet. The
monitor's crossover has been carefully designed with high quality
components insuring a linear frequency and phase response. The
PX-T G2 enclosure is constructed from MDF. It has designed with tuned
vent port that provides extended low-end response, and with a low
turbulence design, the low frequency driver can move freely with minimal
effect on the overall impedance. On the rear of the of the enclosure you'll
find a variety of input connectors including XLR, 1/4" TRS balanced input
and RCA unbalanced input. These inputs are connected to PX-T G2
internal Bi-Amp power module providing power to each PX-T G2
monitor speaker. You will also find the pre-amp controls, including Volume
knob, used to adjust the overall level of the internal power amplifier, as
well as the innovative Hi, Midrange and Low presence control. These
controls allow the mix engineer to contour the Hi, Midrange and Low
response of the monitor from a traditional hi-fi sound to flat and then
through two levels of aggressive Hi, Midrange, Low response. The
PX-T G2 has been designed to provide flat, accurate monitoring, and at
the same time, to provide an adjustable response curve so that the sound
of other popular nearfield monitors can be easily emulated.
Positioning the PX-T G2 monitor
Near field monitoring has become choice of
many engineers in large and small studios
because it minimizes the effect of room
acoustics. By positioning the reference
monitors in the near field (close to the
listener), you can greatly reduce the effects
of room acoustics.
The most important considerations when
evaluating the effects of room acoustics are reflective surfaces that are
around the monitoring area. These can include flat tabletops, glass
mirrors, framed pictures, large open walls and even the surface of your
mixing console. All reflecting sound will eventually reach the listening
position, but since it is slightly delayed from the direct source, the result
is random cancellation of some frequencies, or comb filtering. If possible,
remove any and all reflective surfaces. You may also want to hang some
acoustic foam on walls that are close to the monitors.
When positioning the monitors, you'll want to set up what is commonly
referred to as the "mixing triangle". In this ideal configuration, the space
between the left and right monitor is equal to the distance from the
listener to each monitor, forming an equilateral triangle (as figure 1 shown).
Equal
Distance
Figure 1
6
Setting up your PX-T G2 Active Studio Monitor System
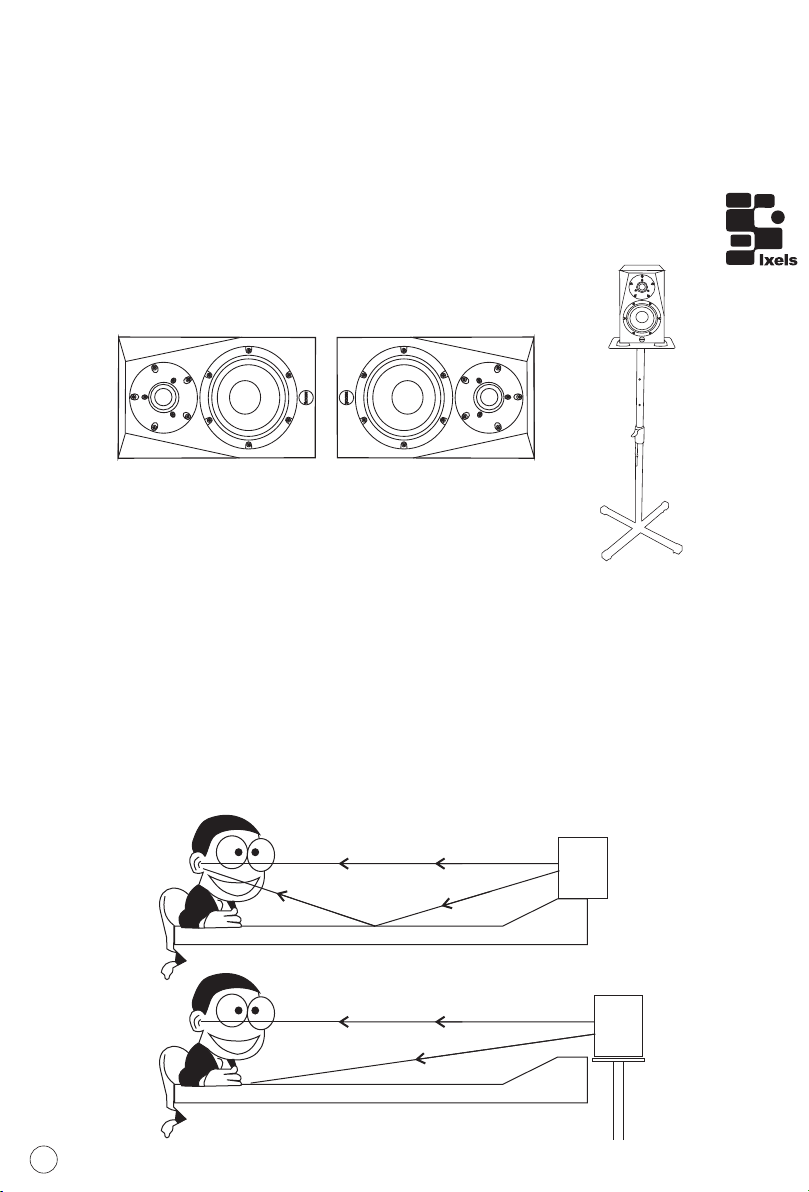
Speaker Orientation
The PX-T G2's can be used in either the vertical or horizontal position.
When using the monitors in the horizontal position, be certain to place
the left and right side tweeters on the outer most sides. (As Figure 2
shown). This will improve the stereo imaging and bass response by
increasing the coupling of the low-end drivers.
Reflection
When choosing the height of your monitor system, be careful to avoid
reflections off the surface of the mixing console (As Figure 3 shown).
These reflections arrive at the listening position slightly delayed from
the original sound resulting in strange cancellations and overall
unpredictable response. Visualize straight lines representing the
beams of sound radiating from the monitors and choose a height that
reduces the occurrence of reflections that will end up in the prime
listening spot (As Figure 4 shown). In most cases, the ideal position is
slightly behind and above the mixing console's meter bridge.
Figure 2
Figure 3
Figure 4
SB100X
ICON Studio Monitor Stand
7
Este manual sirve para los siguientes modelos
3
Tabla de contenidos
Otros manuales de Oradores de ICON


