
I-Sotec i-soamp-2 Manual de usuario
The easy way to make it better.
THE EASY WAY TO
GET MORE MUSIC!
Manual

– 2–
Congratulations on your purchase of this i-sotec
product, and thank you for your trust! With this
i-sotec-amplifier you have acquired a techno-
logically fully developed and innovative product
that will give you many years of outstanding
music enjoyment.
We have gone to great lengths with both the
circuit design and the product design to create a
product that you will be able to enjoy for many
years.
i-sotec-products contain the sum of experience
gained over many years by our engineers, editors
of specialist publication and not least the car audio
dealers who have given us many ideas.
The i-soamp-2 is a 2-channel car audio amplifier
that was specifically designed for use in cars with
integral (OEM) car radios. A complete adaptor
range permits connections without elaborate
cabling work with more than 500 vehicle models.
The i-soamp-2 can, of course, also be operated
with any standard commercial car radio. Alterna-
tively, the channels may be configured to bridge
mode to enable the subwoofers to be operated
at more than twice the output.
The many adjustment and adaptation possibilities
make i-sotec i-soamp-2 an all-round genius for
your car.
Please read these instructions carefully
before installation and operation to avoid
operating problems. If in doubt, please
consult your specialist dealer.

– 3–
INTENDED USE:
The i-soamp-2 is exclusively intended for
operation in a car with a 12V vehicle electrical
system and on the original loudspeaker cable
harness. It takes the audio signals of the OEM
radio and conducts them to the vehicle loud-
speakers in amplified form.
INSTALLATION
When installing the equipment, be sure that it is
well ventilated. It must not be covered or
mounted near other heat emitting objects or be
subjected to direct sunlight!
The i-soamp-2 can heat itself up significantly
(up to 80°C); it is therefore important to ensure
sufficient clearance from other heat-sensitive
vehicle components (particularly plastic parts and
electronic components)!
For safety reasons, the device must be securely
mounted in the vehicle. Attach the device with
the supplied mounting screws to a firm and
suitable base. Do not drill holes in parts of the
vehicle if you are not sure what is located behind
it.Watch out for wiring harnesses and fuel lines!
1. Connections
The i-soamp-2 is connected directly to the
vehicle cable harness and to the original radio
with an adaptor. Vehicle models without an ISO
connection require a special vehicle-specific
adaptor for this purpose. Please consult the
i-sotec vehicle list to check whether you need
an additional adaptor to connect the i-soamp to
your vehicle.
You can do this online as well at:
http://www.i-sotec.com/de/products/chooser.php.
– 4–
1.1 Option no.1
Remove the original radio from the radio slot
according to the vehicle manufacturer‘s instruc-
tions so that you can get to the terminals on the
rear side of the radio. If your original radio has
an ISO terminal – possibly next to other terminals
such as the antenna cable - you will find the
following two plugs which can be removed after
pressing together the locking mechanism on the
side:
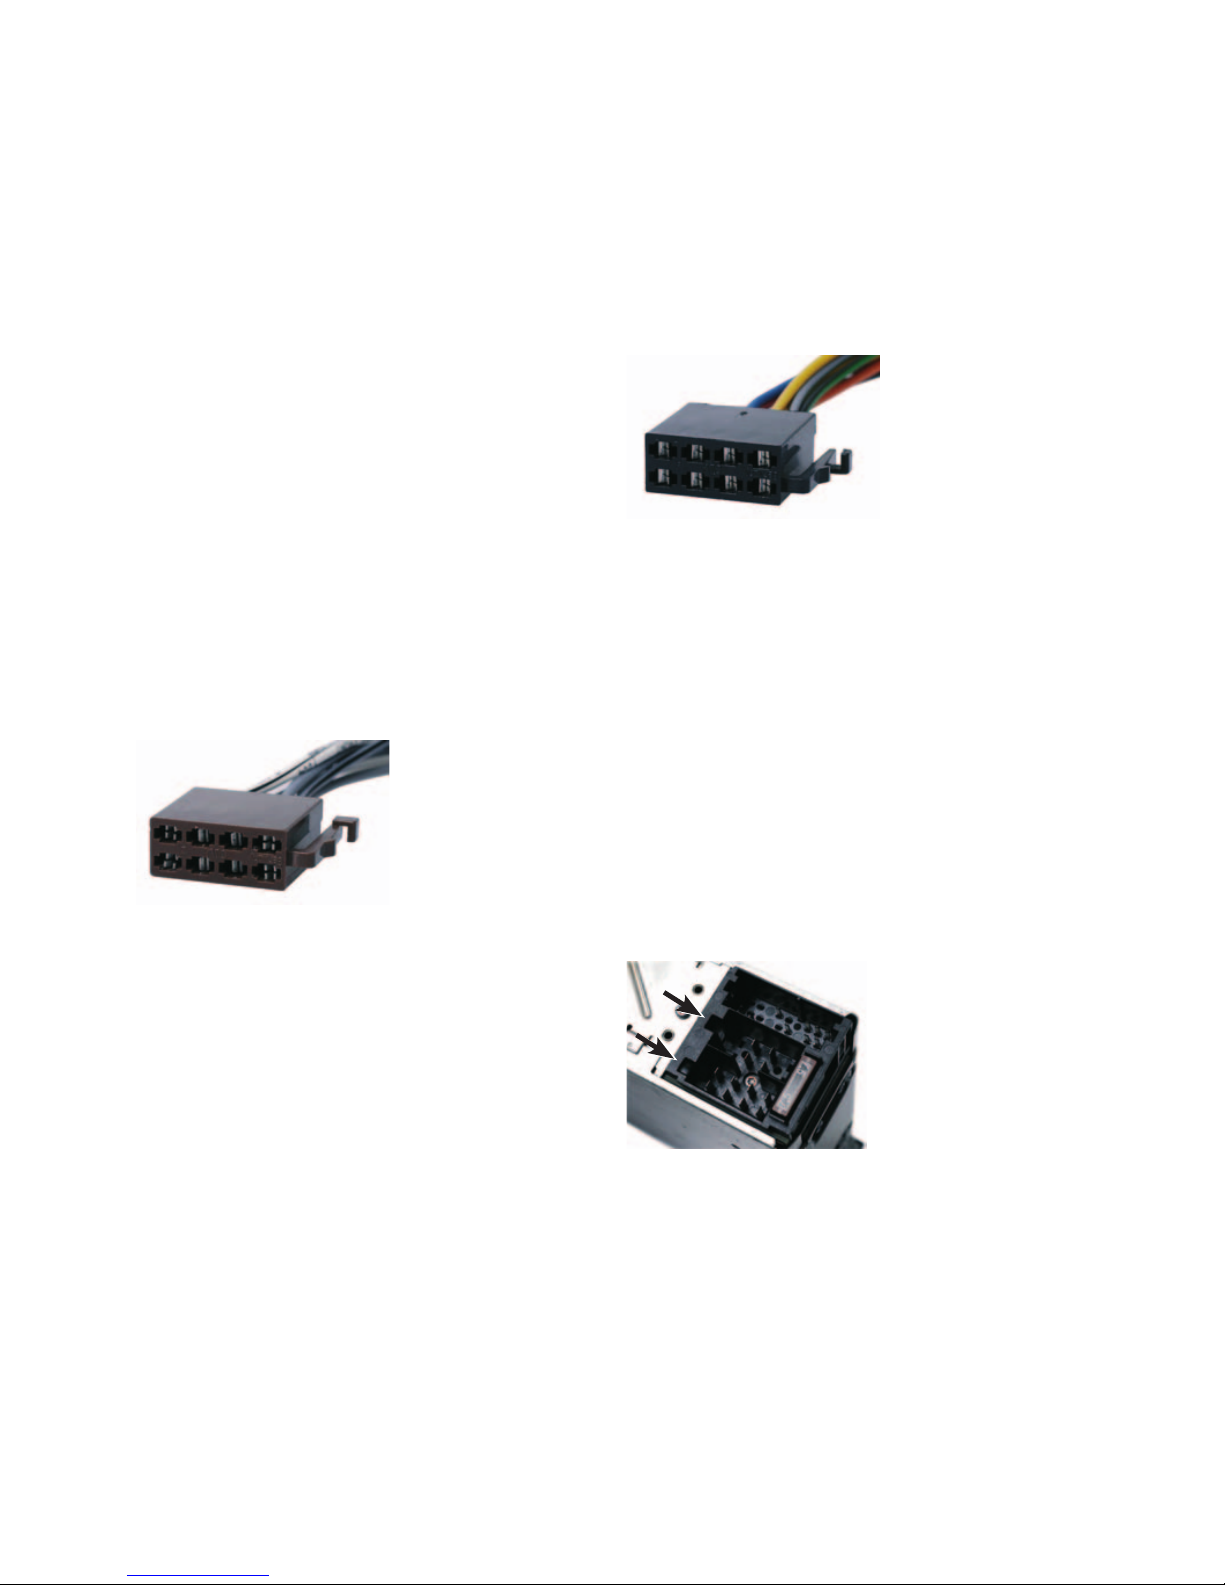
ISO plug for the loudspeaker connection
This plug (below
also referred to as
the ISO loudspeaker
plug) can be clearly
identified by the fact
that the locking
mechanism is located in the center of the
narrow side of the plug.
Apart from that, the plug is usually made of
brown plastic and the connected loudspeaker
cables are typically grey and white.
The color coding, however, is not uniformly
maintained by all vehicle manufacturers and can
vary.
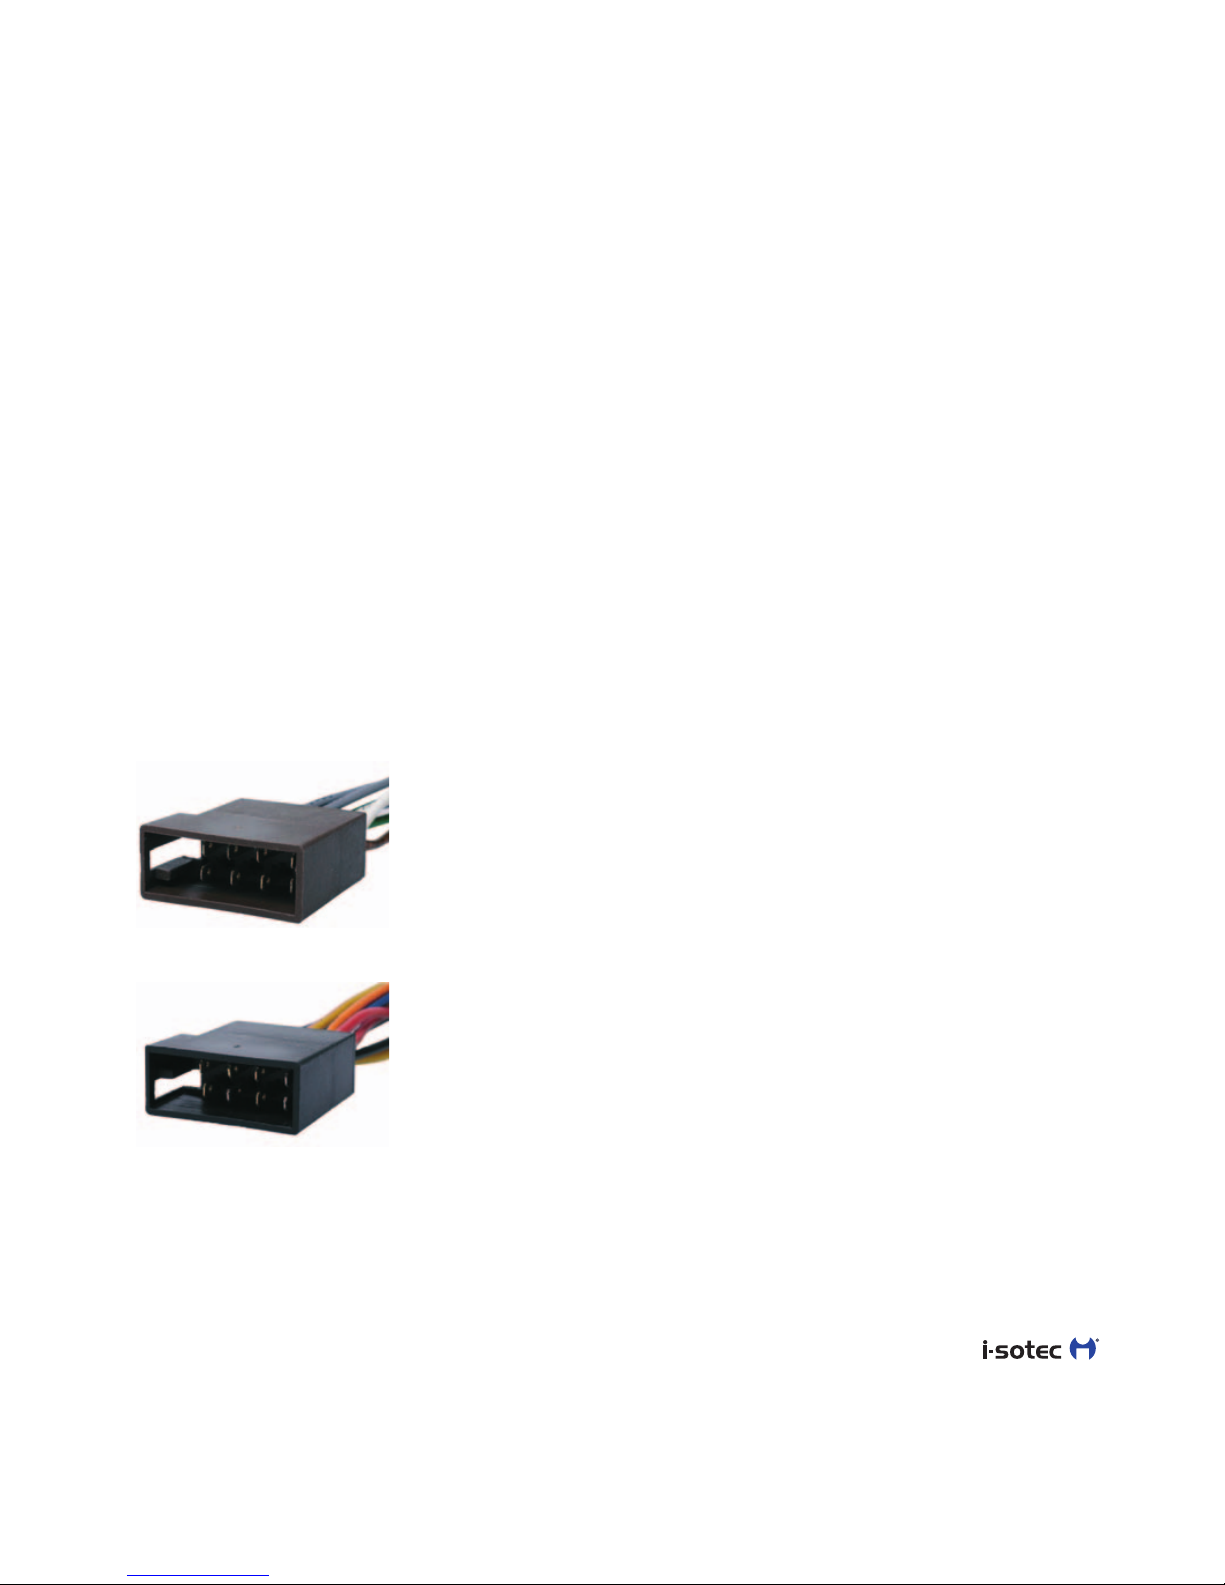
ISO plug for the power connection
This plug (below
also referred to as
the ISO power plug)
can be clearly
identified by the fact
that the locking
mechanism is not located in the center of the
narrow side of the plug.
Apart from that, the plug is usually made of black
plastic and typically a red, a black, a yellow and
additional colored cables are connected to this
plug.The color coding, however, is not uniformly
maintained by all vehicle manufacturers and can
vary.
The mating parts for these ISO plugs are called
ISO receptacles
The ISO receptacle
for the loudspeaker
connection (ISO
loudspeaker recepta-
cle) can only be
connected to the
matching ISO loud-
speaker plugs.The ISO coupling for the power
– 5–
connection (ISO power receptacle) can also only
be connected to the matching ISO power plugs.
Here, too, a corresponding groove located on
the side of the coupling ensures the correct
connection.
In most radios these receptacles are directly
recessed in the housing as Terminals.
Use the two ISO couplings on the i-soamp
cable harness shown here to connect the existing
ISO plugs, located in the vehicle‘s cable harness,
to the i-soamp:
ISO loudspeaker receptacles
on the i-soamp cable harness
ISO power receptacle on the
i-soamp power adaptor
– 6–
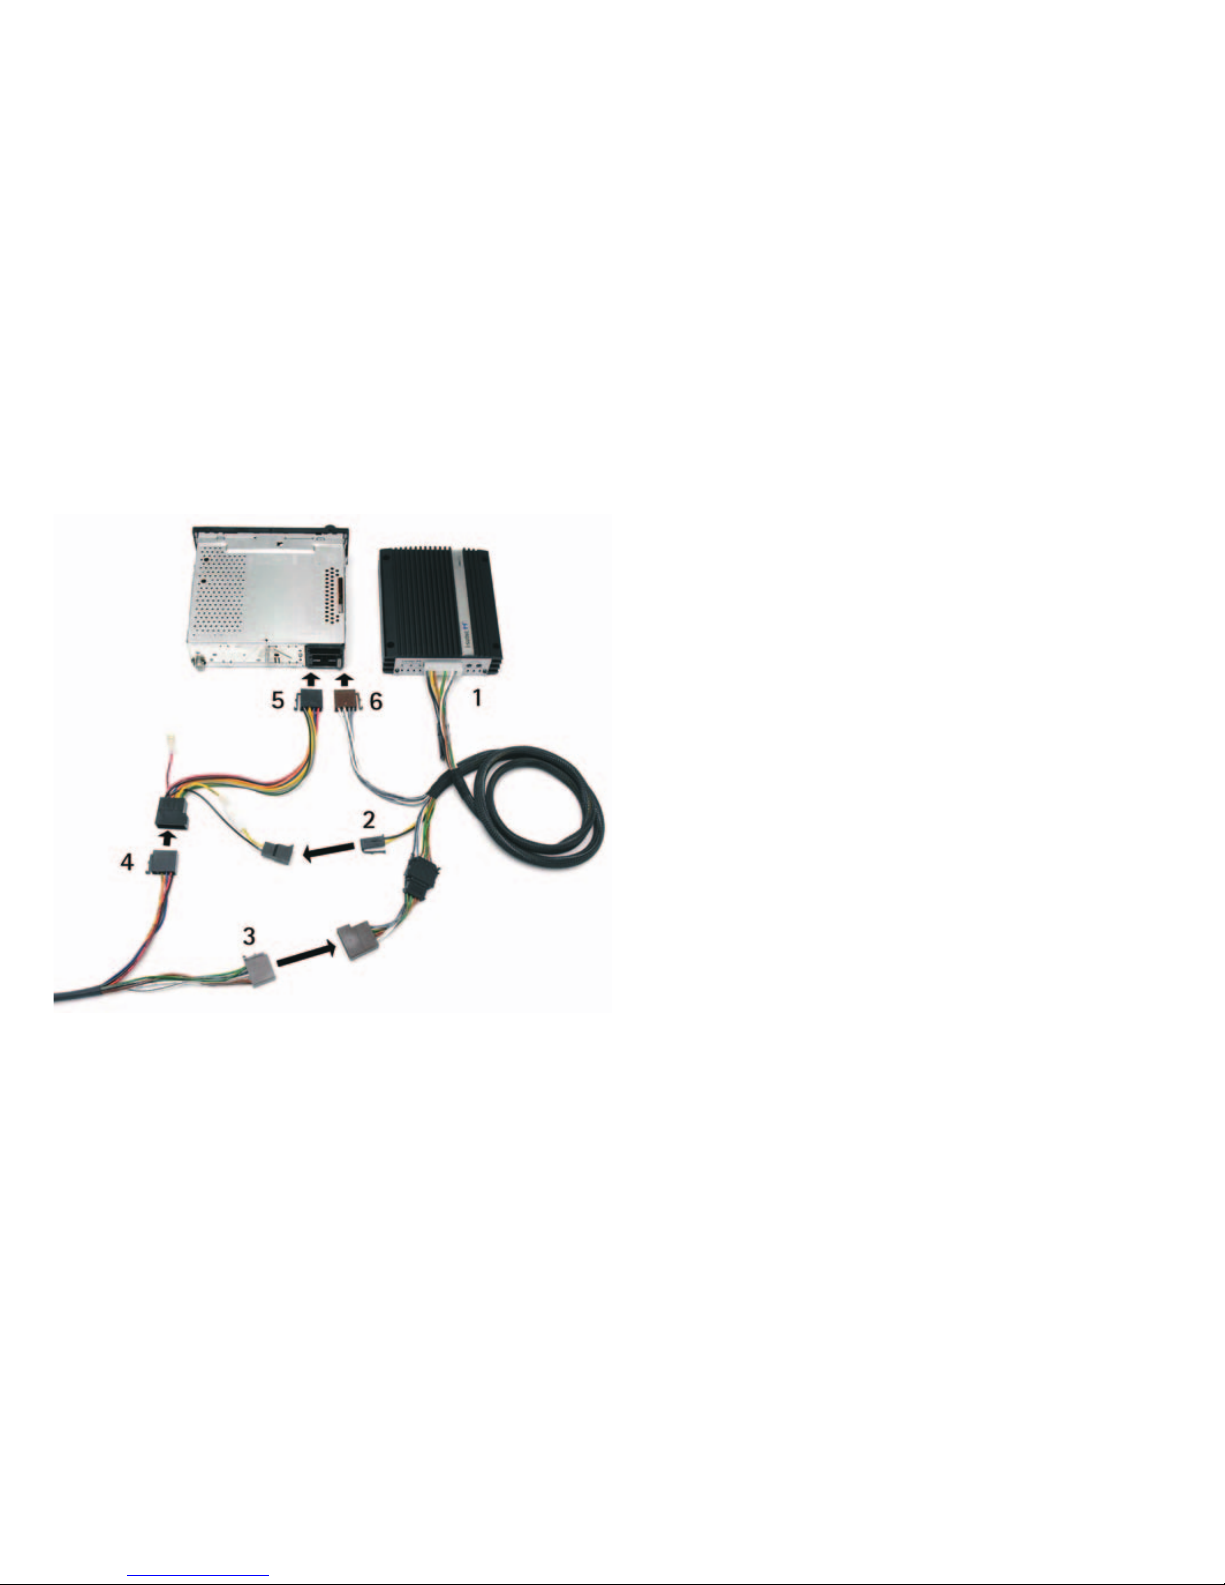
1.2 Overview: the i-soamp-2 connection
principle
This depiction is designed to give you an overview
of how the i-soamp is connected to your vehicle‘s
components in principle.
The following steps are required to connect the
i-soamp-2 to your existing car radio:
1. Connect the i-soamp cable harness to the
compact plug on the i-soamp-2.
2. Connect the power plug on the i-soamp
cable harness to the power receptacle of the
supplied power adaptor
3. Remove the ISO loudspeaker receptacle of
the vehicle‘s cable harness from the car radio
and connect it to the ISO loudspeaker
coupling (brown) of the i-soamp cable
harness. (For details on connection variants
see Chapter 1.3 and 1.4)
4. Remove the vehicle cable harness ISO power
coupling from the car radio and connect it to
the ISO power coupling (black) of the supplied
power adaptor (For details on the power
connection see Chapter 1.6 and 1.7)
5. Connect the ISO power plug (black) of the
supplied power adaptor to the ISO power
receptacle of the car radio
6. Connect the ISO loudspeaker plug (brown) of
the i-soamp cable harness to the ISO
loudspeaker receptacle of the car radio.
In any case, be sure to read the following chapter
before you start connecting the i-soamp-2 to
find out about the details of the individual
connection options.
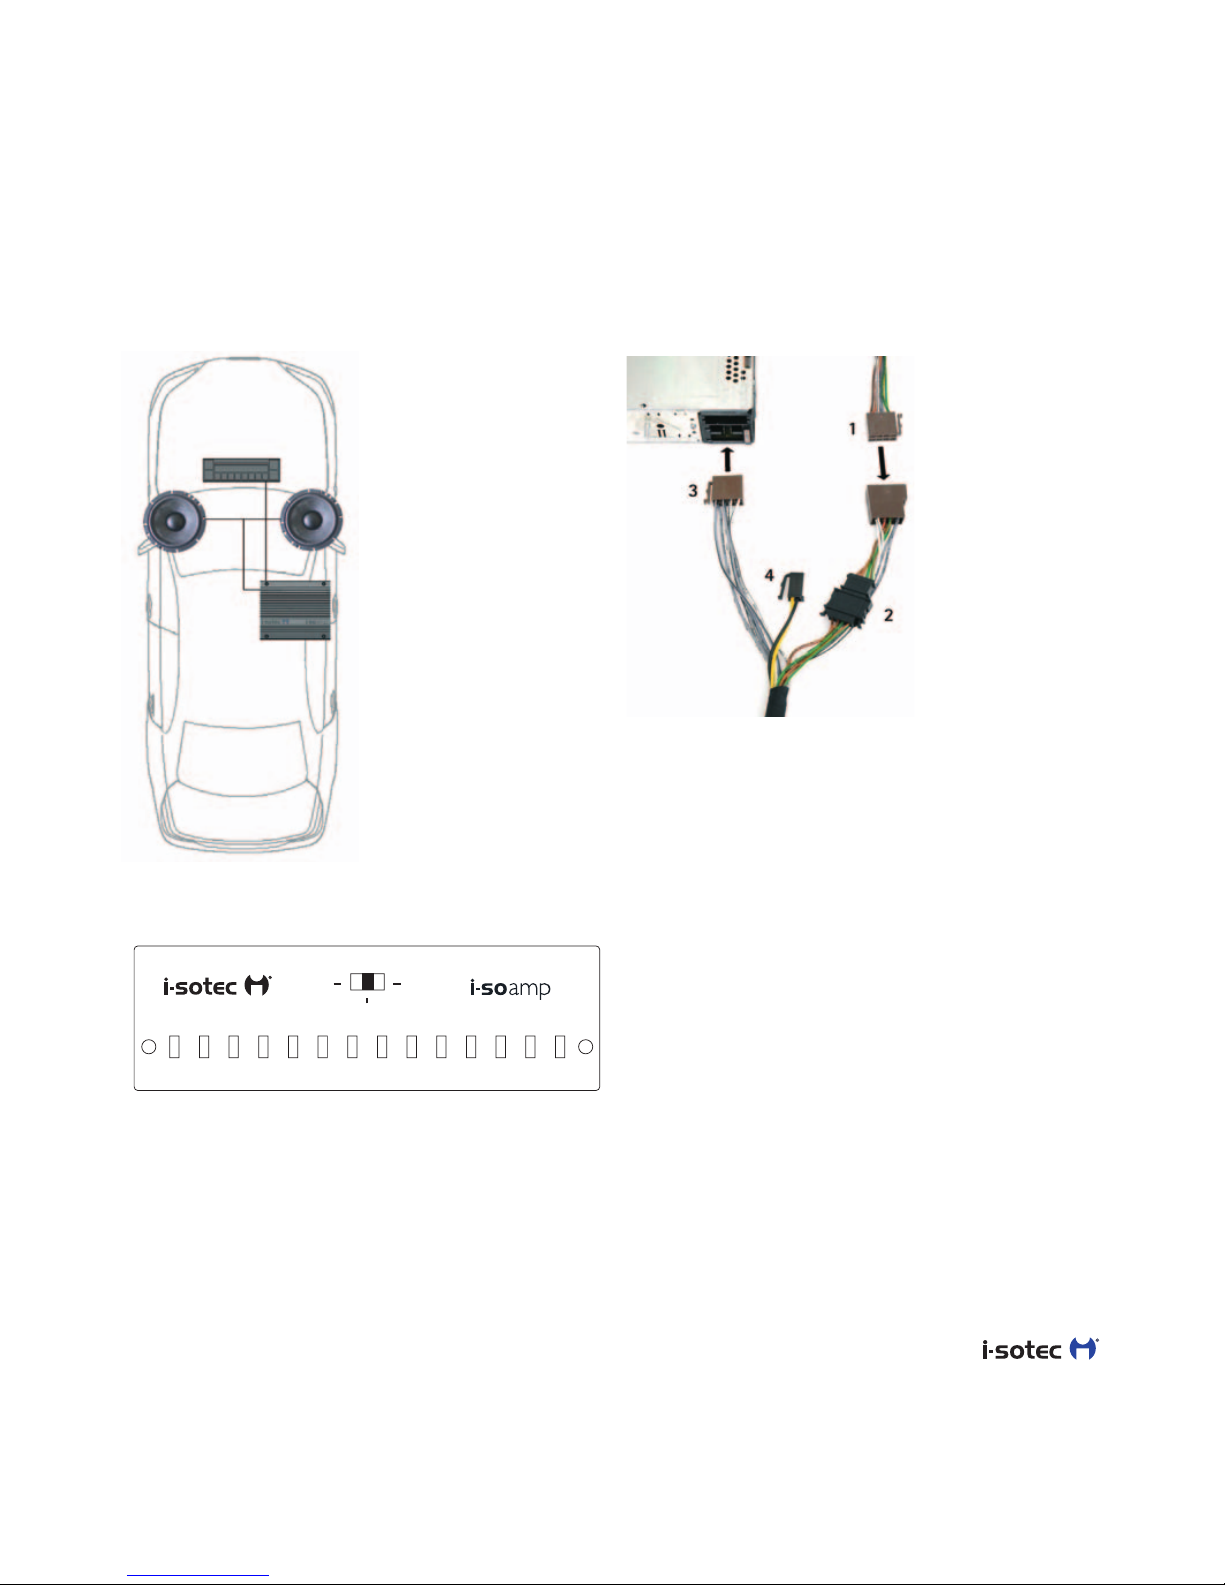
– 7–
1.3 „Normal“ loudspeaker connection option
The i-soamp-2 is
connected to the front
speakers (e.g. for small
convertibles).
The selector switch is
set at the „normal“
position.This means
that all loudspeakers
are operated without
affecting the frequency
response.
„Normal“ loudspeaker wiring diagram
After the
i-soamp-2
cable harness
has been
connected to
the compact
plug on the
i-soamp-2, the
loudspeakers are
connected as
follows:
1. Remove the vehicle cable harness ISO
loudspeaker plug from the car radio and
connect it to the ISO loudspeaker receptacle
(brown) of the i-soamp cable harness.
2.The two 4-pole plugs stay connected (as it is
when delivered)
3. Connect the ISO loudspeaker receptacle of
the i-soamp cable harness with the car radio
ISO loudspeaker receptacle.
4.The power connection is performed in
accordance with Chapter 1.6 and/or 1.7
SUB
Normal
2 CH
-2
Made in Germany
2 CH + SUB
(extern)
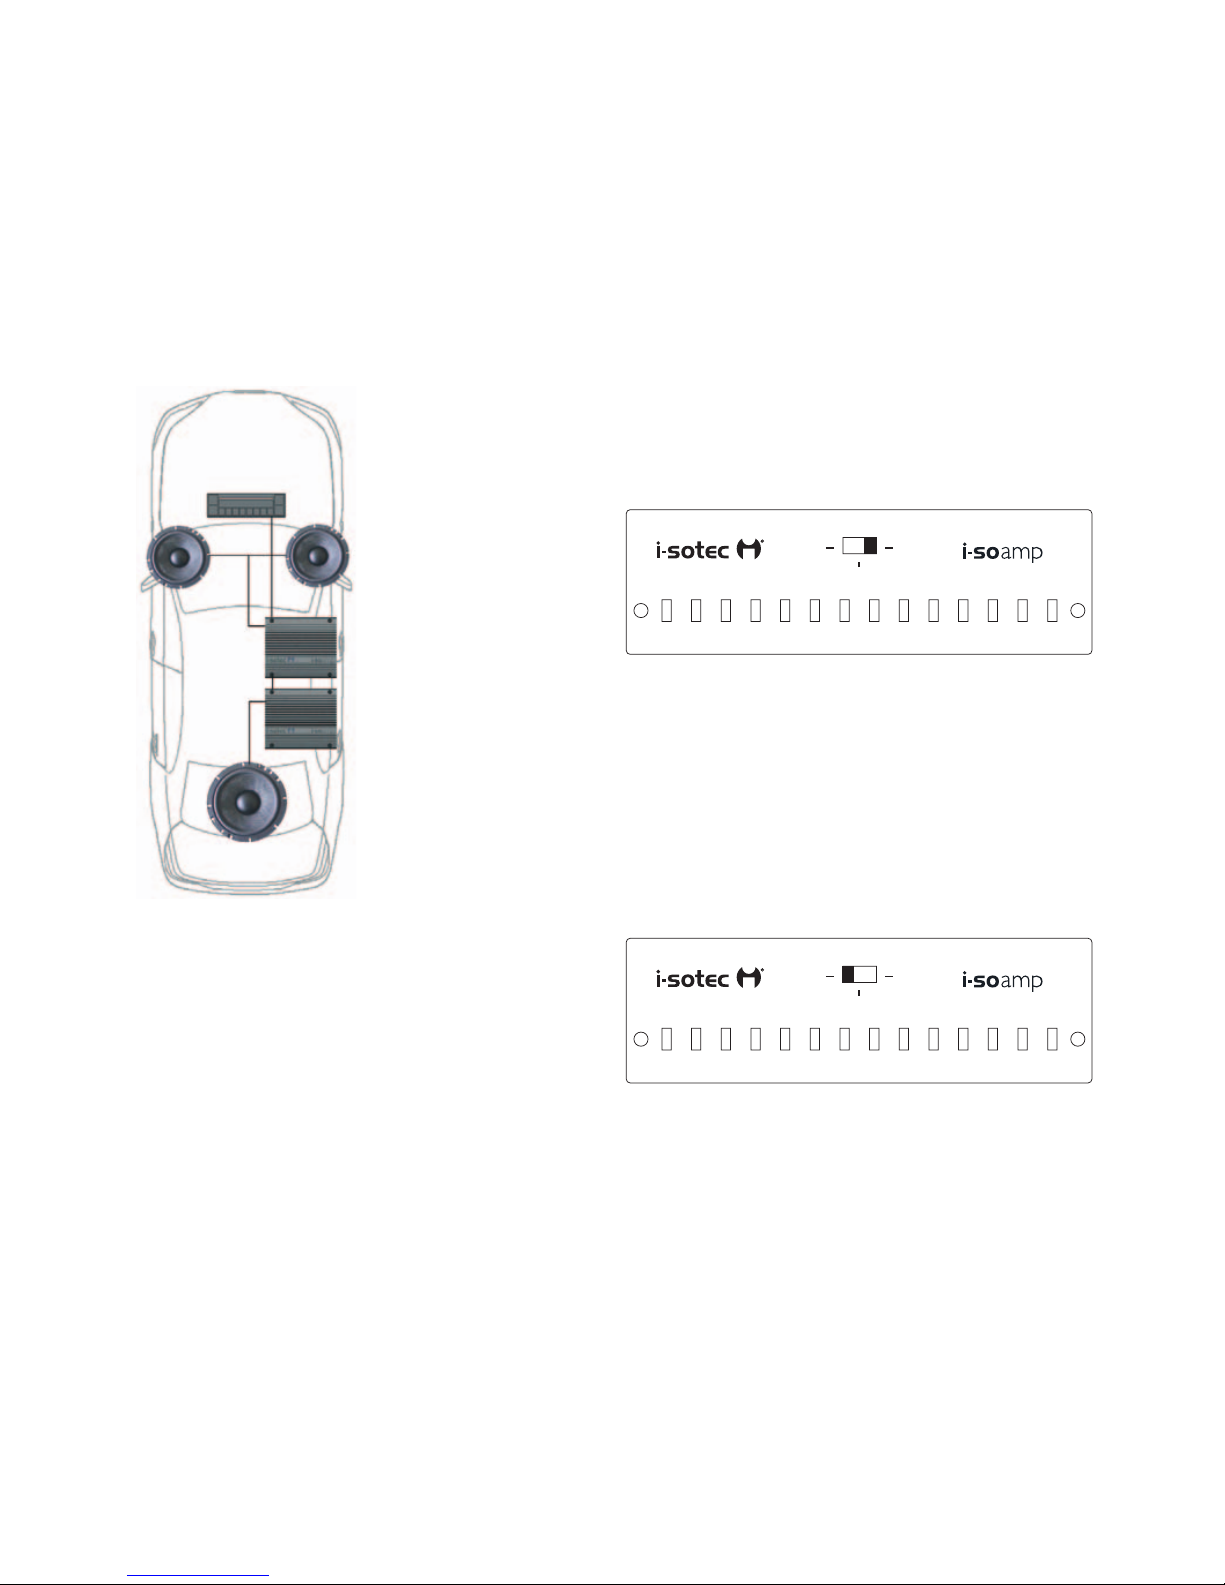
– 8–
1.4 Loudspeaker connection option „Front +
Subwoofer
For this connection
option, the front
loudspeakers and the
rear loudspeakers are
driven by an i-soamp-2.
The bass speaker is
driven by an i-soamp-2.
Signal distribution for
the amplifiers is
performed with a split-
adaptor (AD-0124).
Use only original i-sotec subwoofers! Other
loudspeakers can damage the i-soamp-2!
Due to the increased power requirements of
these two amplifiers it is important to connect
the amplifiers directly to the battery. For further
information, see Chapter 1.7.
For this connection option, the i-soamp-2 selec-
tor switch is set to the „2CH+Sub“ position. In
this switch position the active filters required for
the front and rear loudspeakers are automati-
cally activated.
Setting i-soamp-2 for front loudspeakers
In this connection option, the i-soamp-2
selector switch is set to the „Sub“ position. In
this switch position the active filters required for
the bass speaker are automatically activated.
(Wiring diagram see Normal + Sub)
Setting i-soamp-2 for subwoofer
SUB
Normal
2 CH
-2
Made in Germany
2 CH + SUB
(extern)
SUB
Normal
2 CH
-2
Made in Germany
2 CH + SUB
(extern)
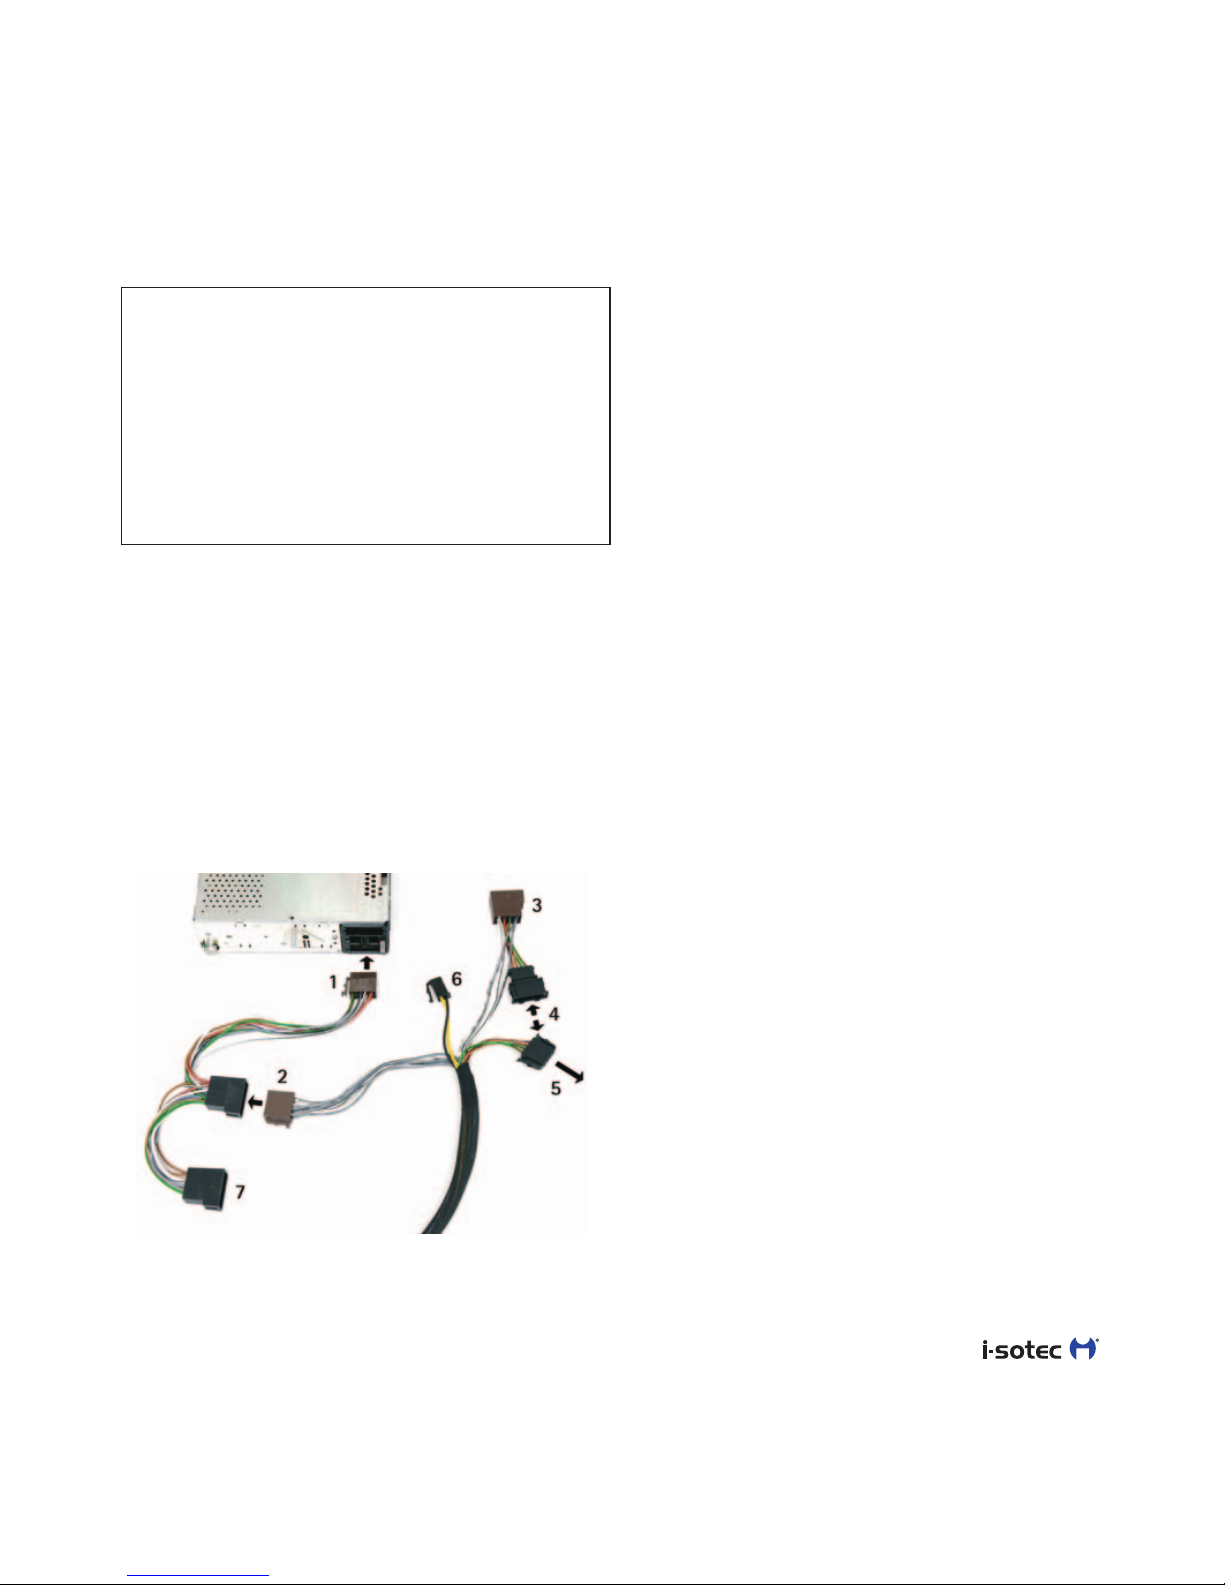
– 9–
The i-soamp-2 has a max. current requirement
of 15A per amplifier. In a few vehicles and when
connecting to two amplifiers, the radio wiring
cannot cover this power requirement.
The i-soamp-2 must then be connected directly
to the battery. (See 1.7)
Loudspeaker Wiring Diagram „Front + Sub-
woofer“
Loudspeaker wiring diagram subwoofer:
after the cable harness of the i-soamp-2 has
been connected to the compact plug at the
i-soamp-2, the subwoofer is connected as
follows:
1.The vehicle cable harness ISO loudspeaker plug
is removed from the car radio.The ISO loud-
speaker of the Y cable AD-0124 is connected
to the ISO loudspeaker receptacle of the car
radio.
2.The ISO loudspeaker of the i-soamp cable
harness is connected to one of the two ISO
loudspeaker receptacles of the split-adaptor.
3.The ISO loudspeaker receptacle of the i-soamp
cable harness is not used.
4.The two 4-pole plugs are removed.
5.The 4-pole plug at the i-soamp cable harness
serves as a connector for the subwoofer.
Please use the original i-sotec subwoofer
connector cable for the connection or the
adaptor cable AD-0126 (subwoofer connector
cable 5m).
6.The power connection is made in accordance
with Chapter 1.7
7.The free ISO loudspeaker receptacle at the
split-adaptor is used for connecting the second
i-soamp-2, which drives the front loudspeakers.
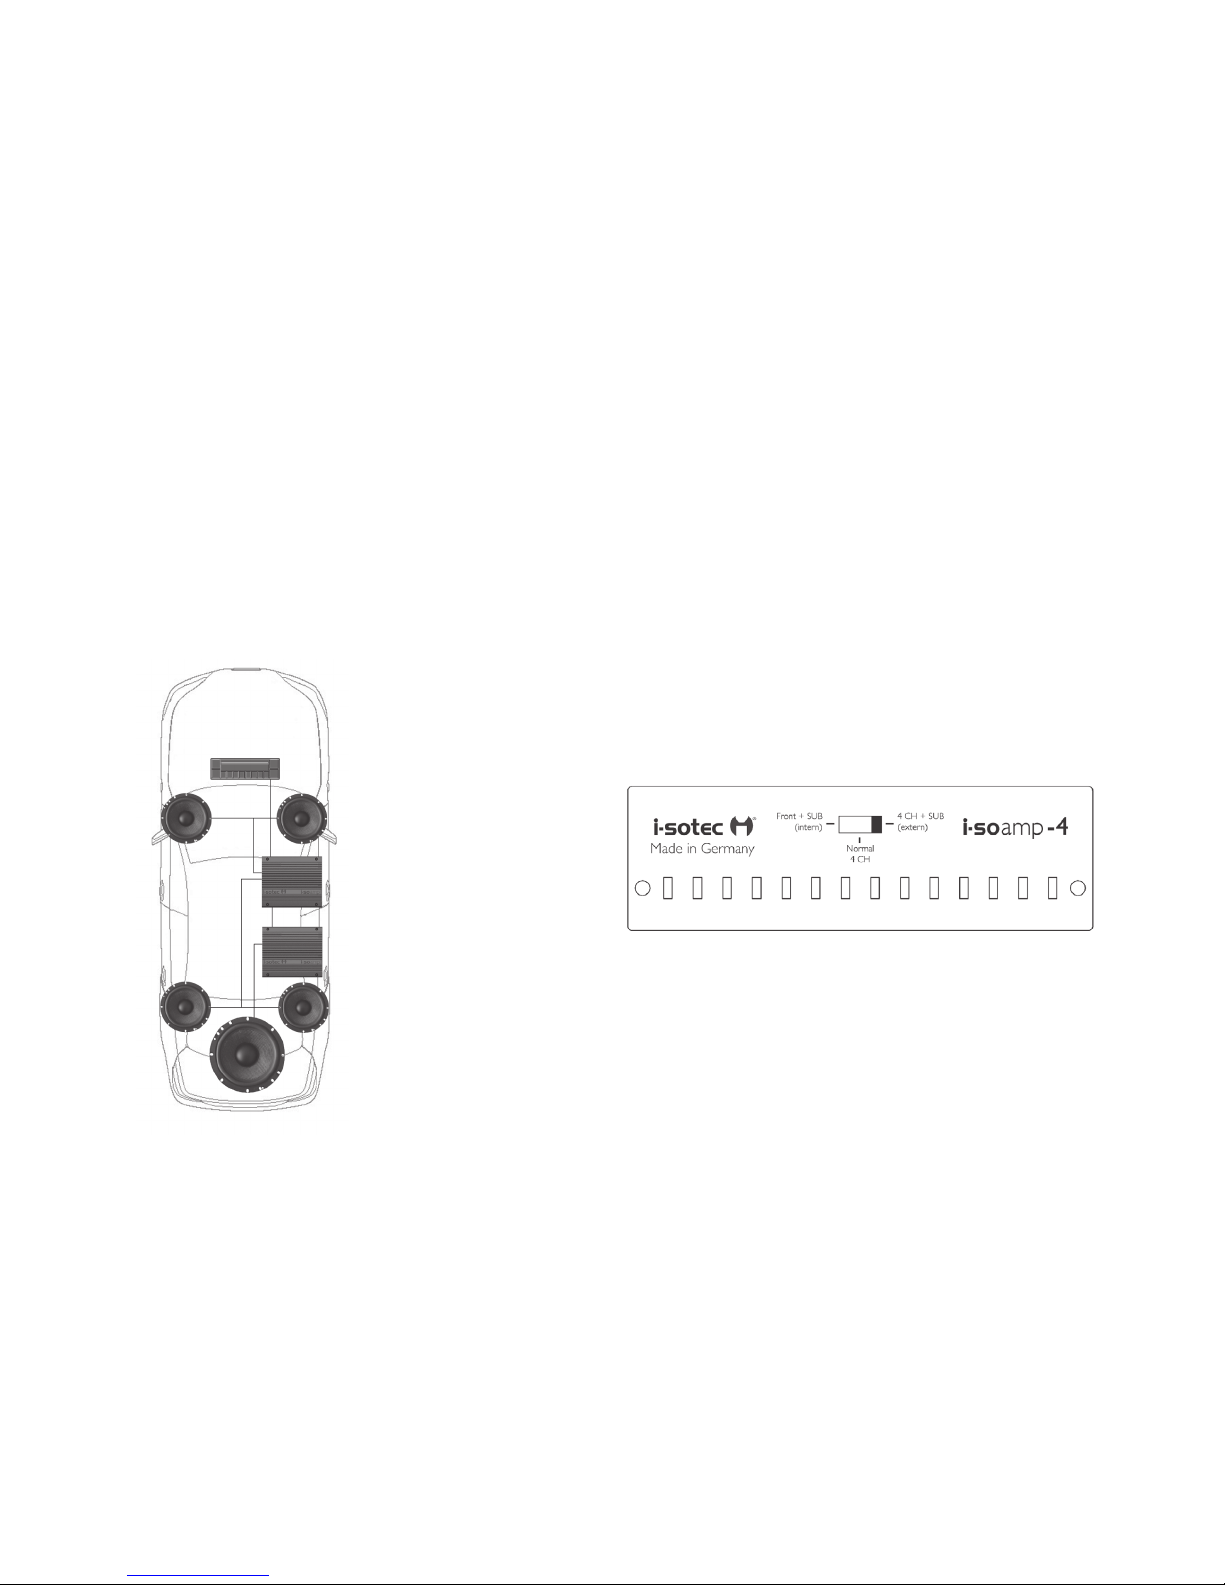
– 10 –
Loudspeaker wiring diagram front loudspeakers:
The i-soamp-2, which drives the front loud-
speakers, is connected as described in Chapter 1.3.
Instead of the ISO loudspeaker receptacle of the
car radio, however, now the free ISO loudspeaker
receptacle of the split-adaptor AD-0124 is to be
used to connect the cable harness of the
i-soamp-2 to the car radio (Chapter 1.3, point 3).
1.5 Four loudspeakers + Subwoofer
With this connection
option the front
loudspeakers and the
rear loudspeakers are
driven by an i-soamp-4.
The bass loudspeaker is
driven by an i-soamp-2.
Signal distribution for
the amplifiers is per-
formed via a separate
split-adaptor AD-0124
available from i-sotec.
Use only original i-sotec subwoofers! Other
loudspeakers can damage the i-soamp-2!
Due to the increased power demand for these
two amplifiers it is important to connect the am-
plifiers directly to the battery. See Chapter 1.7 for
additional information.
With this connection option, the selector switch
for the i-soamp-4 is set to the „4 CH+Sub“
position. In this switch position the active filters
required for the front and rear loudspeakers are
automatically activated.
Setting i-soamp-4
Otros manuales para i-soamp-2
1
Tabla de contenidos
Otros manuales de Amplificador de coche de I-Sotec


