Hyundai H-1444 Manual de usuario
лчиттничюнльтцию.
глтчн.Бзвыдны
www.sotmarket.ru
дбняинфмциятв,
тзывы,бзыиы
Инструкция для
Hyundai H-1444
Перейти в карточку товара
8 800 775 98 98
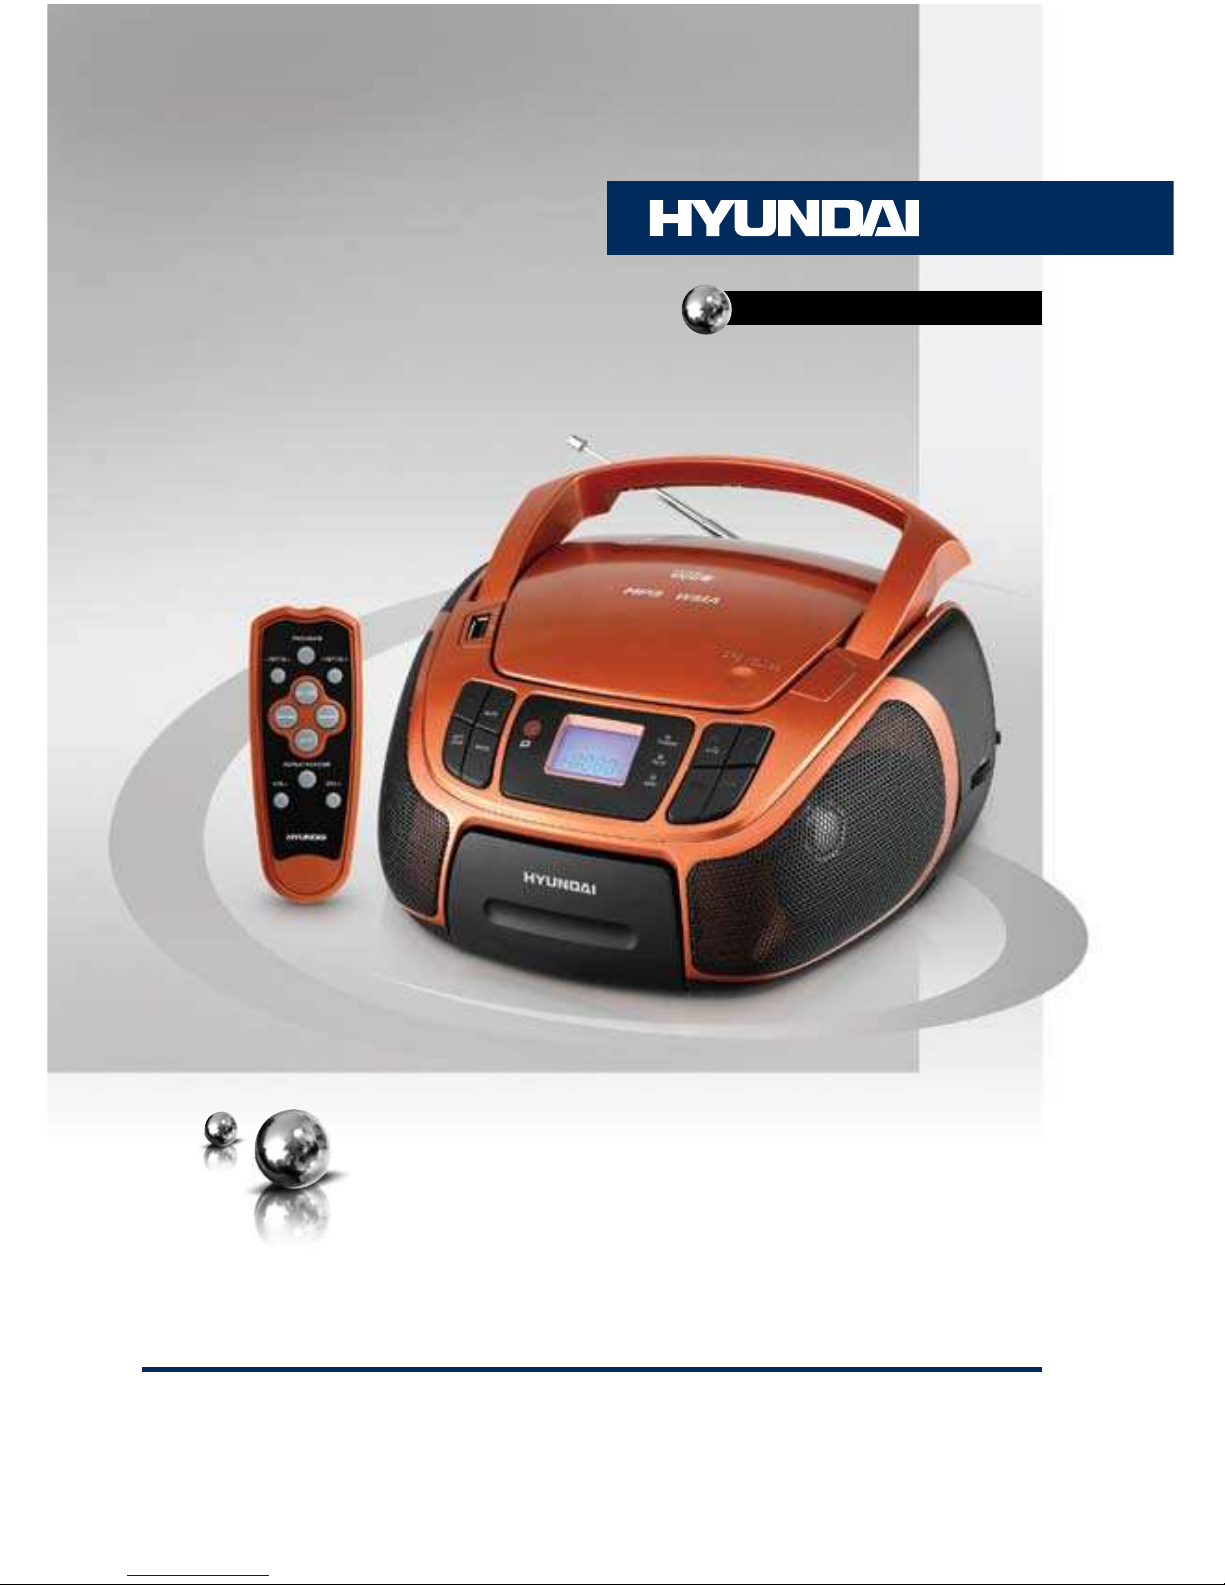
CD/MP3/USB-СТЕРЕОМАГНИТОЛАС ПОДДЕРЖКОЙ IPOD/IPHONECD/MP3/USB RADIO PLAYER WITH IPOD/IPHONE DOCKINGРуководство по эксплуатации Instruction manualH-1444
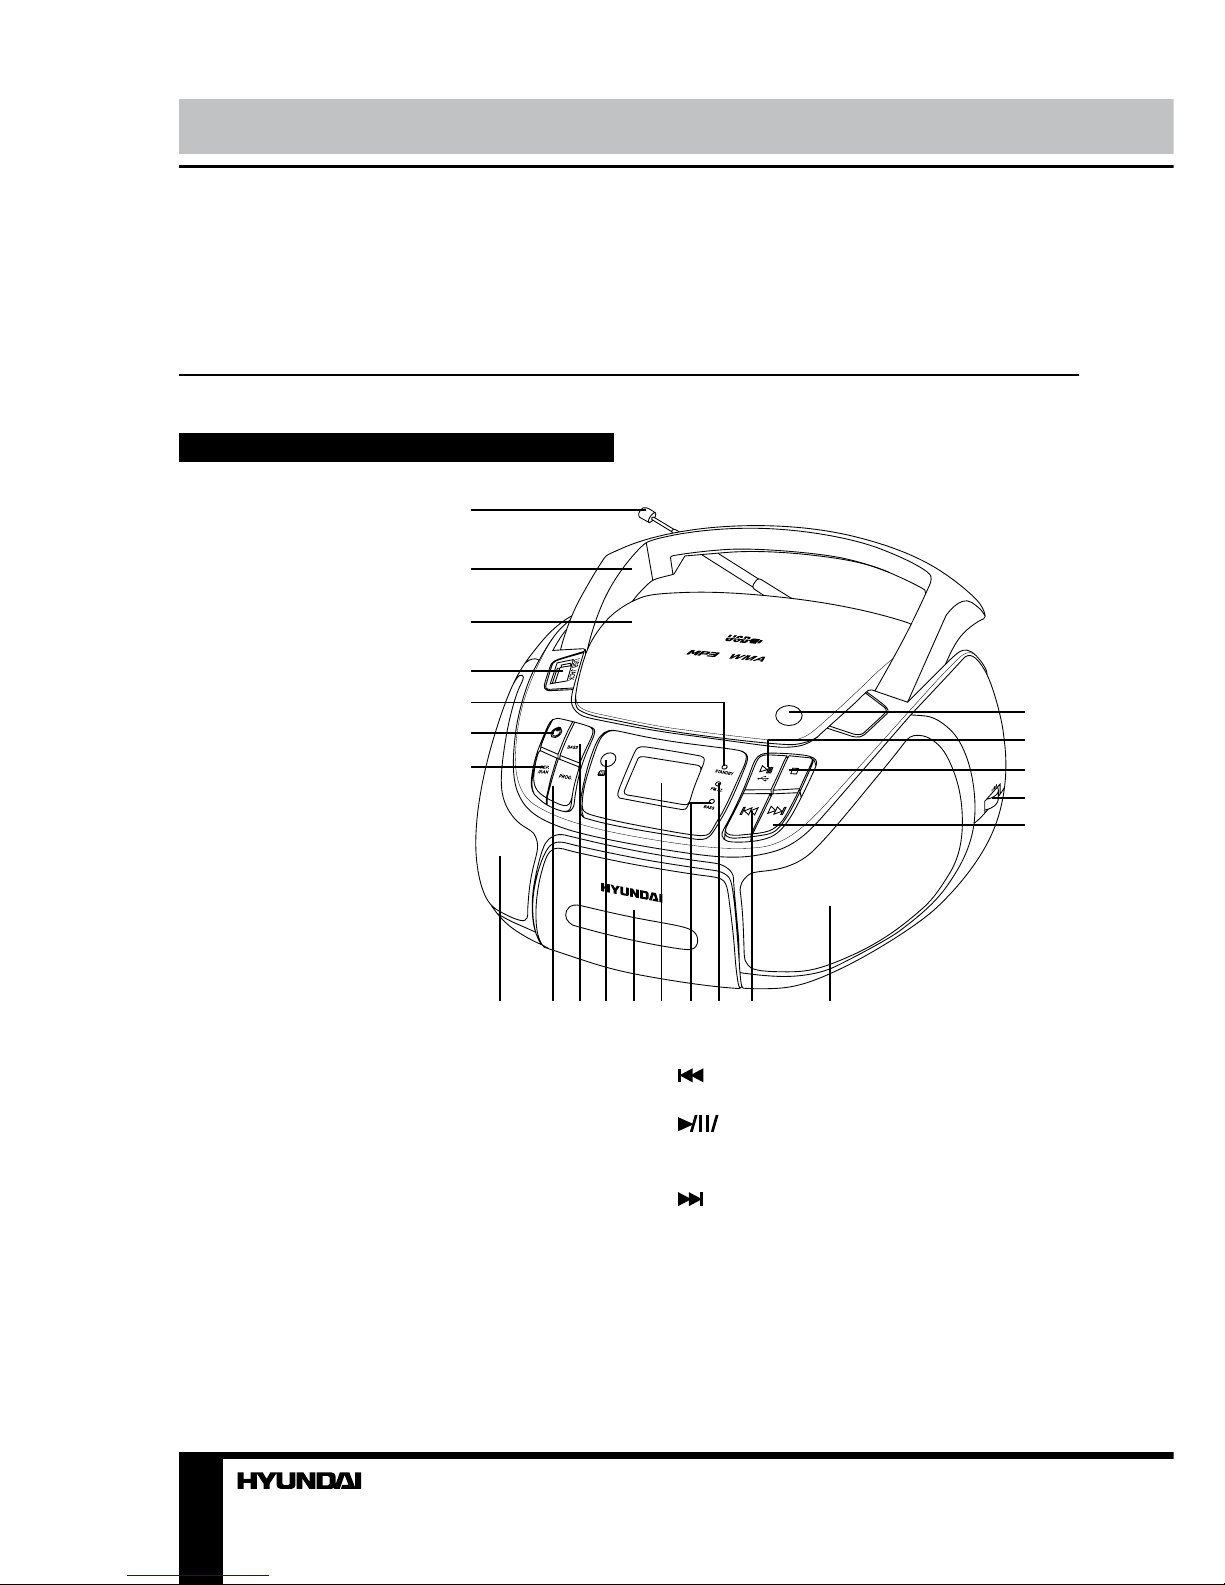
23Instruction manualInstruction manualDear customer!Thank you for purchasing our product. For safety, it is strongly recommended to read this manual carefully before connecting, operating and/or adjusting the product and keep the manual for reference in future.Description Main unit1. Telescopic FM-antenna2. Handle3. CD compartment cover4. USB port5. Standby indicator6. POWER button7. REP/RAN button8, 17. Speakers9. PROG button10. BASS button11. IR sensor12. iPod jack compartment13. LCD display14. BASS indicator15. FM stereo indicator16. button18. OPEN/CLOSE button19. USB button20. STOP button21. TUNING regulator22. buttonNot indicated:Back panel: Power cord socket, AUX input, Phone outputBottom: Battery compartmentLeft panel: VOL regulator, Function switchRight panel: Band switch12345678910111213141516171819202122
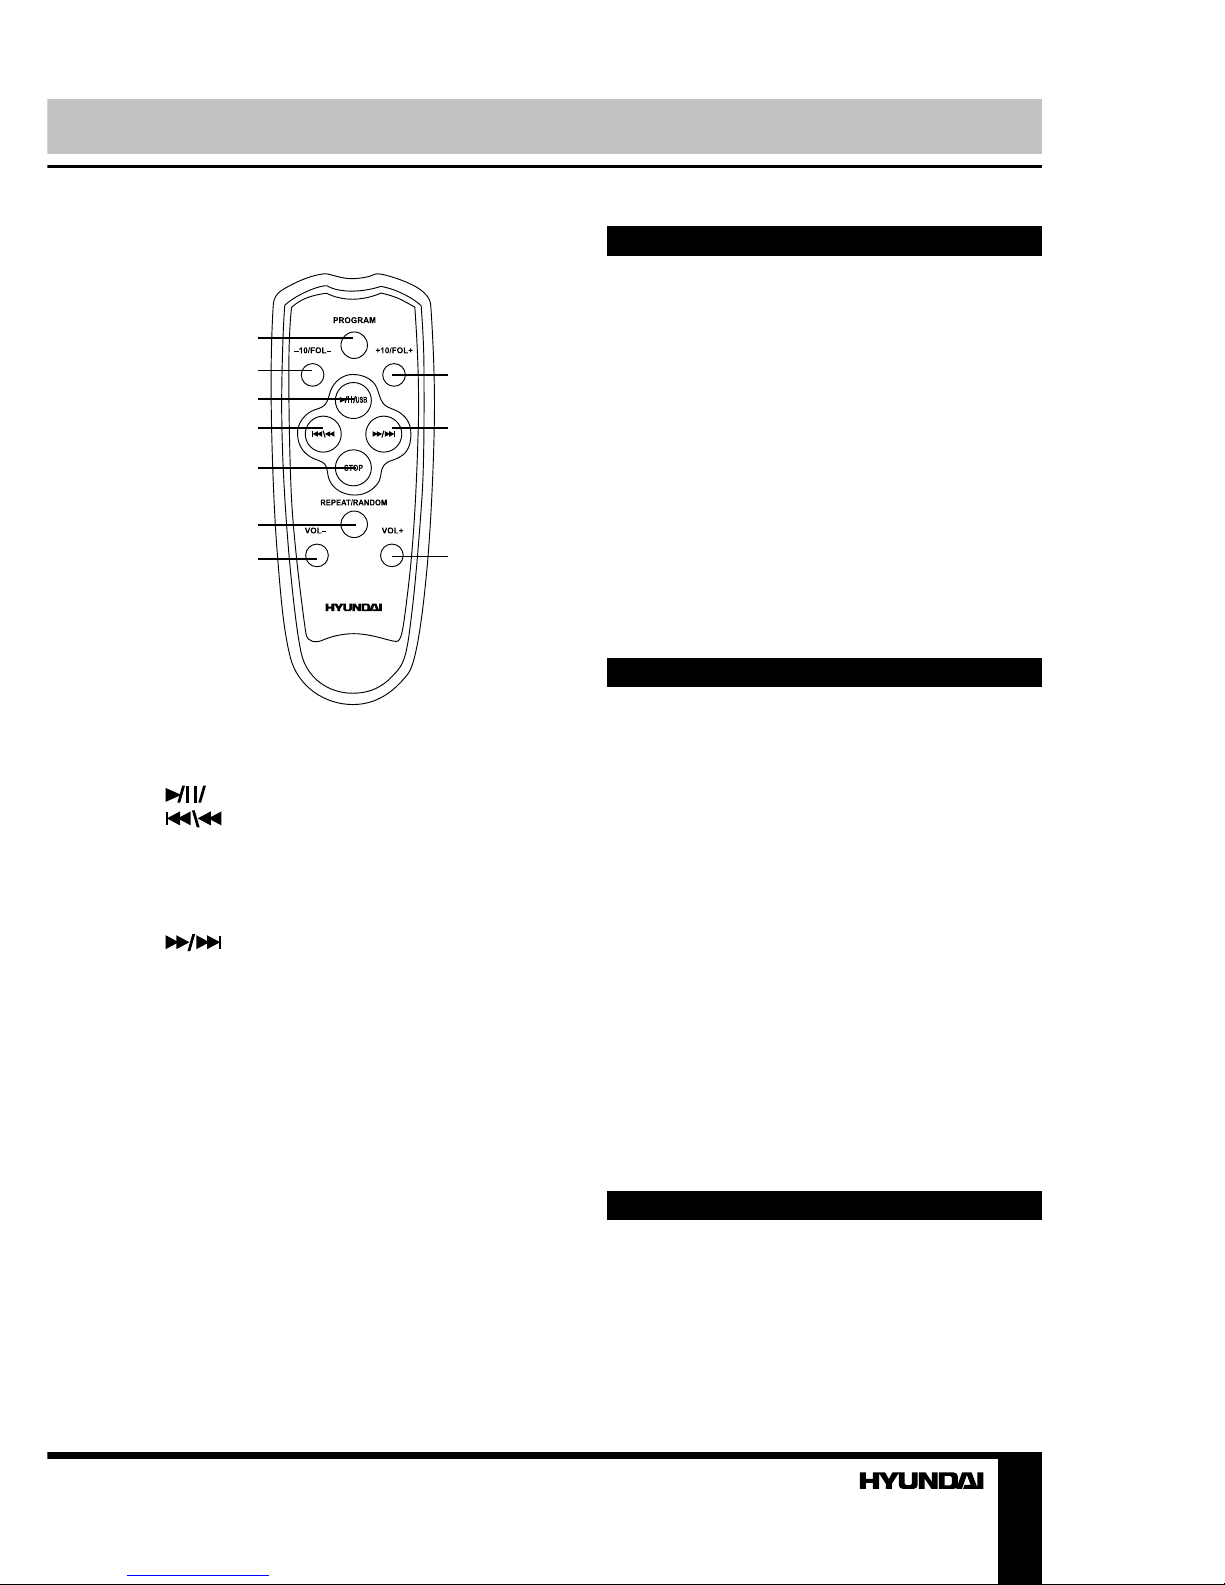
23Instruction manualInstruction manualRemote controller (RC)123456789101. PROGRAM button2. -10/FOL- button3. USB button4. button5. STOP button6. REPEAT/RANDOM button7. VOL- button8. +10/FOL+ button9. button10. VOL+ buttonRC power and operation• Open the battery cover on the rear of the Remote controller. Insert 2 AAA batteries (not included) correctly so that the + and - polarities math the diagrams inside the battery compartment.• When the batteries are exhausted, replace them with new batteries for normal operation. Remove the batteries if the RC is not in use for a long time.• The operating distance between the RC and the main unit is up to 6 m, the operation angle is not more than 300.• The RC buttons are functional for CD/MP3/USB operations only.Utilization of the product If you want to dispose this product, do not mix it with general household waste. There is a separate collection system for used electronic products in accordance with legislation that requires proper treatment, recovery and recycling.Please contact your local authorities for the correct method of disposal. By doing so, you will ensure that your disposed product undergoes the necessary treatment, recovery and recycling and thus prevent potential negative effects on the environment and human health.Important safeguards • Attention: The owner’s manual contains important operating and maintenance instructions. For your safety, it is necessary to refer to the manual.• Dangerous voltage: Uninsulated dangerous voltage that may be of sufficient magnitude to constitute a risk of electrical shock to persons is present within this product enclosure.• Caution: To reduce the risk of electric shock, do not dismantle the body. Prefer servicing to qualified service personnel. Do not use the unit in places where it can be exposed to water, moisture and dust. Make sure that pins or other foreign objects do not get inside the unit; they may cause malfunctions, or create safety hazards such as electrical shock.Power supply Battery operation• Open the battery compartment cover.• Insert 6 x UM-2/C/R-14 size batteries (not included). Please observe correct battery polarities or the set will not work.

4Instruction manual• Close the battery compartment cover.AC operation• Before the first connecting of the appliance check that voltage indicated on the rating label corresponds the mains voltage in your home.• Plug the corresponding end of supplied cord into the power cord socket of this unit.• Insert the plug into power supply.Caution: • When the set is only used with AC or is not used for 2 weeks or more, please remove the batteries, to avoid damage to the set from leakage of batteries. • Always switch off the unit when not in use.• Always unplug the appliance from power supply, when no use long time.Switch on/offPress POWER button on the unit to switch it from standby mode. Standby indicator will go out. When the unit is on, press POWER button to switch the unit off to standby mode; Standby indicator will light up with red color.Headphone jack• For private listening, insert 3.5 mm headphone into the Phone jack. • Adjust volume to the appropriate level as desired.• When the stereo headphone jack is plugged, speaker will disconnect automatically.AUX line in jackYou can connect the audio output of an external device (such as a CD-player) to this unit, to listen to the sound of that device through the amplifier of this unit.• To connect an external audio device (eg. MP3 player), please use a standard stereo cable (not included) with 3.5 mm to 3.5 mm plugs to connect the headphone out or audio line-out of the external device to the AUX input socket of this unit.• Slide the function switch to AUX position.• Turn on the external device.Radio operation• Set the function switch to RADIO position.• Select your desired broadcasting band by setting the band switch to the desired position. AM of FM will be displayed.• Rotate TUNING regulator to tune to your desired radio station frequency. The radio frequency will be shown on the display.• Rotate VOL regulator to adjust sound volume level.• To turn off the radio set the function switch to AUX position.Antenna• For FM reception, adjust the telescopic antenna appropriately to obtain the best reception on the band selected.• The AM signals are picked up through the built-in antenna. The set should be placed to an appropriate position for the best reception.FM stereo reception• In particular when stereo signal is weak and much noise are received, it is preferable to receive programs in mono mode. Set the band switch to FM ST position to receive radio programs in stereo mode.• If the program is received in FM stereo, the FM stereo indicator will light up.Disc operationsInsertion and removal of discs• Press the OPEN/CLOSE button to open the CD compartment cover. Place a disc into the compartment with the label side (printed side of disc) facing upwards.• When the disc has been placed onto
5Instruction manualthe center spindle, gently lower the CD-door downwards until it locks shut. The disc is now ready to be played.• When opening the CD-door, always ensure the disc is not in motion (not spinning). Always press STOP button to stop the disc spinning first.• To remove the disc, follow the same procedure as described above, except to remove the disc instead of inserting it into the compartment. Always hold a disc by its edges. Avoid getting any fingerprints, smudges or dirt onto the surface of a disc. In case this happens, use a special CD-cleaning cloth or cleaning kit to remove the dirt or smudges.Important: Please make sure to always fold down the handle before opening the CD door.Compact disc operation• Set function switch to CD/MP3 position.• Put a disc into the CD compartment and close the CD door.• The display will show the total number of tracks after a few seconds.Play/pause mode• Press USB button on the unit or on the RC to start playback, the display will show the current track number and PLAY symbol.• Press USB button on the unit or on the RC to pause at any track when playing, PLAY symbol on the display flashes. Press this button again to resume playback.• To stop playback, press STOP button. The display will show the total number of tracks on the disc.Skip and search mode• Press button on the unit or button on the RC once to skip to the next track. Press and hold this button to search for a particular point at high speed forward. Release the button to resume normal playback.• Press button on the unit or button on the RC to go to the beginning of the current track; press this button twice to skip back to previous track. Press and hold this button to search for a particular point at high speed backward. Release the button to resume normal playback.• If the disc contains more than 10 tracks, you can skip to 10 tracks forward or back by pressing +10/FOL+ or -10/FOL- buttons on the RC correspondingly.• If you use an MP3 disc containing folders, you can select a folder. In stop mode, press and hold repeatedly +10/FOL+ or -10/FOL- button on the RC. The number of the current folder will be displayed. After you selected a folder you can select tracks in the current folder as described above. While playback, the track number and folder number will be shown every few seconds alternatively.Repeat/Random mode• Press once REP/RAN button on the unit or REPEAT/RANDOM button on the RC for single track repeat playing. REP will be displayed.• Press this button again for all track repeat playing. REP ALL will be displayed.• If you use an MP3 disc containing folders, press this button again to repeat all tracks in the current folder. REP ALBUM will be displayed.• Press this button again for all track random playing. RANDOM will be displayed.• To cancel repeat or random playback, press again REP/RAN button on the unit or REPEAT/RANDOM button on the RC.Program modeUp to 99 tracks can be programmed for disc play in any order or the same track can be repeated up to 99 times.• Before use, be sure to stop the disc by pressing STOP button.• Press PROGRAM button on the RC or PROG button on the unit. The display will show “P01” and “PROGRAM”. This indicates that the set is now in memory programming mode, at the first memory position.• If you use an MP3 disc, press and hold
6Instruction manualrepeatedly +10/FOL+ or -10/FOL- button on the RC to select a folder.• Select a desired track by using / buttons on the unit or or buttons on the RC.• Press PROGRAM (PROG) button again to confirm. The set will advance to next memory position, the display will show “P02”. Repeat two steps described above to enter additional memories into the program if necessary.• After the maximum of 99 tracks (or less) have been selected as described above, press USB button on the unit or on the RC to start playing the programmed tracks.• The “PROGRAM” symbol will remain on to indicate that you have saved a program-memory (sequence).• To check the program you stored, after the programming is completed, in stop mode press PROGRAM (PROG) button, then press repeatedly button on the unit or button on the RC to see all programmed track numbers.• The program memory will be cleared when you press STOP button twice, open the disc compartment door or turn off the disc player or power supply. Good quality sound is guaranteed only when playing licensed MP3 discs.USB playback• This unit is equipped with a USB socket that can accept and play MP3 files stored on standard USB flash (compatible with USB versions 2.0) up to 16 Gb.• To use USB drives for MP3 playback, slide the function switch to CD/MP3 position. Insert the USB drive into the USB port and press and hold USB button on the unit or on the RC until the display shows “USB”.• All operations with files contained in USB are the same as operations with MP3 discs. Always switch off the unit or change mode to CD before removing a USB flash drive, to prevent damage to your USB device.Note: Although this product is fully compatible with USB 2.0 standard formats, a small percentage of USB flash drives might not be readable, due to those device manufacturers non-compliance with the full (official) USB standards. FAT/FAT32 file systems are supported.iPod/iPhone docking• Open the iPod jack compartment cover and connect your iPod or iPhone to the jack. Be careful, the jack can be easily damaged. Ensure the connection is good for a better contact.• Set the function switch to AUX position. The battery of the connected device will be automatically charged by the power of this unit.• When the device is connected, this unit will serve as amplifier and speaker for music played in the connected device. Rotate VOL regulator on this unit to adjust volume. All playback operations are performed by the controllers of the connected device.• If you connect an external device through the AUX input and iPod at the same time, the iPod/iPhone docking will not function.“Dynamic Bass Boost” systemFor increased bass at all volume levels, press BASS button for an emphasized bass sound. Press the button again to disable the function. When the function is activated, BASS indicator will light up in red.Maintenance and care• Check your batteries regularly, old or discharged batteries should be replaced. If the unit is not going to be used for some time or is being run exclusively on the alternative power, remove the batteries to avoid leakage and damage.• Electronic products of this kind should
7Instruction manualSpecificationsSupported formatsMP3, CDDASupported storageCD/CD-R/CD-RW/USBNominal voltage220 V, 50 HzBattery power supply9 V (1.5 V x 6 batteries UM2/LR14)Nominal power consumption13.5 WOutput power, RMS2 x 1 WFM frequency range64 - 108 MHzAM frequency range520 - 1620 kHzNet/Gross weight1.25 kg/1.38 kgUnit dimensions215 mm x 208 mm x 113 mmSpecifications and functions are subject to change without notice. It is connected with continual improvement of the device.never be subjected to moisture or extreme temperatures.• Do not use the unit in places where it can be exposed to water, moisture and dust.• If necessary, clean the unit with a piece of cloth dampened with water only (be sure the power cord is disconnected from the power supply).• When pick up the CD disc, always hold the edge of the disc, never touch the surface of the disc, it would scratch the disc surface and may occur sound distortion or raise reading problem.AccessoriesRadio player 1 pcPower cord 1 pcRemote controller 1 pcInstruction manual 1 pcWarranty card 1 pcConsumer information 1 pc

8Руководство по эксплуатацииУважаемый покупатель!Благодарим Вас за покупку нашего изделия. Чтобы понять, как правильно и без-опасно пользоваться Вашей моделью изделия, рекомендуется тщательно изучить настоящее руководство перед включением, регулировкой и эксплуатацией изделия. Сохраняйте руководство для использования в будущем.Описание Вид спереди1. Телескопическая FM-антенна2. Ручка3. Крышка отсека дисков4. USB-порт5. Индикатор режим ожидания6. Кнопка POWER7. Кнопка REP/RAN8, 17. Динамики9. Кнопка PROG10. Кнопка BASS11. ИК-датчик12. Крышка отсека для iPod13. ЖК-дисплей14. Индикатор BASS15. Индикатор FM16. Кнопка 18. Кнопка OPEN/CLOSE19. Кнопка USB20. Кнопка STOP21. Регулятор TUNING22. Кнопка Не показано на рисунке:Задняя панель: разъем для кабеля питания, вход AUX, выход для наушников PhonesНижняя панель: отсек для батарей12345678910111213141516171819202122
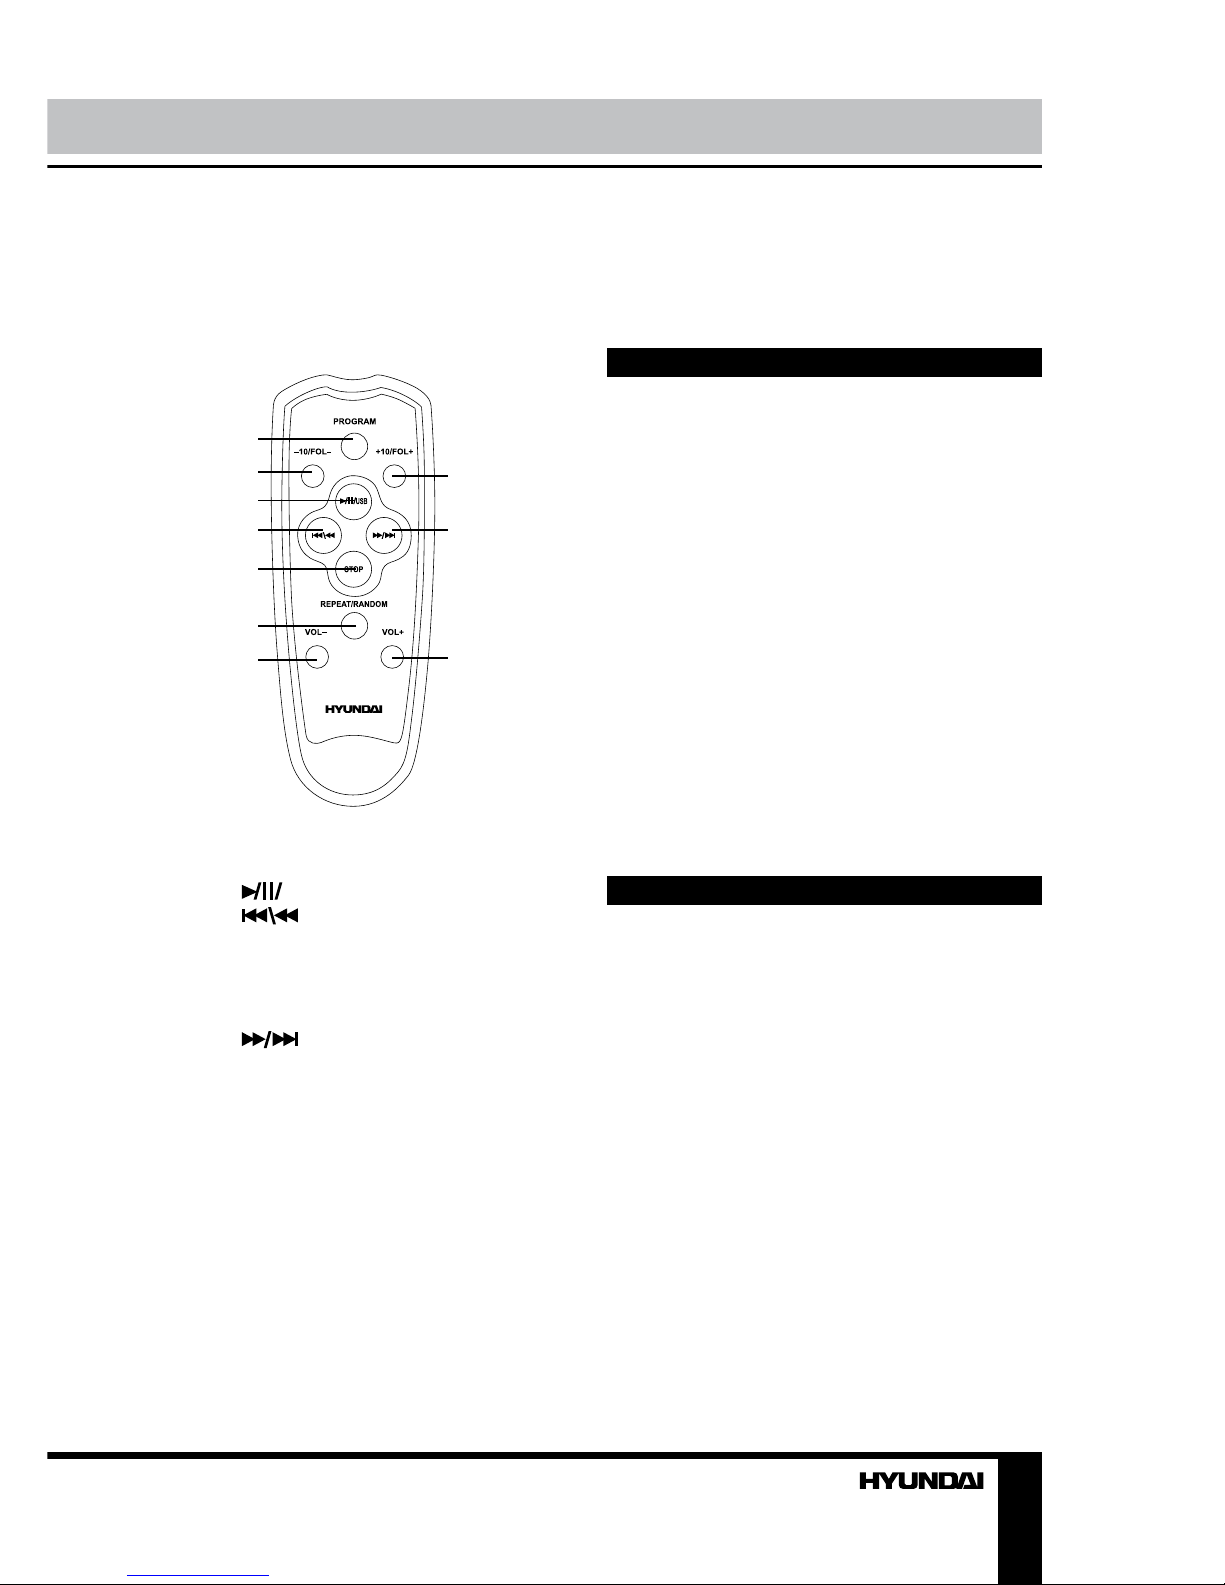
9Руководство по эксплуатацииЛевая панель: регулято VOL, переключа-тель режимовПравая панель: переключатель диапазоновПульт дистанционного управления123456789101. Кнопка PROGRAM2. Кнопка-10/FOL-3. Кнопка USB4. Кнопка 5. Кнопка STOP6. Кнопка REPEAT/RANDOM7. Кнопка VOL-8. Кнопка +10/FOL+9. Кнопка 10. Кнопка VOL+Обращение с ПДУ• Откройте отсек для батарей на задней панели ПДУ. Вставьте 2 батарейки типа AAA (не входят в комплект) с соблюдением полярности (+ и -).• При разрядке батареек в ПДУ замените их на новые. Если ПДУ не будет использо-ваться в течение долгого времени, извлеки-те батарейки из ПДУ.• Рабочее расстояние между ПДУ и ИК-датчиком устройства - до 6 м, угол работы ПДУ - до 300.• ПДУ предназначен только для работы с дисками CD/MP3 и USB-накопителями.Утилизация изделия Если вы желаете утилизировать данное изделие, не выбрасывайте его вместе с обычным бытовым мусором. Существует отдельная система сбора использованных электронных изделий в соответствии с законодательством, которая предполагает соответствующее обращение, возврат и переработку.Обращайтесь в органы местного управления за инструкциями по правиль-ной утилизации продукта. Тем самым Вы обеспечите утилизацию Вашего изделия с соблюдением обязательных процедур по обработке, утилизации и вторичной пере-работке и, таким образом, предотвратите потенциальное негативное воздействие на окружающую среду и здоровье людей.Меры безопасности • Внимание: В руководстве приводятся важные указания по эксплуатации и уходу. Сохраните руководство по эксплуатации для последующего использования.• Высокое напряжение: В приборе находятся оголенные провода высокого напряжения. Напряжение внутри прибора достаточно высокое, чтобы вызвать удар электрическим током.• Предупреждение: Во избежание удара электрическим током не демонтируйте кор-пус устройства. Доверяйте ремонт только квалифицированным специалистам. Не используйте устройство в местах, где оно может подвергнуться воздействию воды, влаги и пыли. Убедитесь, что посторонние предметы не попали внутрь изделия; они могут вызвать сбои в работе или стать при-
Otros manuales para H-1444
1
Tabla de contenidos
Idiomas:
Otros manuales de Sistema estéreo portátil de Hyundai

Hyundai
Hyundai H-1416 Manual de usuario

Hyundai
Hyundai H-1420 Manual de usuario

Hyundai
Hyundai H-1438 Manual de usuario

Hyundai
Hyundai H-2203 Manual de usuario

Hyundai
Hyundai H-1443 Manual de usuario

Hyundai
Hyundai H-1439 Manual de usuario

Hyundai
Hyundai H-1444 Manual de usuario

Hyundai
Hyundai H-1434 Manual de usuario

Hyundai
Hyundai H-1419 Manual de usuario

Hyundai
Hyundai H-1429 Manual de usuario


