Hyundai HSS-880HCI Manual de usuario

1
Contents
Contents
11. Introduction 2
1.1. Overview
1.2. Main Features
12. Safety/Precautions 3
2.1. Safety
2.2. Precautions
13. Check Point before Use 5
3.1. Accessories
3.2. The Satellite dish
14. Controls/Functions 6
4.1. Front Panel
4.2. Rear Panel
4.3. Remote Control
15. How to Connect 10
16. Operation 13
6.1. Getting Started
6.2. Channel Editing
6.3. System Parameters
6.4. Transponder
6.5. Factory Set
6.6. On Air Download
6.7. Other Function on Remote Control
6.8. Picture in Picture
6.9. Zoom Function
17. Hard Disk Operation 44
7.1. Recording
7.2. Playing
7.3. Delete Programs
7.4. Descrambling Service
7.5. Lock Programs
7.6. Skip Play
7.7. Bookmark
7.8. Repeat
7.9. Split Operation
7.10. Trick Play Controls without OSD
18. Conditional Access 53
19. Trouble Shooting 55
10. Specifications 56
DiSEqC is a trademark of EUTELSAT.

2
Introduction
Introduction
This Dual tuner PVR(Personal Video Recorder) with Common Interface is your “Window to the World”
giving you the opportunity to enjoy scrambled programs. Enjoy the rich choice of more than 4,000
different channels, broadcasting a large range of culture, sports, cinema, news, events, etc. This
receiver is a technical masterpiece, assembled with the highest qualified electronic parts.
Fully compliant with MPEG-2 and DVB standards
Dual Tuners for watch and record
PCMCIA 2-slot Common Interface
User friendly operating Menu and On-Screen Graphic Menu
Easy to use EPG(Electronic Program Guide) on screen
Age protection lock function
Tele-text supported by VBI insertion and OSD
Manual PID control
Software downloading via RS-232C connector
DiSEqC 1.2 compatible
Hard Disk extensible upto 160GB
Picture in Picture(Dual Decoding)
Software upgrade via Satellite
S/PDIF for digital audio and Dolby AC-3 bitstream output
USB supported for fast PC interface
Dual Recording and Playback simultaneously
Recording and Time Shifting simultaneously
Playback of the selected region repeatedly
Powerful trick mode supported
Zoom function
1.1
Overview
1.2
Main Features

3
Safety/Precaution
Safety/Precaution
Be sure to read the user's manual before
starting the operation of the unit. Do not touch the power cord with wet hands
as it may cause electric shock.
Never open the cover. It is very dangerous to
touch the inside of the unit due to possible
electric shock.
Place the unit in a well ventilated and no-
heat environment.
When you do not use this unit for a long time,
make sure that power cord is pulled out from
the outlet. Also do not use a damaged
power cord as it may cause fire or electric
shock.
A professional installation is required.
If reception is interrupted, contact your local
service centre.
2.1
Safety

4
Safety/Precaution
SafetyPrecautions
When installing the unit
Install the unit horizontally. An uneven
installation may cause the unit to be
damaged.
Do not put heavy items such as a TV on the
unit. That may cause the unit to be
damaged.
Do not leave the unit where the water drops
or splashs. Do not put water holding items such as vase
on the unit.
Do not install the unit:
Where it is subject to vibrations
Where it is exposed to direct sunlight
Where there is humidity
Where the temperature is too high or too low.
Where there is no ventilation
Moving the unit to a hot area from a cold
one will cause condensation.
Do not operate the unit for one or two hours
or until it has dried completely.
2.2
Precautions

5
Check Point before Use
CheckPointbeforeUse
User's manual : 1
User's manual
QZ-
ABC DEF
GHI JKL MNO
PRS TUV WXY
INFO
AUDIO
GUIDE
CH.LIST
AUXIN
RECALL
TV/RADIO
TV/SAT
MENU
EXIT
CH
VOLVOL
CH
SLEEP
LIST
Remote control : 1
Batteries (AAA type) : 2 RCA Cable : 1
USB Cable (A-B Type) : 1 Loop Through Cable : 1
If any accessories listed above are missing, contact the sales representative where you purchased
this unit.
This unit is working with DiSEqC 1.2 on a compatible antenna positioner.
Ask your dealer for information.
Accessories of the Unit
Your dish should be properly installed and azimuth and elevation must be precisely set up.
3.1
Accessories
3.2
The Satellite dish

6
Controls/Functions
Controls/Functions
Power : To switch the receiver in “standby” mode or in power on mode.
Channel Display (4 Digit)
- When you connect the power line of the receiver, the current time is displayed.
- After programming, the program number or name is displayed.
Remote Sensor : Receives the infrared signal from remote control.
Menu : To launch or terminate the menu application.
Guide :To watch program information directly(EPG).
Select : To activate a highlighted item or go to next level on hypertext menu or confirm the
user s action.
Remote :Flashing orange while the receiver is receiving data from remote control unit.
Record :Twinkling green while the receiver is recording mode.
Standby : Flashing red in “standby” and no light in power on mode.
- Vol. (/):To adjust the volume level or change the value of an item with
preprogrammed values. The Key Vol. can be used as a backspace to cancel the
numerical input.
- CH. (/):To change channel or cursor position on the application screen.
PCMCIA :To receive pay-TV channels, you need a C.A.Module and a smart card from the
service provider.
14
1312
1110
9
8
7
6
5
4
3
2
1
2 3 7 8 9
1 4 5 6
1410 13 11
12
4.1
Front Panel

7
Controls/Functions
Controls/Functions
4.2
Rear Panel
No. Name Connector Function
1 LNB1 INPUT IEC 169-24 Female IF input from LNB to Digital Tuner 1
2 LOOP1 OUT IEC 169-24 Female IF Loop-through output from Digital Tuner 1
3 LNB2 INPUT IEC 169-24 Female IF input from LNB to Digital Tuner 2
4 LOOP2 OUT IEC 169-24 Female IF Loop-through output from Digital Tuner 2
5 Digital Audio Optical Digital Audio Output
6 USB USB connector USB supported for PC I/F
7 Digital Audio RCA Cinch Digital Audio Output
8 TV SCART SCART SCART output to TV
9 VCR/AUXSCART SCART SCART output to VCR, analog Receiver or Hi-Fi.
10 VIDEO RCA Cinch Composite Video Output
11 AUDIO L RCA Cinch Left Audio Output
12 AUDIO R RCA Cinch Right Audio Output
13 RS-232 DB-9 Low Speed Serial Port
31
10 13
2 4 65 7
12
8
9
11
Note : To use USB interface, additional PC program is required. Please refer to HDT
homepage, www.hdt.co.kr.

8
Controls/Functions
Controls/Functions
POWER :To switch into ‘standby’ or ‘power on’ mode.
MUTE : To turn the sound on/off.
Numeric Keys(0-9) : To input numeric value, channel
number or characters.
INFO. :To display the information of the current
channel.
AUDIO :To change the audio track, stereo-mono
mode.
GUIDE : (EPG : Electronic Program Guide)
To watch program information. Press once more to
return to normal mode.
CH LIST :To watch the channel list. Press to
confirm or press EXIT to return to previous
chosen channel.
MENU : To enter/exit the main menu.
EXIT :To return to previous status or menu.
AUX IN : To select in/out mode of scart connector. SAT,
AUX, AUX2 and TV mode are toggled in turn.
RECALL :To return to the previous chosen channel.
- Left & Right : To change the value of a
selected item with preprogrammed value in menu.
can be used as a backspace to cancel the
numerical input.
(ENTER):To select an item or to confirm a menu.
- Up & Down : To move the cursor up
and down in menu.
TV/RADIO :To switch between the TV and radio
channels.
TV/SAT :To toggle the TV output source between the
satellite input and UHF/VHF antenna input.(Option)
BLUE : To delete a channel from the Channel List
menu. To show extended program information in the
EPG menu. To see Teletext Service Data. To play or
pause the stored programs on HD.
19
18
17
CH
CH
1615
14
VOL
VOL
VOL
1312
11
10
9
8
7
6
5
4
3
2
1
QZ-
ABC DEF
GHI JKL MNO
PRS TUV WXY
INFO
AUDIO
GUIDE
CH.LIST
AUX IN
RECALL
TV/RADIO
TV/SAT
MENU
EXIT
CH
VOLVOL
CH
SLEEP
LIST
1
3
4
6
8
10
12
16
17
2
5
7
9
11
13
18
14
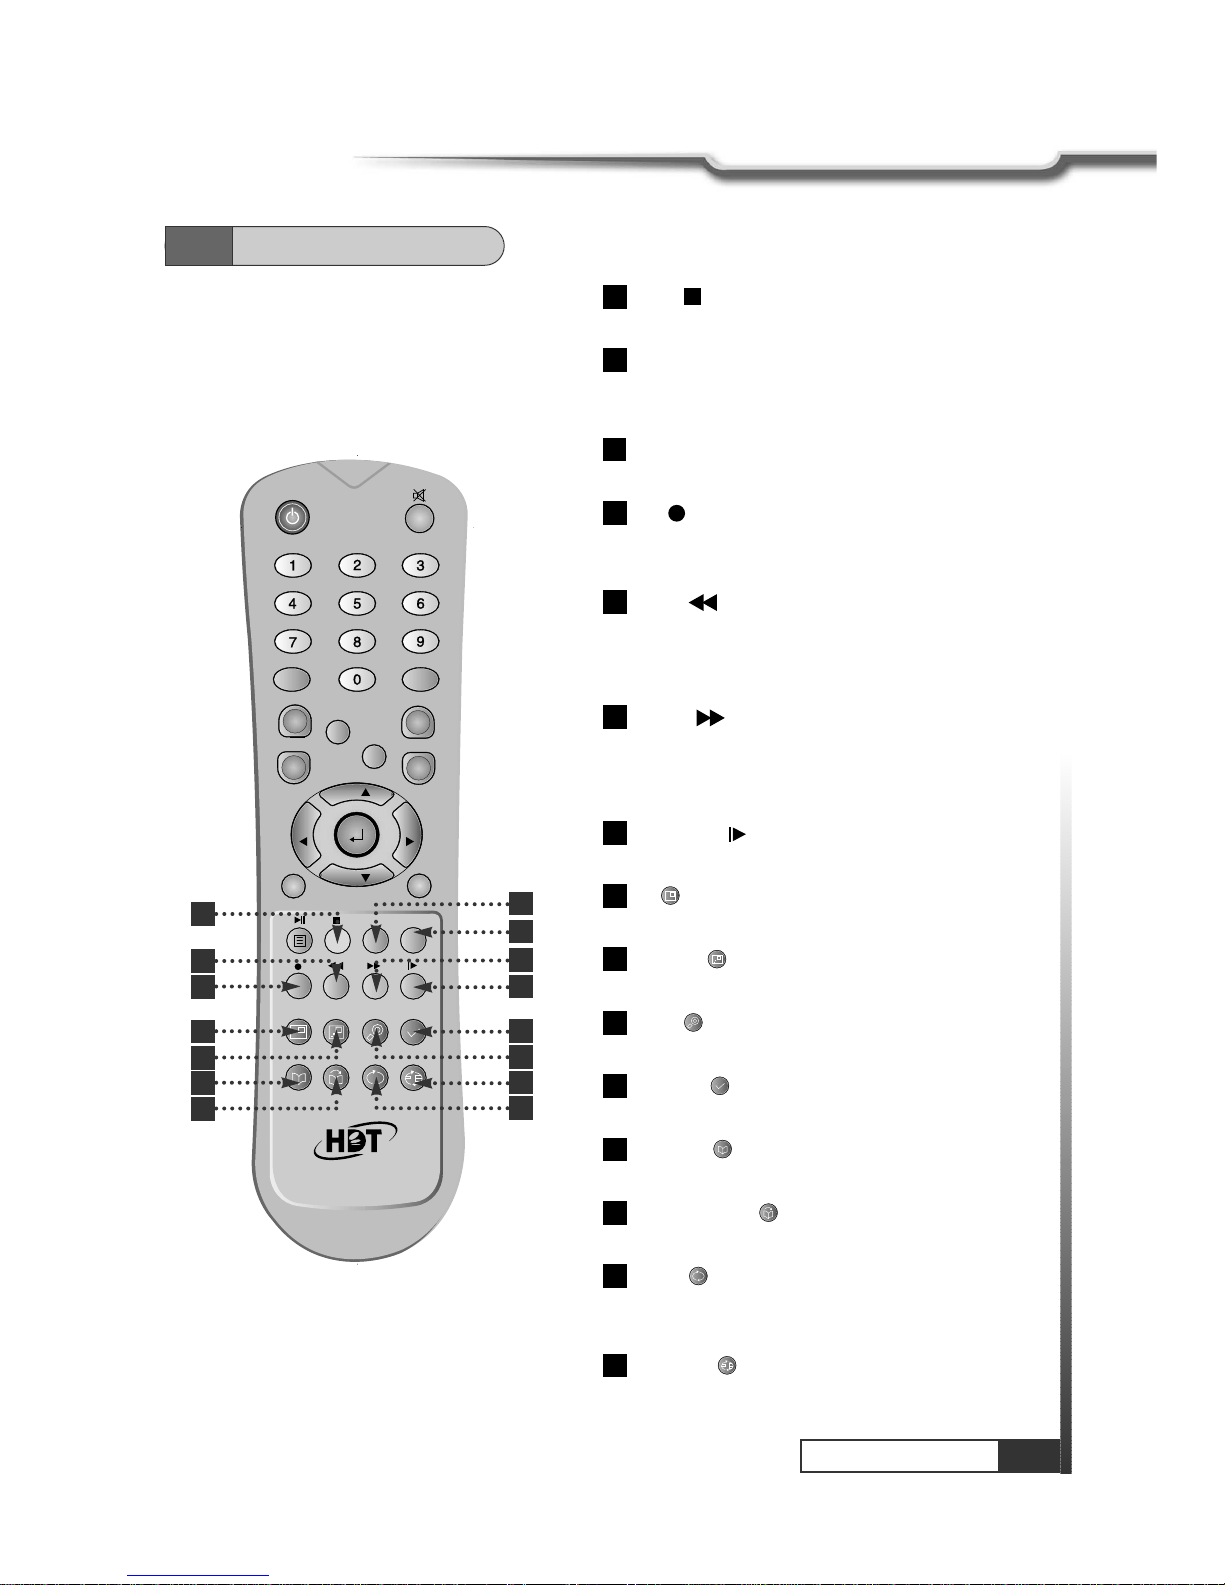
4.3
Remote Control
15
19
9
Controls/Functions
Controls/Functions
4.3
Remote Control
IVORY : To add a new channel to the Channel List
menu. To stop the played programs on HD.
ORANGE(LIST):To see variant channel lists for user's
convenience in the Channel List menu. To watch the list of
stored programs on HD.
SLEEP : To switch off the receiver automatically after 30
upto 150 minutes.
RED :To setup favorite channel lists in the Channel
List menu. To record the program on to HD. To delete
the stored programs on HD or set skip points.
GREEN : To lock channel in the Channel List
menu. To show current/next program information in the
EPG menu. To play the stored programs on HD with fast
reverse mode.
YELLOW : To move a channel to other position in
the Channel List menu. To show program schedule
information in the EPG menu. To play the stored
programs on HD with fast forward mode.
Slow Motion :To play the stored program on HD with
slow motion mode.
PIP :To Set PIP Window. Live, HDD and Diasble the
Sub-picture.
PIP SWAP : To Switch between Main-Picture and
Sub-Picture.
ZOOM : To set zoom function. Control zoom
function beginning and magnification.
Time-Shift : To start the time-shift function for the
current channel.
Bookmark : To set the bookmark position while
playback.
Go to Bookmark : To jump to the bookmark
position while playing.
REPEAT : To repeat playback of the stored program
on HD. Repeat 1, Repeat All and Normal are toggled
in turn.
PEPEAT A-B : To repeat playback of the selected
section of the stored program on HD.
34
33
32
31
30
29
28
27
26
25
24
23
22
21
20
QZ-
ABC DEF
GHI JKL MNO
PRS TUV WXY
INFO
AUDIO
GUIDE
CH.LIST
AUX IN
RECALL
TV/RADIO
TV/SAT
MENU
EXIT
CH
VOLVOL
CH
SLEEP
LIST
20 21
22
23
24 25
26
27
28 29
30
31
32 33
34

10
How to Connect
HowtoConnect
5.1
Connecting IRD to Hi-Fi system and TV, VCR with SCART
Note : At tuner select in LNB Configuration menu, #1 or #2 mode should be selected.
5.2
Connecting Tuner to two separated Antennas
Tabla de contenidos
Otros manuales de DVR de Hyundai


