Husqvarna PAB1100 Manual de usuario

PAB1100
EN Operator's manual 2-16
ES-MX Manual del usuario 17-32
FR-CA Manuel d’utilisation 33-48

Contents
Introduction..................................................................... 2
Safety..............................................................................3
Assembly........................................................................ 6
Operation........................................................................ 8
Maintenance................................................................... 9
Technical data.............................................................. 15
Accessories.................................................................. 15
Introduction
Product description
We have a policy of continuous product development
and therefore reserve the right to modify the design and
appearance of the products without prior notice.
Note: This manual cover battery operated power units.
Intended use
WARNING: This attachment may only be
used together with the intended product, see
the accessory chapter in the Operator’s
Manual of the product.
This attachment is only designed for cutting branches
and twigs.
Attachment overview
2
211
11
9
12
3
13
16
15
14
5
6
8
10 7
4
18
17
1
1. Bevel gear
2. Chain lubrication adjustment screw
3. Shaft (1100 mm)
4. Harness support hook (24 mm)
5. Protective guard for saw chain
6. Bar nut
7. Chain tensioning screw
8. Saw chain
9. Guide bar
10. Chain oil tank
11. Filling with chain oil
12. Operator′s manual
13. Transport guard
14. Combination wrench
15. Harness
16. Torx wrench
17. Hand guard
18. Harness support hook (1”)
Symbols on the attachment and on the
power unit
Careless or incorrect use of this product can
result in serious or fatal injury to the operator
or others.
21358 - 001 - 18.10.2019

Read the operator’s manual carefully
and make sure you understand the in-
structions before you use the attach-
ment.
Always wear approved hearing protection
and protective goggles or a visor.
Always wear approved protective gloves.
Wear sturdy, non-slip boots.
Keep all parts of your body away from the
hot surfaces.
Max 3/10 sec
Direction of rotation of the saw chain,
running time/idling.
Chain direction.
This product is not electrically insulated. If the product touches or
comes close to high-voltage power lines it could lead to death or seri-
ous injury. Electricity can jump from one point to another by arcing.
The higher the voltage, the greater the distance electricity can jump.
Electricity can also travel through branches and other objects, espe-
cially if they are wet. Always keep a distance of at least 10 m be-
tween the machine and high-voltage power lines and/or any objects
that are touching them. If have to work within this safe distance you
should always contact the relevant power company to make sure the
power is switched off before you start work.
The operator of the product must ensure, while working, that no per-
sons or animals come closer than 15 meters.
Note: Other symbols/decals on the product refer to special certification requirements for certain markets.
Safety
Safety definitions
Warnings, cautions and notes are used to point out
specially important parts of the manual.
WARNING: Used if there is a risk of injury or
death for the operator or bystanders if the
instructions in the manual are not obeyed.
CAUTION: Used if there is a risk of damage
to the product, other materials or the
adjacent area if the instructions in the
manual are not obeyed.
Note: Used to give more information that is necessary in
a given situation.
IMPORTANT
SAFETY
INSTRUCTIONS
Read all instructions
WARNING: When using electric gardening
appliances, basic safety precautions should
always be followed to reduce the risk of fire,
electric shock, and personal injury, including
the following:
General safety instructions
WARNING: Read the warning instructions
that follow before you use the product.
1358 - 001 - 18.10.2019 3

• Please read the operator’s manual carefully and
make sure you understand the instructions before
using the attachment.
• These instructions supplement the instructions that
were included with the product. For other
procedures, please refer to the operating instructions
for the product.
• Under no circumstances may the design of the
attachment be modified without the permission of the
manufacturer. Do not use a attachment that appears
to have been modified by others and always use
original accessories. Non-authorized modifications
and/or accessories can result in serious personal
injury or the death of the operator or others.
• National regulations can restrict the use of the
product.
Safety instructions for operation
• Never allow children to use the product.
• Keep unauthorized persons at a distance. Children,
animals, onlookers and helpers should be kept
outside the safety zone of 15 meters while you work.
Stop the product immediately if anyone approaches.
• Never allow anyone else to use the product without
first ensuring that they have read and understood the
contents of the operator’s manual.
• Never work from a ladder, stool or any other raised
position that is not fully secured.
• Always ensure you have a safe and stable working
position.
• Always use both hands to hold the product. Hold the
product at the side of your body. Make sure that you
connect the harness to the harness support hook.
• Use your right hand to control the power trigger.
• Make sure that your hands and feet do not come
near the cutting attachment when the motor is
running.
• When the motor is switched off, keep your hands
and feet away from the cutting attachment until it has
stopped completely.
• Watch out for stumps of branches that can be thrown
out during cutting.
• Always put the product on the ground when you are
not using it.
• Check the working area for foreign objects such as
electricity cables, insects and animals, etc, or other
objects that could damage the cutting attachment,
such as metal items.
• If a foreign object is hit or if vibrations occur, stop the
product immediately. Remove the battery from the
product. Make sure that the product is not damaged.
Repair the product if it is damaged.
• If anything gets caught up in the cutting attachment
while you are working, switch off the motor and let it
stop completely before cleaning the cutting
attachment.
• Do not use the pruner while you are tired or under
the influence of drugs, alcohol or medication.
• Overexposure to vibration can lead to circulatory
damage or nerve damage in persons who have poor
circulation. Speak to your physician if you
experience symptoms of overexposure to vibration.
Such symptoms include numbness, loss of feeling,
tingling, pricking, pain, loss of strength, changes in
skin color or condition. These symptoms usually
show in the fingers, hands or wrists. The risk
increases at low temperatures.
Personal protective equipment
WARNING: Read the warning instructions
that follow before you use the product.
• Use a helmet if it is possible that objects can fall on
you.
• Use approved hearing protection.
• Long-term exposure to noise can result in permanent
hearing impairment. Always use approved hearing
protection.
• Always wear protective, non-slip boots.
• Always wear working clothes and heavy-duty long
trousers.
• Never wear loose clothing or jewelry.
• Make sure your hair does not hang below shoulder
level.
Safety devices on the product
This section describes the safety devices on the
product, their purpose, and how checks should be
carried out to ensure that the safety devices operate
correctly.
41358 - 001 - 18.10.2019

WARNING: Never use a product with faulty
safety devices. The safety devices must be
checked as described in this section. If the
product fails any of these checks, contact
your servicing agent to get it repaired.
Pole pruner safety information
• Do not operate near electrical power lines. The unit
has not been designed to provide protection from
electric shock in the event of contact with overhead
electric lines, Consult local regulations for safe
distances from overhead electric power lines and
ensure that the operating position is safe and secure
before operating the saw chain pole pruner.
• Keep all parts of the body away from the saw chain.
Do not remove cut material or hold material to be cut
when blades are moving. Make sure the switch is off
when clearing jammed material. Saw chain
continues to move after the switch is turned off. A
moment of inattention while operating the extended-
reach pruner may result in serious personal injury.
• Carry the extended-reach pruner by the handle with
the saw chain stopped. When transporting or storing
the extended-reach pruner, always fit the saw chain
device cover. Proper handling of the extended-reach
pruner will reduce possible personal injury from the
saw chain.
• Hold the extended-reach pruner by insulated
gripping surfaces only, because the saw chain may
contact hidden wiring. A saw chain contacting a ″live
″ wire may make exposed metal parts of the
extended-reach pruner ″live″ and could give the
operator an electric shock.
• Do not use the extended-reach pruner in bad
weather conditions, especially when there is a risk of
lightning. This decreases the risk of being struck by
lightning.
• To reduce the risk of electrocution, never use near
any electrical power lines. Contact with or use near
power lines may cause serious injury or electric
shock resulting in death.
• Always use two hands when operating the extended-
reach pruner. Hold the extended-reach pruner with
both hands to avoid loss of control.
• Always use head protection when operating the
extended-reach pruner overhead. Falling debris can
result in serious personal injury.
Other safety information
• Avoid Dangerous Environment – Don’t use
appliances in damp or wet locations.
• Don’t Use In Rain.
• Keep Children Away – All visitors should be kept at a
distance from work area.
• Dress Properly – Do not wear loose clothing or
jewelry. They can be caught in moving parts. Use of
rubber gloves and substantial footwear is
recommended when working outdoors. Wear
protective hair covering to contain long hair.
• Use Safety Glasses – Always use face or dust mask
if operation is dusty.
• Use Right Appliance – Do not use appliance for any
job except that for which it is intended.
• Avoid Unintentional Starting – Don’t carry plugged-in
appliance with finger on switch. Be sure switch is off
when plugging in.
• Don’t Force Appliance – It will do the job better and
with less likelihood of a risk of injury at the rate for
which it was designed.
• Don’t Overreach – Keep proper footing and balance
at all times.
• Stay Alert – Watch what you are doing. Use common
sense. Do not operate appliance when you are tired.
• Store Idle Appliances Indoors – When not in use,
appliances should be stored indoors in dry, and high
or locked-up place – out of reach of children.
• Maintain Appliance With Care – Keep cutting edge
sharp and clean for best performance and to reduce
the risk of injury. Follow instructions for lubricating
and changing accessories. Keep handles dry, clean,
and free from oil and grease.
• Check Damaged Parts – Before further use of the
appliance, a guard or other part that is damaged
should be carefully checked to determine that it will
operate properly and perform its intended function.
Check for alignment of moving parts, binding of
moving parts, breakage of parts, mounting, and any
other condition that may affect its operation. A guard
or other part that is damaged should be properly
repaired or replaced by an authorized service center
unless indicated elsewhere in this manual.
Safety instructions for maintenance
WARNING: The cutting attachment
continues to rotate even after the power
trigger has been released. Remove the
battery from the product. Make sure that the
cutting attachment has stopped completely
before you do maintenance on the
attachment.
• Make sure that the transport guard is attached
correctly to the cutting attachment when the product
is not in use, is transported or is in storage.
• Always wear heavy-duty gloves when repairing the
cutting attachment. The cutting equipment is
extremely sharp and can easily cause cuts.
• Store the product out of reach of children.
• Use only original spare parts for repairs.
• Never use a product that is faulty. Carry out the
safety checks, maintenance and service instructions
described in this manual. Some maintenance and
service measures must be carried out by trained and
qualified specialists.
• Secure the machine during transport.
1358 - 001 - 18.10.2019 5
Safety instructions for the cutting equipment
WARNING: Read the warning instructions
that follow before you use the product.
• Only use the guide bar/saw chain combinations and
filing equipment that we recommend. Refer to
Maintenance on page 9
for instructions.
• Use protective gloves when you use or do
maintenance on the saw chain. A saw chain that
does not move can also cause injuries.
• Keep the cutting teeth correctly sharpened. Obey the
instructions and use the recommended file gauge. A
saw chain that is damaged or incorrectly sharpened
increases the risk of accidents.
• Keep the correct depth gauge setting. Obey the
instructions and use the recommended depth gauge
setting. Too large depth gauge setting increases the
risk of kickback.
• Make sure that the saw chain has the correct
tension. If the saw chain is not tight against the guide
bar, the saw chain can derail. An incorrect saw chain
tension increases wear on the guide bar, saw chain
and chain drive sprocket. Refer to
To tension the
chain on page 13
.
• Do maintenance on the cutting equipment regularly
and keep it correctly lubricated. If the saw chain is
not correctly lubricated, the risk of wear on the guide
bar, saw chain and chain drive sprocket increases.
SAVE THESE
INSTRUCTIONS
Assembly
Introduction
WARNING: Read and understand the safety
chapter before you assemble the product.
To assemble the cutting head
CAUTION: Make sure that the drive shaft
inside the shaft engages with the cut-out in
the cutting head.
B
A
1. Loosen the screw on the cutting head. (A)
2. Fit the cutting head on the shaft so that the screw (A)
is aligned with the hole in the shaft as shown.
3. Screw in screw A finger tight. Make sure that screw
A fits into the hole in the shaft.
4. Tighten screw A.
5. Tighten screw B.
To assemble the bar and chain
1. Unscrew the bar nut and remove the protective
cover.
2. Fit the bar over the bar bolt. Place the bar in its
rearmost position. Place the chain over the drive
sprocket and in the groove on the bar. Begin on the
top side of the bar.
61358 - 001 - 18.10.2019

3. Make sure that the edges of the cutting links are
facing forward on the top edge of the guide bar.
4. Fit the cover and locate the chain adjuster pin (A) in
the hole in the bar. Check that the drive links of the
chain fit correctly on the drive sprocket (B) and that
the chain is in the groove in the bar (C). Tighten the
bar nut finger-tight.
A
B
5. Tension the chain by turning the chain tensioning
screw clockwise using the combination spanner. The
chain should be tensioned until it does not sag from
the underside of the bar.
6. The chain is correctly tensioned when it does not
sag from the underside of the bar, but can still be
turned easily by hand. Hold up the bar tip and tighten
the bar nuts with the combination spanner.
7. When fitting a new chain, the chain tension has to be
checked frequently until the chain is run-in. Check
the chain tension regularly. A correctly tensioned
chain ensures good cutting performance and long
life.
To assemble the guard
1. Assemble the guard on the shaft. Make sure the
guard is assembled adjacent to the saw head.
2. Secure the guard to the shaft with the screw.
To assemble the suspension ring
1. Fit the suspension ring between the rear handle and
the loop handle. Position the hanging ring so that the
product is balanced and comfortable to work with.
To adjust the harness
Always use the harness when you operate the product.
The harness gives maximum control during operation of
the product. The harness decreases the risk of tiredness
in your arms and back.
1. Put on the harness.
2. Attach the product to the harness support hook.
3. Adjust the length of the harness until the support
hook is roughly level with your right hip.
1358 - 001 - 18.10.2019 7

To fill with oil
1. Open the oil cap on top of the bar head.
2. Fill with saw chain oil.
3. Attach the cap again.
Operation
Introduction
WARNING: Read and understand the safety
chapter before you use the product.
To check before starting
1. Inspect the working area. Remove any objects that
could be thrown out.
2. Check the cutting attachment. Never use blunt,
cracked or damaged equipment
3. Check that the machine is in perfect working order.
4. Check that all nuts and screws are tight.
5. Make sure the chain is adequately lubricated. See,
To lubricate cutting equipment on page 14
.
6. Make sure that the cutting attachment always stops
when you release the throttle/power trigger.
7. Only use the product for the purpose it was intended
for.
8. Make sure the handle and safety features are in
order. Never use a machine that has any parts
missing or has been modified in relation to the
specification.
To use the product
WARNING: Observe the applicable safety
regulations for work in the vicinity of
overhead power lines.
WARNING: Never stand directly underneath
a branch that is being cut. This could lead to
serious or even fatal personal injury.
WARNING: This product is not electrically
insulated. If the product touches or comes
close to high-voltage power lines it could
lead to death or serious bodily injury.
Electricity can jump from one point to
another by arcing. The higher the voltage,
the greater the distance electricity can jump.
Electricity can also travel through branches
and other objects, especially if they are wet.
Always keep a distance of at least 10 m
between the product and high-voltage power
lines and/or any objects that are touching
them. If have to work within this safe
distance you should always contact the
relevant power company to make sure the
power is switched off before you start work.
WARNING: This product has a long reach.
Make sure that no people or animals come
closer than 15 m when the product is
running.
WARNING: Never activate the power trigger
without having the cutting attachment in full
view.
• Hold the product as close to your body as possible to
get the best balance.
• Make sure that the tip does not touch the ground.
• Do not rush the work, but work steadily until all the
branches have been cut back cleanly.
• Release the power trigger after each working
operation. Long periods at full speed without any
load on the motor can cause serious motor damage.
• Always work at full speed.
• Observe great care when working close to overhead
power lines. Falling branches can result in short-
circuiting.
81358 - 001 - 18.10.2019

• Whenever possible position yourself so that you can
make the cut at right angles to the branch.
90°
• Do not work with the shaft held straight out in front of
you (like a fishing rod) as this increases the apparent
weight of the cutting attachment.
• Cut large branches in sections so that you have
better control over where they fall.
• Never cut through the swelling at the root of the
branch as this will slow down healing and increase
the risk of fungal attack.
• Use the stop at the base of the cutting head to
provide support during cutting. This will help prevent
the cutting attachment from ”jumping” on the branch.
• Make an initial cut on the underside of the branch
before cutting through the branch. This will prevent
tearing of the bark, which could lead to slow healing
and cause permanent damage to the tree. The cut
should not be deeper than 1/3 of the branch
thickness to prevent jamming. Keep the chain
running while you withdraw the cutting attachment
from the branch to prevent it jamming.
• Use the harness to support the weight of the
machine and make it easier to handle.
• Make sure you have a firm footing and that you can
work without being hampered by branches, stones
and trees.
Maintenance
Introduction
Below you will find some general maintenance
instructions. If you need further information please
contact your service workshop.
To perform maintenance on the
attachment
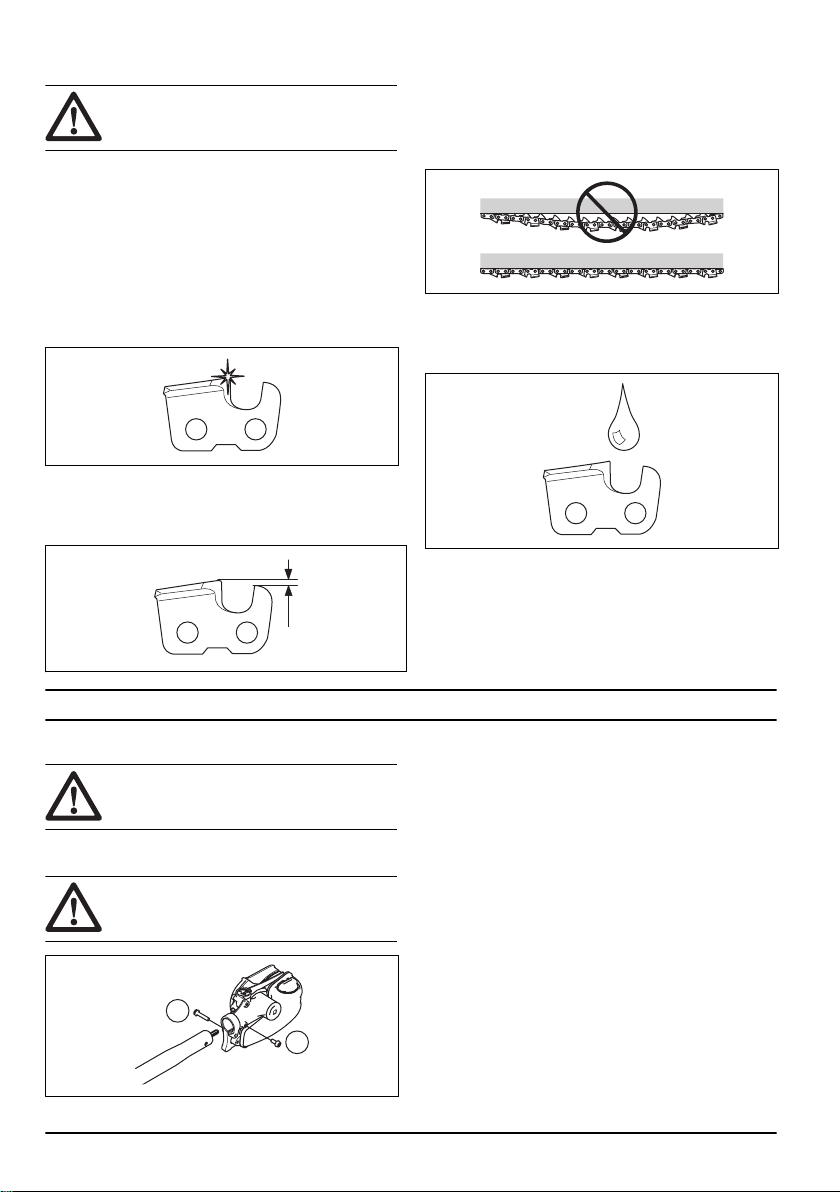
To check the saw chain
Do a check of the saw chain daily.
1358 - 001 - 18.10.2019 9

1. Make sure that there are no cracks in rivets and
links.
2. Examine if the saw chain is rigid.
3. Compare the saw chain with a new saw chain to
examine if the rivets and links are worn.
4. Replace the saw chain if it exhibits any of the
conditions above.
5. Replace the saw chain when the length of the cutting
teeth has worn down to only 4 mm (0.16 in.)
To check the chain drive sprocket
1. Regularly check the degree of wear on the drive
sprocket. Replace if wear is excessive.
To do a check of the guide bar
1. Make sure that the oil channel is not blocked. Clean
if it is necessary.
2. Examine if there are burrs on the edges of the guide
bar. Remove the burrs using a file.
3. Clean the groove in the guide bar.
4. Examine the groove in the guide bar for wear.
Replace the guide bar if it is necessary.
5. Examine if the guide bar tip is rough or very worn.
6. Make sure that the bar tip sprocket turns freely and
that the lubricating hole in the bar tip sprocket is not
blocked. Clean and lubricate if it is necessary.
7. Turn the guide bar daily to extend its life cycle.
To sharpen the saw chain
Information about the guide bar and saw chain
Replace a worn or damaged guide bar or saw chain with
the guide bar and saw chain combinations that we
recommend. This is important in order to keep the safety
functions of the cutting equipment. See
Accessories on
page 15
, for a list of replacement bar and chain
combinations that we recommend.
10 1358 - 001 - 18.10.2019
Tabla de contenidos
Idiomas:
Otros manuales de Accesorios para herramientas eléctricas de Husqvarna


Manuales populares de Accesorios para herramientas eléctricas de otras marcas


ADAMAS
ADAMAS B32 Manual de usuario

STEINEL PROFESSIONAL
STEINEL PROFESSIONAL 4007841009595 Manual de usuario

Echo
Echo Speed-Feed Universal 400 LH/RH Manual de usuario

SCHUNK
SCHUNK ROTA TB-TBS-EP Instrucciones de uso

Schmid
Schmid RAPID Secure XL Manual de usuario

Drill Master
Drill Master 360X Manual de usuario


