
Huffy 6V Manual de usuario
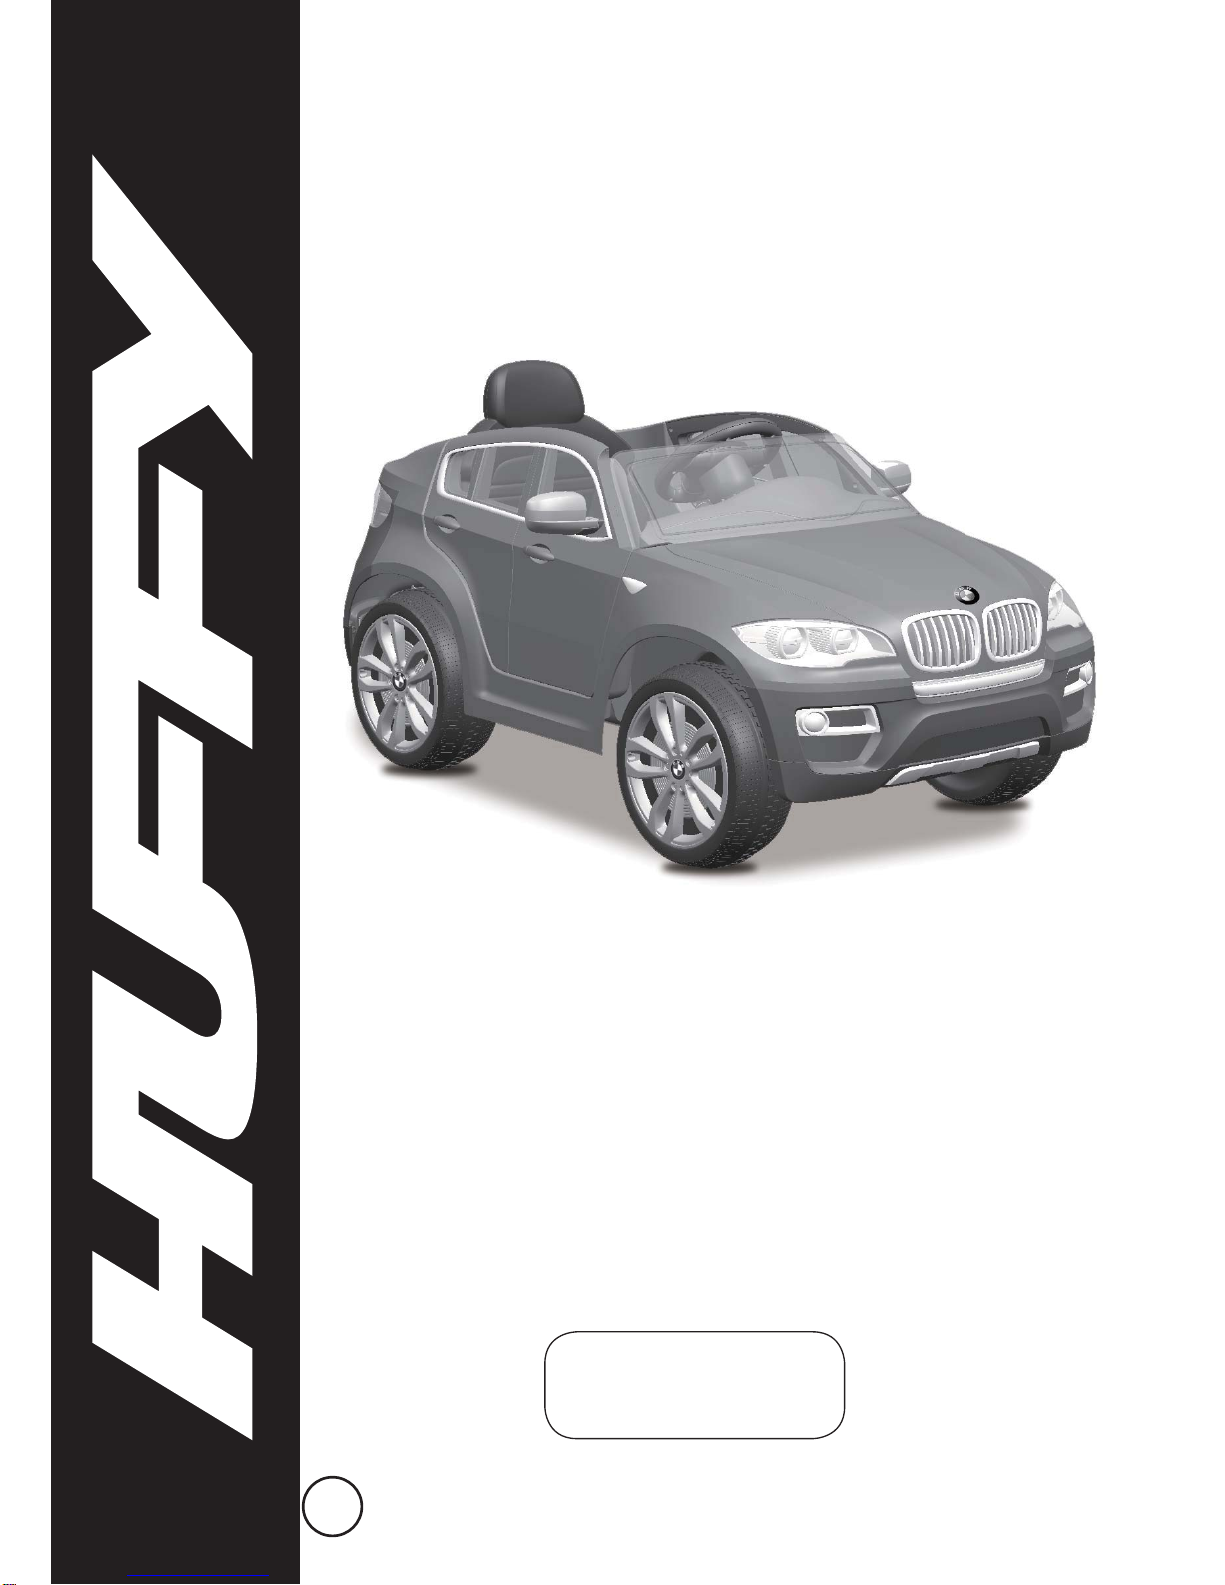
Owner’s Manual
for
6V BMW Ride On
Please read and fully understand this manual
before operation.
Save this manual for future reference.
This manual contains important safety, assembly, operation
and maintenance information.
HBMW Rideon EN 092613 m0132
Copyright Huffy Corporation 2013
BC

2
Owner’s Manual Index
Safety
• Warnings...............................................................................................3-4
• User Requirements................................................................................5
Assembly
• Parts Assembly View.............................................................................6
• Parts Assembly List...............................................................................7
• Drive Motor and Rear Wheel Installation...............................................8
• Front Wheel Installation.........................................................................9
• Steering Rod Installation ......................................................................10
• Drive Battery Installation....................................................................... 11
• Motor Cover Installation........................................................................12
• Seat Installation....................................................................................13
• Steering Wheel and Sound Effect Batteries.........................................14
• Side Mirror Installation..........................................................................15
Operation
• Operation and Features........................................................................16
Maintenance and Service
• General.................................................................................................17
• Battery Re-charge Interval and Time....................................................17
• Charging the Drive Battery...................................................................18
• Battery Fuse.........................................................................................19
• Battery Storage.....................................................................................19
• Battery replacement and disposal........................................................20
• Troubleshooting Guide .......................................................................21/22
Huffy Warranty
• Huffy Corporation Limited Warranty .....................................................23
Tools Needed for Assembly:
Small Phillips Screwdriver Spanner Socket (supplied)

3
WARNING
The user must follow all safety rules and guidelines below or serious injury or death
may occur to the user.
• Always use common sense and safe practices when using the vehicle. This ve-
hicle is unsuitable for children under 3 years. The user must be 3 to 5 years, and
weigh no more than 65 lbs (30kgs).
• This product contains small parts that are for adult assembly only. Keep small
children away when assembling. Remove and dispose of all protective material
and poly bags before assembly. Be sure to remove all packaging materials and
parts from underneath the vehicle body.
• Always use the vehicle in a safe, secure environment with continuous adult
supervision.
• Body parts such as hands, legs, hair and clothing can get caught in moving
parts. Never place a body part near a moving part or wear loose clothing while
using the vehicle. Always wear shoes when using vehicle.
• Use on flat, smooth paved surfaces only.
• Using the vehicle on or near streets, motor vehicle, drop-offs such as: steps,
water (swimming pools), sloped surfaces, hills, wet areas, flammable vapors, in
alleys, at night or in the dark could result in an accident.
• Do not use the vehicle in unsafe conditions such as snow, rain, loose dirt, mud
sand or fine gravel. This may result in unexpected action such as tip over and
skidding.
• This vehicle has no brakes. Motor friction will gradually stop the unit.
• Do not use the vehicle in an unsafe manner. Examples include but are not limited
to:
• Pulling the vehicle with another vehicle or similar device.
• Allowing more than one rider.
• Pushing the vehicle.
• Traveling at an unsafe speed.
• There are additional hazards of using the vehicle in areas other than private
grounds.
• Not to be used in traffic.
• The vehicle shall be used with caution since skill is required to avoid falls or colli-
sions.
• Do not overload the vehicle.
• Do not tow anything behind the vehicle.
• Do not drive up steep slopes.
• Do not drive into fixed objects, which may cause the wheels to spin, causing the
motor to overheat.
• Do not drive in very hot weather, components may overheat.
• Do not allow water or other liquids to come in contact with the battery or other
electric components.
• Do not tamper with the electrical system. Doing so may create a short, causing
the fuse to trip or other damage including fire.
• Child should always wear an approved helmet when using this product.
Safety
4
Safety
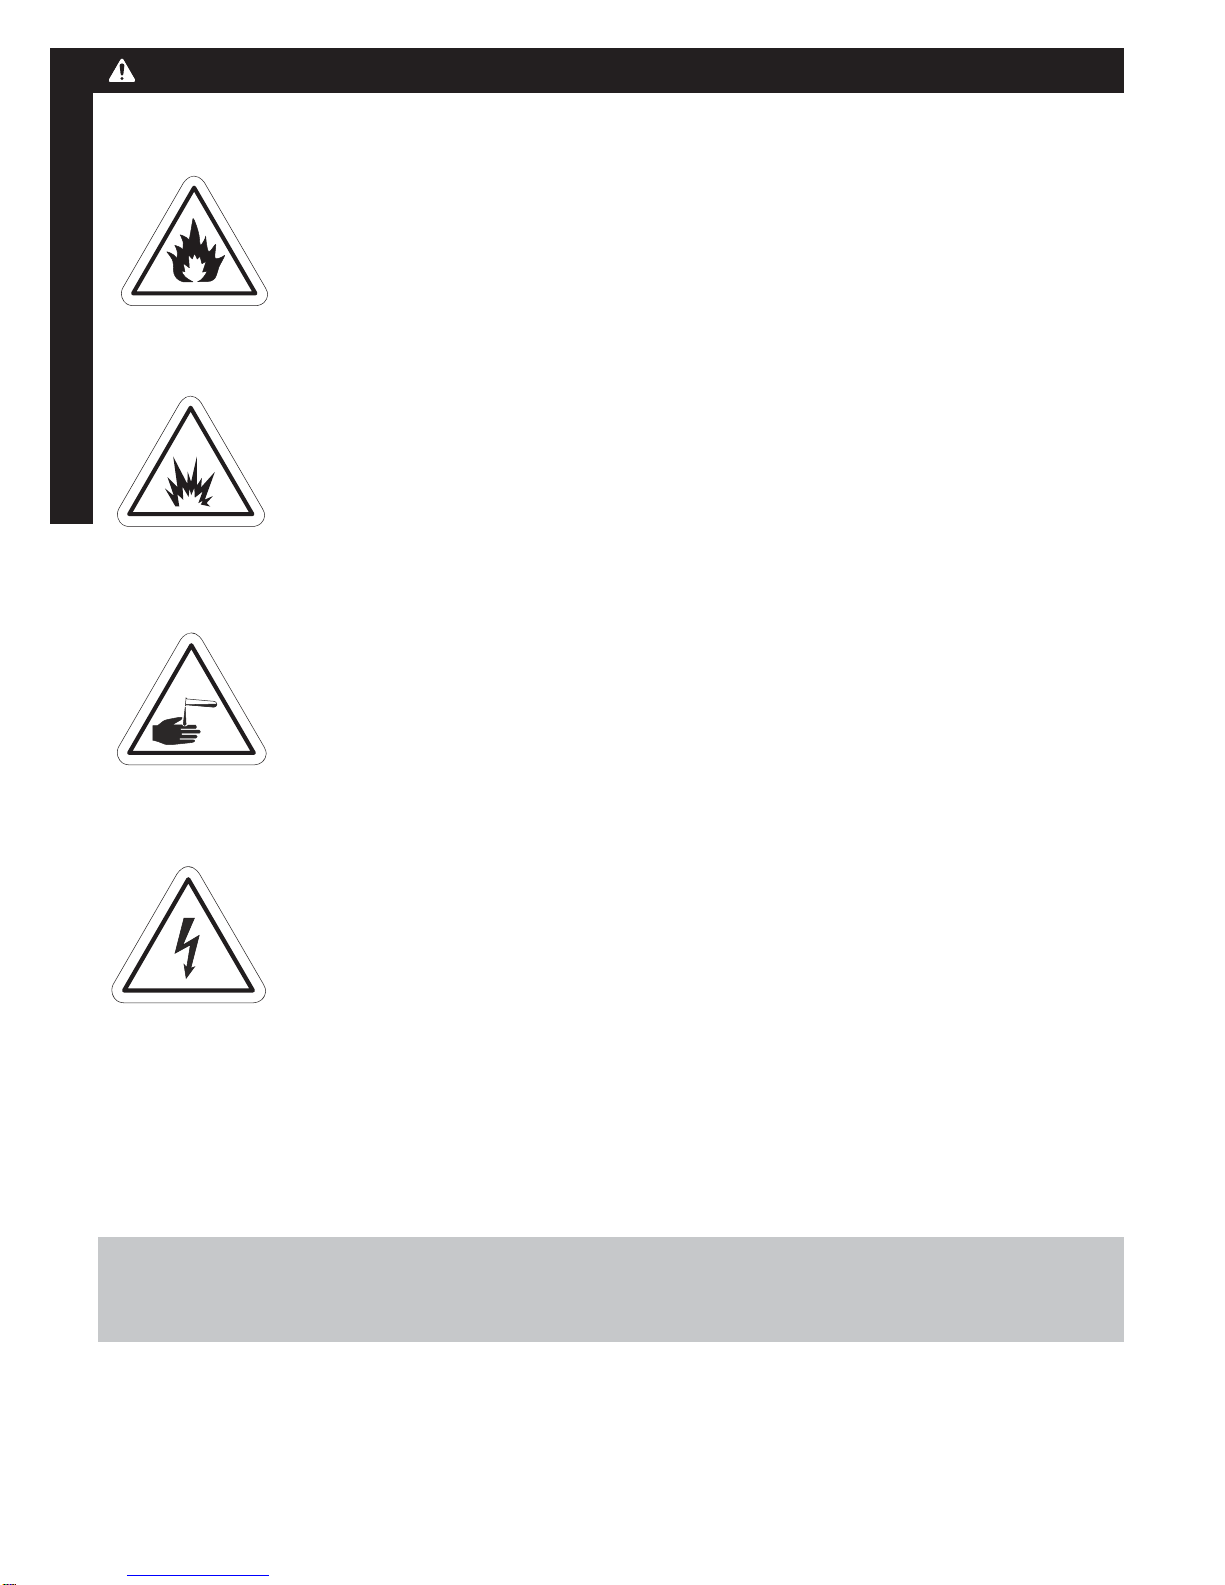
WARNING - Charging the Drive Motor Battery
The following safety hazards may result in serious injury or death to the user of the
vehicle:
• Use of a battery or charger other than the supplied rechargeable
battery and charger may cause a fire or explosion. Only use the
supplied rechargeable battery (or suitable replacement) and char-
ger with the vehicle.
• Using the rechargeable battery and charger for any other product
may result in overheating, fire or explosion. Never use the re-
chargeable battery and charger with another product.
• Explosion. Gases are created during charging. Charge the battery
in a well ventilated area. Do not charge the battery near heat or
flammable materials.
• Contact between the positive and negative terminals may result in
fire or explosion. Avoid direct contact between the terminals. Pick-
ing up the battery by the wires or charger can cause damage to the
battery and may result in a fire. Always pick up the battery by its
case or handles.
• Battery must be handled by adults only. Liquids on the battery may
cause fire or electric shock. Always keep all liquids away from the
battery and keep the battery dry.
• Contact or exposure to battery leakage (lead acid) may cause
serious injury. If contact or exposure occurs immediately call your
physician. If the chemical is on the skin or in the eyes, flush with
cool water for 15 minutes. If the chemical was swallowed, immedi-
ately give the person water or milk. Do not give water or milk if the
patient is vomiting or has a decreased level of alertness. Do not
induce vomiting.
• Battery Posts, terminals and related accessories contain lead and
lead compounds (acid), chemicals known to cause cancer, repro-
ductive harm and are toxic and corrosive. Never open the battery.
• Tampering or modifying the electric circuit system may case a
shock, fire or explosion and permanently damage the system. Ex-
posed wiring and circuitry in the charger may cause electric shock.
Always keep the charger housing closed.
Important! Before using the unit for the first time the battery needs to be charged
for 15 to 18 hours, Only an adult who has read and understands the safety warnings
should handle, charge or recharge of the battery (see Maintenance).
Note: It is not necessary to remove the battery from the vehicle for charging. How-
ever, if the adapter cord will not safely reach a 110-120 volt wall outlet, the battery
can be removed for charging.

5
Safety
User Requirements
The suitable age range for a child using the vehicle is 3 to 5 years. The maximum
weight of the child is 65 lbs (30 kg).
Before using the vehicle the child must understand the controls and safety issues.
They must also demonstrate the capability to handle the vehicle and operate its
controls.
It is the responsibility of the adult to educate the child, determine if they are fit
to operate the vehicle, and supervise use.
Here are basic safe riding rules you should read aloud to your child and anyone who
may use the vehicle:
• An adult must always supervise a child that is using the vehicle.
• Always sit in the seat when using the vehicle.
• Keep your hands, hair and clothes away from moving parts. Always wear shoes
when using in the vehicle.
• Do not use the vehicle on streets or near cars.
• Children under three years old should not be allowed use the vehicle.
• Only drive on level ground. Don’t go near water, drop-offs or up and down steep
slopes.
• Don’t drive the vehicle in loose dirt, mud, sand or fine gravel. Using the vehicle
in loose dirt, mud, sand, or fine gravel may damage the electronics and gear box
inside the vehicle.
Caution: Changes or modifications not expressly approved by the party responsible
for compliance could void the user’s authority to operate the equipment.
NOTE: This equipment has been tested and found to comply with the limits for the
Class B digital device, pursuant to Part 15 of the FCC Rules. These limits are de-
signed to provide reasonable protection against harmful interference in a residential
installation. This equipment generates uses and can radiate radio frequency energy
and, if not installed and used in accordance with the instructions, may cause harmful
interference to radio communications. However, there is no guarantee that interfer-
ence will not occur in a particular installation. If this equipment does cause harmful
interference to radio or television reception, which can be determined by turning the
equipment off and on, the user is encouraged to try to correct the interference by one
or more of the following measures:
• Reorient or relocate the receiving antenna.
• Increase the separation between the equipment and receiver.
• Connect the equipment into an outlet on a circuit different from that to which the
receiver is connected.
• Consult the dealer or an experienced radio/TV technician for help.
Radio Frequency Information
6
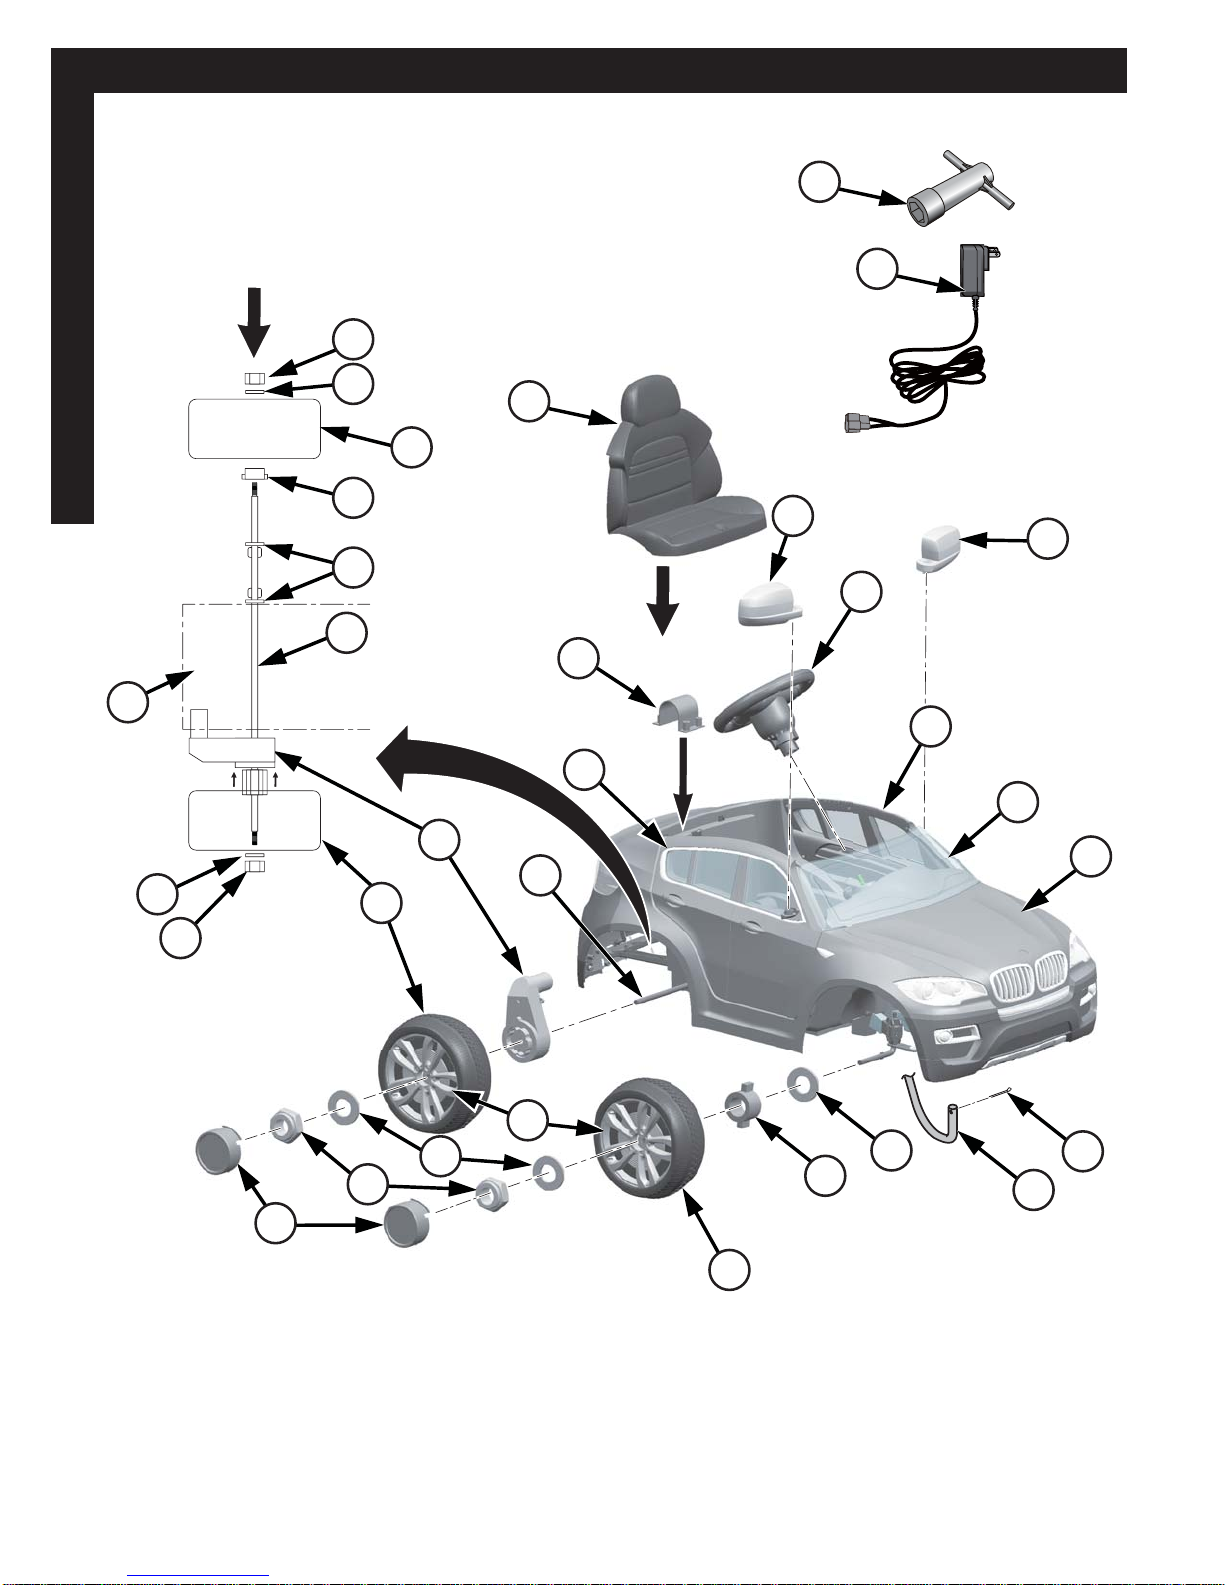
Parts View
Parts View
15
16
17
14
11
18
15
19
20
5
1
4
7
6
3
13
8
21
22
12
10
9
15
18
12
11
15
16
2
15
1
16
LEFT
RIGHT
REAR AXLE
STACK-UP

7
No. Description
1 Body
2 Door, Left
3 Door, Right
4 Steering Wheel Assembly
5 Windshield
6 Mirror, Left
7 Mirror, Right
Mirror Screws (x2)
8 Seat
9 Drive Motor
10 Drive Wheel
11 Wheel (x3)
12 Axle
13 Motor Cover
Motor Cover Screws (x4)
14 Wheel Cover (x4)
Wheel Cover Screws (x3 per wheel)
15 Axle Washers (x8)
16 Locknut (x4)
17 Hubcaps (x4)
18 Wheel Bushing (x7 - total for vehicle)
19 Steering Rod
20 Cotter Pin
21 Battery Charger
22 Spanner Socket (x2)
23 Steering Rod Washers (x2)
Parts List
Parts List
NOTE: Loose parts are packaged in plastic bag.
8
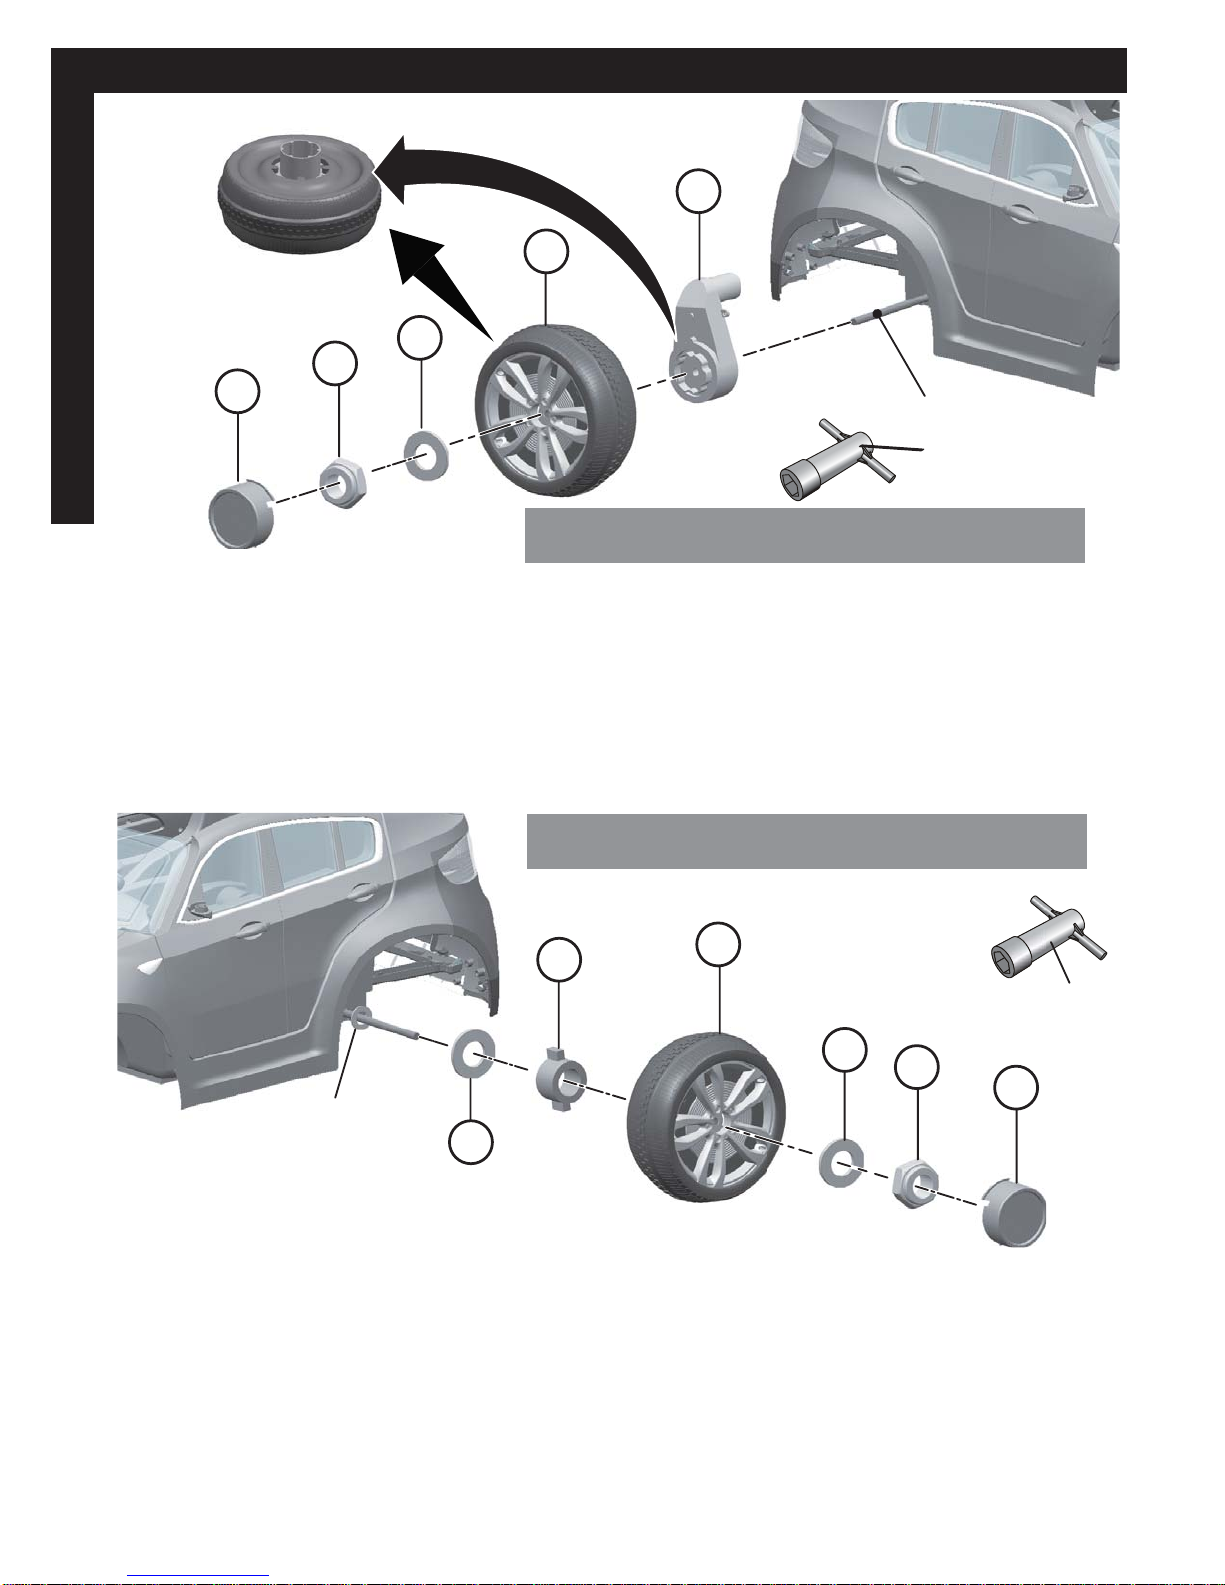
Installing the Drive Motor and Rear Wheels
Assembly
Spanner
Rear axle
Spanner
Washer assembled
already
17
16
16 17
15
11
18
10
15
9
15
1. Slide the Motor (9) onto the rear axle (right side).
2. Feed the Plug and Wires through motor hole.
3. Slide the Drive Wheel (10) onto the rear axle. Ensure the Drive Wheel Gear
matches with the Motor Gear Inset.
4. Slide Washer (15) onto the rear axle.
5. Install Locknut (16) securely on the end of the rear axle with Spanner Wrench.
1. Slide Washer (15) onto the rear axle.
2. Slide the Bushing (18) into the indent in the back of the Wheel (11) (it will sit even
with the back of the wheel).
3. Slide the Wheel onto the rear axle. Ensure Bushing stays in place in Wheel.
4. Slide Washer (15) onto the rear axle.
5. Install Locknut (16) securely on the end of the rear axle with Spanner Wrench.
Hint: An extra Spanner has been provided to hold the locknut on one side of the
rear axle while tightening the locknut on the other side.
6. Align the two tabs of the Hubcap (17) with the slots of the wheel cover, and press
the Hubcap firmly into place. Repeat this step for the other side.
Attach the Left Rear Wheel
Attach the Drive Wheel
NOTE: Begin by turning the vehicle upside down.
9
Installing the Front Wheels
Assembly
Spanner
Front axle
16
17
15
11
18
15
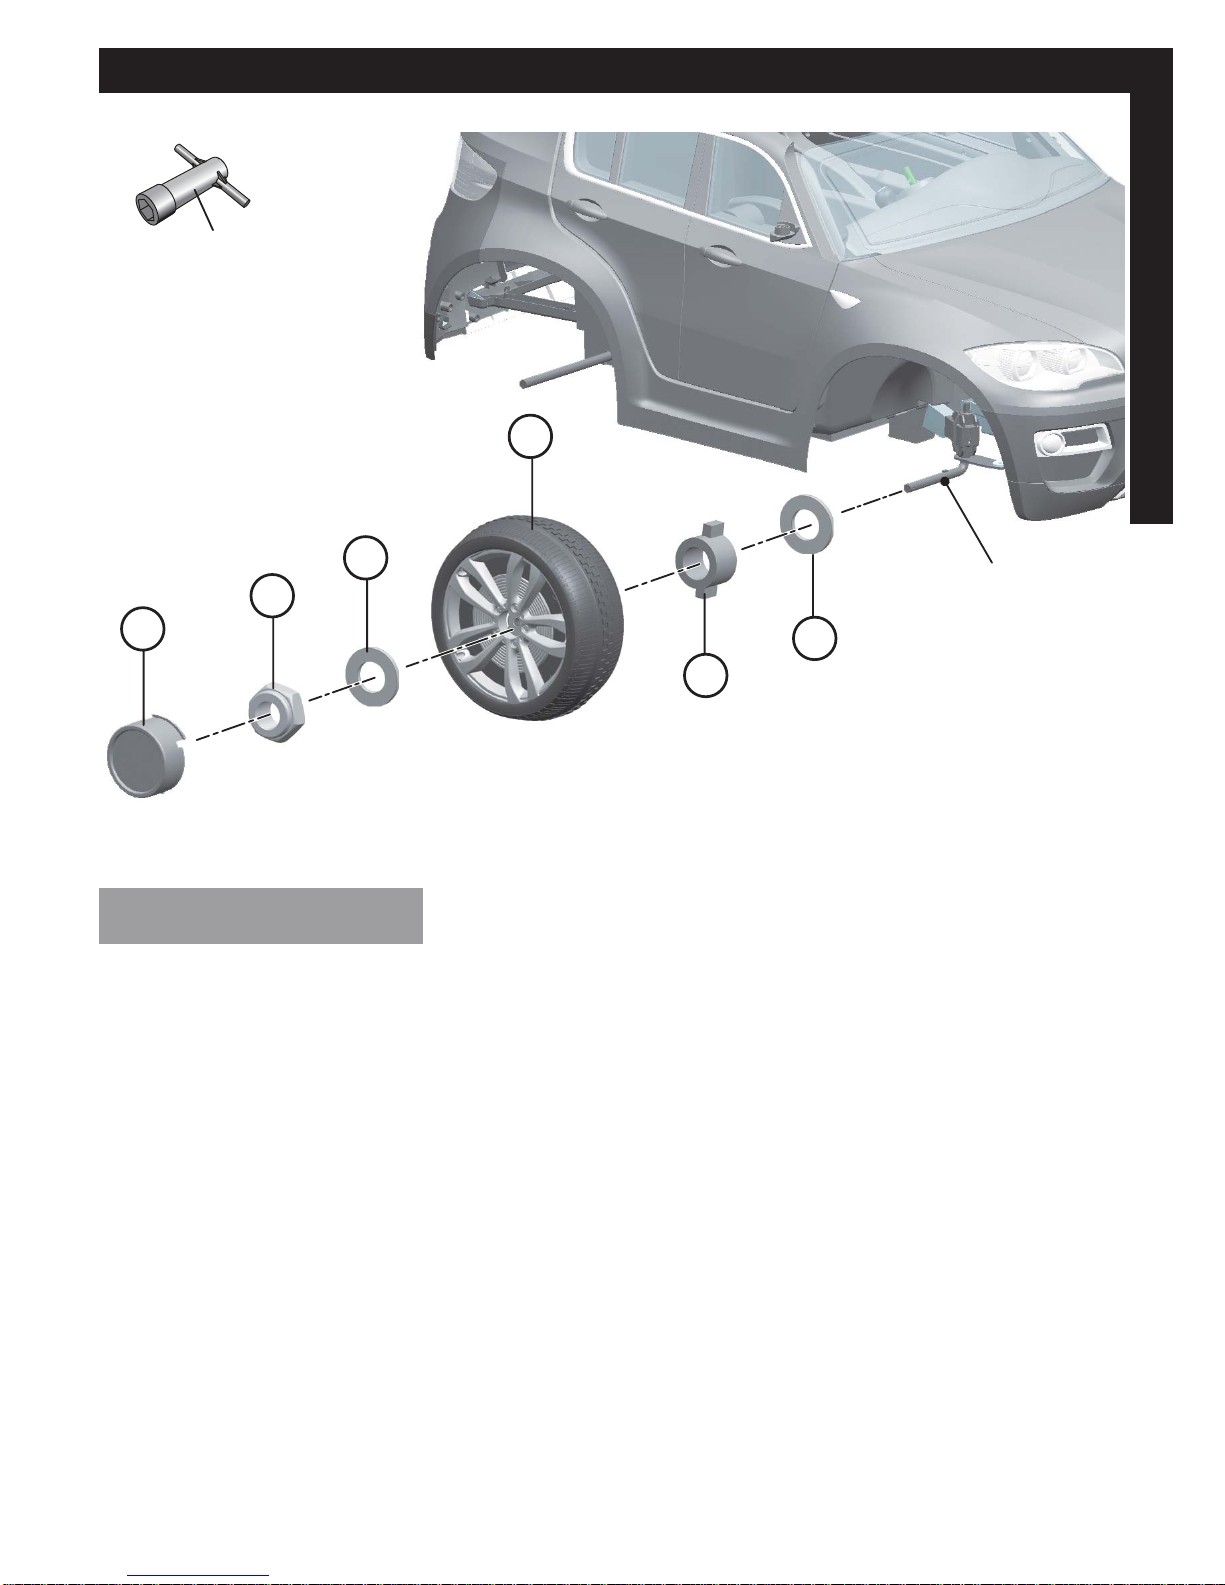
1. Slide Washer (15) onto the Front Axle.
2. Slide the Bushing (18) into the indent in the back of the Wheel (11) (it will sit even
with the back of the wheel).
3. Slide the Wheel onto the Front Axle. Ensure Bushing stays in place in Wheel.
4. Slide Washer (15) onto the Front Axle.
5. Install Locknut (16) securely on the end of the Front Axle with Spanner Wrench.
6. Align the two tabs of the Hubcap (17) with the slots of the wheel cover, and press
the Hubcap firmly into place.
Repeat the above steps for the other front wheel.
Installation
10
Assembly
Installing the Steering Rod
B
B
19
C
C
19
B
A
23
23
23
19
20
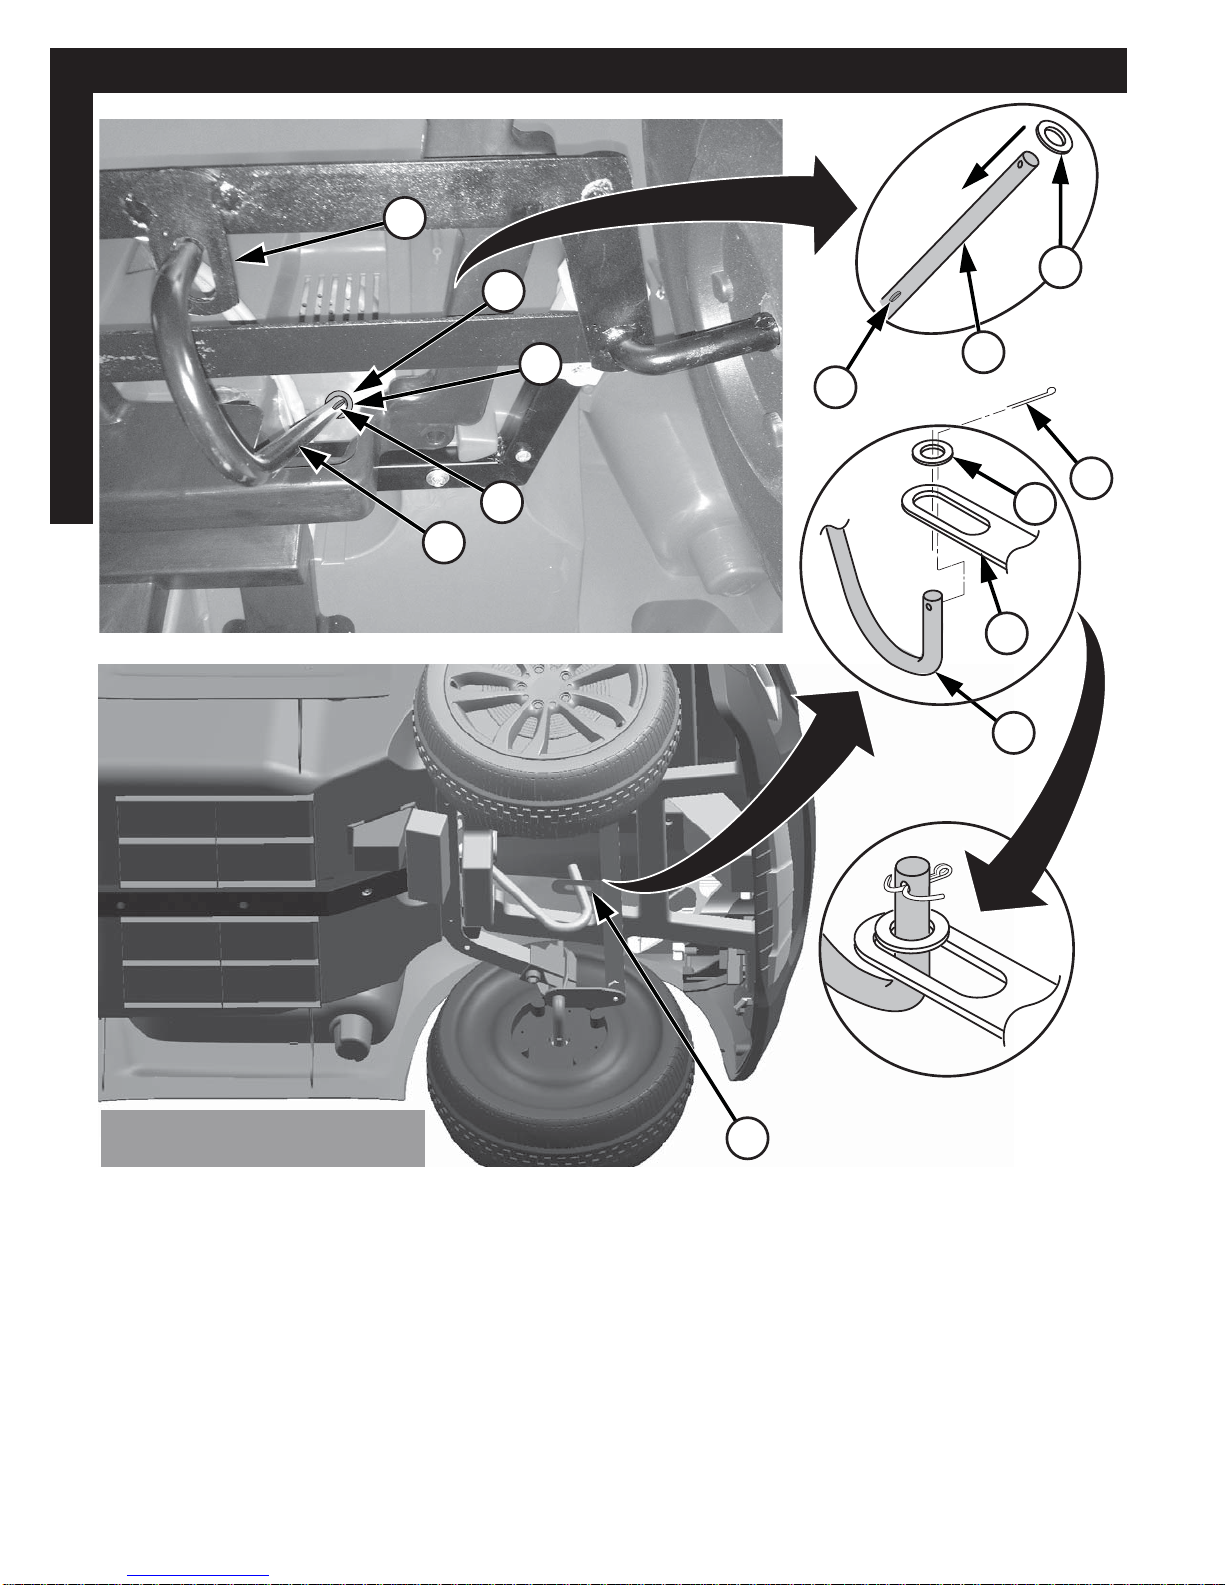
1. Locate the Steering Rod Hole (A) and Steering Slot (B).
2. Place a Washer (23) over the long end of the Steering Rod (19) and slide up to
rod Dimple (C).
3. Insert the long end of the Steering Rod (19) through Hole (A).
4. Insert the short end of the Steering Rod into slotted Hole (B) as shown.
5. Push the Steering Rod through the hole until the rod Dimple (C) is against the
body.
6. Place washer (23) over end of Steering Rod as shown.
7. Insert Cotter Pin (20) through Steering Rod and bend ends around as shown.
Installation
Este manual sirve para los siguientes modelos
1
Tabla de contenidos
Otros manuales de Coche de juguete motorizado de Huffy

Huffy
Huffy m0409 Manual de usuario

Huffy
Huffy True Timber Manual de usuario

Huffy
Huffy CR8-R Manual de usuario

Huffy
Huffy Mini Quad Manual de usuario

Huffy
Huffy BMW Manual de usuario

Huffy
Huffy 6V BMW Ride On Manual de usuario

Huffy
Huffy Disney Princess Royal Horse and Carriage Manual de usuario

Huffy
Huffy 360 Battery Ride-on Manual de usuario


