HRMTEC 123 SCHLEIFENPROFI VX Manual de usuario

1
MANUAL FOR 123 RIBBON PRINTER

2
CONTENTS
1. Machine Settings....................................................................................................................3
1.1 Configuration and calibration...........................................................................................3
2. Software setup........................................................................................................................6
2.1 Driver...................................................................................................................................6
3. Use Instructions......................................................................................................................9
3.1 Run Foil Control Center....................................................................................................9
3.2Prepare 123 Ribbon Printer..............................................................................................9
3.2.1 Check parts.....................................................................................................................9
3.2.2 Enter Ribbon...................................................................................................................9
3.2.3 Enter Foil.......................................................................................................................10
3.2.4 Adjustments..................................................................................................................11
3.3 Prepare “Schleifenprofi” Software.................................................................................12
3.3.1 Prepare Shortcuts........................................................................................................12
3.3.2 Release copy protection (“Freischaltung”)...............................................................12
3.3.3 Prepare Layout.............................................................................................................15
3.3.4 Specialties in use with 123 Ribbon Printer..............................................................16
3.4 Design................................................................................................................................19
3.4.1 “Schleifenprofi” Software ............................................................................................19
3.4.2 Printing Parameters in Foil Control Center..............................................................19
3.4.3 Standard Parameters per Ribbon/Foil......................................................................20
4. Preventive Maintenance .....................................................................................................23
4.1Clean the Print head........................................................................................................23
4.2 Storage of printing foils...................................................................................................23
5. Technical Data......................................................................................................................24

3
1. Machine Settings
Ribn Dog:V3.22 version don't support
Heads: the quantity of the print head
IP Addr: Equipment network IP address
NIC Type: Equipment network card type Numbers
Date: the current date
Clock: the current time
HeadType: the type of the print head
Save: The distance of the saving foil
1.1 Configuration and calibration
Lang: support CHS, CHT, ENGLISH, adjust though "V-"
DataCrct: general to the default, for example, print a "color lump" in 500mm x 500mm, and
the actual size is 500mm x 600mm, can adjust it, if the actual length is longer than the target
length, increase this value, conversely, decrease the value.
BlnkCrct: the distance between the text/image and text/image, the adjustment is the same
as "DataCrct"
HeatMode: can choose "Normal" or "Fast"
HeadByte: the width of the print head, 330A choose 256
Pulse: Default for 46
Cool: open it or not by "V+/V-"
Pre-heat: set the preheat of the print head, usually use it below 10, please used carefully, if
abused, the printing result will be not good or the print head will be damaged.
PrHeatST: set the heating speed of the "Pre-heat", usually use it below
10, please used carefully, for if misemploy, the printing result will be not good or the print
head will be damaged.
Contrast: Adjust LCD screen brightness
Heads: the main board supports 3 print head
Heat Intv: Default for 100, please don't adjust this value at will, otherwise, the printing result
will be not good or the print head will be damaged.
Motor Acc: Default for 80, please don't adjust this value at will, otherwise, the printing result
will be not good or the print head will be damaged.
Upgrade Mode: press "Enter" and upgrade the main board.
Test Printing: click “Enter"

4
Restore CFG: if click “Enter", the main board goes back to default value.
FormatS: use to format SD card or USB,
Pressing "test" can adjust the printing settings, and can
change for the memory device.
When the machine works, the machine will stop printing after
printing the text/image, repress, the machine will continue to work, in "Suspend" and press
"return", the printing stops.
Can delete the file in the memory device; if press it, the
machine will stop working in the process of printing, repress it and the machine continues to
print.
Return to previous menu.
Adjust the settings

5
Choose the menu
Menu choice and file printing
Control the run or stop of the receiving motor
This button must be pressed down when you printing.
This switch controls the print head up/down position.
Position I: print head moves up
Position Middle: print head remains stationary in position (without pressure)
Position II: print head moves down. When it reaches the rubber roll with ribbon and foil, it
remains there with pressure. Before printing, set switch to position II.
Output print
Equipment adjustment
When install the foil, make sure it is in the middle
Set print head switch to position II
Press down the red button to make sure the foil flat
Press "test" to find the printing result, if not good, please adjust the settings and print head
position.
Output printing way Use USB
Online printing way Use Windows Driver

6
2. Software setup
2.1 Driver
Execute the file setup.exe in the folder ftp://hrmtec.com/Printer_Schleifenprofi_v1/ISIX_setup
(User: f00a54fc, Password: fcc123...).
Configure the driver as follows:
Click "Next"

7
Click "Finish"
Enter a printer name, e.g.. "SchleifenProfi2" choose "RF_Xpress", and press "OK"
Click "OK"

8
The printer was installed

9
3. Use Instructions
3.1 Run Foil Control Center
Open the file "FoilControlCenter" and Run the
Normally, when installation is done by ISIX, the FoilControlCenter is already running in
the background.
3.2 Prepare 123 Ribbon Printer
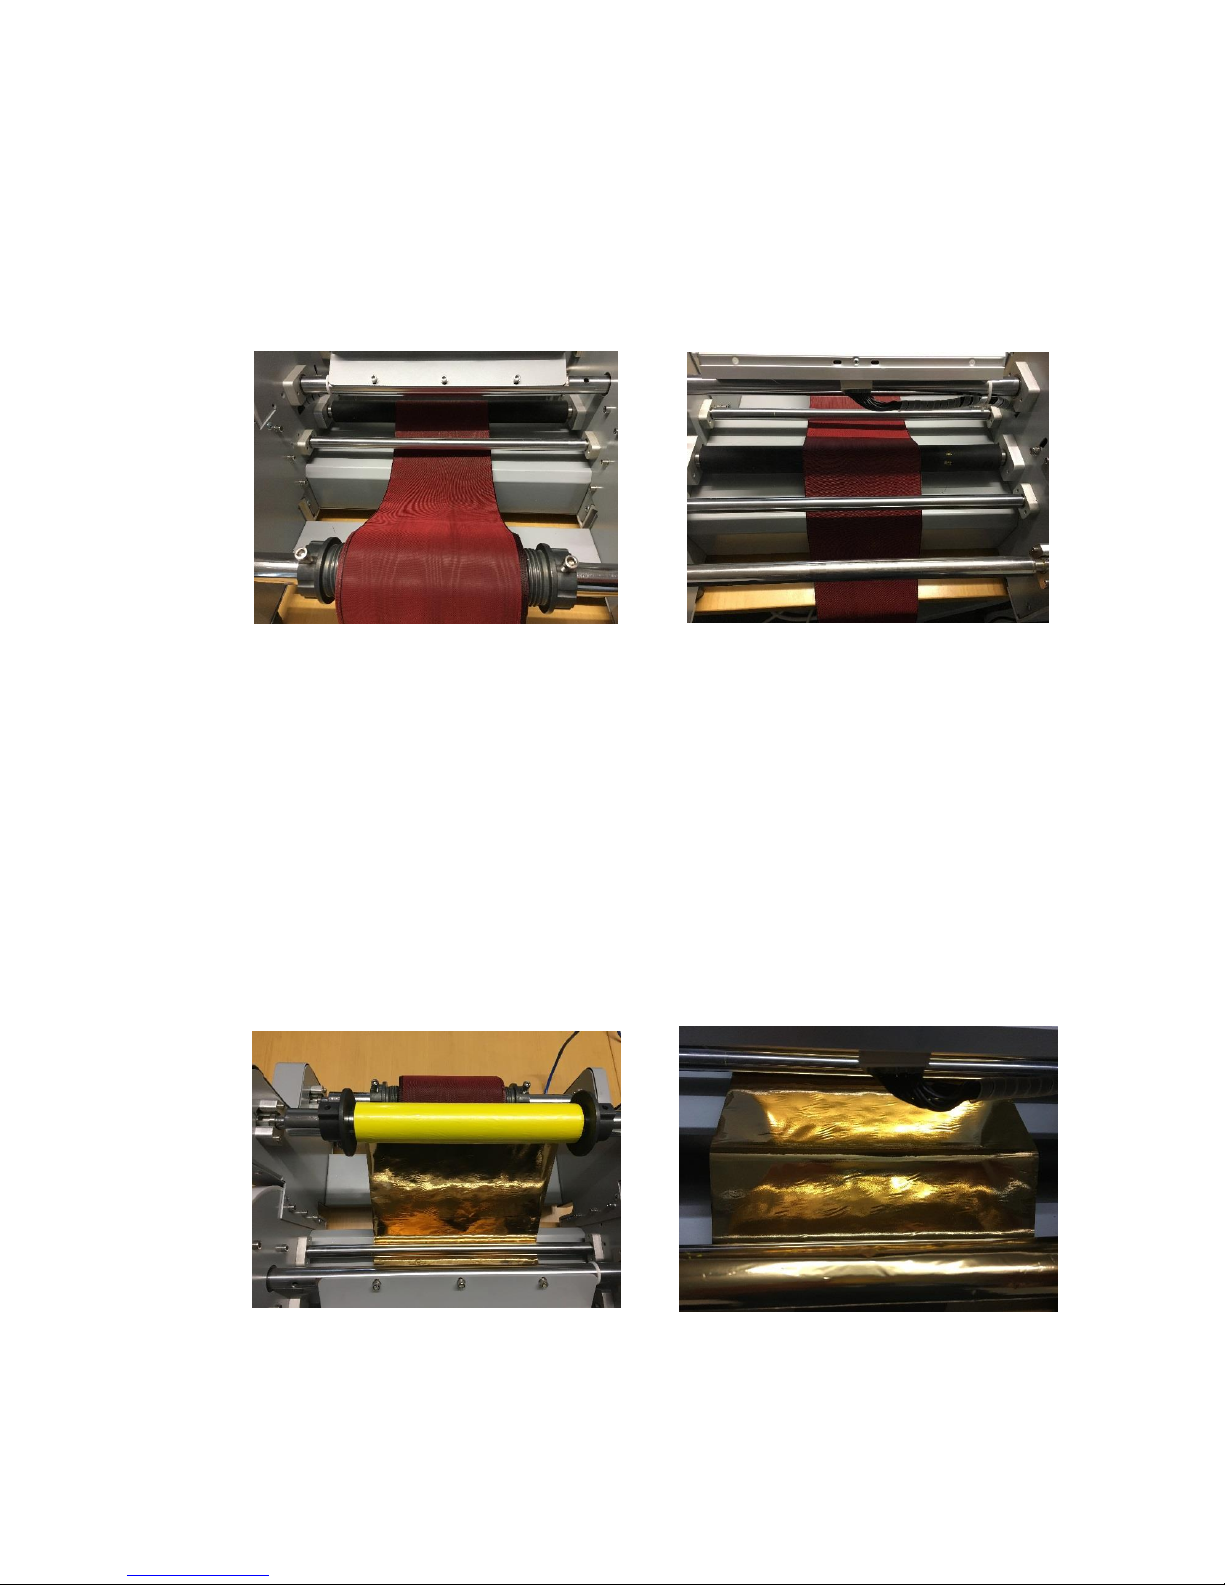
3.2.1 Check parts
The 123 Ribbon Printer consists of two feeding axes (one for the foil and one for the
ribbon) with four mounting sleeves, two waste axes for the foil, the printer itself, the
power cable and the network cable.The delivery also includes a tool to fix the mounting
sleeves, plus cotton pads to clean the print head.
3.2.2 Enter Ribbon
Move the print head manually up, so that the area to the main printing axis and the two
defection axes is easy accessible.
Position the ribbon centralized on the feeding axle (thicker axis) and fix it with the
mounting sleeves.
10
The printing section consists of three axles: the main printing axles (black rubber) and
two deflection axles just before and after the printing axle.
Enter the ribbon in the order “down”, “up”, “down”:
1. Below the first deflection axis (“down”)
2. Above the main printing axis (“up”)
3. Below the second deflection axis (“down”)
Hint: to change the ribbon, you can let the foil installed (just ease it to have enough
space to enter the new ribbon). E.g. if you want to print different ribbons with the same
foil (e.g. gold on black ribbon and gold on white ribbon).
3.2.3 Enter Foil
First make sure the foil is entered the way you have the material on top that should be
finally on top of the ribbon. E.g., the gold foil will have to golden part on top, while the
yellow part looks towards the ribbon.
The foil follows the ribbon, so the order “down”, “up”, “down” applies. After the second
deflection roll, the foil needs to be fixed at the upper waste roll.
You might want to fix the foil with a small tape to the waste axis.
Otros manuales para 123 SCHLEIFENPROFI VX
1
Tabla de contenidos


