Hotpoint FP 100 Manual de usuario

FP 100 UK
02/2013 - ver.1.1
Indesit Company UK Ltd
Morley Way,
Peterborough PE2 9JB
www.indesitcompany.com EN Operating Instructions
Max
Mid
Min
Off
Pulse
FP 1005 AX0 UK FP 1009 AX0 UK
3
12
16
6
7
8
5A
5B
5C
5D
5E
10
9
11B
11A
11
4
3
1
14
13
6
7
8
5
5A
5E
5B 5C 5D
2
10
9B
9A
9
12B
12A
12
15
16
220-240V
1000W
FP 100 UK
FP 100 UK
02/2013 - ver.1.1
Indesit Company UK Ltd
Morley Way,
Peterborough PE2 9JB
www.indesitcompany.com EN Operating Instructions
Max
Mid
Min
Off
Pulse
FP 1005 AX0 UK FP 1009 AX0 UK
3
12
16
6
7
8
5A
5B
5C
5D
5E
10
9
11B
11A
11
4
3
1
14
13
6
7
8
5
5A
5E
5B 5C 5D
2
10
9B
9A
9
12B
12A
12
15
16
220-240V
1000W
FP 100 UK
A C EB D F G

A C EB D F G

A C EB D F G

FP 100 UK
02/2013 - ver.1.1
Indesit Company UK Ltd
Morley Way,
Peterborough PE2 9JB
www.indesitcompany.com EN Operating Instructions
Max
Mid
Min
Off
Pulse
FP 1005 AX0 UK FP 1009 AX0 UK
3
12
16
6
7
8
5A
5B
5C
5D
5E
10
9
11B
11A
11
4
3
1
14
13
6
7
8
5
5A
5E
5B 5C 5D
2
10
9B
9A
9
12B
12A
12
15
16
220-240V
1000W
FP 100 UK

55
en
hotpoint.co.uk
accordance with the specications on the rat-
ing plate.
• Read all instructions. Keep these instructions
for future use.
• To protect against risk of electrical shock, do
not immerse base, cord, or plug in water or
other liquid.
• Do not leave appliance unattended if in the
‘On’ or ‘Pulse’ positions.
• Keep children away from appliance.
• Supervise children to prevent them from play-
ing with the appliance.
• Do not allow persons with restricted physical,
sensory, perceptive or mental abilities, or with
lack of experience and knowledge to operate
the appliance unless they are supervised or
have been instructed in the use of the ap-
pliance by somebody who is responsible for
their safety.
• If the power is interrupted, the appliance
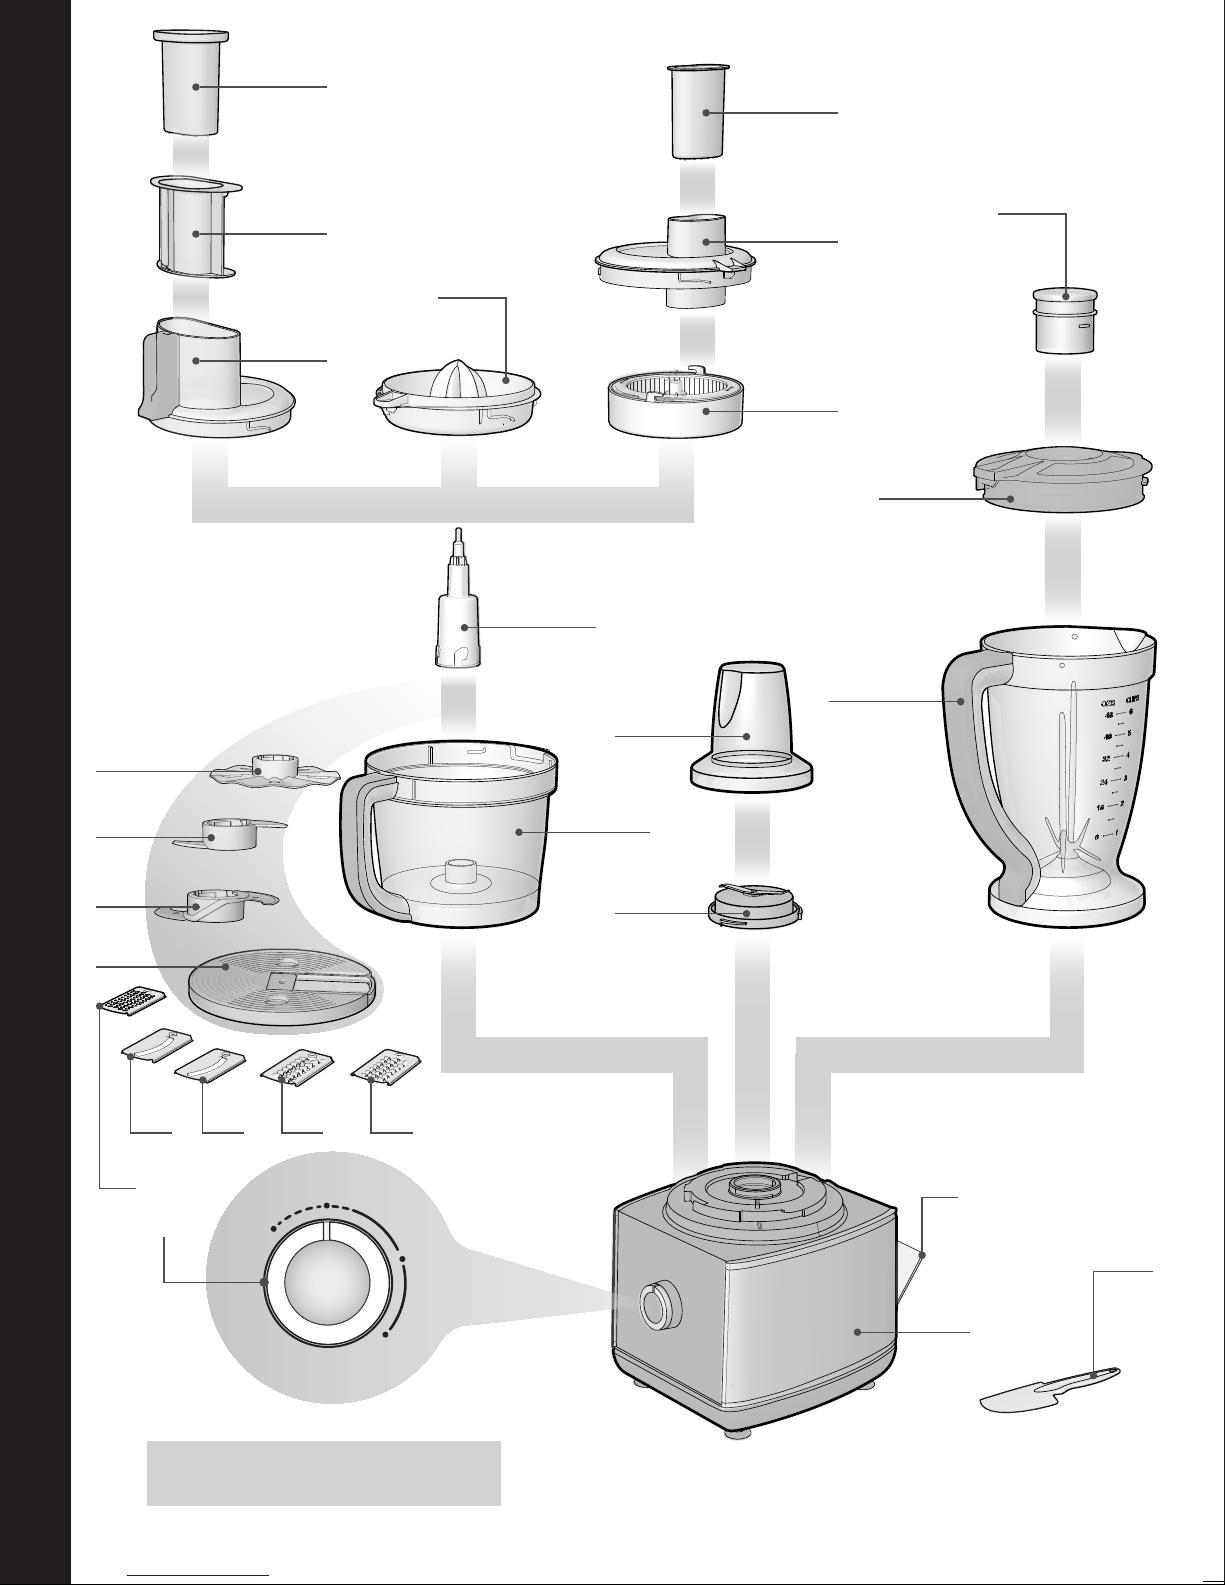
PARTS AND FEATURES
1. Base
2. Control knob
3. Bowl
4. Drive shaft
5. Insert carrier disc
5A. Fine slice insert
5B. Coarse slice insert
5C. Fine shredding insert
5D. Coarse shredding insert
5E. Grating blade
6. Beating disc
7. Kneading hook
8. Chopping Blade
9. Juice extractor
Knob
OFF — Processor should always be left in OFF position when unit is not in use.
FROM OFF TO HIGH — Operating speed, adjustable from minimum to maximum speed
PULSE — Turn the knob anticlockwise to “PULSE” and hold for unit to operate. When released, unit will
stop. Use PULSE for short
processing tasks, such as chopping nuts, raw meats, or vegetables.
The Pulse function allows you to check processed results and control the tininess continuously until the
knob turns to “OFF”.
9A. Lid
9B. Pusher
10. Citrus Press
11. Bowl Lid
11A. Big Food Pusher
11B. Small Food Pusher
12. Jug Assembly
12A. Jug lid
12B. Measuring cup
13. Spatula
14. Accessories storage compartment
15. Milling cup jug
16. Blade unit
INTRODUCTION
Thank you for purchasing our product.
In doing so, you have opted for an effective, high
performing appliance.
If the instructions for correct use of this appliance
are not observed, the manufacturer’s liability for
any resulting damage will be excluded.
Operating instructions may describe different mod-
els. Any difference is clearly identied.
IMPORTANT INFORMATION
FOR YOUR SAFETY
When using electrical appliances, basic safety pre-
cautions should always be followed, including the
following.
• Connect and operate the appliance only in

66
en
hotpoint.co.uk
remains switched on and restarts when the
power is restored.
• Turn unit off and unplug from outlet when not
in use, before putting on or taking off parts,
and before cleaning. To disconnect, turn unit
off, grasp plug, and pull out from wall outlet.
Never yank on cord.
• Avoid contacting moving parts and keep n-
gers out of discharge opening.
• Do not operate any appliance with a damaged
cord or plug or after the appliance malfunc-
tions or has been damaged in any manner.
Return the appliance to an authorized service
facility for examination, repair, or electrical or
mechanical adjustment.
• To prevent injury, repairs such as replacing a
damaged cord should only be carried out by
our customer service.
• The use of attachments not recommended
or sold by the appliance manufacturer may
cause re, electric shock, or injury.
• Do not use outdoors.
• Do not let cord hang over edge of table or
counter or touch hot surfaces.
• Keep hands and utensils away from moving
blades or Discs while processing food to pre-
vent the possibility of severe personal injury
or damage to the food processor. A scraper
may be used but must be used only when the
food processor is not running.
• Blades are sharp. Handle carefully. Be sure to
insert or remove Chopping Blade and Slice/
Shred Disc by touching non-cutting edges to
avoid injuries.
• To avoid injury, never place Chopping Blade
or Slice/Shred Disc on Base without rst put-
ting Bowl properly in place. Make sure motor,
Disc, and/or Chopping Blade have stopped
completely before removing cover.
• Be certain cover is securely locked in place
before operating appliance.
• Never feed food into chute by hand. Always
use Food Pusher.
• Do not operate this appliance in the presence
of explosive and/or ammable fumes.
• This appliance is intended for household use
only, not for commercial or industrial use. Use
for anything other than intended will void the
warranty.
• Do not attempt to override the cover interlock
mechanism.
• Do not leave the appliance unattended while
it is running.
• To reduce the risk of electric shock, do not
attempt to remove the bottom cover. There
are no user serviceable parts inside. Repair
should be done only by authorized personnel.
• For your protection, this unit has an interlock
system so the processor won’t operate unless
the Bowl is locked onto the Base and the Cov-
er is correctly locked onto the bowl. Be sure
the Big Food Pusher on the Bowl Lid is also
in the lock position. Do not attempt to oper-
ate the unit without the Bowl lid, Bowl and Big
Food Pusher being correctly in place. Be sure
the Base is on a at, dry and clean surface
before you begin processing.
BEFORE FIRST USE
• When unpacking the product and removing
packing material, handle the Chopping Blade,
and Slice/Shred Disc carefully; they are very
sharp.
• Wash all parts except the Base in hot, soapy
water. Rinse them dry. These parts can also
be placed in the dishwasher. Be sure to read
this Use & Care Book, paying special atten-
tion to the sections on “How to Use” and “Care
and Cleaning” to learn the correct methods
for taking the unit apart and cleaning.
USE YOUR FOOD
PROCESSOR
Please read “Important information and
safeguards” paragraph before using.
Tips and operating techniques
Be sure to process small amounts of liquids (about
2 cups or less) at a time. Larger amounts may leak
from the bowl.
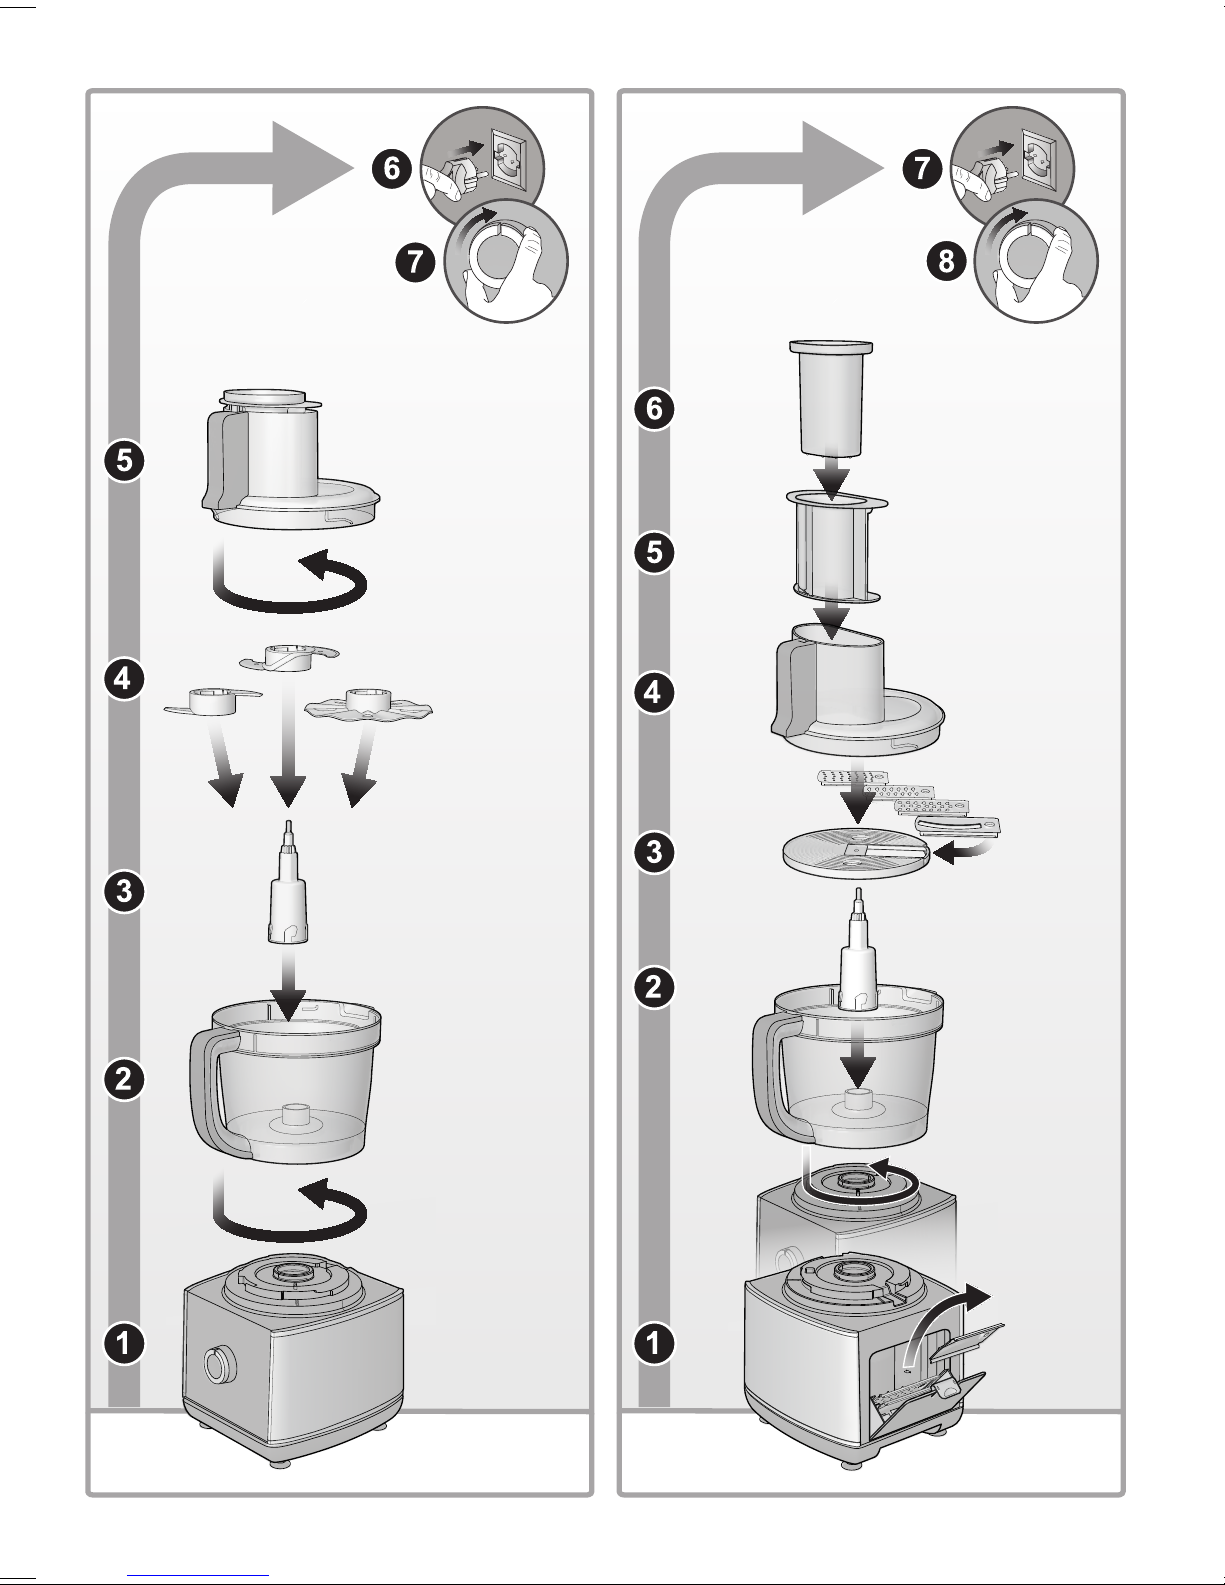
CHOPPING BLADE/BEATING
DISC/KNEADING HOOK (A)
1. Place the unit base on a dry level surface.
2. Attach the bowl and snap the Bowl han-
dle and rotate it anticlockwise until it is fully
locked on the Base.
3. Put down the Drive Shaft until it is correctly

77
en
hotpoint.co.uk
placed on the bowl.
4. Insert Chopping Blade / Beating disc/ Knead-
ing hook into the drive shaft and release.
5. Add ingredients.
6. Attach lid with pusher and rotate it anticlock-
wise until it is fully locked into the bowl.
SLICING, SHREDDING AND
GRATING INSERTS
Be sure the unit is OFF and the cord is
unplugged before use.
Use Food Pusher when processing food - never
use hand to push food directly.
Let unit do the work, heavy pressure will not speed
operation. Do not use the processor continuously
for more than 3 minutes at a time, allow a rest pe-
riod of 5 minutes between working cycles (when
mixing, the cycles can be longer, e.g. 5 minutes
on end).
The blade and grater attachments are not suit-
able for processing walnuts, nuts, horseradish and
similar foods. Use the grater attachment to process
hard cheeses.
How to process small or long pieces
of food (B)
1. Place the Bowl onto the Base.
2. Ensure the Drive shaft is placed in position.
3. Extract the required insert from the drawer.
4. Insert the required insert into the carrier disc.
5. Attach the carrier disc to the drive shaft.
6. Lock the cover with the big food pusher.
7. Put small, long food with the small food push-
er. Use the Food Guide to help you prepare
food for slice/shred processing.
8. Rotate the knob clockwise until it is on
“LOW”/“HIGH” for continuous processing.
Put down the big food pusher with about 400-
500g force.
9. After processing food, rotate the knob anti-
clockwise until it is on “OFF ”, allow the disc to
stop rotating, twist the Cover towards unlock
to remove the cover.
How to process large pieces of
food (C)
1. Place the Bowl onto the Base.
2. Ensure the Drive shaft is placed in position.
3. Insert the required insert into the carrier disc.
4. Attach the carrier disc to the drive shaft.
5. Lock the cover with the big food pusher.
6. Put the large food into the big food chute on
the cover, then push the big and small food
pusher together. Use the Food Guide to help
you prepare food for slice/shred processing.
7. Rotate the knob clockwise until it is on
“MIN”/”MAX” for continuous processing, put
down the big food pusher with about 400-
500g force.
8. After processing food, rotate the knob anti-
clockwise until it is on “OFF ”, allow the disc to
stop rotating, twist the Cover towards unlock
to remove the cover.
Removing big food pusher will stop the
motor.
USE THE JUICE EXTRACTOR
ATTACHMENT (D)
Please read “Important information and
safeguards” paragraph before using.
Use this function to squeeze the juice out of pip
fruits (e.g. apples, pears), berries, pitted stone
fruits, vegetables (e.g. carrots, tomatoes).
1. Place the Bowl onto the Base.
2. Ensure the Drive shaft is placed in position.
3. To assemble the juice extractor attachment,
screw the grater with the lter basket in the
lock position in an anticlockwise direction.
4. Attach cover for juice centrifuge an rotate in
an anticlockwise direction.
5. Turn the rotary switch to a low speed setting.
6. Add fruit or vegetables through the feeding
tube and only gently push forward with the
pusher. Cut beforehand if necessary.
7. After processing, set the rotary switch briey
to high speed and leave the appliance run-
ning until all the fruit pulp has been squeezed
out.
Maximum processing quantity: 250g
fruit or vegetables.

88
en
hotpoint.co.uk
USE THE CITRUS PRESS
ATTACHMENT (E)
Please read “Important information and
safeguards” paragraph before using.
Be sure the unit is OFF and the cord is
unplugged before use.
The pressure cone can not be removed from
the juice.
Halve the food/fruit in advance.
Let unit do the work, heavy pressure will not
speed operation. Do not use the processor
continuously for more than 30 minutes at a
time, allow a rest period of 1 minute between
working cycles.
1. Place the Bowl onto the Base.
2. Ensure the Drive shaft is placed in position.
3. Screw on the Citrus Press as far as possible
in an anticlockwise direction.
4. To extract juice from the fruit, set the rotary
switch to low speed and press the fruit onto
the pressing zone.
Do not exceed the max liquid level in
the bowl. Empty the bowl soon.
USE THE BLENDER
ATTACHMENT (F)
Please read “Important information and
safeguards” paragraph before using.
Before rst use, wash all parts except
the unit base: the Measuring cup, lid,
jug assembly (the jug assembly includes jug,
blade assembly, gasket and jug base). The
jug assembly is non- decomposable.
Blades are sharp. Handle carefully. Never
place blender motor base in water or other
liquids.
1. Place the jug assembly onto the Base. Put
down the jug assembly until it is correctly
placed on the Base, snap the jug assembly
handle and rotate it anticlockwise until it is
fully locked on the Base.
2. Place the food to be blended into the jug.
3. Put the lid on the jug and rotate it anticlock-
wise till lock position. Be sure the measuring
cup is in place.
4. Ensure the knob is on “OFF”. Plug the cord
into a standard electrical outlet.
5. For best results when crushing ice, use
“PULSE”. To activate it, rotate it anticlockwise
until it is on “PULSE”; to stop crushing, re-
lease the knob.
6. If you want to add ingredients while the blend-
er is on, remove the measuring cup and feed
through the lid opening.
7. When nished blending, rotate the knob until
it is on the “OFF” position.
There is only one position for the jug
assembly to be locked onto the Base.
The unit won’t operate if the jug assembly is
not correctly placed onto the Base.
Tips and Techniques
• To avoid damage, do not process deep-fro-
zen ingredients (except ice cubes). Do not
operate when empty.
• Cut food into small pieces, about 2 in. (5 cm)
before adding to the blender. To chop, grate
or prepare fruit smoothies using fresh or fro-
zen fruit, cut foods into 3/4 in. (2 cm.) pieces.
• For best circulation of foods that are to be
blended with some liquid, pour the liquid into
the jug rst, then add solids.
• Following items should never be placed in the
unit as they may cause damage: bones, large
pieces of solid frozen foods, or tough foods
such as turnips.
• To crush ice, ll blender jug half-full with cold
water. Add about 2 cups of ice cubes. Hold
one hand rmly on the lid and rotate the knob
on pulse position. If more ice is needed, re-
move the cap and add cubes one by one
through the hole in the lid. DO NOT CRUSH
ICE WITHOUT LIQUID. Failure to follow
these directions can result in damage to the
blades, jug, blender, and possibly result in
personal injury.
USE THE MILLING CUP
ATTACHMENT (G)
Use the milling cup for herbs, nuts and coffee
beans.
1. To open the cup, screw counter-clockwise the
blade unit (yy).
Tabla de contenidos
Otros manuales de Exprimidor de Hotpoint


