Hotpoint II E75 AA0 Manual de usuario

Compact Generator
2013/06 ver. 1.1.
Indesit Company UK Ltd
Morley Way,
Peterborough PE2 9JB
www.indesitcompany.com EN Operating Instructions
K
1
2
34
5
6
7
8
9
10 10
11
II E75 AA0 UK | II DC60 AA0 UK II C50 AA0 UK
Compact Generator
2013/06 ver. 1.1.
Indesit Company UK Ltd
Morley Way,
Peterborough PE2 9JB
www.indesitcompany.com EN Operating Instructions
K
1
2
34
5
6
7
8
9
10 10
11
II E75 AA0 UK | II DC60 AA0 UK II C50 AA0 UK

55
A
B
C
E F G
D
I
H
J
55
A
B
C
E F G
D
I
H
J

Compact Generator
2013/06 ver. 1.1.
Indesit Company UK Ltd
Morley Way,
Peterborough PE2 9JB
www.indesitcompany.com EN Operating Instructions
K
1
2
34
5
6
7
8
9
10 10
11
II E75 AA0 UK | II DC60 AA0 UK II C50 AA0 UK

5
enit
GENERAL SAFETY INSTRUCTIONS
• Iftheplug,powercordorapplianceappeartobe
damagedorifanyvisibledamageorwaterleaks
arefound,donotoperatetheiron.Insuchcases
haveitcheckedbyHotpoint’sauthorisedstaffin
ordertoavoidanyhazardoussituation.
• Iftheappliancewasdropped,donotoperateit.
• Thisappliancecanbeusedbychildrenagedfrom
8 years and above and persons with reduced
physical, sensory or mental capabilities or lack
ofexperienceandknowledgeiftheyhavebeen
given supervision or instruction concerning use
of the appliance in a safe way and understand
thehazardsinvolved.
• Supervisechildrentopreventthemfromplaying
withtheappliance.
• Neverleavetheapplianceunattendedwhenitis
pluggedintoanelectricalsocket.
• Aftereachuseoftheapplianceandwhenlling
thewaterreservoir,placetheapplianceinastable
position-usingthespecialironpadsupplied-and
disconnecttheplugfromtheelectricalsocket.
• The appliance must be used and placed on a
stable at horizontal surface. We recommend
usinganironingboard.
• For your safety, all repairs or maintenance
operationsontheappliancemustbecarriedout

6
en
exclusivelybyHotpoint’sauthorisedstaff.
• Cleaning and user maintenance shall not be
madebychildrenwithoutsupervision.
• Keeptheironanditscordoutofreachofchildren
lessthan8yearsofagewhenitisenergizedor
coolingdown.
This symbol warns operators that surfaces
are liable to get hot during use and can burn
your skin.

7
en
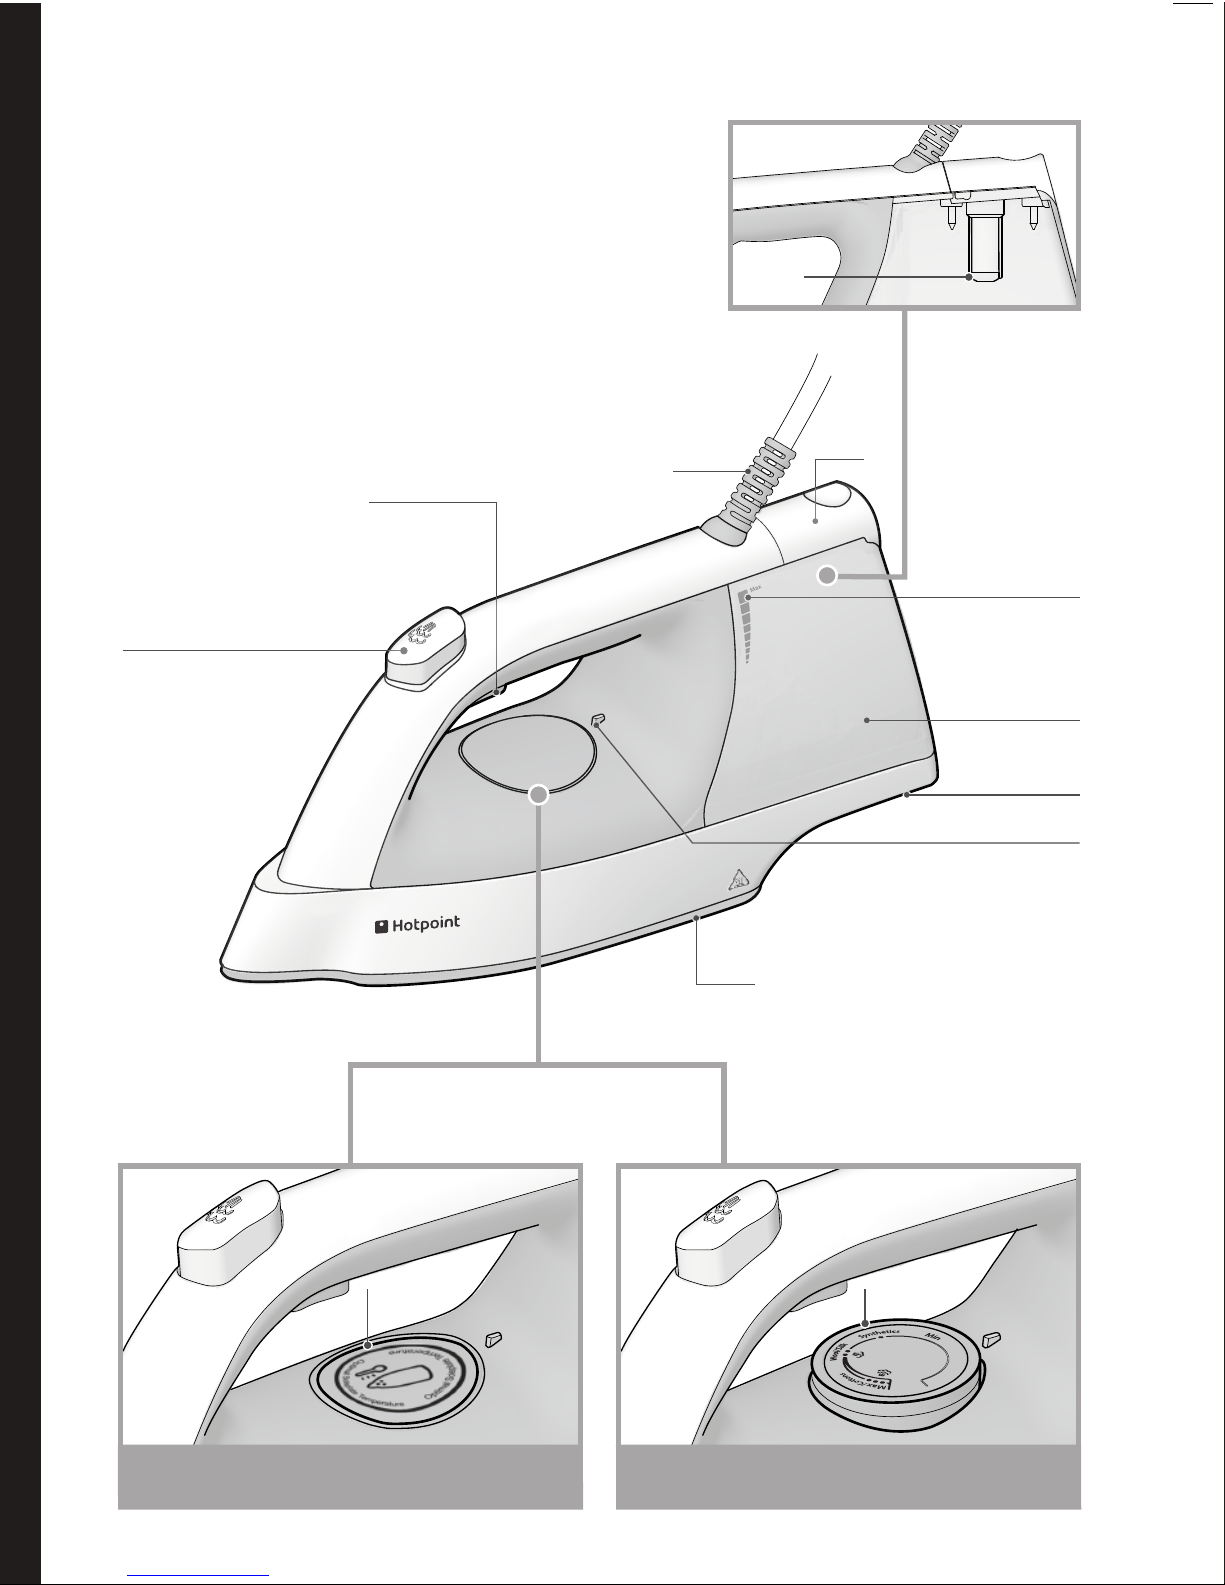
DESCRIPTION OF THE
APPLIANCE
1. Shot-of-steambutton
2. Steambutton
3. Powercableholder
4. Fillerholelid
5. Temperatureindicatorlight
6. Waterreservoir
7. Cablewinder
8. Soleplate
9. Temperaturecontrol(ifavailable)
Notshown:
Watermeasurer
Ironpad
damage to the appliance and void its warranty.
• Only connect the appliance to a grounded
socket.Whenusinganextensioncord,make
surethatagroundedsocketisavailable.
• Regularlychecktheconditionofthepower
cable.
Do not use the steam function with no
water in the reservoir to prevent any
damage to the pump.
• Donotllthewaterreservoirbyholdingthe
appliance directly under the tap. Always
use the water measurer supplied with the
appliance.
• Makesureyouhavedisconnectedtheplug
from the electrical socket before lling and
emptyingthewaterreservoirandinanycase
aftereachuse.
• Disconnect the plug from the socket by
holdingtheplugandnotbypullingthecable.
• Avoidanycontactbetweenthepowercable
andtheironplatewhenhot.
• Do not wind the power cable around the
platewhenhot.Usethespecialcablewinder
instead.
The iron and the water/steam coming out
of the soleplate are very hot and can
burn your skin.
• Beforestoringtheappliance,waituntilithas
INTRODUCTION
Thank you for purchasing our new
Compact Generator steam iron. We
recommend registering this product on
www.hotpoint.co.uk to make sure you are
entitled to all the benets made available
by Hotpoint’s Customer Service.
The Compact Generator was designed to have
thepowerofasteamgeneratorironwiththebody
and convenience of a conventional steam iron.
This is achieved thanks to a pump injecting as
muchsteamasagenerator.
Thisappliancewasdevelopedforhouseholduse
onlyandisnotintendedforindustrialuse.
Before you begin using the appliance, it
is important that you thoroughly read
these instructions and carefully keep them for
further reference.
GENERAL SAFETY
INSTRUCTIONS
Thesafetyfeaturesofyourironcomplywiththe
technicalspecicationsandregulationsinforce.
The mains voltage must match the
voltage of the iron (220-240 V). Any
connection error could cause irreversible

8
en
cooleddowncompletely-asteamirontakes
aboutonehourtocooldown.Usethehandle
tostoretheapplianceafteruse.
• Do not direct steam towards people or
animals and do not iron garments while
worn.
• After use, store the appliance in a stable
positionusingthespecialpadsupplied.
• Never add any perfume, vinegar, starch,
scale-removing agents, ironing products
or other chemicals in the water reservoir -
unless recommended by Hotpoint. Never
usecontaminatedwater.
• Neverimmersetheapplianceinwaterorany
otherliquid.
• Do not leave the appliance in the open
air and exposed to inclement weather
conditions.
• Never leave or use the appliance over or
closetoames,ovens,ammablematerials
orothersourcesofheat.
• Donotusetheapplianceforanyuseother
thanitsintendeduse.
• Should you suspect a failure, immediately
unplugitfromtheelectricalsocket.
• The manufacturer shall assume no
responsibility in case of damage resulting
fromanyimproperuseoftheappliance.
This appliance must be earthed. The fol-
lowing operations should be carried out
by a qualied electrician.
Replacing the fuse
Whenreplacingafaultyfuse,a13ampASTAap-
provedfusetoBS1362shouldalwaysbeused,
and the fuse cover re-tted. If the fuse cover is
lost, the plug must not be used until a replace-
mentisobtained.
Replacement fuse covers
If a replacement fuse cover is tted, it must be
ofthecorrectcolourasindicatedbythecoloured
markingorthecolourthatisembossedinwords
on the base of the plug. Replacements can be
obtained directly from your nearest Service De-
pot.
Removing the plug
If your appliance has a non-rewireable moulded
plug and you should wish to re-route the mains
cablethroughpartitions,unitsetc.,pleaseensure
thateither:
• theplugisreplacedbyafused13ampere
rewireableplugbearingtheBSImarkofap-
proval.
or:
• the mains cable is wired directly into a 13
ampcableoutlet,controlledbyaswitch,(in
compliancewithBS5733)whichisaccessi-
blewithoutmovingtheappliance.
Disposing of the plug
Ensurethatbeforedisposingoftheplugitself,you
makethepinsunusablesothatitcannotbeacci-
dentallyinsertedintoasocket.
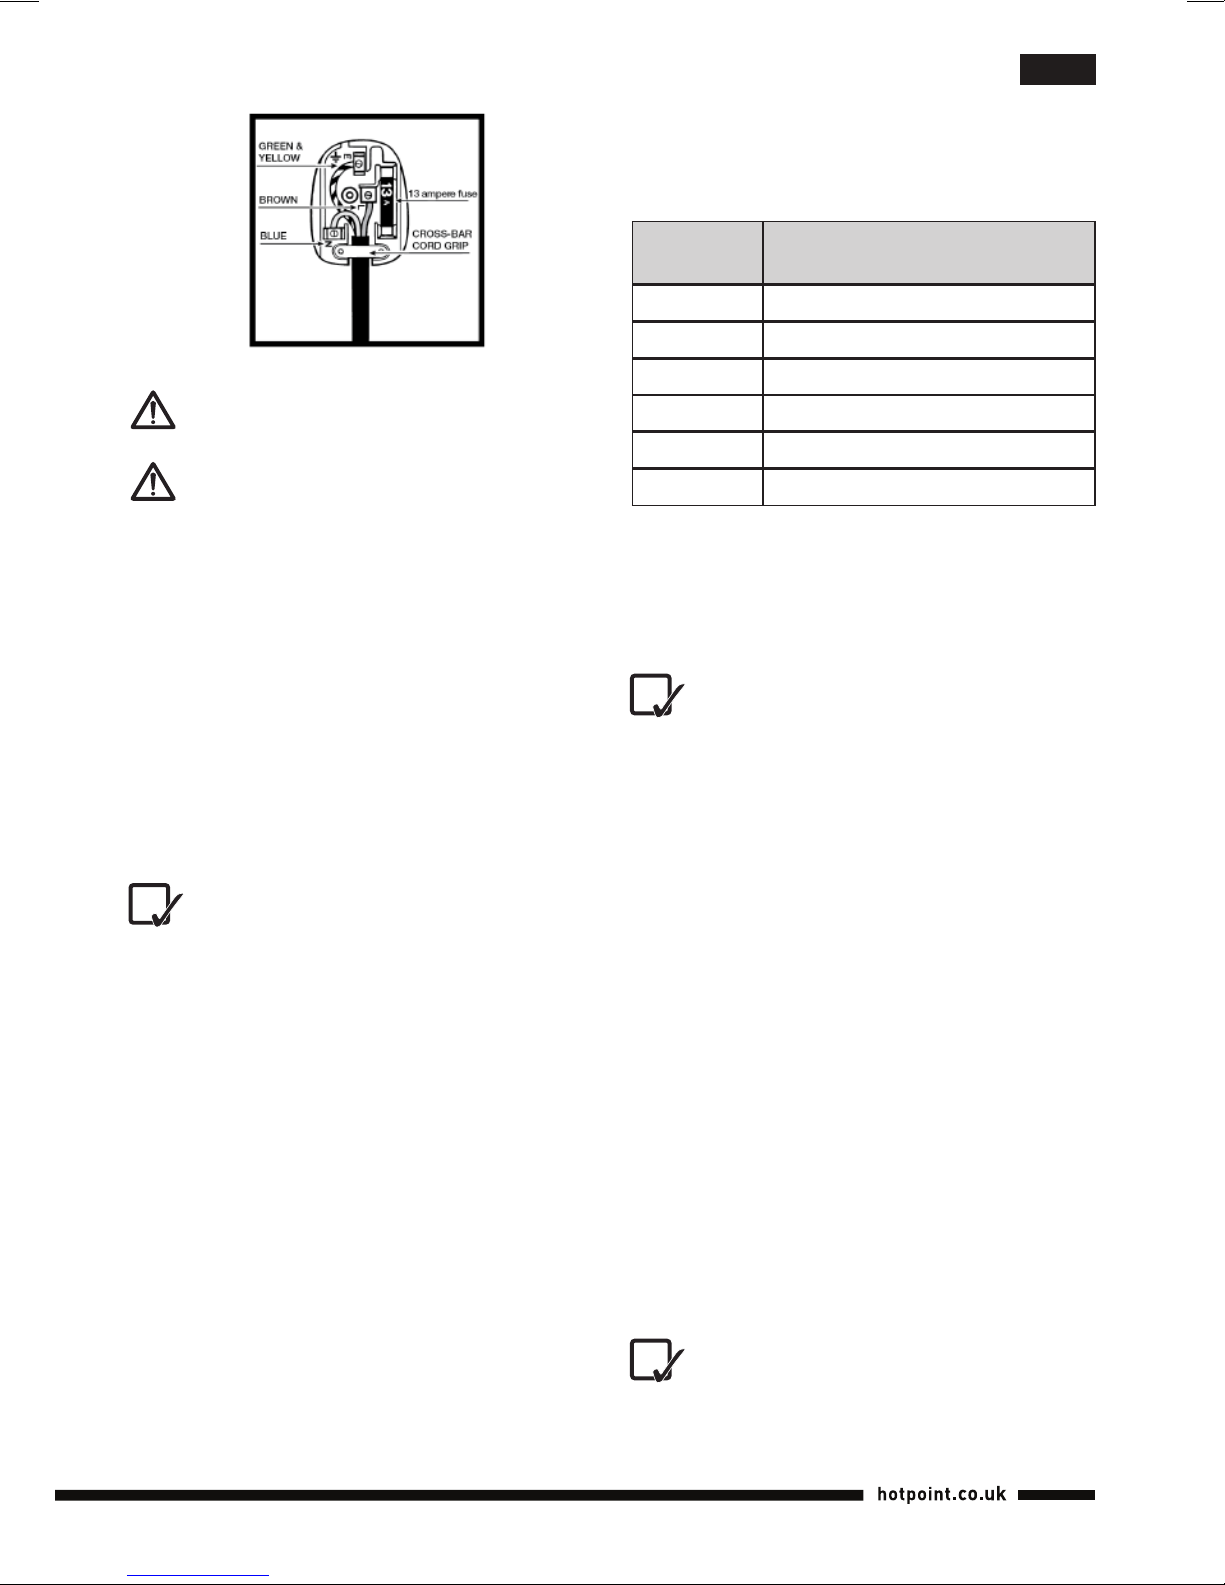
Instructions for connecting cable to
an alternative plug
The wires in the mains lead are coloured
in accordance with the following code:
GREEN & YELLOW EARTH
BLUE NEUTRAL
BROWN LIVE
As the colours of the wires in the lead may not
correspondwiththecolouredmarkingsidentifying
theterminalsinyourplug,proceedasfollows:
• Connect Green & Yellow wire to terminal
markedEor
orcolouredGreenorGreen
&Yellow.
• ConnectBrownwiretoterminalmarkedLor
colouredRed.
• ConnectBluewiretoterminal markedNor
colouredBlack.
Ifa13ampplug(BS1363)isuseditmustbetted
witha13ampfuse,eitherintheplugoradaptoror
atthedistributionboard.
If you are in any doubt regarding the electrical
supplytoyourmachine,consultaqualiedelec-
tricianbeforeuse.
How to connect an alternative plug
Thewiresinthismainsleadarecolouredinaccor-
dancewiththefollowingcode:
BLUE NEUTRAL (N)
BROWN LIVE (L)
GREEN & YELLOW EARTH (E)
9
en
veryhard(as measuredinFrench degrees),we
recommendmixingtapwaterand demineralised
wateraccordingtothefollowingtable.
Hardness
degree[°f]
Proportion
[tapwater:demineralisedwater]
7°f 1:0
7°f-14°f 1:0.5
14°f-22°f 1:1
22°f-32°f 1:2
32°f-54°f 1:3
>54°f 0:1
Todeterminethehardnessdegreeofthewaterin
yourarea,contactyourlocalwaterboardorbody.
This data is sometimes available on the board/
body’swebsitetoo.
Never add any perfume, vinegar, starch,
scale-removing agents, ironing pro-
ducts or other chemicals in the water reser-
voir - unless recommended by Hotpoint. Ne-
ver use contaminated water.
Water to be used – no Calc Proof
If your Compact Generator is not equipped with
thedescalingsystemCalcProof,werecommend
usingdemineralisedwater.
Filling the water reservoir (A)
Before lling the reservoir of the Compact
Generator with water, make sure that the iron
hasbeenswitchedoffanddisconnectedfromthe
electricalsocket.
1. PlacetheCompactGeneratorinahorizontal
position, open the lid of the ller hole (4)
and ll the water reservoir using the water
measurersuppliedwiththeiron(6).
2. Closethelidofthellinghole.
Never add any perfume, vinegar, starch,
scale-removing agents, ironing
products or other chemicals in the water
reservoir - unless recommended by Hotpoint.
Never use contaminated water.
The power supply cable must never be
bent or dangerously compressed.
The power supply cable must only be re-
placed by an authorised serviceman.
BEFORE USE
BeforeusingtheCompactGeneratorfortherst
time, remove all stickers, protective plastic or
cardboard packaging from the soleplate of the
iron.
Make sure that all adhesive parts have been
removed from the soleplate using a damp soft
clothandremove anyresiduesor particlesfrom
the manufacturing process by repeatedly lling
andemptyingthewaterreservoir.
When you switch on the Compact
Generator for the rst time, you may
notice an unpleasant smell, a little smoke and
some impurities. They will disappear in a few
minutes. When using the steam function for
the rst time, do not direct the steam jet on the
garments because manufacturing residues
may be present in the steam dispenser.
FILLING THE WATER
RESERVOIR
Waterplaysanessentialroleboth intheironing
process and in the good operation of the iron
in time. In particular, a high concentration of
limescalemaydamagesomepartsoftheCompact
Generatorandcauseitsearlydeterioration.
Water to be used – Calc Proof
Although the version of the Compact Generator
thatisequippedwiththe descaling systemCalc
Proofcanbeusedwithtapwater,ifthewateris
Otros manuales para II E75 AA0
1
Este manual sirve para los siguientes modelos
2
Tabla de contenidos
Otros manuales de Hierro de Hotpoint

Hotpoint
Hotpoint ARISTON SG C11 CKG Manual de usuario

Hotpoint
Hotpoint SI E40 BA0 UK Manual de usuario

Hotpoint
Hotpoint SG E12 AA0 UK Manual de usuario

Hotpoint
Hotpoint SI C35 CKG Manual de usuario

Hotpoint
Hotpoint SG C11 CKG UK Manual de usuario

Hotpoint
Hotpoint SG E12 AA0 UK Manual de usuario

Hotpoint
Hotpoint II E75 AA0 Manual de usuario

Hotpoint
Hotpoint SI E40 BA1 UK Manual de usuario

Hotpoint
Hotpoint SI E40 BA0 Manual de usuario


