HONBIKE Uni4 Manual de usuario

1
EN
Owner's Manual

IMPORTANT
This manual contains important information regarding the safe operation
and maintenance of your bicycle. Read all sections before you ride your new
HONBIKE, and carefully follow the instructions. If you have any questions or do
not understand something in this manual, take responsibility for your safety and
consult HONBIKE. Keep your owner’s manual and any other documents that came
with your HONBIKE for future reference. All content in this update and the manual
is subject to change or withdrawal without notice. Visit www.honbike.com to
view and download the latest version. HONBIKE makes every effort to ensure
the accuracy of its documentation and assumes no responsibility or liability
if any errors or inaccuracies appear within. This manual is not intended as a
comprehensive use, service, repair or maintenance guide.
WARNING
Riding any type of bicycle involves risks which can’t be predicted or avoided and
that are the sole responsibility of the rider. This manual makes no representations
about the safe use of bicycles under all conditions. Off road riding, jumping or
acrobatic tricks can cause frame damage which may result in death or serious
injury of the rider. It is the sole responsibility of the rider to become properly
educated and prepared to ride safely.
Pay particular attention to the following symbols:
Indicates a potentially
dangerous situation that,
if not avoided, could
result in injury or death.
Indicates a potentially
dangerous situation that,
if not avoided, could result
in damage to the bicycle or
the voiding of your warranty.
Indicates specific safety
instructions or procedures on
how to handle the product,
or refers to the section of the
operating instructions that
deserves your special attention.
CAUTIONWARNING SAFETY INSTRUCTION
Register your HONBIKE Uni4
Before using your HONBIKE Uni4, you need to register it via the HONBIKE
app to activate the electric system of your Uni4. You can scan the QR code
or go to www.honbike.com to download the app and learn how to register
your HONBIKE Uni4. Once registration succeeds, you become the owner
of your HONBIKE Uni4 in our record, which serves as proof of ownership if
your bike is ever lost or stolen.

TABLE OF CONTENTS
What’s in the box ................................................................................................ 1
Accessories & Tools ......................................................................................................2
Key features ................................................................................................................. 4
Frame number ................................................................................................................ 4
Get your HONBIKE ready ................................................................................. 5
Unboxing ...........................................................................................................................5
Install the front fender ...............................................................................................7
Install the front wheel ................................................................................................ 8
Adjust the right brake lever .....................................................................................10
Install the pedals .......................................................................................................... 11
Saddle height adjustment ........................................................................................12
Adjusting the saddle position and angle ...........................................................13
Recommended torque values ................................................................................14
Getting started ................................................................................................... 15
Display operations ........................................................................................................16
Walk mode .......................................................................................................................18
Throttle ..............................................................................................................................18
Display advanced settings .......................................................................................19
Battery ...............................................................................................................................21
Charging the battery................................................................................................21
Battery & Charger safety information............................................................ 22
Proper frame sizing .................................................................................................... 23
Intended use .................................................................................................................. 24
Road conditions suitable for this model ........................................................... 24
Maximum permitted overall weight .................................................................. 25
How to increase riding mileage ............................................................................ 25
Before the first ride .................................................................................................... 26
Rear light ......................................................................................................................... 27
The front reflector installation instructions (US Version) ....................... 27
Before every ride .......................................................................................................... 28
Safety ...................................................................................................................... 29
Thebasics ....................................................................................................................... 29
Saferiding ...................................................................................................................... 30
Ridinginbad weatherconditions .........................................................................31
Ridingin low light conditions ..................................................................................31
Maintaining your Honbike .............................................................................. 32
Serviceinterval ............................................................................................................ 33
Replacingparts ........................................................................................................... 34
Maintenancenotes .....................................................................................................34
Warranty ............................................................................................................... 35
Warranty notes ............................................................................................................36
Exclusions ......................................................................................................................37
Specialnotes ................................................................................................................37
Disclaimer ........................................................................................................... 38
Declaration of conformity .......................................................................................38
Federal Communications Commission (FCC) Compliance Statement for USA
.............38
ISED Statement .............................................................................................................39
Liability Disclaimer .....................................................................................................39
Legal ..................................................................................................................... 40

1 2
EN
Charger& cable *1
Accessories & Tools
Pedal * 2
Hex Key Front Reflector
(US Only)
The front reflector is only compatible with the US version of HONBIKE Uni4, therefore the
above accessories are not included in the toolkit in countries and regions outside the US.
3pcs Socket spanner *1
Dropout cover *4
Owner‘s Manual
M5
#3
#4
#5
#6
After unpacking, please take all items out of the package and make sure that everything
listed above is included. If anything is missing or damaged, please contact HONBIKE
immediately for assistance.
Owner's Manual
Manuel du propriétaire
Benutzerhandbuch
-EN
-FR
-DE
What’s in the box
Front wheel *1 Front fender *1

3 4
EN
1. Rear Fender
2. Saddle Clamp
3. Rear Light/Reflector
4. Seat
5. Seat Post
6. Seat Tube
7. Frame
8. Display
9. Brake Lever
10. Front Light/Reflector
11. Stem
12. Head Tube
13. Front Disc Brake
14. Front Fork
15. Front Fender
16. Pedal
17. Crank
18. Carbon Belt Drive
19. Kickstand
20. Charging Port
1 2 3 4 765 8 9 10
17 15 14 131819 1620
11 12
Example: 24872XXXXXXXXXX
Rear Hub Motor
High efficiency
High reduction ratio 1:13
Handlebar Integrated display
LCD screen
Built-in bluetooth
Riding status display
Carbon Gates Belt Drive
11,000km maintenance free
Gates Carbon Drive belt delivers a
smooth and quiet ride. It’s lightweight
and low-maintenance.
Frame
Aircraft-grade 7000 series
aluminum material enables sturdy
and minimalist frame design.
Key features
Frame number
5 6
EN
1. Open the carton carefully and try
not to damage it. Take out the foam.
2. Take the bicycle out of the
carton carefully by holding the
seat tube and handlebar (as
shown in the picture). Please do
not hold on to the front wheel and
the fender when lifting upwards.
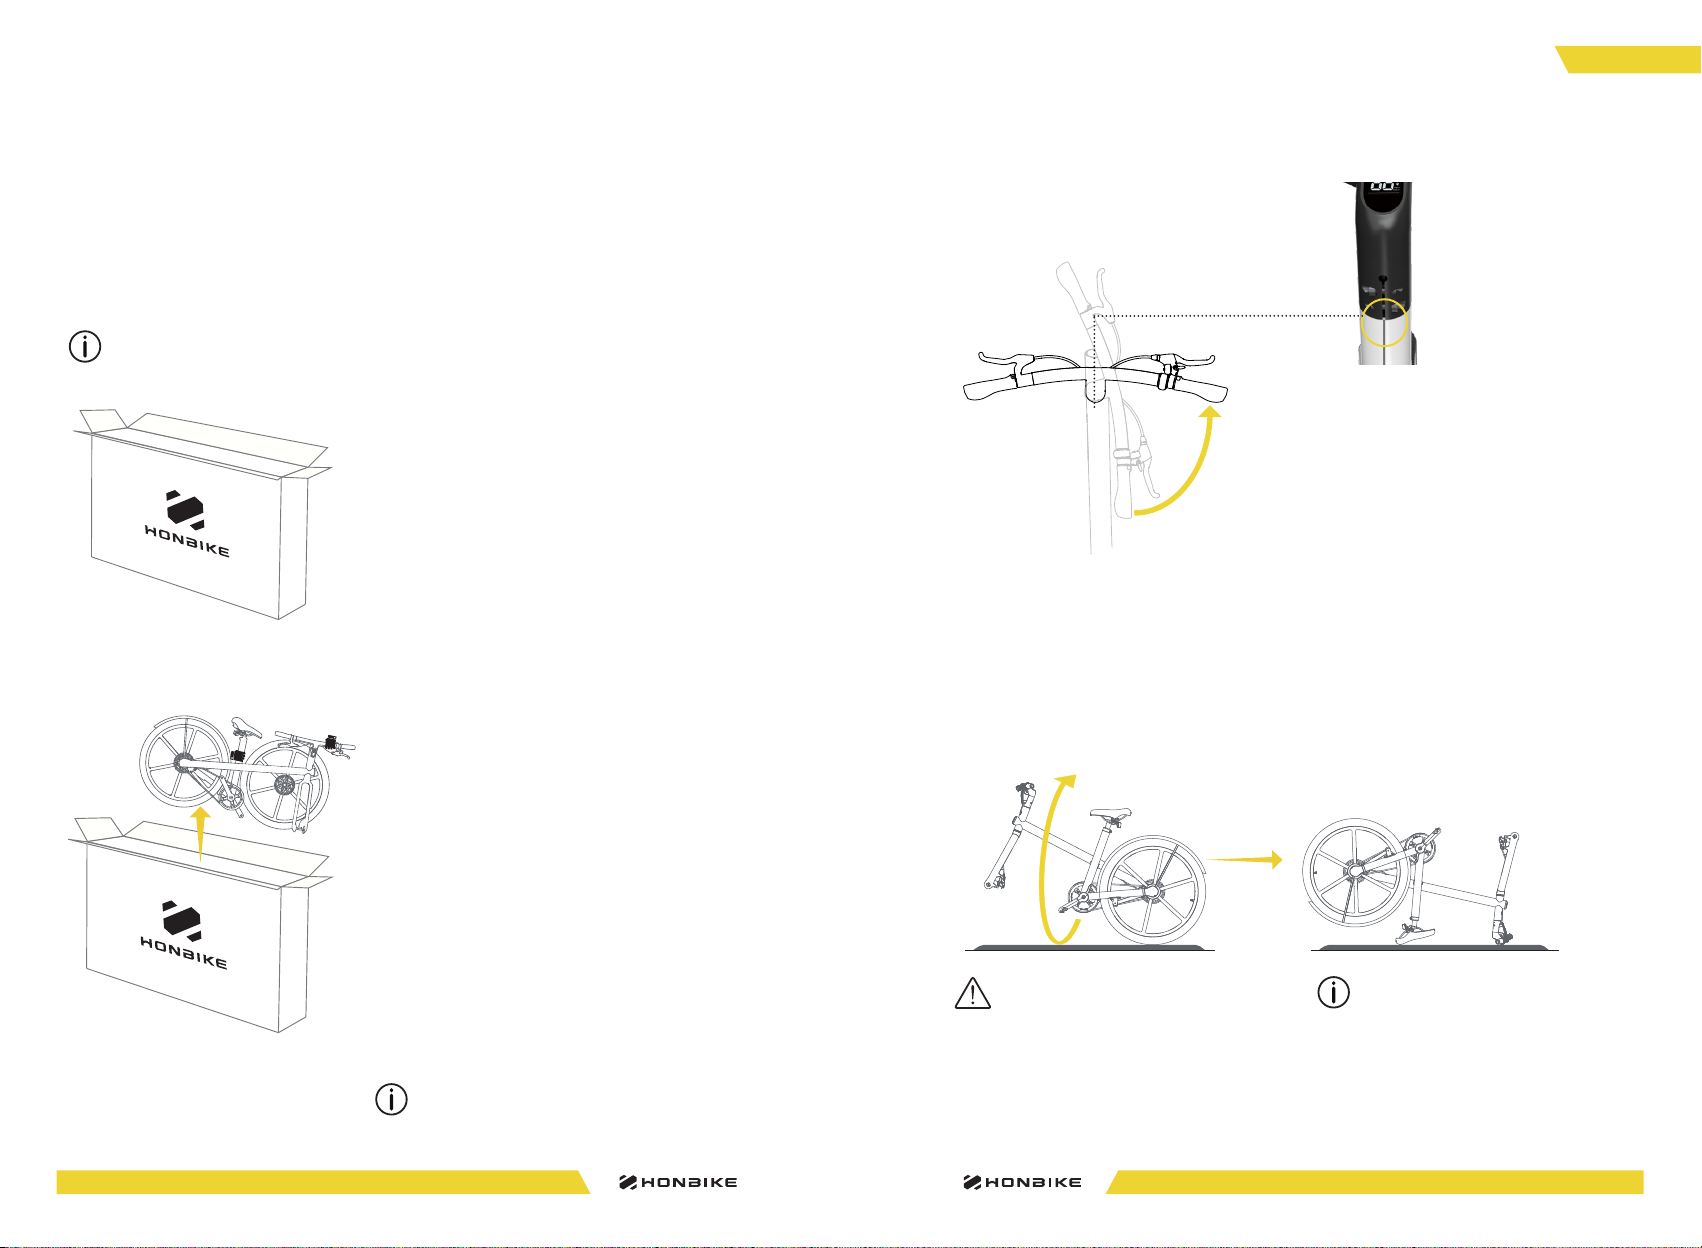
3. Rotate the handlebar
anticlockwise, as shown in the
figure. Make sure the groove on the
stem is aligned with the mark on
the head tube.
Please assemble the bicycle on a smooth indoor surface or carpet to avoid scratching it.
Visit www.honbike.com to view corresponding videos to install and use
HONBIKE Uni4 correctly. HONBIKE packaging is delicately designed for the safe
transportation of electric bicycle. We recommend that you keep HONBIKE original
packaging for at least one month in case you need to send your HONBIKE Uni4 for
service or maintenance.
Unboxing
Get your HONBIKE ready
It is recommended to operate by two people.
4. Flip the bicycle 180 degrees and place
it on levelled ground. Ensure that the
bicycle does not fall.
Before the front wheel is installed, the
bicycle may not maintain balance.
Please add auxiliary support when you
encounter similar problems.
Place the bicycle frame on a soft carpet
or lay a cloth on the ground to prevent
damage to the frame body.

7 8
EN
CB
Install the front fender
1. Take out the front fender and attach it to
the front fork, as shown on the left. Loosely
tighten the three M5 bolts to the front fork in
the order of ABC.
Do not fully tighten for subsequent adjustment
of position.
The axle nut and washer on the other side can
be removed with the axle. You don’t have to
loosen them.
Make sure that the front fender is not skewed or
tilted. Make sure it does not shake at the center
of the front fork.
2. Firmly tighten each bolt in the order of
ABC in the arrow direction until all bolts are
secured.
CB
A
A
The fender can move up
and down in a small scope.
6~8 Nm
H4
Install the front wheel
2. Remove the plastic guard that protects the
brake disc. Put the front wheel into the front
fork. Make sure the brake disc is aligned with
the brake pad.
brake disc
brake disc
brake pad
brake pad
1. Hold on to the middle part of the axle tightly
with one hand, and loosen the axle nut on any
side anticlockwise with a socket spanner.
Remove the axle nut, washer, and axle and set
them aside for later use.

9 10
EN
3. Install the axle on the front fork.
4. Place the washer and nut you removed in
step 1 in sequence.
5. Tighten up the nut on the outside clockwise
using the socket spanner.
6. Cover the dropout cover on both sides.
After the front wheel is installed, make sure that the
front fender fits the curvature of the front wheel.
There are 4 dropout covers totally in the tool box,
two for loading and two spare ones.
It is recommended to operate with two people.
Please follow the instructions shown in the
diagram. Install the washer first, then screw on
the nut.
The exposed part of the axle shall be about 1.5mm
when the spacer nut is strung on the axle.
7. After the front wheel is installed, flip the
bicycle 180 degrees, land it correctly on the
ground and put down the kickstand.
AB
AB
1.5mm
35~40Nm
3 4
Adjust the right brake lever
1. Use Hex Key #5 to loosen the bolt on
the right brake lever anticlockwise.
2. Once the bolt is adequately loose,
adjust the brake lever to an appropriate
and comfortable position. Use Hex Key #5
to tighten the bolt clockwise.
5~8Nm
M6*1
The left brake lever of HONBIKE Uni4 is adjusted at the factory.
Please follow the steps below to adjust the right brake lever.
The bolt is under the brake lever.
H5

11 12
EN
Apply some anti-rust oil or grease on the pedal threads if necessary.
Take the right pedal with the label R.
Screw it clockwise onto the crank by
hand. Use Hex Key #6 to tighten it.
Right:
Take the left pedal with the label L.
Screw it anticlockwise onto the
crank by hand. Use Hex Key #6 to
tighten it.
Left:
Install the pedals
20~25Nm
20~25Nm
Saddle height adjustment
1. Use Hex Key #5 to loosen the clamp bolt
anticlockwise until the saddle can be moved
with little force.
2. Lift the saddle upward to an appropriate
height.
3. Tighten the bolt clockwise with Hex Key #5.
Be careful not to loosen this bolt too much.
When you see the “Minimum Insertion”
warning mark, the saddle has been raised
to its highest position.
MIN.INSERTION
1
2
3
4
5
6
7
8
9
10
MIN.INSERTION
1
2
3
4
5
6
7
8
9
10
13~15Nm
H6 H5

13 14
EN
1 Brake lever bolts 5-8 N·M Hex Key #5
2 Handlebar bolts 13-15N·M Hex Key #5
3 Saddle adjustment bolts 20-25N·M Hex Key #5
4 Saddle clamp bolt 13-15N·M Hex Key #5
5 Rear wheel nuts 35-40N·M adjustable wrench
6 Kickstand bolts 13-15N·M Hex Key #5
7 Pedals 20-25N·M Hex Key #6
8 Crank arm bolts 40-45N·M Hex Key #8
9 Front wheel nuts 35-40N·M Socket spanner *1
9
1
2
87
6
5
4
3
Recommended torque values
Ensure correct setup, tightening, and torquing to recommended torque values
is performed on your bicycle before first using it and check the setup, tightening,
and condition of components and hardware regularly.
Adjusting the saddle position and angle
H5
1. Remove the rubber plugs on the
bolts and keep them safe. Use
Hex key #5 to loosen the saddle
adjustment bolts.
2. Once the bolts are adequately
loose, the saddle can be moved
forward or back and angled up or
down.
3. Move the saddle to the desired
position, and tighten the bolts to
20-25Nm. Install the rubber plugs
to protect the bolts.
Do not exceed the maximum limit marking on the saddle rail when you
move the saddle.
Tabla de contenidos
Otros manuales de Bicicleta de HONBIKE


