Hisense HFG3601CPS Guía

INSTRUCTIONS FOR
INSTALLATION
GAS RANGE

Contents
3Before you begin .....................................................................................................................
3In the commonwealth of Massachusetts ..................................................................................
3Fire or explosion hazard ...........................................................................................................
4For your safety ........................................................................................................................
4Tip-Over hazard ........................................................................................................................
4Anti-Tip Bracket ........................................................................................................................
5Tools and materials ...................................................................................................................
6Steps for installation ...............................................................................................................
6Remove packaging materials ....................................................................................................
6Prepare the opening .................................................................................................................
8Electrical connection .................................................................................................................
9Gas supply ................................................................................................................................
10Surface burners ........................................................................................................................
11Check surface burners ..............................................................................................................
11Check bake and broil burners ...................................................................................................
11Anti-tip device installation .........................................................................................................
13Level the range .........................................................................................................................
13Final installation check list ........................................................................................................
EN 2

Before you begin
Read these instructions completely and carefully.
IMPORTANT - Save these instructions for the local inspector’s use.
IMPORTANT - Observe all governing codes and ordinances.
IMPORTANT - Remove all packaging material and literature from the oven before connecting the gas
and electrical supply to the range.
IMPORTANT - To avoid damage to your cabinets, check with your builder or cabinet supplier to make
sure that the materials used will not discolor, delaminate or sustain other damage. This oven has been
designed in accordance with the requirements of UL and OSA International and complies with
temperatures of 194°F (90°C).
Important to the Installer - Be sure to leave these instructions with the consumer.
Important to the customer - Keep these instructions for reference.
Propper installation is the responsibillity of the installer.
In the commonwealth of Massachusetts
Appliance must be installed by a qualified plumber or gas fitter. The shut-off valve must be with a
T-handle type.
Fire or explosion hazard
WARNING!
If the information in this manual is not followed exactly, a fire or explosion may result
causing property damage, personal injury or death. Installation must be performed by a
qualified installer. Installation of this range must conform with local codes, or in the
absence of local codes, with the National Fuel Gas Code, ANSI Z223.1/ NFPA.54, latest
edition. In Canada, installation must conform with the current Natural Gas Installation
Code, CAN/CGA-B149.1 or the current Propane Installation Code, CAN/CGA-B149.2, and
with local codes where applicable. This range has been design-certified by UL
International according to ANSI Z21.1, latest edition and Canadian Gas Association
according to CAN/CGA-1.1.latest edition. When installing a gas appliance the use of old
flexible connectors can cause gas leaks and personal injury. Always use a NEWflexible
connector! Leak testing of the appliance shall be conducted according to the
manufacturer instructions. The range must be electrically grounded in accordance with
local codes or, in the absence of local codes, in accordance with the National Electrical
Code (ANSI/NFPA 70, latest edition). In Canada, electrical grounding must be in
accordance with the current CSA C22.1 Canadian Electrical Code Part 1 and/or local
codes. See Electrical Connections in this section. Do not install this product with an air
curtain hood or other range hood that operates by blowing air down on the cooktop.
This airflow may interfere with operation of the gas burners resulting in fire or explosion
hazard.
EN 3

For your safety
Tip-Over hazard
WARNING!
A. A child or adult can tip the range and be killed.
B. Verify the anti-tip device has been properly installed and
engaged (See below).
C. Ensure the anti-tip device is re-engaged when the range is
moved (See below).
D. Do not operate the range without the anti-tip device in place
and engaged.
Anti-Tip Bracket
WARNING!
•To reduce the risk of tipping the range, the range must be
secured by a properly installed anti-tip bracket.
•See installation instructions shipped with the bracket for
complete details before attempting to install.
EN 4
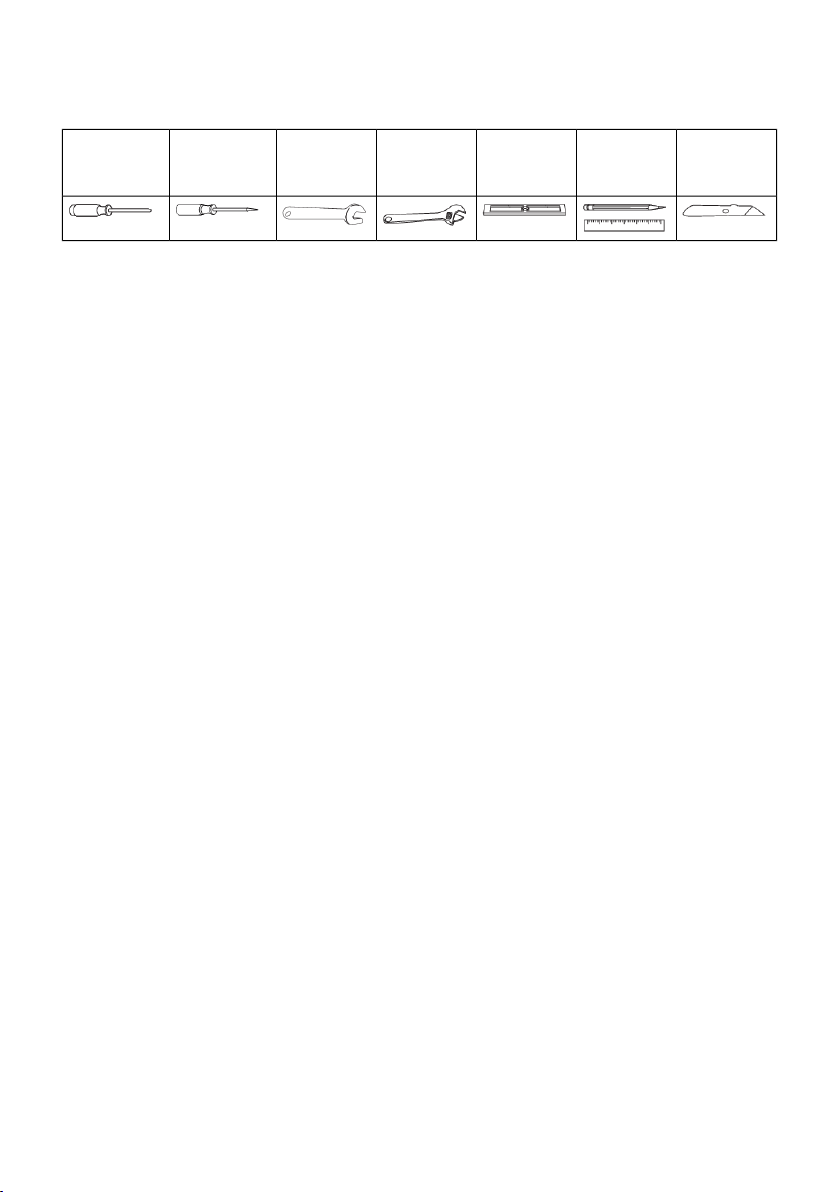
Tools and materials
Tools you may need
Utility knifePencil and
ruler
LevelPipe
wrench (2)
Open-end
wrench
Drill, awl or
nail
Flat-blade
and Phillips
screwdriver
Materials you may need
Gas line shut-off valve. Pipe joint sealant or UL-approved pipe thread tape with Teflon* that resists
action of natural and propane gases, Flexible metal appliance connector (1/2”I.D.). A 5-foot length is
recommended for ease of installation but other lengths are acceptable. Never use an old connector
when installing a new range. Flare union adapter for connection to gas supply line (3/4”or 1/2”NPT
x 1/2”I.D.). Flare union adapter for connection to pressure regulator on range (1/2”NPT x 1/2”I.D.).
Liquid leak detector or soapy water. *Teflon: Registered trademark of DuPont.
EN 5

Steps for installation
Remove packaging materials
Failure to remove packaging materials could result in damage to the appliance. Remove all packing
parts from the oven, racks, heating elements and drawer. Also remove protective film and labels on
the door, cooktop and control panel.
Prepare the opening
(for indoor use only)
See ilustrations for all rough-in and spacing
dimensions. The appliance may be placed with
0'' clearance (flush) at the back walls and side
walls of the cabinets.
A. Recommended acceptable electrical and
gas outlet area. Orient the electrical
receptacle so the length is parallel to the
floor.
EN 6

Minimum dimensions between cooktop, walls and above the cooktop
•Provide adequate clearances between the
range and adjacent combustible surfaces.
These dimensions must be met for the safe
use of your appliance.
•Make sure the wall covering, countertop,
flooring and cabinets around the range can
withstand the heat (up to 200°F (90°C))
generated by the range.
•Allow 30'’minimum clearance between
surface units and bottom of an unprotected
wood or metal cabinet, or allow a 24'’
minimum when the bottom of wood or
metal cabinets is protected by no less than
1/4'’thick flame retardant millboard
covered with not less than No 28MSG sheet
metal, (0,015'’) thick stainless steel, 0,024'’
aluminium or 0,020'’copper.
•This appliance has been approved for a
3'’right and 6'’left minimum spacing to
first vertical barrier.
•Install with zero clearance on sides and
back.
Cabinet storage space above the cooktop should be avoided to reduce the risk of burns or fire when
reaching over hot surface elements. If cabinet storage space is to be provided above the cooktop,
the risk can be reduced by installing an appliance hood that projects at least 5'’beyond the front of
the cabinets. Cabinets installed above the cooktop must be no deeper than 16'’.
NOTE! The cooktop must be at or above the
counter.
Rating plate
The rating plate indicating the basic information
about the appliance is located on the oven
frame and it is visible when the oven door is
opened.
EN 7

Electrical connection
WARNING!
This appliance must be properly earth grounded. Malfunction or breakdown grounding
can result electric shock.
Do not remove the ground prong.
Do not use and adapter or an extension cord.
Do not modify the power plug, power cord, or power outlet in any way.
Electrical Requirements - 120-volt, 60 Hertz, properly grounded dedicated circuit protected by a
15-amp or 20-amp circuit breaker or time delay fuse.
Use of automatic, wireless, or wired external switches that shut off power to the appliance are not
recommended for this product.
Grounding
The power cord of this appliance is equipped with a three-prong (grounding) plug which plugs into a
standard three-prong grounding wall receptacle to minimize the possibility of electric shock hazard
from this appliance. The wall receptacle must be clean and circuit checked by a qualified electrician
to make sure the receptacle is properly grounded. Where a standard two-prong wall receptacle is
encountered, it is the personal responsibility and obligation of the customer to have it replaced with
a properly grounded three-prong wall receptacle.
Installation must be electrically grounded in accordance with local codes. Barring local codes, it should
meet the latest NSI/NFPA 70 - Latest revision or the Canadian Electric CODE CSA C22.1- Latest
Revision.
DO NOT, UNDER ANY CIRCUMSTANCES, CUT OR REMOVE THE
THIRD (GROUND) PRONG FROM THE POWER CORD. DO NOT USE
AN ADAPTER. DO NOT USE AN EXTENSION CORD.
EN 8

Gas supply
WARNING!
Fire Hazard: Do not use a flame to check for gas-tightness.
WARNING!
Explosion Hazard: Do not use excessive torque when making gas line connections.
Excessive torque can damage gas pressure regulator and other gas line components.
Gas pressure Regulator
Appliance is supplied with gas pressure regulator which is pre-set to operate with natural gas at 4’’
of W.C. and can be converted to 10’’ of W.C. for liquid propane gas.
Inlet gas pressure must be between below range for proper operation of the appliance:
Natural gas:
From 6’’ of W.C. to 13’’ of W.C.
Liquid propane gas:
From 11’’ of W.C. to 13’’ of W.C.
Before removing your old appliance make sure the main shut-off valve is closed and appliance free
of gas.
It is recommended to use certified flexible metal connection unless hard-piped connection is required.
Main shut-off valve must be installed in such a place that it is accessible outside of the appliance.
Gas pressure regulator is located on lower back side of the appliance, the inlet internal thread is ½’’
NPT.
After installation make sure with test that all connections are gas-tight.
Installer: Inform the consumer of the location of the gas shut-off valve.
EN 9

Surface burners
WARNING!
Fire or Explosion Hazard: Do not operate the burner without all burner parts in place.
1. Caps - Place caps on proper size burner.
2. Burners - Place surface burners into
corresponding position on cooktop.
3. Single Grates - Place the oval (center)
headcap assembly over the electrode on
the cooktop.
1. Left Grate
2. Right Grate
3. Center Grate of Griddle
Exhaust vent cover
The cover guides the fumes from the oven and
prevents any food remains or cooking utensils
from falling the oven. Install the cover over the
exhaust vent according to the assembly picture.
WARNING!
The cover will be hot during use!
EN 10
Otros manuales para HFG3601CPS
1
Este manual sirve para los siguientes modelos
1
Tabla de contenidos
Idiomas:
Otros manuales de Rango de Hisense

Hisense
Hisense HBG3601CPS Manual de usuario

Hisense
Hisense HBG3601CPS Guía

Hisense
Hisense HBG3601CPS Manual de usuario

Hisense
Hisense HBG3601CPS Manual de usuario

Hisense
Hisense HER30F5CSS Manual de usuario

Hisense
Hisense HBE3501CPS Manual de funcionamiento

Hisense
Hisense HFE3501CPS Guía

Hisense
Hisense HFG3601CPS Manual de usuario


