Heartland 9730 Manual de usuario
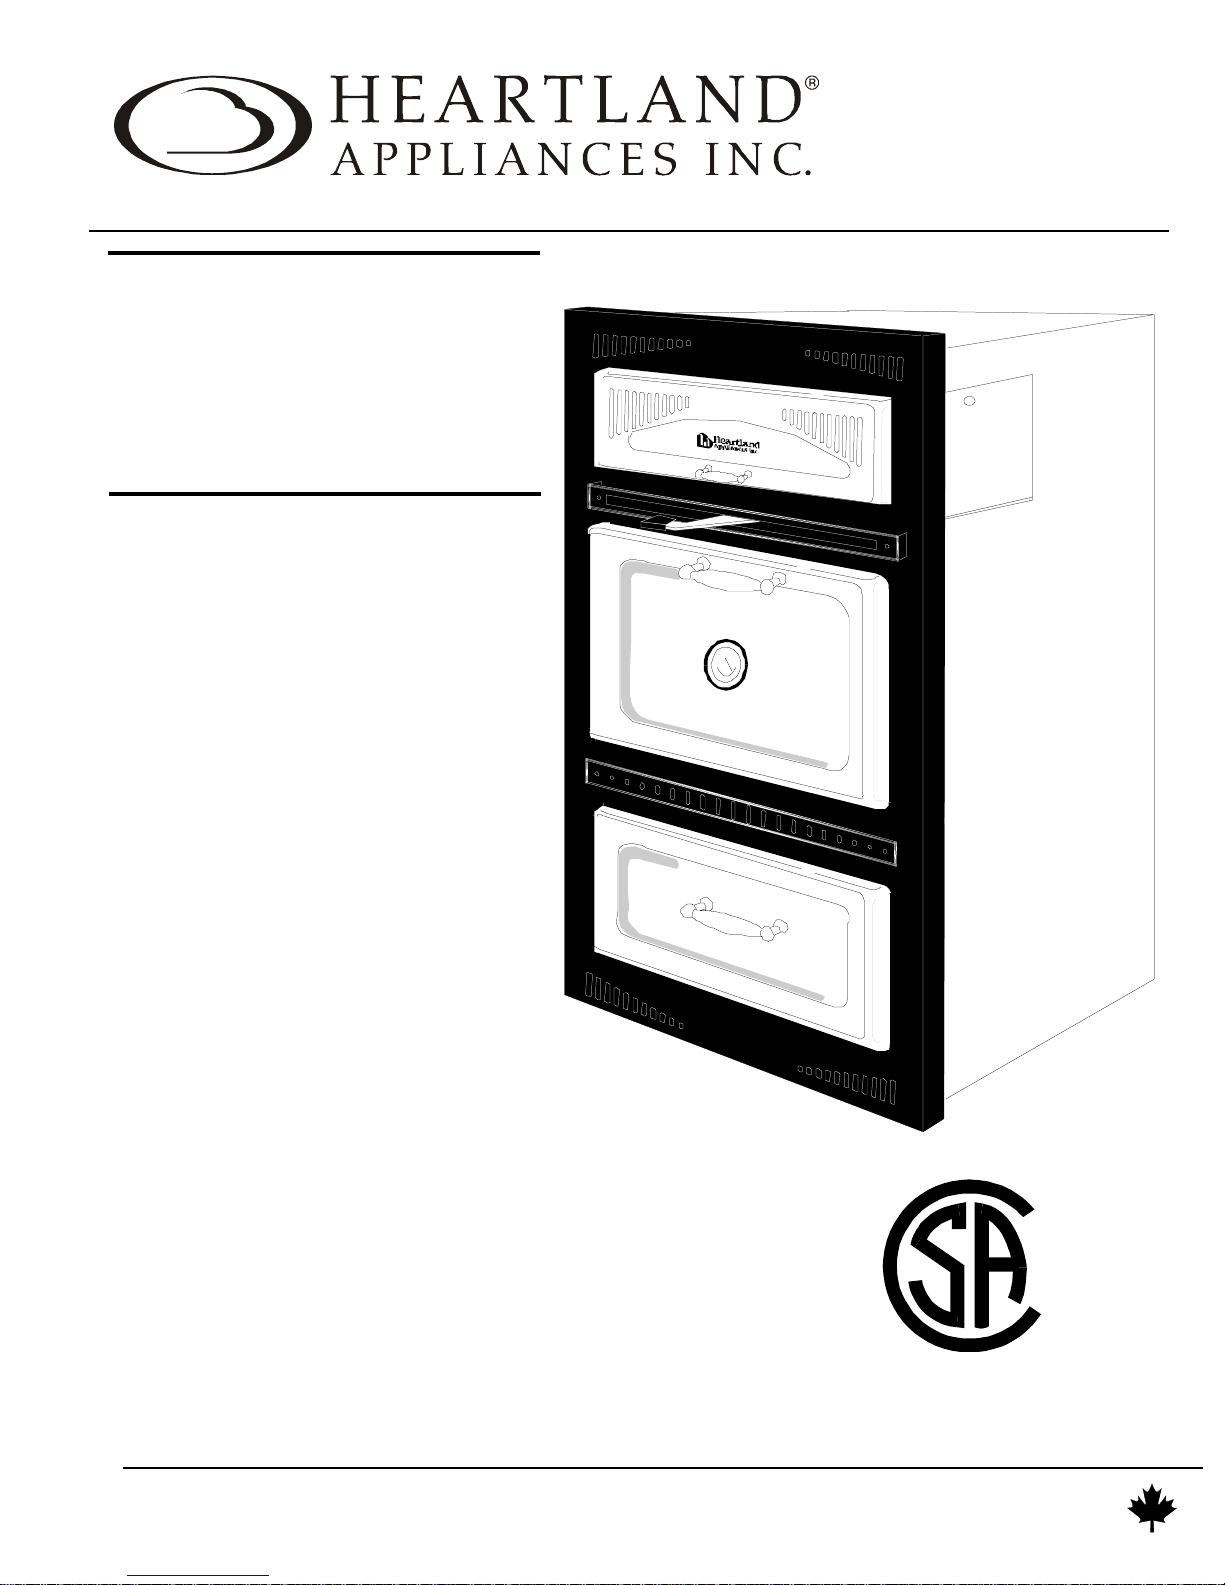
Model 9730
CONVECTION SELF CLEAN AND HALF WALL OVEN
ATTENTIONINSTALLER:Leavethismanualwithappliance
Manual#9716
0042605
INSTALLATION
AND
OPERATING
INSTRUCTIONS
Save these
instructions
for future use
The oven door thermometer
does not sense temperature. It is
for aesthetics only and is
nonfunctional.
Note: Please read these instructions
thoroughlybeforeattemptingtoinstall
this unit. Failure to follow installation
instructionswillresultincostlyservice
calls.
NOTE: Clock must be set or your
oven will not function!
© 2005HEARTLANDAPPLIANCESINC.
1050 Fountain St N.
Cambridge,Ontario,
Canada N3H-4R7
Business(519)650-5501
Fax(519)650-3773
TollFreePhone:1-800-361-1517
TollFreeFax:1-800-327-5609
®
CUS

PLACEOFPURCHASE______________________________
DATEOFPURCHASE_______________________________
SERIALNUMBER__________________________________
MODELNUMBER__________________________________
ENTIRE PRODUCT – LIMITED ONE YEAR WARRANTY
HEARTLANDwarrantsthereplacementorrepairofallparts,ofthisappliancewhichprovetobedefectiveinmaterial
orworkmanship,withtheexceptionofthepaintedorporcelainenamelfinishorplatedsurfaces,foroneyearfromthe
dateoforiginalpurchase.SuchpartswillberepairedorreplacedattheoptionofHeartlandwithoutcharge,subjectto
the terms and conditions set out below.
Thewarrantyperiodagainstdefectsinthepaintedorporcelainenamelfinish,orplatedsurfaces,is90daysfromdate
of original purchase. The warranty does not include replacement of oven lamps or filters.
OVEN ELEMENTS - LIMITED SECOND THROUGH THIRD YEAR WARRANTY
HEARTLANDwarrantstheovenheatingelementsagainstdefectsinmaterialorworkmanshipforanadditionaltwo
years.ThesepartswillberepairedorreplacedattheoptionofHeartlandwithoutcharge,butyoupayforlabourand
transportation subject to the terms and conditions set out below.
TERMS AND CONDITIONS
1. Thiswarrantyappliesonlyforsinglefamilydomesticusewhentheappliancehasbeenproperlyinstalledaccording
totheinstructionssuppliedbyHeartlandandisconnectedtoanadequateandproperutilityservice.Damagedue
tofaultyinstallation,improperusageandcare,abuse,accident,fire,flood,actsofGod,commercial,business
or rental use, and alteration, or the removal or defacing of the serial plate, cancels all obligations of this
warranty.ServiceduringthiswarrantymustbeperformedbyafactoryAuthorizedServicePerson.
2. Warranty applies to product only in the country in which it was purchased.
3. HeartlandisnotliableforanyclaimsordamagesresultingfromanyfailureoftheCookstoveorfromservicedelays
beyondtheirreasonablecontrol.
4. Toobtainwarrantyservice,theoriginalpurchasermustpresenttheoriginalBillofSale,ModelandSerialnumber.
Componentsrepairedorreplacedarewarrantedthroughtheremainderoftheoriginalwarrantyperiodonly.
5. Thewarrantydoesnotcoverexpenseinvolvedinmakingthisappliancereadilyaccessibleforservicing.
6. Thiswarranty gives youspecific legal rights.Additional warranty rightsmay be providedby law insome areas.
7.Adjustmentssuchascalibrations,levelling,tighteningoffasteners,orutilityconnectionsnormallyassociatedwith
originalinstallation are the responsibilityof the dealer orinstaller and not thatof the Company.
TOENSUREPROMPTWARRANTYSERVICE,SENDINYOURWARRANTYCARDWITHIN10DAYSOFPURCHASE.
Iffurtherhelp is needed concerningthiswarranty, contact:
CustomerService
1050 Fountain St N.
Cambridge,Ontario,
Canada N3H-4R7
Electric Self Clean Model 9730
CONSUMER WARRANTY
Business(519)650-5775
Fax(519)650-3773
TollFreeTelephone1-800-361-1517
TollFreeFax1-800-327-5609

1
THE OVEN THERMOMETER DOES NOT SENSE TEMPERATURE
The thermometer on the oven door is for aesthetics only and is
nonfunctional.
1. Installation ................................... 3
2.Unpacking........................................................3
3. Prepare for Installation ....................................4
4.BeginningInstallation.......................................5
5.FinalInstallation...............................................6
8. Features ....................................... 7
8. Dual Oven Control Panel Features .................7
9. Dual Oven Features........................................8
10. Important Safety Instructions . 9
11. Oven Safety ..................................................9
12. Self Clean Oven Safety .................................9
14. Operation .................................10
15. Before You Start..........................................10
16. Getting to Know Your Oven.........................10
17. Oven Bake Broil Control..............................11
18. Clock / Timer Function ...............................12
19. Time of Day Setting.....................................12
20.MinuteMinder ..............................................12
21. Time Bake...................................................13
22. How to Self Clean........................................14
23. Time Delay Self Clean ................................15
24. How to Select Cooking Methods .................17
25. Standard Cooking........................................17
26. Standard Broiling.........................................17
27. Convection ..................................................18
28. Convection Cooking ....................................18
28. Convection Roasting...................................18
29. Roasting Times and Temperature Guide....19
31. Broiling Tips ................................................20
31. BroilingGuide ..............................................21
32. Baking Times and Temperature Guide .......22
33. Poultry Times and Temperature Guide.......23
34. Care and Cleaning..................24
35. Porcelain .....................................................24
36. Nickel Trim ..................................................24
37. Convection Fan Filter ..................................24
38. Oven Light Replacement.............................24
39. Standard Oven Cleaning .............................25
40. Self Clean Oven Cleaning ...........................26
41. The Broiler Pan ...........................................26
42. Main Oven Door Removal ...........................27
43. Lower Oven Door Removal.........................28
44. Interior Oven Rack Removal .......................29
45. Rack Supports Removal ............................ 29
46. Range Problem Solver ................................30
47. Oven Thermostat ........................................30
48. If you still require help— ..............................30
49. Parts Chart / List .....................31
50. Wiring Diagrams .........................................32
51. Products ..................................33
Contents

2
PLEASE READTHESE IMPORTANTSAFETY
POINTS
PROPER INSTALLATION - BE SURE YOUR APPLIANCE IS PROPERLY INSTALLED AND
GROUNDED BY A QUALIFIED TECHNICIAN.
FORYOURSAFETY...DONOTSTOREORUSEGASOLINEOROTHERFLAMMABLEVAPOURS
OR LIQUIDS IN THE VICINITY OF THIS APPLIANCE.
1. Donotleavechildrenalone.Childrenshouldnotbeleftaloneorunattendedinareawhereapplianceisinuse. Theyshould
never be allowed to sit or stand on any part of the appliance.
2. Wearproperapparel.Loosefittingorhanginggarmentsshouldneverbewornwhileusingtheappliance.
3. Userservicing;donotrepairorreplaceanypartoftheapplianceunlessspecificallyrecommendedinthemanual. All
otherservicingshouldbereferredtoaqualifiedtechnician.
4. Useonlydrypotholders-Moistordamppotholdersonhotsurfacesmayresultinburnsfromsteam. Donotletpotholder
touch hot heating elements. Do not use a towel or other bulky cloth.
5. Do not use the oven as a heater.
6. Donot heat unopened glass or metal containers in the oven.
7. Greaseaccumulation is the cause ofmany cookingfires. Clean the oven regularly.
8. Do Not Use Water on Grease Fires - Smother fire or flame or use dry chemical or foam-type extinguisher.
9. Avoidtheuseofaerosolcontainersneartheoven.
10. Never place pans, cookie sheets or roasters directly on the oven bottom. Use the rack in its lowest position.
Do not use aluminium foil.
11. Allow at least 1" of space all around pots, pans or cookie sheets in the oven to permit convection air flow.
To fully enjoy your new oven, it is important that you read this manual thoroughly.

3
Caution:Do not set this edgeonthetableorthefloor,as
porcelaincoating will chip. Alwaysplace over anedge
Unpacking
1. Withunitsittingonthefloor,cutbanding,andremovewoodencrating. Cutplasticwrapand
removefoampacking.
2. Havesomeoneontheleftandtherightsideoftheunitliftingitupfromthebottom,remove
allpackagingmaterialsaroundandundertheunit.
3. Setunitonatableorsomeothersupportingplatform,sothatthefaceoftheunitoverhangsbut
isnot supportinganyweight. Be sure todothis orthe porcelainfrontmaychip!
Installation
Installation
4
You must have a qualified electrician
connectthenewoventoensurethatall
electricalcodesandrulesareobserved.
CAUTION- Children climbing on oven to reach items could be seriously injured therefore,
do not store items of interest to children in cabinet above the oven.
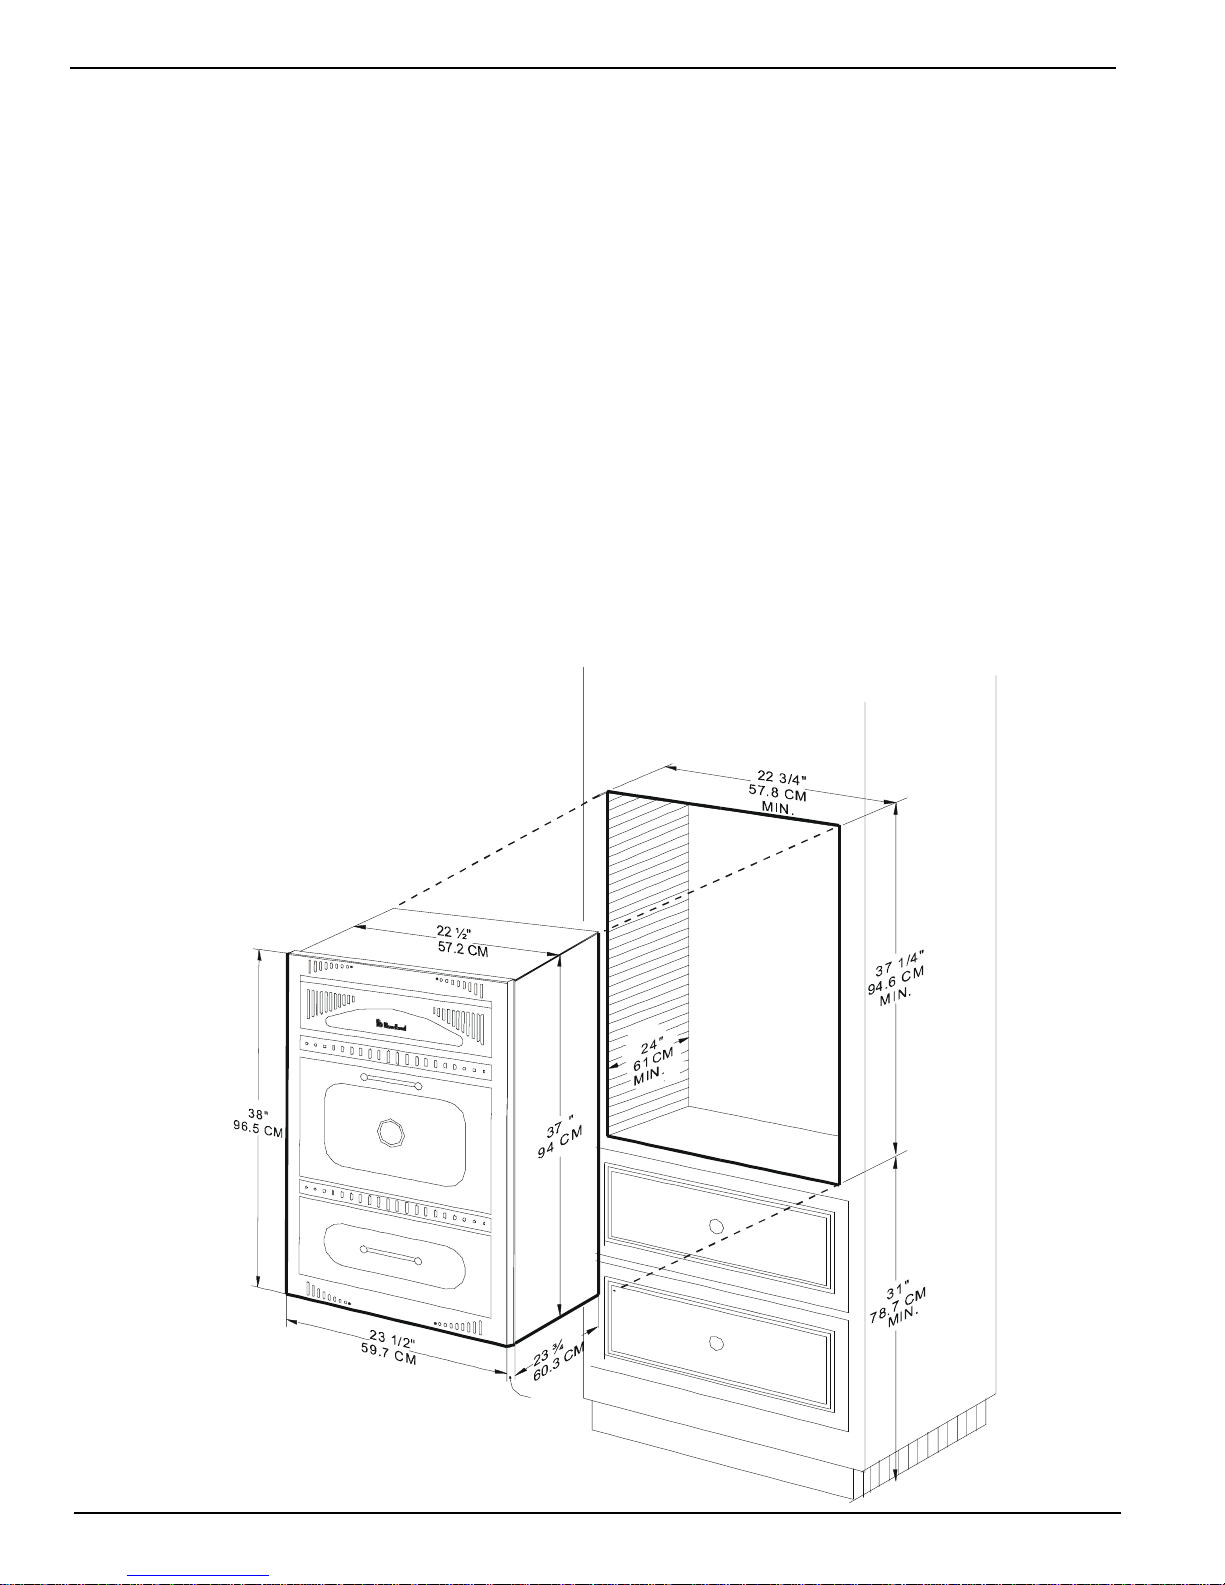
Thisillustration showsthe sizeof enclosurerequired forthe applianceand thedimensions ofthe
appliance.Dimensions areshown ininch measurementand metriccentimeter measurement.For
bestcooking resultsyour ovenmust belevel. Thiscan bechecked atthefinalinstallationstagewitha
carpenterslevel acrossthe topof theappliancefront.Iflevelling isrequired, shimthe ovenbetween
thebottom ofthe cabinetopening andtheovenbottom.Pleasenotethat thepower supplybox must
bemounted inthecupboard below,modifications tothecupboard maybe required.
Prepare for Installation
Pleasenote:Thewallovenfacewillmeetyourcabinetfacingresultinginsomeheattransferto
thecabinetfacing. Ifyourcabinetshaveaplasticcoatingorveneercheckwiththemanufacturer
to ensure it was applied with a (300°F) heat resistant adhesive. If the plastic coating and the
adhesivearenot heat resistant, itispossible that the coatingwilldeform or become detached,
particularlyalong the edgesthat meet thewall oven.
Installation
1 ½"
3.81 CM

5
Mount clips here
(seepage6)
Installation
Beginning installation
1. Oncethelocationoftheunithasbeendeterminedconstructanenclosurewithdimensionsas
shownonpage4. Besure totakeyourtime andmeasureaccurately.
2. Atthispointyouwillhavetocreatetheopeningforthepowersupplybox.Thepowersupply
box(includedwiththeunit)mustbemountedinthecupboardundertheapplianceopening.The
powersupplyboxcomeswith36"cableandcanbemountedanywherewithinthelengthofthe
cable. At the rear of the opening and 16 1/4" from the left side, cut a slot 5 1/2" x 2 1/2" (see
illustrationbelow).Ensure thatyoucaneasilyslidethesupplyboxthroughit.(Thepower
supplyboxispermanentlyattachedtotheapplianceandismounted aftertheapplianceis
installed.)
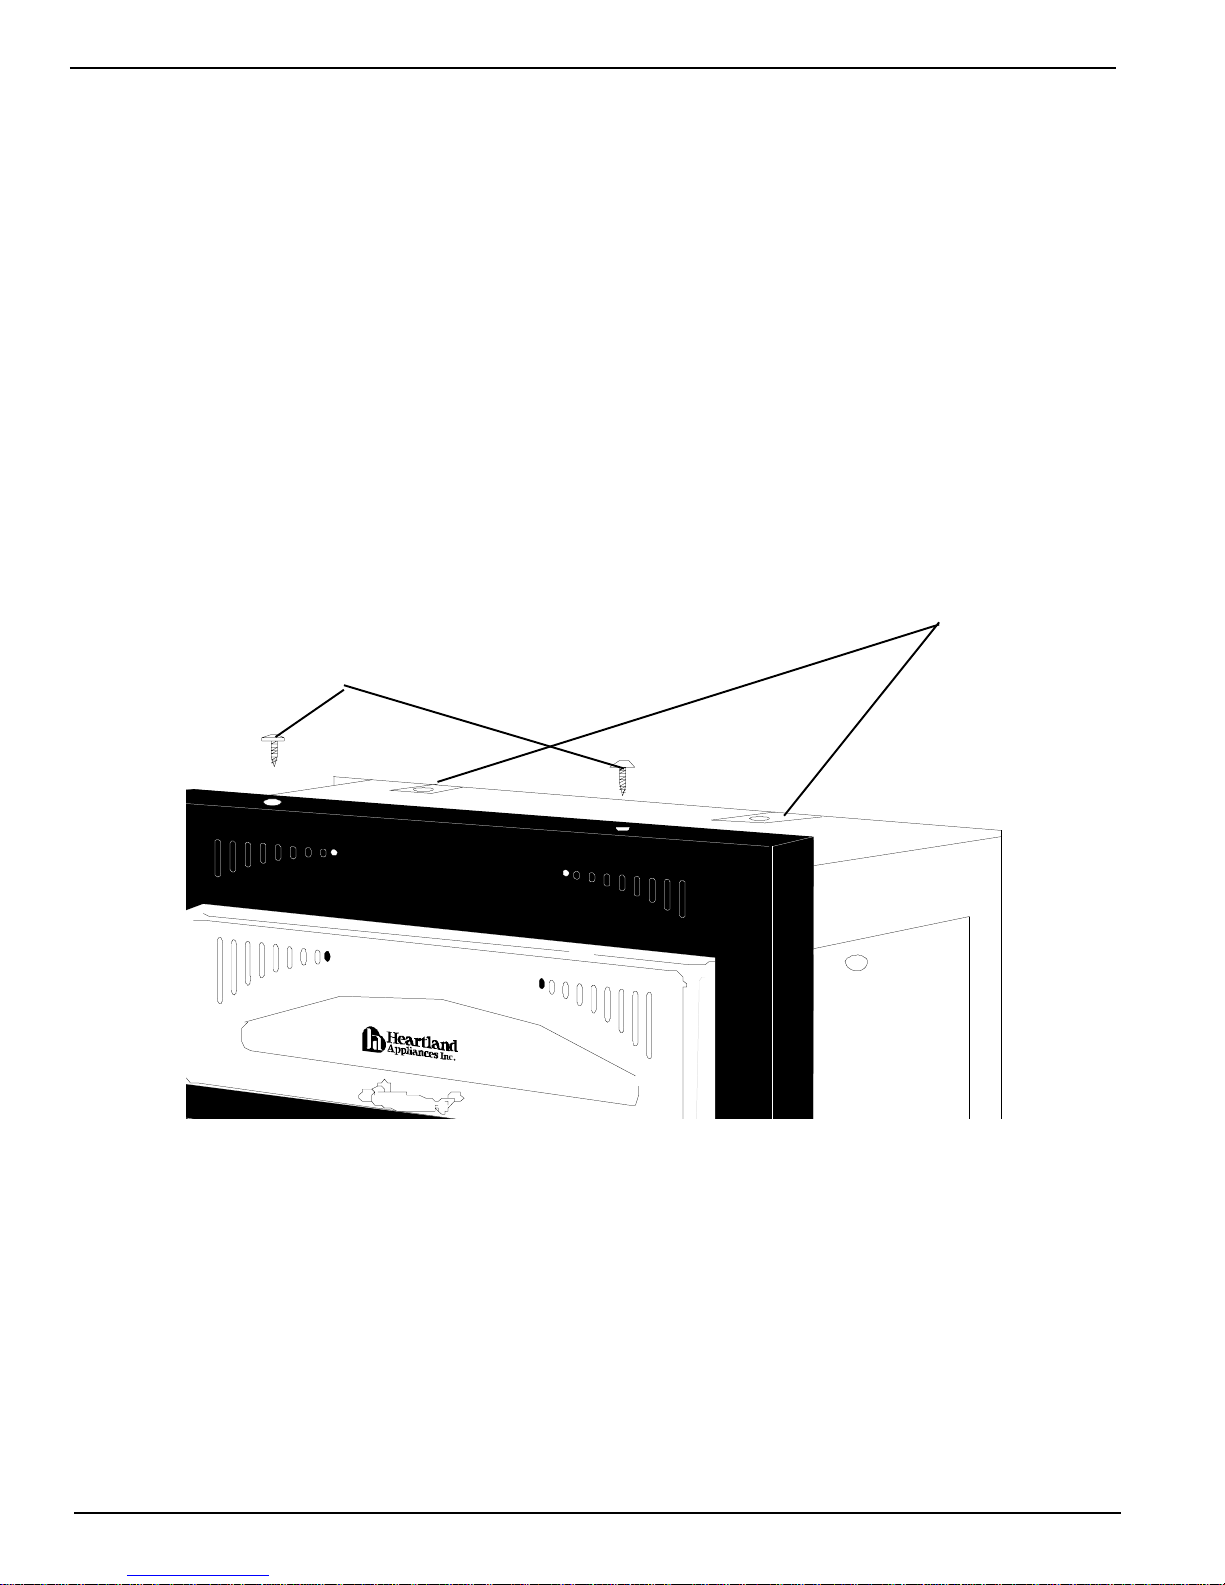
3. Screwthe anchorclipsto thetop ofthecabinet openingas shownon page 6. Theseclips will
latersecuretheunittothecabinetandmustbeinstalled.Findthecentreoftheopeningand
mounttheclips73/16"oneachsideofthecentrepoint,andextendingfromtheopening
approximately5/8".
6
Final installation
Note: It is recommended to have two people for lifting the oven.
1. Lifttheunituptotheopeningandguidethesupplyboxthroughtheslotintothelowercupboard
atthebackoftheopening.Thepowersupplyboxandcablemustbefullyinsertedintothelower
cupboardor theappliance willnotinstallcompletelyintotheenclosure.
2. Slidetheunitintoplace andcheckthat theunitislevelby placingaspirit levelacross thetop
ofappliancefront.Iflevellingisrequired,shimtheunitbetweenthebaseandthebottomopening.
3. Afterunithasbeenlevelled,securetheunittothecupboardwithtwoscrewsalongthetop,into
thetwoanchorclipsinstalledpreviously.(seebelowandpage5illustration )
4. Removecoverofthepowersupplyboxandfastenthesupplyboxtothebackofthecupboard
belowwithfour wood screws(See page 5).
5. Theunitcannowbewiredintothepowersourcebyaqualifiedelectrician.
6. Beforeturningtheunitonpleaseread“BeforeyouStart”undertheOperationsectiononpage
10.
Note:
Theovenfaceshouldnotgoinsidetheopening.Followingthesedirectionstheface-platewill
overlap thecabinetby1/4"top andbottom andon thesides.The flangewill extend1 1/2"off
thefaceofthecabinetwhenmounted.
Anchor clips
Screw unit to anchor clips
installedincabinetopening
Installation
7
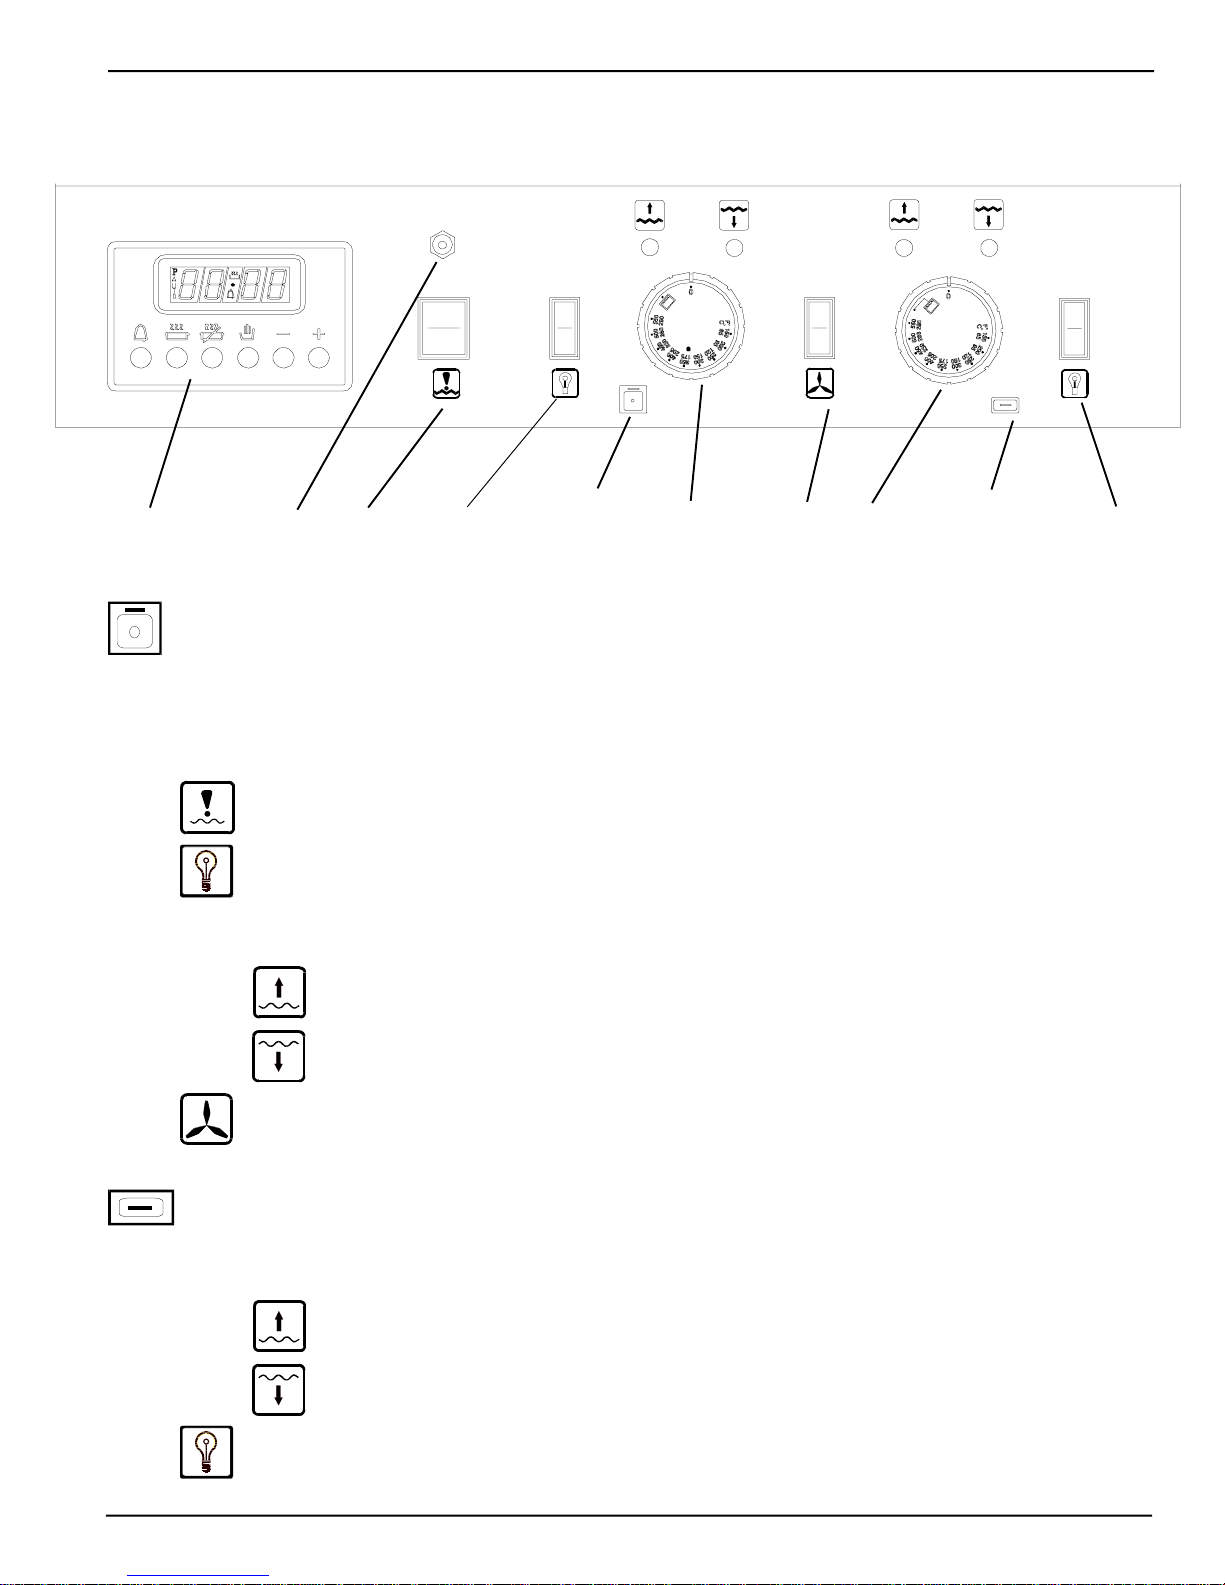
BCD EFLower oven
symbol
A
Features
Dual Oven Control Panel Features
#9730 Self Clean
A) DigitalTimer-Withminuteminderandautomaticstopandstartcookingandselfcleanfunctions.
B) Selfcleanovenresetbutton(selfcleanonly)
C) RockerSwitch,controlsselfcleanfunction(seepage14)
D) Ovenlighton/offswitch.Uppositionis"Off"
E) MainOvenTemperatureControlinFahrenheitandCelsiuswith-
bake indicator
broil indicator
F) On/offswitch- Controlsconvectionfanforregularbaking/broilingandconvectionbaking/
broiling. Up position is "Off"
Lower Oven Controls:
G) LowerOvenTemperatureControl-
bake indicator
broil indicator
H) Ovenlighton/offswitch.Uppositionis"Off"
I) ControlPaneldoor Cover:
Main oven
symbol G H
Features
PREHEAT

8
K) LowerOven:
-for regularbaking andbroiling
- 2 position racking.
-1.5cubic feet ofenergy efficientbakingarea
(.04cubicmeters)
L) Agreasefilteris includedthat may befitted onto
thefanshieldtolimitgreasebuild-upwhenroasting
orbroilingmeatsinanuncoveredvesselin
convectionmode.
doorslidesupintotheunittorevealcontrol
panelwithtimer,lightswitches,ovenindicators
andcontrols.Alsohousesselfcleancontrol.
J) MainOven:
- baking,broiling
- timed baking, broiling
- convectionbaking,broiling
- timedconvectionbaking,
boiling
- 4 position racking
- 2.7cubicfeet ofenergy
efficient baking area (.07
cubicmeters)
- selfcleanfeature
Dual Oven Features
Features
Tabla de contenidos
Otros manuales de Horno de Heartland


