HCL Smart Band SM-FT-1000 Manual de instrucciones

SM-FT-1000 Banding Tool
Operation, Parts & Safety Manual
Original Instructions

Tooling
Index
Health & Safety
1.1 Warning & Safety Instructions
Torque Wrenches
2.1 Options
Operation
3.1 Using the Tool
3.2 Smart®Band Hybrid & Compact
Servicing
4.1 Servicing
4.2 Troubleshooting
4.3 Parts List
Depending on set up, this tool is designed to assemble the following HCL Smart®products:
– Smart® Tie 20mm (¾˝)
– Smart® Tie 32mm (1¼˝)
– Smart® Band 19mm (¾˝) Hybrid & Compact
– Smart® Band 32mm (1¼˝) Hybrid & Compact
Follow the instructions described to achieve safe operation.
Note: This tool is not suitable for Smart®Band Standard Systems
www.hclfasteners.com

www.hclfasteners.com
Read these instructions carefully:
Whilst Smart®Band and Smart®Tie are considered to be
signicantly safer than alternative metallic solutions, failure
to follow these instructions can still result in personal injury.
General safety considerations:
1. STRAP BREAKAGE HAZARD
Smart®Band and Smart®Tie are free from sharp metallic edges however it is important to understand that improper
operation of the tool or sharp corners on the load can result in strap breakage during tensioning that could result in the
following:
– A sudden loss of balance causing you to fall
– Both tool and strap ying violently towards your face
Failure to place the strap properly around the load, an unstable or shifted load, could result in a sudden loss of strap tension
during tensioning. This could result in a sudden loss of balance causing you to fall.
Positioning yourself in-line with the strap during tensioning, can result in personal injury from ying strap or tool. When
tensioning, position yourself to one side of the strap and keep all bystanders away.
2. TRAINING
This tool must not be used by persons not properly trained in its use. Be certain that you receive proper training from your
employer. If you have any questions contact your HCL representative.
3. EYE INJURY HAZARD
Failure to wear safety glasses with side shields can result in eye injury or blindness. Always wear safety glasses
with side shields which conform to ANSI Standard Z87.1 or EN 166.
4. CUT HAZARD
Although the Smart®Band and Smart® Tie are not metallic and therefore signicantly less likely to cause cuts to
hands or ngers, it is still strongly recommended that the operator wear protective gloves.
5. FALL HAZARD
Maintaining improper footing and/or balance when operating the tool can cause you to fall. Do not use the tool when you
are in an awkward position.
6. TOOL CARE (for further information see Servicing section)
– Inspect and clean the tool daily. Replace all worn or broken parts.
– Lubricate all moving parts approximately every 50 hours of use.
– If used in sea water, wash off immediately with fresh water after use. Dry and lubricate.
Health & Safety - Warning & Safety Instructions
1.1

www.hclfasteners.com
Torque Wrenches - Options
Mountz – FGC-10A (Factory set to speciced torque – Suitable for Marine use).
For use with: Material
Smart®Tie 20mm (¾˝)
PA66 (Nylon 6.6)
PA12 (Nylon 12)
PK
PPS
Smart®Tie 32mm (1¼˝)
PA12 (Nylon 12)
PPS
Smart®Band Hybrid 19mm (¾˝)
Smart®Band Compact 19mm (¾˝)
PA66 (Nylon 6.6)
PA12 (Nylon 12)
PPS
POM (Acetal)
Mountz – FGC-30A (Factory set to speciced torque – Suitable for Marine use).
For use with: Material
Smart®Tie 32mm (1¼˝)PK
Smart®Band Hybrid 32mm (1¼˝)
Smart®Band Compact 32mm (1¼˝)
PA66 (Nylon 6.6)
PA12 (Nylon 12)
PPS
Norbar – TTi20 (Variable torque setting – Not advised for Marine use).
For use with: Material
All product types
PA66 (Nylon 6.6)
PA12 (Nylon 12)
PK
PPS
POM (Acetal)
2.1
www.hclfasteners.com
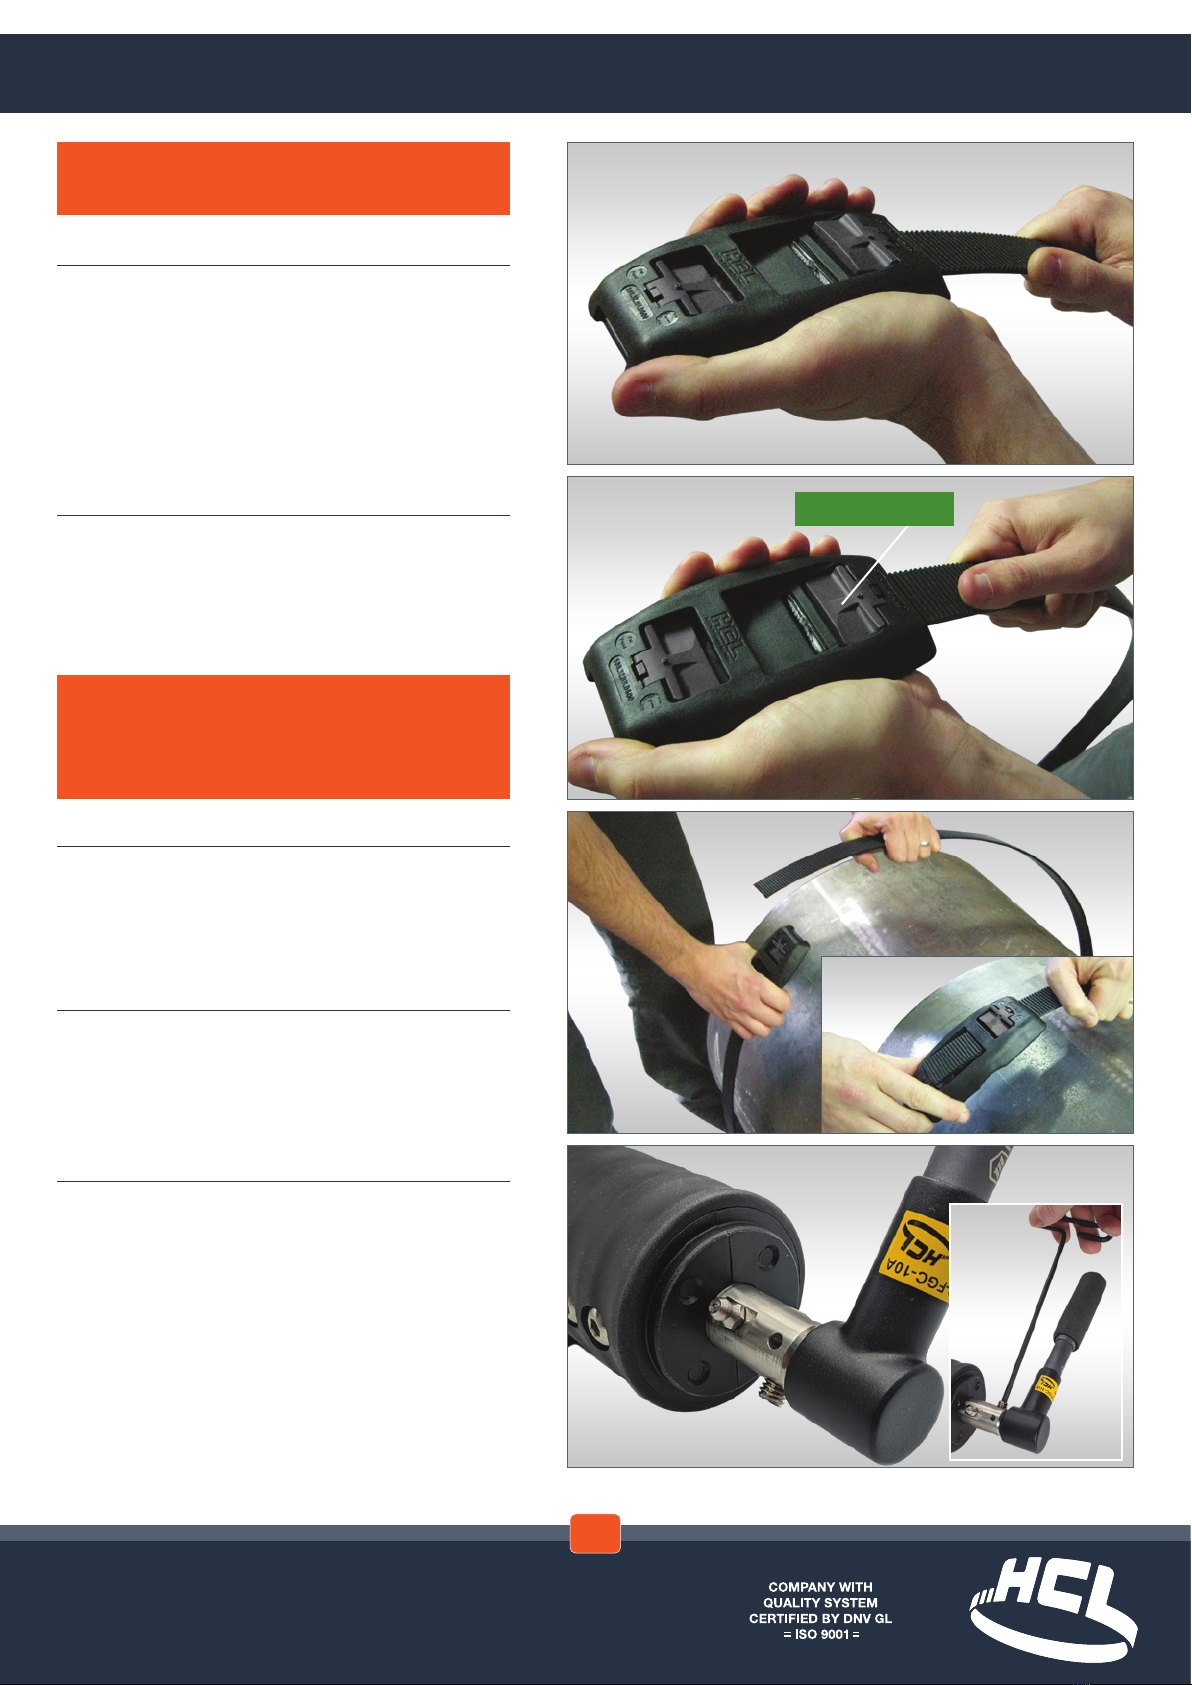
5
Attach Torque wrench to the square drive at
the rear of the tool.
Optional – Lock Torque wrench to square drive
using a 4mm hexagon key
3
Wrap band around the application...
...and insert band into other end of buckle
4
Pull band tight by hand, making sure teeth are
fully engaged with band
Operation - Using the Tool with Mountz Torque Wrench
1
Insert band fully into xed end of the buckle
2
Pull back band to engage latch teeth and push
down rmly on the latch using the thumb or
nger to ensure full engagement
WARNING – Ensure latch is fully engaged
with band before tightening. Latch not fully
engaged could lead to premature failure of
system when tightening
TEETH ENGAGED
NOTE – Steps 1 & 2 are not applicable to
Smart®Tie
3.1

www.hclfasteners.com
9
Is the yellow marker in the ‘70mm’ position
(tool has run out of movement)?
8
Tighten the band using a winding movement...
...until the Torque wrench ‘CLICKS’
6
Is yellow marker in the ‘0mm’ position?
7
Insert tool onto band...
...and push tool up against buckle
NOTE – The Mountz torque wrench is factory
set to the correct torque requirement for the
specied product being used. The set torque is
marked on the wrench.
The torque wrench does not have a ratchet
facility and will wind clockwise until the set
torque is reached. At this point it will slip over
with a positive click.
NO
YES
CLICK!
Operation - Using the Tool with Mountz Torque Wrench
IMPORTANT – If Mountz type torque wrench is
being utilised follow steps 6-9 followed by 18-20
NO
Go to 6.1
on next
page
YES
Go to 8.1
on next
page
3.1

www.hclfasteners.com
8.2
...until the yellow marker is at the
‘0mm’ position...
8.1
...wind Torque wrench anti-clockwise...
6.1
...wind Torque wrench anti-clockwise...
6.2
...until the yellow marker is at the
‘0mm’ position...
NOTE – In the aniti-clockwise direction, the
torque wrench will click over if enough
resistance is met. This could be experienced if
the tool is forced when reaching the end of its
travel at the ‘0mm’ position.
Go to 7
on previous
page
Go to 8
on previous
page
3.1

www.hclfasteners.com
3.1

www.hclfasteners.com
12
Set Torque Wrench to the required Torque
Refer to the tensioning tables in the
torque setting section for the maximum
recommended torque. See
torque wrench manual for
detailed operating instructions.
For reference the maximum
torque settings for each
material are labelled on the tool
and torque wrench.
13
Attach Torque wrench to the square drive at
the rear of the tool.
Optional – Lock Torque wrench to square drive
using a 4mm hexagon key
10
Wrap band around the application...
...and insert band into other end of buckle
11
Pull band tight by hand, making sure teeth are
fully engaged with band
WARNING – Do not exceed the maximum torque
settings recommended for the Smart®Tie or
Smart®Band system being applied
Operation - Using the Tool with Norbar Torque Wrench
3.1
IMPORTANT – If Norbar type torque wrench is
being utilised follow steps 10-20 and refer to the
torque setting section.

www.hclfasteners.com
17
Is the yellow marker in the ‘70mm’ position
(tool has run out of movement)?
16
Tighten the band using a ratcheting
movement...
...until the Torque wrench ‘CLICKS’
14
Is yellow marker in the ‘0mm’ position?
15
Insert tool onto band...
...and push tool up against buckle
WARNING – Do not wind the Torque wrench
using a smooth continuous movement or
beyond the click point
NO
YES
CLICK!
Operation - Using the Tool with Norbar Torque Wrench
3.1
NO
Go to 14.1
on next
page
YES
Go to 17.1
on next
page
Otros manuales para Smart Band SM-FT-1000
1
Tabla de contenidos
Otros manuales de Herramientas de HCL


