Hama DIT2006BT Manual de usuario

F
D
GB
E
Quick Guide
Kurzanleitung
Notice d’utilisation
Instrucciones breves
Краткое руководство
Istruzioni brevi
Beknopte bedieningsinstructies
Σύντομες οδηγίες
Krótka instrukcja obsługi
Rövid útmutató
Stručný návod
Stručný návod
Instruções resumidas
Kısa kullanımkılavuzu
Instrucțiuni scurte
Snabbguide
Lyhyt ohje
Kort vejledning
Kortveiledning
Digital Hi-Fi Tuner
Digital-HiFi-Tuner
RUS
PL
P
I
H
TR
FIN
NL
CZ
RO
DK
GR
SK
S
N
00054238
(DIT2006BT)
QUICK GUIDE
KURZANLEITUNG

Further information and features areavailable on/
WeitereInformationen und Features nden Sie hier
www.hama.com -> 00054238
Technical Data
Technische Daten
Display 2.8" (7.11cm) Color TFT
320 x240 px
Power Supply
Stromversorgung 100-240 V~50/60 Hz
Supported Languages
Unterstützte Sprachen
English, German, Danish, Dutch, Finnish, French, Italian, Norwegian, Polish, Portuguese, Spanish,
Swedish, Turkish, Czech, Slovak
Packaging Content
Verpackungsinhalt
Hama DIT2006BT,Power Cord, Remote GB-RC001, 2x AAA Batteries, Quick Start Manual, Telescope
Antenna Coaxial, WiFi Antenna, RCAAudio Cable
Connectivity
Konnektivität
Ethernet LAN (10/100)
WiFi 2.4GHz (b/g/n) /5GHz (a/n)
Bluetooth Receiver (RX): 4.2, class 1, A2DP,AVRCP
USB
(FAT32 File System)
Charge: 5V /1A
Playback: MP3, WMA, M4A, ADTS, FLAC, WAV
Audio Connectors
Audio Anschlüsse
Inputs AUX In 3.5mm
Outputs Headphone 3.5mm, Digital Optical, Digital Coaxial, RCAL/R,
Line Out 3.5mm
Sources
Quellen
Presets
Favoriten
DAB/DAB+
(174.928 -239.2 MHz)
ü30
FM
(87.5 -108 MHz) ü30
Internet Radio ü30
Spotify Connect ü10

A
B
1 3 12
13
2 4 6 9 1115 14
16
5 7 8 10
1721 23
2018 24 1922
1
3
4
6
8
10
9
12
14
16
18
2
5
7
11
13
15
17
19


8
Spotify Connect
GUse your phone, tablet or computer as aremote
control for Spotify.Gotospotify.com/connect to learn how.
DVerwende dein Smartphone, Tablet oder deinen
Computer als Fernbedienung für Spotify.Auf spotify.com/
connect erfährst du mehr.
FUtilisez votretéléphone, votretablette ou votre
ordinateur comme une télécommande pour contrôler
Spotify.Accédez àspotify.com/connect pour en savoir plus.
EUsa tu teléfono, tu tablet otucomputadoracomo
control remoto de Spotify.Paramás información, entraa
spotify.com/connect.
IUsa il tuo cellulare, tablet ocomputer come
telecomando remoto per Spotify.Vai su spotify.com/
connect per scoprirecome.
NGebruik je telefoon, tablet of computer als een
afstandsbediening voor Spotify.Ganaar spotify.com/
connect om te leren hoe je dat doet
JΧρησιμοποίησε το τηλέφωνο,το τάμπλετ ήτον
υπολογιστή σουωςτηλεχειριστήριο για το Spotify.Πήγαινε
στο spotify.com/connect για να μάθεις πώς.
PWykorzystuj telefon, tablet lub komputer jako pilota,
aby sterowaćaplikacjąSpotify.Wejdźna spotify.com/
connect, aby dowiedziećsię,jak to zrobić.

9
Spotify Connect
HHasználd atelefont, táblagépet vagy számítógépet
aSpotify távirányítójaként. További tudnivalókat aspotify.
com/connect oldalon olvashatsz.
CHudbu ze Spotify můžeš ovládat na dálku přes
telefon, tablet nebo počítač.Nastránce spotify.com/
connect najdeš, jak na to.
OUsa oteu telemóvel, tablet ou computador como
comando do Spotify.Vai aspotify.com/connect para
saberes como
TTelefon, tablet veya bilgisayarınıSpotify için uzaktan
kumanda olarak kullan. Nasılyapacağınıöğrenmek için
spotify.com/connect adresine
SAnvänd din telefon, surfplatta eller dator som
fjärrkontroll för Spotify.Gåtill spotify.com/connect för att
ta reda på hur.
LKäytä puhelinta, tablettia tai tietokonetta Spotifyn
kaukosäätimenä. Katso tarkemmat tiedot osoitteesta
spotify.com/connect.
KBrug din telefon, tablet eller computer som
fjernbetjening til Spotify.Gåtil spotify.com/connect for at
nde ud af,hvordan du gør.
VBruk telefonen, nettbrettet eller datamaskinen som
en fjernkontroll for Spotify.Gåtil spotify.com/connect for å
lærehvordan.

2
GQuick Reference Guide
Controls and Displays
A: Radio Front
1[POWER] Button
2AUX-In Socket
3[VOLUME] +/-
4[PRESET] Wheel
5[MODE] Button
6[ALARM] Button
7[EQUALIZER] Button
8[MENU] Button
9[INFO] Button
10 [BACK] Button
11 IR Sensor
12 [Navigation]
13 Headphone Socket
14 USB connection
15 2.8" Colour Display
16 LED
B: Radio Rear
17 Mains Power Supply
18 Antenna*
19 WiFi/Bluetooth Antenna
20 Optical OUT
21 Coaxial OUT
22 Stereo Chinch l/R out
23 Line OUT (3.5mm)
24 LAN (10/100 Mbit) Connection
Note
*"DIT2006BT" has achangeable antenna. Youcan use an active or passive antenna equipped with acoaxial
connection.
** The rotary knob has adual function. Turning the controller allows you to change the volume or navigate through the
menu structure. Pressing this rotary knob puts the device in standby mode or conrms aselection.
!
Important information -Quick-reference guide
•This quick-reference guide contains the most important basic information, such as safety instructions and the steps
necessary to operate the product.
•To help protect the environmental and conserve valuable rawmaterials, Hama does not issue aprinted manual and
instead makes this available exclusively as aPDF download.
•The full text
of the
manual is available at the following internet address:
www.hama.com -> 00054238 -> Downloads
•Save the manual on your computer for reference and print them out if possible.
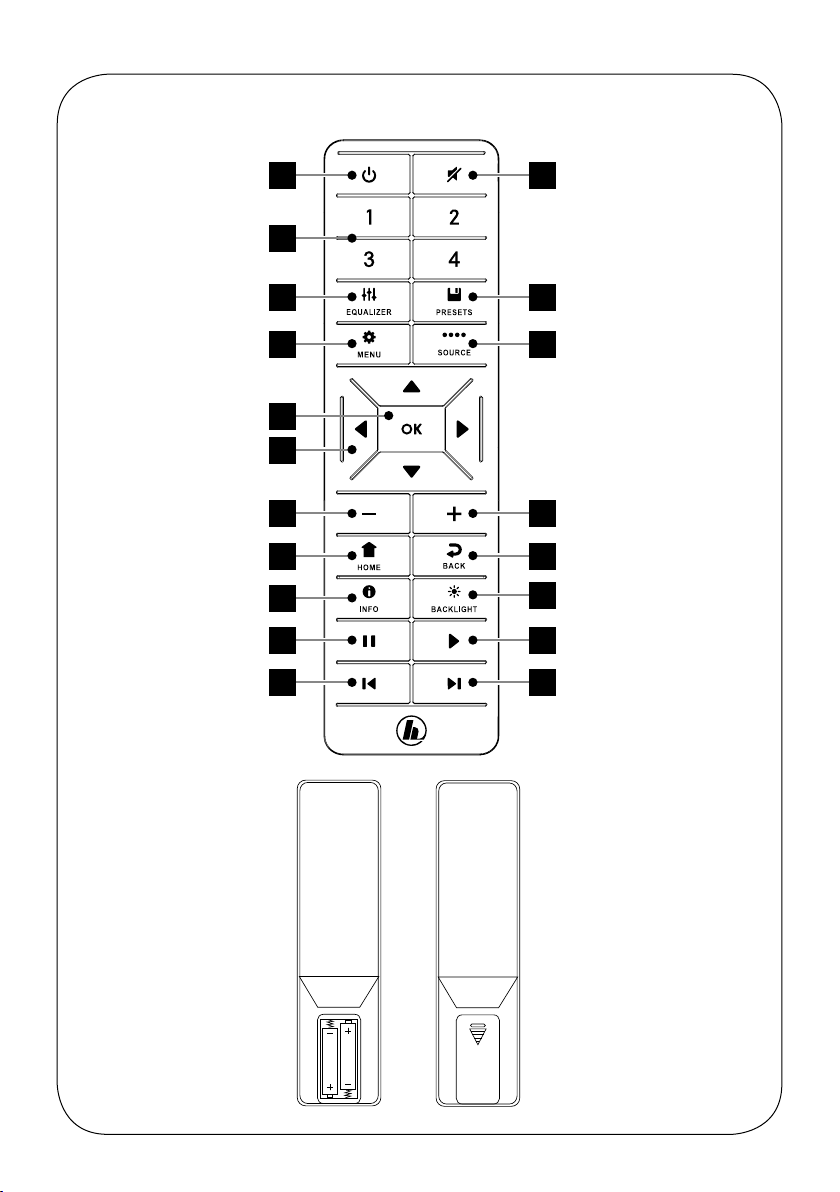
Remote Control
1[POWER] Button
2[MUTE] Button
3[PRESET] Direct Button (1-4)
4[EQUALIZER] Button
5[PRESET] List Button
6[MENU] Button
7[SOURCE] Button
8[OK] Button
9
[NAVIGATION] Button
▲Up ▼Down
◄Left ►Right
10 [VOL-] Button
11 [VOL+] Button
12 [HOME] Button
13 [BACK] Button
14 [INFO] Button
15 [BACKLIGHT] Button
16 [PAUSE] Button
17 [PLAY] Button
18 [PREVIOUS] Button
19 [NEXT] Button

3
1. Explanation of Warning Symbols and Notes
Risk of electric shock
This symbol indicates arisk of electric shock from
touching product parts carrying hazardous voltage.
Warning
This symbol is used to indicate safety instructions or to
draw your attention to specichazards and risks.
Note
This symbol is used to indicate additional information or
important notes.
2. Package Contents
•Digital-HiFi-Tuner DIT2006BT
•RCAcable (for stereo L/R RCAoutput)
•Remote control
•2x AAA batteries
•Quick guide
3. Safety Instructions
•The product is intended for private, non-commercial use
only.
•Do not use the product in areas in which electronic
products arenot permitted.
•Protect the product from dirt, moistureand overheating
and use it in dry rooms only.
•As with all electrical products, this device should be kept
out of the reach of children.
•Do not drop the product and do not expose it to any
major shocks.
•Do not operate the product outside the power limits
specied in the technical data.
•Keep the packaging material out of the reach of children
due to the risk of suffocation.
•Dispose of packaging material immediately in
accordance with the locally applicable regulations.
•Do not modify the device in any way.Doing so voids the
warranty.
•Use the product only for the intended purpose.
•Do not use the product in the immediate vicinity of
heaters, other heat sources or in direct sunlight.
•Do not use the product in adamp environment and
avoid splashing water.
•Only use the article under moderate climatic conditions.
Risk of electric shock
•Do not open the device or continue to operate it if it
becomes damaged.
•Do not use the product if the
AC adapter,the adapter cable or the mains cable are
damaged.
•Do not attempt to service or repair the product
yourself.Leave any and all service work to qualied
experts.
Warning –Batteries
•When inserting batteries, note the correct polarity (+
and -markings) and insert the batteries accordingly.
Failuretodosocould result in the batteries leaking or
exploding.
•Only use batteries (or rechargeable batteries) that
match the specied type.
•Beforeyou insert the batteries, clean the battery
contacts and the polar contacts.
•Do not allow children to change batteries without
supervision.
•Do not mix old and new batteries, or batteries of
different types or from different manufacturers.
•Remove the batteries from products that arenot being
used for an extended period (unless these arebeing
kept ready for an emergency).
•Do not short-circuit batteries.
•Do not charge batteries.
•Do not burn batteries.
•Keep batteries out of the reach of children.
•Never open, damage or swallow batteries or allow
them to enter the environment. They can contain toxic,
environmentally harmful heavy metals.
•Remove spent batteries from the product and dispose
of them without delay.
•Avoid storing, charging or using the device in extreme
temperatures and extremely low atmospheric pressure
(for example, at high altitudes).
4. Before First Use
Note
Adetailed description of the
UNDOK app and all of its
functions can be found in our
UNDOK guide at:
www.hama.com ->00054238 ->Downloads

4
Notes on use
•The [OK] button and ►on the remote control
correspond to the [POWER/VOLUME/ENTER/
NAVIGATE] button (11) on the front of the radio.
•The ◄button on the remote control corresponds to
the [ ] button on the front of the radio
•The ▲▼buttons on the remote control correspond
to turning the navigation controller to the left and
right on the front of the radio.
Preparing the remote control for use
Open the cover on the battery compartment. This can
be found on the back of the remote control and can be
opened by sliding in the direction indicated.
The extent of delivery includes two AAA batteries which
must be inserted into the battery compartment for the
remote control to work. When inserting the batteries,
ensurethat they areinserted with the correct polarity.
The relevant polarity (+ /-)ismarked inside the battery
compartment.
Setting up anetwork connection
4.1 LAN (wired network)
•Connect the LAN connection of your router to the LAN
connection on your radio. Youwill requireanEthernet
cable, which is not included in the delivery,todothis.
•Make surethat the router is on and working properly,
and that you have an Internet connection.
•See the operating instructions for your router regarding a
properly functioning LAN connection.
•Then proceed as described in point 5, “Getting Started”.
4.2 WLAN (wireless network)
•Ensurethat the router is switched on, is functioning
correctly and that thereisaconnection to the internet.
•Activate the WLAN function of your router.
•Follow your router‘s operating instructions as regards the
correct functioning of the WLAN connection.
•Then proceed directly as described under section 5
‚Getting started‘.
5. Getting Started
Note -optimising reception
"DIT2006BT" has an antenna connection for external
antennas with acoaxial connection. Asuitable telescopic
antenna that allows DAB, DAB+ and FM reception is
included in the extent of delivery.Alternatively,you
can use an active or passive antenna to improve the
reception or to adapt it to your requirements.
Please note:
•Always pull the antenna out completely.
•We recommend you adjust the antenna vertically to
ensureoptimal reception.
5.1 General Notes on Use
5.1.1 Switch On /Off /Standby
•Press [POWER/VOLUME/ENTER/NAVIGATE](11) to
switch on the radio.
•Press and hold [POWER/VOLUME/ENTER/NAVIGATE]
(11) for 3seconds to switch the radio off (standby).
•To completely switch off the device, disconnect it from
the power supply.
5.1.2 Navigation and Control
•After pressing ashortcut button, navigate through the
menu items using.
•Select the individual menu items by turning [POWER/
VOLUME/ENTER/NAVIGATE](11).
•Conrm the selection by pressing [POWER/VOLUME/
ENTER/NAVIGATE](11).
5.1.3 Volume Adjustment
•Turn the volume up (right) or down (left) by turning
[POWER/VOLUME/ENTER/NAVIGATE](11)
accordingly.
Otros manuales para DIT2006BT
1
Este manual sirve para los siguientes modelos
1
Tabla de contenidos
Idiomas:
Otros manuales de Sistema estéreo de Hama

Hama
Hama PR-2180 Manual de usuario

Hama
Hama FDA 980 Manual de usuario

Hama
Hama BA-5120 Manual de usuario

Hama
Hama FDA 980 Manual de usuario

Hama
Hama PR-5120 Manual de usuario

Hama
Hama Rip & Play Manual de usuario

Hama
Hama BA-2120 Manual de usuario

Hama
Hama LPR-2180 Manual de usuario

Hama
Hama uRage Soundz 2.1 Essential Manual de usuario

Hama
Hama RS100 Manual de usuario


