Haier SBEV40-SLIM Manual de usuario

User Manual
Guide de l’Utilisateur
Manual del Usuario Modelo
SBEV40-SLIM
Evoke Slim Soundbar

2
English
TABLE OF CONTENTS
Table of contents .....................................................................2
Safety Information ..................................................................3
Getting Started .......................................................................6
Features ..............................................................................6
What's Included ...................................................................7
Parts Descriptions ...................................................................8
Front Panel ..........................................................................8
Rear Panel .......................................................................... 9
Remote Control ..................................................................10
Installation ............................................................................ 11
Mounting the Main Unit ....................................................11
Installing the Remote Control Battery ................................13
Installing the Wireless Subwoofer .....................................14
Pairing the Wireless Subwoofer With the Main Unit ..........15
Positioning the Soundbar System .....................................16
Connections .........................................................................17
Connection Overview .......................................................17
Connecting Audio and Video With HDMI ............................ 18
Connecting to an Audio System ......................................... 19
Operation ............................................................................ 21
Setting the Sound Mode ....................................................21
Turning Off the Sound Temporarily ...................................21
Selecting a Soundbar Input Mode .....................................22
Adjusting the Volume ........................................................22
Adjusting the Delay Between the Sound and the
Video Image (AV Sync) ......................................................22
Troubleshooting .................................................................... 23
Specifications ........................................................................ 25
Index ....................................................................................26
Limited Warranty ..................................................................27

3
English
SAFETY INFORMATION
Important Safety Instructions
1 Read these instructions.
2 Keep these instructions.
3 Heed all warnings.
4 Follow all instructions.
5 Do not use this apparatus near water.
6 Clean only with dry cloth.
7 Do not block any ventilation openings. Install in accordance with the
manufacturer’s instructions.
8 Do not install near any heat sources such as radiators, heat registers,
stoves, or other apparatus (including amplifiers) that produce heat.
9 Do not defeat the safety purpose of the polarized or grounding-type
plug. A polarized plug has two blades with one wider than the other.
A grounding type plug has two blades and a third grounding prong.
The wide blade or the third prong are provided for your safety. If the
provided plug does not fit into your outlet, consult an electrician for
replacement of the obsolete outlet.
10 Protect the power cord from being walked on or pinched particularly at
plugs, convenience receptacles, and the point where they exit from the
apparatus.
11 Only use attachments/accessories specified by the manufacturer.
12 Use only with the cart, stand, tripod, bracket, or table
specified by the manufacturer, or sold with the apparatus.
When a cart is used, use caution when moving the cart/
apparatus combination to avoid injury from tip-over.
TO REDUCE THE RISK OF ELECTRIC
SHOCK, DO NOT REMOVE COVER (OR
BACK). NO USER SERVICEABLE PARTS
INSIDE. PLEASE REFER SERVICING TO
QUALIFIED PERSONNEL.
This lightning bolt with the arrowhead within the triangle is intended to
alert the user to the presence of dangerous, uninsulated voltage in the
enclosure of the product which may be powerful enough to pose a risk of
electric shock.
The exclamation point within the triangle is intended to alert the user
to the presence of important operating and maintenance (servicing)
instructions in the literature accompanying the product.
CAUTION
RISK OF ELECTRIC SHOCK
DO NOT OPEN
CAUTION
RISK OF ELECTRIC SHOCK
DO NOT OPEN
CAUTION
RISK OF ELECTRIC SHOCK
DO NOT OPEN

4
English
13 Unplug this apparatus during lightning storms or when unused for long
periods of time.
14 Refer all servicing to qualified service personnel. Servicing is required
when the apparatus has been damaged in any way, such as power-supply
cord or plug is damaged, liquid has been spilled or objects have fallen into
the apparatus, the apparatus has been exposed to rain or moisture, does
not operate normally, or has been dropped.
PRECAUTIONS: Power Cord
It is recommended that most appliances are plugged into a dedicated circuit.
That is, a single outlet circuit which powers only that appliance and has no
additional outlets or branch circuits. Check the specifications page of this
owner’s manual to be certain. Do not overload power outlets. Overloaded
power outlets, loose or damaged power outlets, extension cords, frayed
power cords, or damaged or cracked wire insulation are dangerous. Any of
these conditions could result in electric shock or fire. Examine the cord of your
FCC Notice
This equipment has been tested and found to comply with the limits for a
Class B digital device, pursuant to Part 15 of the FCC Rules. These limits
are designed to provide reasonable protection against harmful interference
in a residential installation. This equipment generates, uses and can radiate
radio frequency energy and, if not installed and used in accordance with
the instructions, may cause harmful interference to radio communications.
However, there is no guarantee that interference will not occur in a particular
installation. If this equipment does cause harmful interference to radio or
television reception, which can be determined by turning the equipment off
and on, the user is encouraged to try to correct the interference by one or
more of the following measures:
Reorient or relocate the receiving antenna.
Increase the separation between the equipment and the receiver.
Connect the equipment to an outlet on a circuit different from that to which
the receiver is connected.
Consult the dealer or an experienced radio/TV technician for help.
(FCC Part 15.21) Caution: changes or modifications not expressly approved
by the party responsible for compliance could void the user’s authority to
operate the equipment.
This device complies with part 15 of the FCC Rules. Operation is subject
to the following two conditions :
(a) This device may not cause harmful interference, and
(b) This device must accept any interference received, including
interference that may cause undesired operation.

5
English
For Your Safety
Operation
The product must not be exposed to dripping or splashing, and no objects
filled with liquids, such as vases, should be placed on the product.
Always leave sufficient space around the product for ventilation. Do not
place product in or on a bed, rug, or in a bookcase or cabinet that may
prevent air from flowing through the vent openings.
Do not place lighted candles, cigarettes, cigars, etc. on the product.
Only connect the power cord to an AC power source as marked on the product.
Care should be taken to prevent objects from falling into the product.
This product does not contain customer serviceable parts.
Placement
Place this main unit in a location with adequate ventilation to prevent internal
heat from building up.
Do not place the main unit near a heat source, or in a place subject to direct
sunlight, excessive dust, or mechanical shock.
Cleaning
Clean the system with a soft dry cloth. Do not use any type of abrasive pad,
scouring powder or solvents such as alcohol or benzine.
product periodically, and if its appearance indicates damage or deterioration,
unplug it, discontinue use of the product periodically, and have the cord
replaced with an exact replacement part by an authorized service center.
Protect the power cord from physical or mechanical abuse, such as being
twisted, kinked, pinched, closed in a door, or walked upon. Pay particular
attention to plugs, power outlets, and the point where the cord exits the
appliance. To disconnect the power from the mains, pull out the mains cord
plug. When installing the product, ensure that the plug is easily accessible.
Thank you for purchasing our
Haier
product. This easy-to-use manual
will guide you in getting the best
use of your refrigerator.
Remember to record the model
and serial number. They are on a
label inside of the product.
Model number
Serial number
Date of purchase
Staple your receipt to your manual.
You will need it to obtain warranty service.
SAVE THESE INSTRUCTIONS
HOUSEHOLD USE ONLY

6
English
GETTING STARTED
Features
2.1 Channel Built-In Digital Amplifier
Easier Installation, More Vivid sound and image
•
•HDMI•input•for•easy•setup•with•your•TV
Stylish and Skinny Style
•
•Soundbar•system•in•a•stylish•integrated•single-unit•design
•
•Slim•design•that•matches•any•flat•TV
•
•Wall•mountable•to•maximize•space
Enhanced Wireless Active Subwoofer
•
•Class-D•digital•amplifier
•
•2.4GHz•RF•solution

7
English
What's Included
Main Unit
Subwoofer Remote Control
(1 ea) Battery (1 ea) Wall Mount
Brackets(2 ea)
Cradle Stand
(2 ea)
Wall Mount
Sheet (1 ea)
HDMI Cable
(1 ea)
AC Power
Cord
(2 ea)
DC Power
Supply (2 ea)
User Manual
(1 ea)

8
English
PARTS DESCRIPTIONS
Front Panel
1 Display Window
Shows the current status of the main unit.
2 Remote Sensor
Point the remote control towards this point.
1 2
9
English
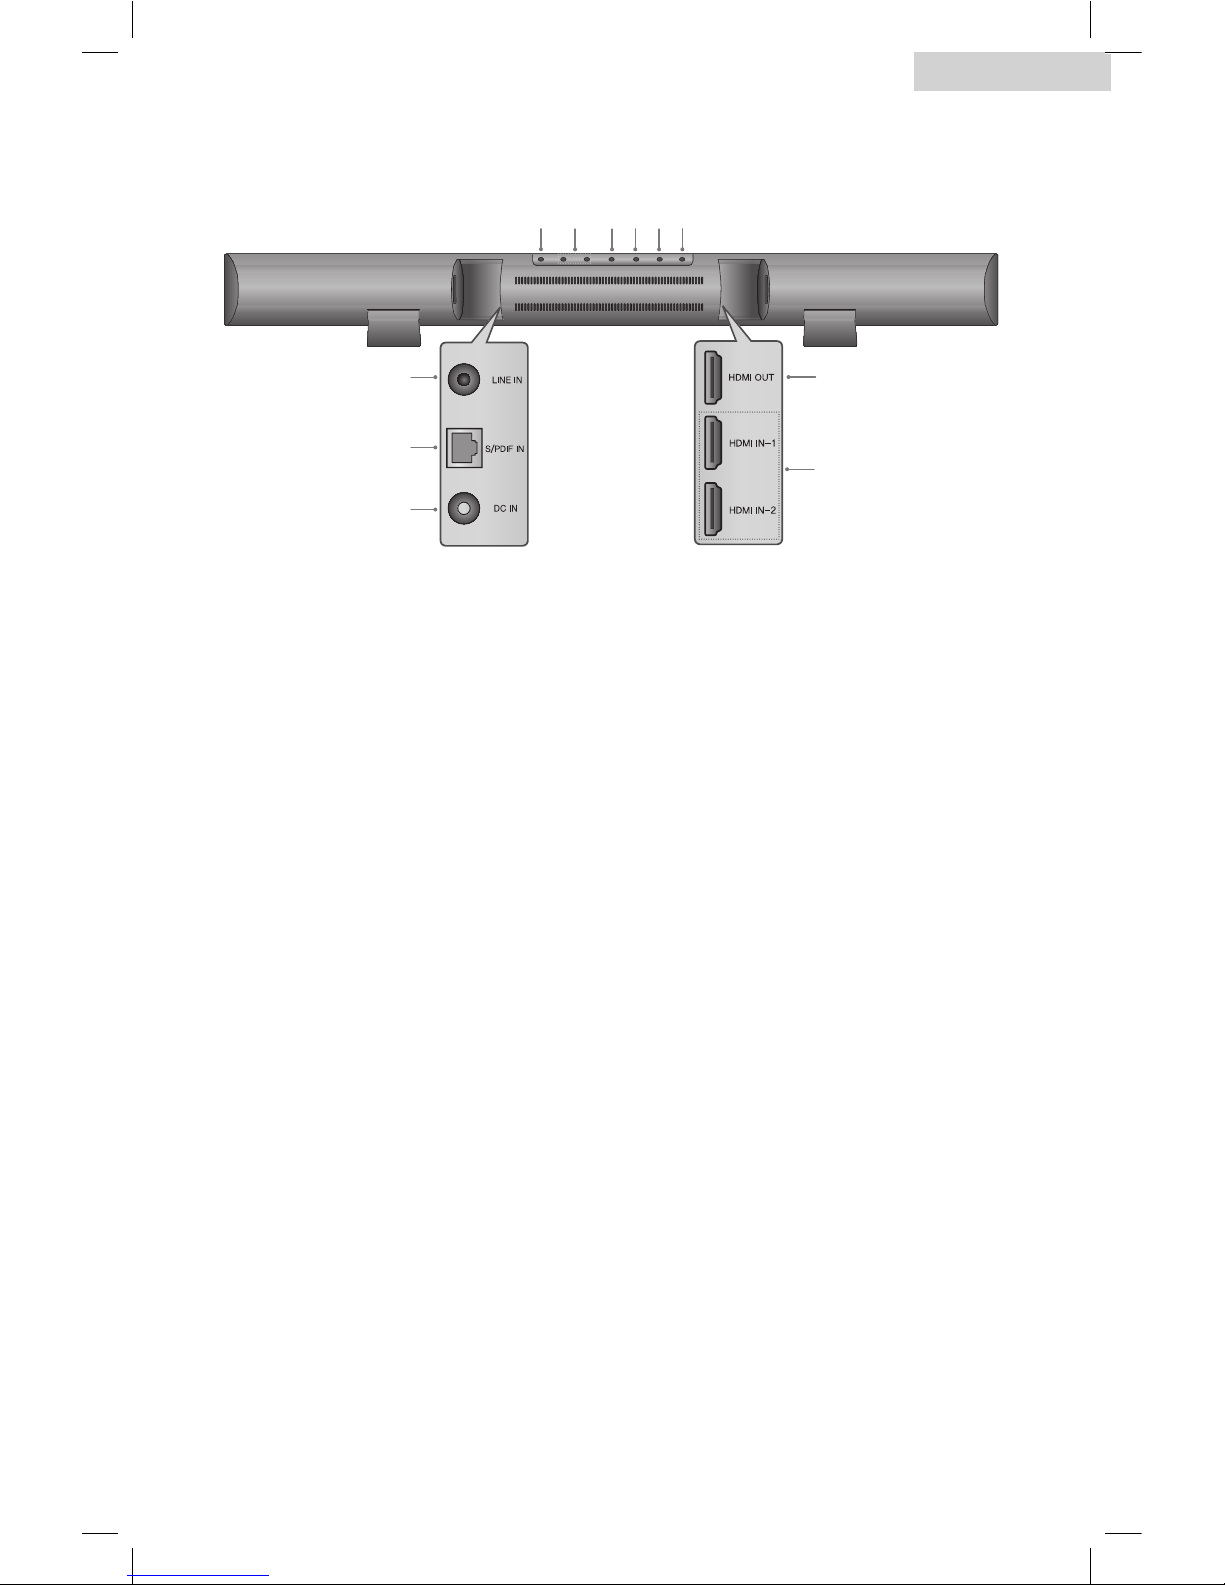
Rear Panel
1 LINE IN Input Jack
Connect to the line out jack of
your portable audio player.
2 S/PDIF Input Jack
Connect to the S/PDIF output jack
of a digital optical audio device.
3 DC IN Jack
Connect the supplied DC power
adapter.
4 HDMI Input Jacks
Connect to the HDMI output jack
of an external device.
5 HDMI Output Jack
Connect to the input jack of an
HDMI compatible TV or monitor.
6 WOOFER
Turns the subwoofer on or off.
7 MODE
Selects a sound mode from
MUSIC, MOVIE, SURROUND, or
NEWS.
8 INPUT
Selects input mode from LINE,
HDMI1, HDMI2, or SPDIF.
9 O
Turns the main unit on or off.
10 VOL + / VOL -
Adjusts the volume level.
11 MUTE
Mutes the sound.
15
67891011
24
3

10
English
Remote Control
1 O
Turns the main unit on or off.
2 VOL - / VOL +
Adjusts the volume.
3 MUTE
Mutes the sound.
MODE
Selects a sound mode from MUSIC,
MOVIE, SURROUND, or NEWS.
4 LINE IN / S/PDIF / HDMI 1 / HDMI 2
Chooses the corresponding input
mode you want to use.
5 SYNC - / SYNC +
Adjusts the audio output delay times
if the video playback is slower than
the audio output in HDMI connection.
6 WOOFER
Turns the subwoofer on or off.
CONNECT
Pairs the subwoofer with the main
unit.
2
3
4
5
6
1
Tabla de contenidos
Otros manuales de Oradores de Haier


