GYM form SLIM FOLD Manual de usuario

SLIM FOLD TREADMILL
International patents pending. All imitations will be prosecuted.
GYMFORM® SLIM FOLD TREADMILL is a registered EU/CTM trade mark.

1
11
10 12 13

3
2
1
2
4
5
3
3

4
4
5
34
5
2
1
321

17
67
8
9

6

7
English
Warnings
Important: Keep these
instructions for future reference.
Read all instructions in the
documentation provided with
your exercise device before
installation,includingallassembly
guides, user guides, and owner’s
manuals.
- Always follow basic safety
precautions when using this
device to reduce the chance of
injury, fire or damage.
This appliance can be used by
children aged from 8 years and
above and persons with reduced
physical, sensory or mental
capabilities or lack of experience
and knowledge if they have been
given supervision or instruction
concerning use of the appliance
in a safe way and understand
the hazards involved. Children
shall not play with the appliance.
Cleaning and user maintenance
shall not be made by children
without supervision.
- Do not leave the device
unattended when it is plugged in.
Unplug the device from its power
source when it is not in use.
- Make sure all users see a
physician for a complete physical
examination before they begin
any fitness program, especially in
case of high blood pressure, high
cholesterol levels, heart disease,
a family history of any of the
disorders mentioned, being over
age 45, being a smoker, obesity,
lack of regular training in the
previous year, or when taking any
kind of medication.
- Make sure the product
components are in good
condition before using the device
the first time. If the components
are damaged, the device cannot
be used. Please return it to your
store.
- The device is only for personal,
indoor use. It is not designed for
commercial use.
- The distributor is not liable for
any loss or damage caused by
misuse of the device.
- Never tug on the power cable.
- Do not jump on the device
because it may damage the unit.
- If the supply cord is damaged,
it must be replaced by the
manufacturer, its service agent
or similarly qualified persons in
order to avoid a hazard.
-WARNING!Heartratemonitoring
systems may be inaccurate. Over-
exercising may result in serious
injury or death. If you feel faint,
stop exercising immediately.
- The device makes more noise
when bearing a load than when
load free.
- The treadmill should not be
operated while it is folded.
- Ensure the running surface has
stopped completely before folding
the device.
- Never try to service the
equipment yourself. Consult an
expert about the problem.
- After the device is used, it
should always be turned off and
cleaned. Turn the device off and
disconnect it from the power
source before you start cleaning
it.
- If you use the device on a
rug, make sure the ventilation
openings are not covered.
- Do some warm-up exercises
before you start using the device.
Start the exercises slowly and
gradually increase the intensity.
- The device can be used by only
one person per session. It should
not be used by more than one
person at the same time.
- Pregnant women SHOULD NOT
use the device.
- Stop using the device
immediately if you feel
uncomfortable or dizzy. Consult
a physician immediately if you do
not feel well or have chest pain or

8
1m = 3,28 feet
any other symptoms.
- If you have not done exercise for
a long time or if you have a heart
condition, a circulatory disorder or
an orthopaedic problem, consult a
physician before using the device.
- This device is not designed
for use by children or persons
with reduced mental or physical
capabilities unless they are
supervised or instructed by
someone responsible for their
safety.
- Children should be supervised
at all times to ensure they do not
play with the device.
- Do not use the device if you
weigh more than 110 kg.
- This device is designed for
individual use. Any breakdown
caused by improper use is not
covered by the warranty.
- Make sure the device is on a
flat surface. Do not use dangling
clothing on the treadmill and do
not scuff the treadmill, as this will
make it difficult to use. Wear sport
shoes when using the treadmill.
Do not start the treadmill while
standing on it. The best position
when turning on the device is to
stand with one foot on either side
of the treadmill. If the initial speed
of the treadmill is too fast, do not
jump on the treadmill. Start using
it at a lower speed and increase it
gradually.
- Do not suddenly stop walking or
running on the treadmill. Press the
ON/OFF button and the treadmill
will gradually stop.
- Stop walking when the treadmill
stops.
- Leave a safety area of 2 metres
by 1 metre behind the treadmill.
PRECAUTION: DO NOT remove
the cover of the control panel,
as this may cause an electric
shock. The parts inside cannot
be repaired by the user.
Product description
1.Control panel
2.Emergency key
3.Base
4.Treadmill
5.Vertical bar screw
6.Handlebars
7.Lock screw
8.Control panel screw
9.ON/OFF button
10. MODE button
11. button
12.↓button
13.↑button
14. Function indicators
15. Small Allen key
16. Wheels
17. Vertical bars
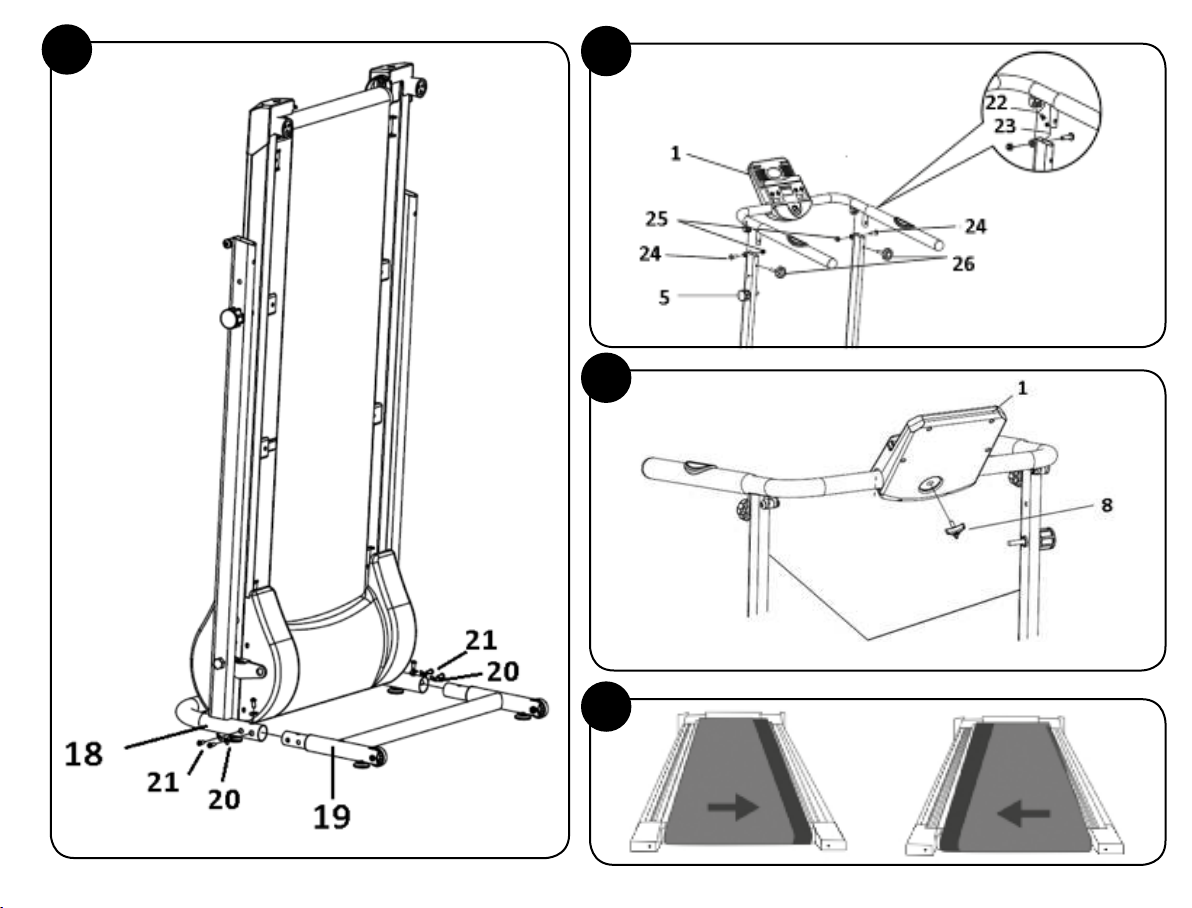
18. Metal base
19. Base extension
20. Washers x 6
21. Screws x 6
22. Handlebar cable
23. Vertical bar cable
24. Screws x 2
25. Nuts x 2
26. Handlebar screws
27. Spanner
28. Pulse sensors
29. Belt screws
Assembly Instructions
1. Open the box, unpack all the parts
and take out the treadmill.
INSTALLING THE METAL BASE (See
Picture 6)
2. Place the treadmill in the upright
positiononaatsurface.
3. Make sure that the screw on the
vertical bar (5) is in place and is attaching
the base (3) to the vertical bar (17).
4. Attach the base extension (19) to the
metal base (18) with six washers (20) and
six screws (21) and the large Allen key
(15).
INSTALLING THE HANDLEBARS (See
Picture 7)
5. Remove the screw on the vertical bar
(5) that is connecting the base (3) to the
vertical bar (17).
6. Gradually lower the base (3) until it is
restingontheoor.
7. Connect the handlebar cable (22) to
the vertical bar cable (23). See Picture 7.
8. Place the handlebars (6) on top of the

9
vertical bars (17) and attach them with
two screws (24) and nuts (25). Tighten
them with the small Allen key (15) and
spanner(27).Ensurethattheyarermly
attached.
9. Attach the handlebars with the two
handlebar screws (26).
INSTALLING THE CONTROL PANEL
(See Picture 8)
10. Lift up the control panel (1) so it is in
the right position and then fasten it with
the panel screw (8).
IMPORTANT:
11. Before using the treadmill, always
make sure that the base (3) is rmly
attached to the vertical bar (17). To do so,
tighten the lock pin (7). (See Picture 3)
Instructions for Use:
1. Connect the plug to the power supply.
2. Press the ON/OFF button (9) located
on the bottom front of the device.
3. The emergency key (2) has a clip
to attach it to clothing. Attach it to the
clothing you are wearing.
4. Attach one end of the emergency
key (2) to the control panel (1). It is a
magnetic attachment. Adjust the length
of the cable from the clip to the control
panel so that it disconnects as soon as
you move too far away from the control
panel. Whenever you use the treadmill,
attach the emergency key to the clothing
you are wearing.
When the emergency key (2) is attached
to the control panel (1), the screen will
display 0.0.
5. Press the button (11) to start the
treadmill belt. The device will not start
working for three seconds, as displayed
on the screen. The device will beep so
you can get ready to use it. After three
seconds, the belt will start moving, the
device will go into manual mode and the
speed will be displayed on the screen.
The initial speed is 1 km/h.
6. Press the ↑ button (13) to increase
the speed by intervals of 0.1 km/h each
time you press the button. The maximum
speed is 6 km/h.
7. Pressthe↓button(12)toreducethe
speed.
8. Press the MODE button ( 10) to view
the other function options on the screen.
Each time you press the button, a different
function will be displayed: the SPEED,
the TIME, the distance (DIST), the
kilocalories burned (CAL) and heartbeat
(PULSE). When the indicator displays
the SCAN function, the information
(speed, time, distance and calories) will
be displayed on the screen every ve
seconds without the need to press any
buttons.
9. Tondoutyourheartrate,selectthe
PULSE option on the control panel and
place your hands on each of the pulse
sensors (28) and press down until the
heartbeat is displayed on the screen.
10. Each function indicator (14) will light
up when the function is selected.
Note: Each time you use a programme,
your data on distance, time and calories
are saved. To set the panel to zero, press
the MODE button (10) for two seconds
once the belt has stopped.
11. The treadmill has a manual mode
(P0) and three automatic programmes:
P0 - Manual mode
P1 - Intervals
P2 - Resistance
P3 - Cardio Booster
To change programmes, rst set the
panel to zero. To set the panel to zero,
press and hold down the MODE button
(10) until you hear a beep. When you
hear the beep, release the MODE button
(10) and then press it until you reach
the heartbeat function (PULSE). Then
press the MODE button (10) again. The
screenwillashontheprogrammeyou
are working on (P0, P1, P2 or P3). Use
the↓button(12)andthe↑button(13)to
choose the desired programme.
Even if you use the automatic
programmes, the speed can be adjusted
by increasing or reducing it to t your
needs. When the speed is automatically
changed on a programme, it is increased
or reduced proportionately.
In programme P1, the speed is set and
changes automatically, but the user can
manually increase or reduce the speed in
increments of 1 km/h.
The speed set in programme P2 can be
reduced in increments of 1 km/h, but
cannot be increased.
The speed set in programme P3 can be
reduced in increments of 1 km/h, but
cannot be increased.
Each time the programme speed is
changed, you will hear three warning
beeps so you are ready.
12. When you have chosen the
programme you want to use, you can
select the workout time before you begin.
Go to the TIME function, which will be
set at the default time of 30 minutes. The
time can be reduced by pressing the ↓
button (12) or increased by pressing the
↑button(13).Thetimesavailableare30,
20 and 10 minutes.
13. When the treadmill is operating and
the
button (11) is pressed, the treadmill
will slow down and eventually stop. To
restart the treadmill, press the button
again and all the functions will the same
as in the previous workout.
14. Press the MODE button (10) for
three seconds to erase all the previous
functions and start a new workout.
15. If you want to stop the treadmill
quickly, pull on the emergency key.
Unfolding the device (see Picture 3)
1. Remove the two handlebar screws
(26).
2. Lower the handlebars (6) to the
horizontal position.
3. Hold onto the base (3) with one hand
and use the other to remove the screw on
the vertical bar (5) and unlock the base.
4. Place the treadmill in the upright
positiononaatsurface.
5. Remove the protective plastic parts
inserted into the metal base (18) before

10
attaching the base extension (19).
6. Slowly lower the base (3) until it is on
theoor.
7. Firmly tighten the lock screw (7).
Device folding system (see Picture 4)
1. Loosen the lock screw (7).
2. Raise the base to the vertical position
and hold it in place.
3. Attach the base (3) to the vertical
bars (17) using the screw on the vertical
bar (5).
4. Remove the two handlebar screws
(26).
5. Raise the handlebars (6) to the
vertical position. Replace the two
handlebar screws (26) so they are not
lost.
6. When the device is folded, it can be
transported using the wheels (16).
Product Cleaning and Maintenance
• Before performing daily cleaning, make
sure the device is off by pressing the ON/
OFF button and pulling the plug from the
power supply.
• Do not use abrasive products or
solvents to clean the device.
• Remove any dirt from the device with a
damp cloth.
• Use a dry cloth to clean the plug and
control panel. Do not use a damp cloth.
• Do not use the device in very damp or
dusty places that could cause the device
tofail.Setupthedeviceonaatsurface
to prevent it from falling and breaking
down.
• Do not use the device for more than
an hour. Rest for an hour after each one-
hour workout. The components should
be kept clean. Both sides of the belt
should be cleaned to reduce dirt build-
up. Before using the device, make sure
the treadmill surface is clean. Use soap
and a damp cloth to clean the belt. Do not
use solvents. Wipe off the sweat on the
handlebars after each use.
• Anti-static lubricant was applied to the
belt at the factory.
• Lubricant can be applied to the device
after 100 hours of use. Apply a special
treadmill lubricant underneath the
treadmill belt by lifting the belt away
from the base slightly and applying the
lubricant.
Centering the running belt:
IMPORTANT: After continuous use, the
belt may shift to one side due to the
constant pressure of the feet. It should
be centred again by adjusting the belt
screws (29) with the small Allen key
provided (15). See Picture 5:
Check that the belt is centered. IF it is
not, adjust the belt so that it runs freely
(see below).
Check that the running belt is correctly
centered between the end caps every
time before using the treadmill. Adjust
the belt if needed, normally only a small
adjustment is required. Screw half a
turn clockwise on the side that the belt
is too near to, then test for at least 15
seconds at 4km/h (check and adjust a
further quarter or half turn until the belt
is centered)
NOTE: Please check the distance
between the running belt and edge, if it
show as the picture 9 please centered
the belt in the correct way.
Tightening the belt:
1. If the treadmill belt (4) slides during
use, it should be tightened. Switch OFF
the treadmill and unplug it from the power
source. Use the small Allen key (15) to
give the left screws and then the right
screws 1/4 of a turn in the anti-clockwise
direction. Switch ON the main switch and
start the treadmill running at 6 km/h. Walk
on the treadmill. If it still slides, repeat the
process until the belt no longer slides.
- If you do not plan to use the device for
an extended period of time, please store
it in a clean, dry place and prevent it from
coming into contact with dust.
- Do not touch the ON/OFF button or the
power cable with wet hands.
- Do not tug on the cable when
unplugging the device. To prevent the
cable from being damaged, do not place
heavy objects on top of it and do not
wrap it around the device . Do not use
the device if the cable or the plug do not
make a good connection.
NOTE: the running surface belt should
not be tightened too hard as this can
cause noise and damage the machine
Technical Specications:
Voltage: 220-240V
Frequency: 50/60 Hz
Power: 500 W
Comply with Normatives:
BS EN ISO 20957-1: 2013
BS EN 957-6:2010+A1:2014
Unfolded Measurements
1358 mm x 610 mm x 1175 mm (L x W
x H)
Folded Measurements
535 mm x 610 mm x 1435 mm (L x W x H)
Packaging Measurements
1360mm x 280mm x 650mm (L x W x H)
Gross Weight 27,5 kg
Net Weight 24.5 kg
Class HC product for household use
Gymform Slim Fold Treadmill
(VDPGYCIND0124)
Disposal of materials
A symbol of a crossed-out wheeled
binmeansyoushouldndoutabout
and follow local regulations about
disposing of this kind of product.
Do not dispose of this product as you
would other household waste. Dispose
of this device in accordance with
the corresponding local regulations.
Electrical and electronic devices contain
hazardous substances that can have
harmful effects on the environment and/
or human health and should be recycled
properly.
Quality Warranty:
This product is covered by a warranty
against manufacturing defects subject
to the time periods stipulated by the
legislation in force in each country.
Tabla de contenidos
Idiomas:
Otros manuales de Rueda de andar de GYM form
Manuales populares de Rueda de andar de otras marcas

Smooth Fitness
Smooth Fitness EVO 3i Manual de usuario

NordicTrack
NordicTrack NETL81810.0 Manual de usuario

Schwinn
Schwinn 830/Journey 8.0 Manual de usuario

Keys Fitness
Keys Fitness HealthTrainer HT-740T Manual de usuario

Spirit
Spirit XT8 Manual de usuario

NordicTrack
NordicTrack T 14.0 Treadmill Manual de usuario