GreenWorks Pro BPS80B00 Manual de usuario
BSB901
FR MANUEL DE L’UTILISATEUR
PULVÉRISATEUR EN SAC À DOS
EN OPERATOR MANUAL
BACKPACK SPRAYER
ES MANUAL DEL OPERADOR
ROCIADOR TIPO MOCHILA
BPS80B00


1 Description...................................4
1.1 Purpose...................................................... 4
1.2 Product overview........................................4
1.3 Packing list................................................. 4
2 General backpack sprayer
safety warnings........................... 4
3 Symbols on the product............. 5
4 Risk levels....................................5
5 Recycle.........................................6
6 Proposition 65............................. 6
7 Installation................................... 6
7.1 Unpack the machine...................................6
7.2 Install the spray gun................................... 6
7.3 Install the tank lid........................................7
7.4 Install the battery pack............................... 7
7.5 Remove the battery pack........................... 7
7.6 Adjust the harness......................................7
8 Operation..................................... 8
8.1 Use the spray gun...................................... 8
8.2 Lock the spray gun trigger..........................9
8.3 Unlock the spray gun trigger...................... 9
8.4 Change the spray tip.................................. 9
8.5 Spray tip type........................................... 10
8.6 Add solution..............................................10
8.7 Start and stop the machine...................... 10
8.8 Pump-free spraying.................................. 10
9 Maintenance ..............................10
10 Troubleshooting........................ 11
11 Technical data............................11
12 Limited warranty........................11
13 Exploded view........................... 12
3
English EN

1 DESCRIPTION
1.1 PURPOSE
The machine is used to spray your yard for invasive
plants and pests. By taking on this task yourself, you
have control over the herbicides and pesticides that you
use in your yard and around your house
For residential use only, not for professional use, and for
operation at temperature above 32°F (0°C).
1.2 PRODUCT OVERVIEW
8a 8b 8c 8d 8e
1
9
7
2
3
4
12
10
11
14
13
5
6
1Tank Lid
2Tank
3Battery Door
4On/Off Power
Switch
5Wand Storage
6Backpack
7Strainer
8a Double Head
Spray Tip
8b Fan Spray Tip
8c Single Head Spray
Tip
8d Four Hole Spray
Tip
8e Adjustable Spray
Tip
9Gun Wand
10 Lock-out Lever
11 Trigger
12 Trigger Handle
13 Water Inlet
14 Hose
1.3 PACKING LIST
• Sprayer
• Spray tips
• Spray gun wand
• Backpack harness
2 GENERAL BACKPACK
SPRAYER SAFETY WARNINGS
• Read all the instructions before using the product.
• To reduce the risk of injury, close supervision is
necessary when a product is used near children.
• Know how to stop the product and bleed pressure
quickly. Be thoroughly familiar with the controls.
• Stay alert – watch what you are doing.
• Do not operate the product when fatigued or under
the influence of alcohol or drugs.
• Keep operating area clear of all persons.
• Do not overreach or stand on unstable support.
Keep good footing and balance at all times.
• Follow the maintenance instructions specified in the
manual.
• Risk of Injection or Injury– DO NOT DIRECT
DISCHARGE STREAM AT PERSONS.
• Do not come in contact or interfere with moving
parts, or liquids being sprayed from wand.
• Only use attachments recommended or sold by the
manufacturer.
• To reduce the risk of electrical shock, do not put in
water or other liquid.
• Do not place or store backpack sprayer where it can
fall or be pulled into a tub or sink. Do not submerge
in water or other liquids.
• Replace damaged or worn parts with replacement
parts listed on "Replacements list".
•
• Read all safety warnings and instructions. Failure to
follow the warnings and instructions may result in
electric shock, fire and/or serious injury.
• Prevent unintentional starting. Ensure the switch
is in the off-position before connecting to battery
pack, picking up or carrying the appliance. Carrying
the appliance with your finger on the switch or
energizing appliance that have the switch on invites
4
English
EN

accidents. Remove your finger from the on/off switch
before carrying or moving the backpack sprayer.
• Disconnect the battery pack from the appliance
before making any adjustments, changing
accessories, or storing appliance. Such preventive
safety measures reduce the risk of starting the
appliance accidentally.
• For use only with BAB726 battery and other BAB
series.
• For use only with CAB809 charger and other CAB
series.
• When battery pack is not in use, keep it away from
other metal objects, like paper clips, coins, keys,
nails, screws or other small metal objects, that can
make a connection from one terminal to another.
Shorting the battery terminals together may cause
burns or a fire.
• Do not use a battery pack or appliance that
is damaged or modified. Damaged or modified
batteries may exhibit unpredictable behavior
resulting in fire, explosion or risk of injury.
• Do not expose a battery pack or appliance to
fire or excessive temperature. Exposure to fire or
temperature above 265°F may cause explosion.
• Follow all charging instructions and do not charge
the battery pack or appliance outside of the
temperature range specified in the instructions.
Charging improperly or at temperatures outside of
the specified range may damage the battery and
increase the risk of fire.
• Have servicing performed by a qualified repair
person using only identical replacement parts .This
will ensure that the safety of the product is
maintained.
• Do not modify or attempt to repair the appliance or
the battery pack (as applicable) except as indicated
in the instructions for use and care.
3 SYMBOLS ON THE PRODUCT
Some of the following symbols may be used on this
tool. Please study them and learn their meaning. Proper
interpretation of these symbols will allow you to operate
the tool better and safer.
Symbol Explanation
V Voltage
A Current
Hz Frequency (cycles per second)
W Power
/min Revolutions, strokes, surface
speed, orbits, etc., per minute
Type or a characteristic of current
Precautions that involve your
safety.
Symbol Explanation
To reduce the risk of injury, user
must read and understand oper-
ator’s manual before using this
product.
Always wear safety goggles or
safety glasses with side shields
and, as necessary, a full face
shield when operating this prod-
uct.
To reduce the risk of injection or
injury, never direct a water stream
towards people or pets or place
any body part in the stream. Leak
ing hoses and fittings are also ca-
pable of causing injection injury.
Do not hold hoses or fittings.
To reduce the risk of injury from
kickback, hold the spray lance se-
curely with both hands when the
machine is on.
Failure to use in dry conditions
and to observe safe practices can
result in electric shock.
Fuel and its vapours are explosive
and can cause severe burns or
death.
4 RISK LEVELS
The following signal words and meanings are intended
to explain the levels of risk associated with this product.
SYM-
BOL
SIGNAL MEANING
DANGER Indicates an imminently
hazardous situation, which,
if not avoided, will result in
death or serious injury.
WARNING Indicates a potentially haz-
ardous situation, which, if
not avoided, could result in
death or serious injury.
CAUTION Indicates a potentially haz-
ardous situation, which, if
not avoided, may result in
minor or moderate injury.
CAUTION (Without Safety Alert Sym-
bol) Indicates a situation
that may result in property
damage.
5
English EN
5 RECYCLE
Separate collection. You must not dis-
card with usual household waste. If it is
necessary to replace the machine, or if it
is no more use to you, do not discard it
with household waste.
Separate collection of used machine
and packaging let you recycle materi-
als and use them again. Use of the re-
cycled materials helps prevent environ-
mental pollution and decreases the re-
quirements for raw materials.
At the end of their useful life, discard
batteries with a precaution for our envi-
ronment. The battery contains material
that is dangerous to you and the envi-
ronment. You must remove and discard
these materials separately at a location
that accepts lithium-ion batteries.
6 PROPOSITION 65
WARNING
This product contains a chemical known to the
state of California to cause cancer, birth defects
or other reproductive harm. Some dust created by
power sanding, sawing, grinding, drilling, and other
construction activities contains chemicals known to
cause cancer, birth defects or other reproductive
harm. Some examples of these chemicals are:
• Lead from lead-based paints;
• Crystalline silica from bricks and cement and other
masonry products;
• Arsenic and chromium from chemically treated
lumber.
Your risk of exposure to these chemicals varies
depending on how often you do this type of work. To
reduce your exposure to these chemicals, work in a
well-ventilated area, and work with approved safety
equipment, such as dust masks that are specially
designed to filter out microscopic particles.
7 INSTALLATION
7.1 UNPACK THE MACHINE
WARNING
Make sure that you correctly assemble the machine
before use.
WARNING
• If parts of the machine are damaged, do not use
the machine.
• If you do not have all the parts, do not operate the
machine.
• If parts are damaged or missing, contact the
service center.
1. Open the package.
2. Read the documentation provided in the box.
3. Remove all the unassembled parts from the box.
4. Remove the machine from the box.
5. Discard the box and packing material in compliance
with local regulations.
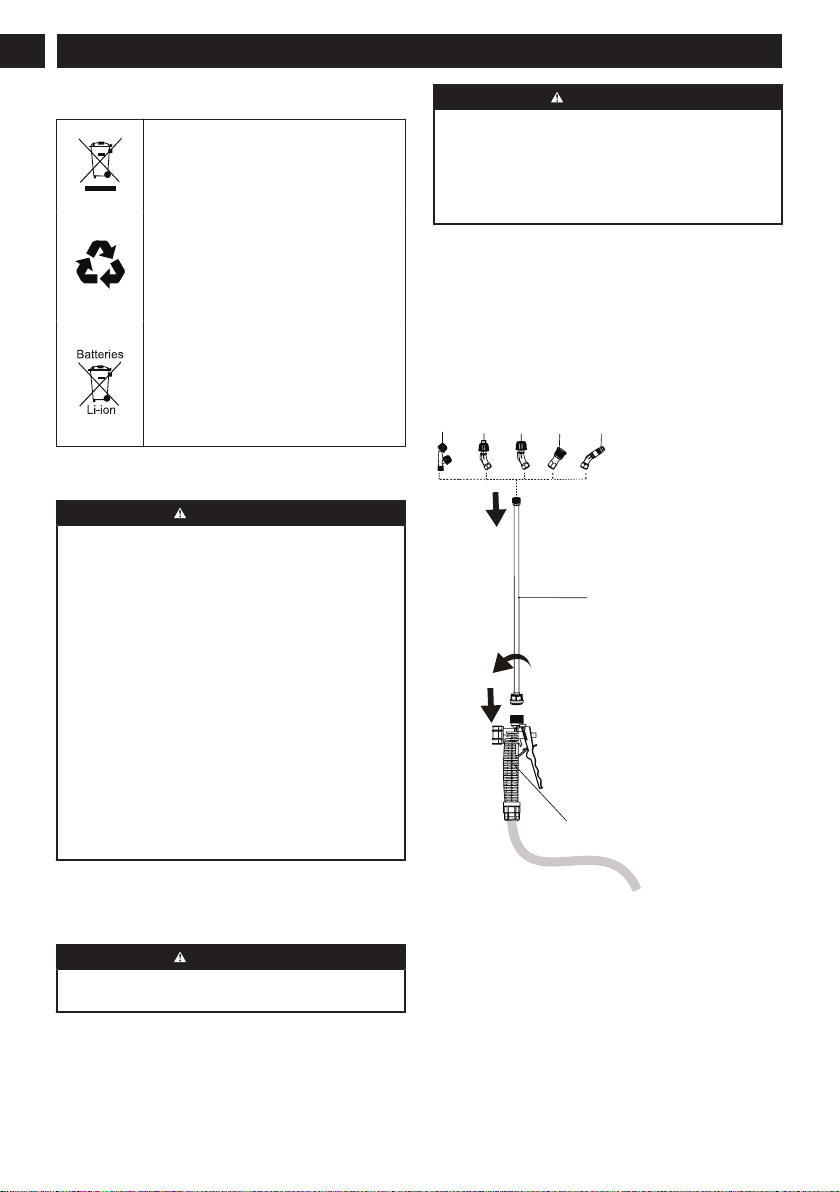
7.2 INSTALL THE SPRAY GUN
8a 8b 8c
9
12
8d 8e
1. Connect the nozzle (8a - 8b) to the wand (3), turn
clockwise until the tabs lock into place to ensure
leak-free connection.
2. Connect the wand (9) to the gun handle (12), turn
clockwise until the tabs lock into place to ensure a
leak-free connection.
6
English
EN

7.3 INSTALL THE TANK LID
1
2
• Connect the tank lid (1) to the tank (2) , turn
clockwise until the tabs lock into place.
WARNING
Do not move the sprayer by carrying the tank
lid handle when the tank is full with solution!
Only lift the lid handle when the tank is empty. It
is recommended to wear harness to transport the
sprayer.
7.4 INSTALL THE BATTERY PACK
Battery pack
Battery
release button
1. Open the battery door (3).
2. Align the lift ribs on the battery pack with the
grooves in the battery compartment.
3. Push the battery pack into the battery compartment
until the battery pack locks into place.
4. When you hear a click, the battery pack is installed.
7.5 REMOVE THE BATTERY PACK
1. Open the battery door.
2. Push and hold the battery release button.
3. Remove the battery pack from the machine.
7.6 ADJUST THE HARNESS
1. Place the sprayer on an elevated surface.
2. Fit the sprayer onto your back loosely.
3. Tighten the upper straps first.
4. Then tighten the lower straps to get the weight
above your waist.
7
English EN

5. Tighten both sides of the waist belt until the weight
of the sprayer is on your hips.
6. Tighten the chest strap the keep the weight close to
your back.
7. Install the back pad against your back tightly and
safely.
8. The sprayer should sit above your waist and the
tank should be close to the user’s back.
8 OPERATION
WARNING
Make sure that all the connections are tight and have
no leakage before operation.
8.1 USE THE SPRAY GUN
11
1. Pull and hold the spray gun trigger (11) to start the
machine.
2. Release the spray gun trigger (11) to stop water flow
through the spray tip.
8
English
EN

8.2 LOCK THE SPRAY GUN TRIGGER
11
10
1. Press the trigger (11) and push forward the trigger
safety lock-out (10) to lock the gun trigger.
2. Release the spray gun trigger (11) to stop water flow
through the spray tip.
8.3 UNLOCK THE SPRAY GUN
TRIGGER
1. Pull backwards on the trigger safety lock-out (10) to
unlock the gun trigger.
8.4 CHANGE THE SPRAY TIP
8a 8b
8
9
8c 8d 8e
1. Insert any of the spray tips (8a - 8e) onto the spray
wand (9).
WARNING
After changing the spray tip, if the angle of the spray
tip is not appropriate, adjust the joint between the gun
wand and the triggle handle and tighten it again.
9
English EN

8.5 SPRAY TIP TYPE
Spray tip APPLICATION
Double head spray tip sprays water
from both tips at the same time.
Fan spray tip, also known as "fan" tip
creates the widest area of spraying.
Single head spray tip provides the
highest versatility.
Four hole spray tip covers a wide
area of spraying and strong pressure.
Adjustable spray tip allows the user to
adjust the tip to the desired spraying
technique.
8.6 ADD SOLUTION
1. Open the tank lid on the tank (2).
2. Pour solution into tank (2).
3. Reattach tank lid to the tank (2).
2
8.7 START AND STOP THE MACHINE
To start:
• Press the switch (4) to turn the machine ON (I).
To stop:
• Press the switch (4) to turn the machine OFF (O).
4
8.8 PUMP-FREE SPRAYING
The battery-powered sprayer keeps fluid continously
cycling through the tank to allow pump-free spraying.
9 MAINTENANCE
WARNING
Always depressurize the sprayer, remove all chemical
solution, and clean the sprayer before making
repairs. Replacement parts may be purchased at the
store where you bought the sprayer. For a list of
replacement parts refer to <Replacement parts>.
Cleaning and maintaining the machine
After each use, clean the tank thoroughly. If spray
solution remains, properly dispose of it and drain
the tank completely. Follow recommendations from
the chemical manufacturer for proper disposal of the
solution. Pumping causes air to be taken in, and the
remaining liquid needs to be discharged. Pump until
10
English
EN
Tabla de contenidos
Idiomas:
Otros manuales de Pistola pulverizadora de pintura de GreenWorks Pro


