Graco G-Barrier Manual de usuario

Instructions - Installation
G-Barrier
Power Barrier for Hazardous Locations
3A5056B
Associated apparatus providing intrinsically safe power to hazardous locations using the
entity parameter concept. For professional use only.
Not approved for use in explosive atmospheres or hazardous locations.
See Approvals on page 3 for approval information.
Important Safety Instructions
Read all warnings and instructions in this manual
before using the equipment. Save these
instructions.
EN
26A364 IS Power Barrier

23A5056B
Table of Contents
Approvals . . . . . . . . . . . . . . . . . . . . . . . . . . . . . . . . . 3
List of Standards . . . . . . . . . . . . . . . . . . . . . . . . . . . 3
Warnings . . . . . . . . . . . . . . . . . . . . . . . . . . . . . . . . . 4
Overview . . . . . . . . . . . . . . . . . . . . . . . . . . . . . . . . . . 5
Power Barrier Output Parameters . . . . . . . . . . . . 5
Installation . . . . . . . . . . . . . . . . . . . . . . . . . . . . . . . . 6
Validating the Field Apparatus Entity Parameters 8
Mounting and Dismounting to DIN Rail . . . . . . . . 9
Grounding . . . . . . . . . . . . . . . . . . . . . . . . . . . . . 10
Wiring the Power Input Connector . . . . . . . . . . 12
Wiring the Power Output Connectors . . . . . . . . 12
Airflow . . . . . . . . . . . . . . . . . . . . . . . . . . . . . . . . 13
Troubleshooting . . . . . . . . . . . . . . . . . . . . . . . . . . 14
Parts . . . . . . . . . . . . . . . . . . . . . . . . . . . . . . . . . . . . 14
Performance . . . . . . . . . . . . . . . . . . . . . . . . . . . . . . 15
Dimensions . . . . . . . . . . . . . . . . . . . . . . . . . . . . . . 16
Technical Specifications . . . . . . . . . . . . . . . . . . . . 17
Graco Standard Warranty . . . . . . . . . . . . . . . . . . . 18
Graco Information . . . . . . . . . . . . . . . . . . . . . . . . . 18

Approvals
3A5056B 3
Approvals
List of Standards
• U.S. Approval
• FM 3600:2018
• FM 3610:2018
• FM 3810:2017
• UL 60079-0:2019
• ANSI/ISA 60079-11:2014
• Canada Approval
• CSA C22.2 No. 60079-0:2019
• CSA C22.2 No. 60079-11:2014
• CSA C22.2 No. 61010-1:2012
• IECEx Certification
• IEC 60079-0:2017
• IEC 60079-11:2011
• ATEX Certification
• EN 60079-0:2018
• EN 60079-11:2012
For connection to:
CLASS I, DIVISION 1, GROUP D (USA & CANADA)
CLASS I, ZONE 0, [AEx ia Ga] IIA (USA)
0°C ≤ Ta ≤ 54°C
FM18US0213
FM18CA0102
II (1) G [Ex ia Ga] IIA
0°C ≤ Ta ≤ 54°C
IECEx FMG 18.0022
FM18ATEX0053
CUS
2575

Warnings
43A5056B
Warnings
The following warnings are for the setup, use, grounding, maintenance, and repair of this equipment. The exclama-
tion point symbol alerts you to a general warning and the hazard symbols refer to procedure-specific risks. When
these symbols appear in the body of this manual or on warning labels, refer back to these Warnings. Product-specific
hazard symbols and warnings not covered in this section may appear throughout the body of this manual where
applicable.
INTRINSIC SAFETY
Intrinsically safe equipment that is installed improperly or connected to non-intrinsically safe equipment
will create a hazardous condition and can cause fire, explosion, or electric shock. Follow local
regulations and the following safety requirements.
• Be sure your installation complies with national, state, and local codes for the installation of electrical
apparatus in a Class I, Division 1, Group D, or Zone 0, or 1, Group IIA (as applicable) Hazardous Loca-
tion, including all of the local safety fire codes. For the United States, this includes NFPA 33, NEC 500
and 516, and OSHA 1910.107.
• Equipment that comes in contact with the G-Barrier’s intrinsically safe terminals must be rated for
Intrinsic Safety. This includes DC voltage meters, ohmmeters, cables, and connections.
• Do not install the G-Barrier, which is non-intrinsically safe, in a hazardous area, as defined in Article
500 of the National Electrical Code (USA) or your local electrical code.
• The G-Barrier must be properly grounded to be effective. For proper grounding, use the ground wire
provided (or a 12-gauge minimum ground wire), and the G-Barrier’s ground must be within 1 ohm of
true earth ground. For more information, see Installation.
• Do not operate the G-Barrier module with the cover removed.
• All electrical wiring must be done by a qualified electrician and comply with all local codes and regu-
lations.
• Do not alter or modify equipment. Alterations or modifications may void agency approvals and create
safety hazards.
Overview
3A5056B 5
Overview
The G-Barrier associated apparatus power supply has
three independent outputs with separate entity parame-
ters. The output barriers are all the trapezoidal type as
defined in EN 60079-25 Annex C. Additional features of
this module include:
• Wide input power range from 12V to 24V
• Regulated first stage
• Feedback controlled for high efficiency
• Overload protection against fuse damage
• Three independent outputs
• Feedback controlled for high efficiency and sta-
ble output
• Color-coded and keyed output connector
• Temporary short-circuit protection against fuse
damage
• DIN rail mounting
• Ground bond screw
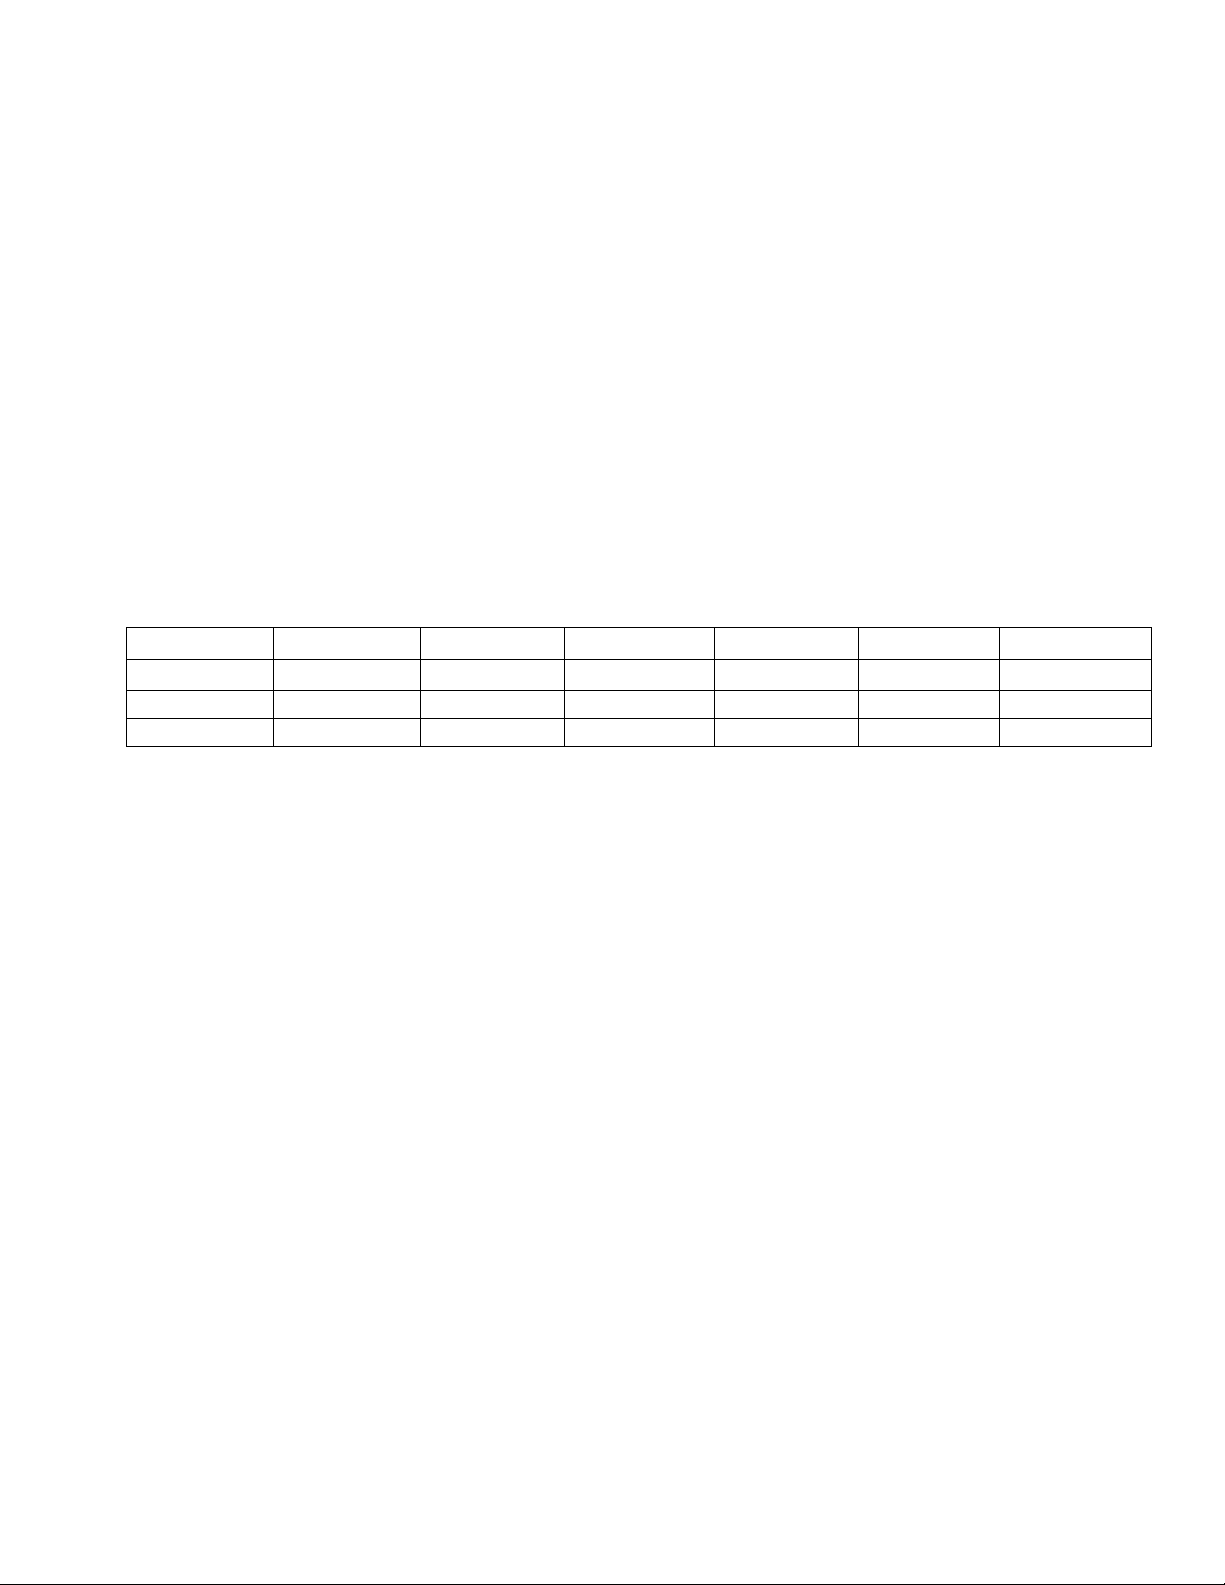
Power Barrier Output Parameters
Zones UoIoPoLoCoLo/Ro
Divisions Voc Isc PoLaCaLa/Ra
Units V mA W µH µF µH/Ohm
Value 16.4 592.2 2.82 64 2.4 76.2

Installation
63A5056B
Installation
• Do not connect the non-intrinsically safe terminals
(power rail) to any device that uses or generates
more than Um=250 Vrms or DC, unless the voltage
is adequately isolated.
• Installation in the United States must meet the
requirements of the National Electrical Code
(ANSI/NFPA 70) and Recommended Practice for
Wiring Methods for Hazardous (Classified) Loca-
tions Instrumentation Part 1: Intrinsic Safety
(ANSI/ISA-RP12.06.01).
• Installation in Canada must meet the requirements
of the Canadian Electrical Code, CSA C22.1, Part I,
Appendix F.
• For ATEX, install according to EN 60079-14 and
applicable local codes and regulations.
• For IECEx, install according to IEC 60079-14 and
applicable local codes and regulations.
• Multiple earthing of components is allowed only if a
high integrity equipotential system is realized
between the points of bonding.
• The G-Barrier does not provide galvanic isolation
from earth or between non-intrinsically safe and
intrinsically safe connections
• Install wiring associated with intrinsically safe chan-
nels A, B, C as separate intrinsically safe circuits
according to the applicable installation codes.
• The specified Ca, Co, La, Lo parameters take the
effects of combined external capacitance and induc-
tance into account. No further reduction in the spec-
ified Ca, Co, La, Lo parameters is required.
• Do not disassemble.
Do not substitute or modify system components as
this may impair intrinsic safety. Do not install equip-
ment approved only for a non-hazardous location in a
hazardous location.

Installation
3A5056B 7
Hazardous (Classified) Locations
Class 1, Division 1, Group D, (US and Canada)
Class 1, Zone 0 or Zone 1, Group IIA, (US and Canada)
Zone 0 or Zone 1, Group IIA (ATEX and IECEx)
FIG. 1: Typical Hazardous Location Installation
G-Barrier
To other
hazardous
locations
Non-Hazardous Location

Installation
83A5056B
Validating the Field Apparatus
Entity Parameters
The entity parameters of the barrier outputs must be
matched to the entity parameters of the field apparatus
power inputs.
The barrier outputs are defined using the symbols Uo,
Io, Po, Co, Lo, and Lo/Ro.
The barrier outputs are alternately defined using the
divisions symbols Voc, Isc, Po, Ca, La, and La/Ra.
The field apparatus power inputs are defined using a
combination of the symbols Ui, Ii, Pi, Ci, and Li. It is pos-
sible that all parameters are not defined. In some cases
the equivalent value can be calculated. Refer to the
appropriate installation standards if this is the case.
For an installation to be valid and safe, use the following
calculation methods. All calculation comparisons must
be true:
FIG. 2: Entity Parameters
clip
Parameter Zones Divisions
Voltage Uo ≤ UiVoc ≤ Umax
Current Io ≤ IiIsc ≤ Imax
Power Po ≤ PiPo ≤ Pi
Capacitance Co ≥ Ci + Ccable Ca ≥ Ci + Ccable
Inductance Lo ≥ Li + Lcable La ≥ Li + Lcable
Inductance to
Resistance
Ratio Lo/Ro ≥ Li/RiLa/Ra ≥ Li/Ri

Installation
3A5056B 9
Mounting and Dismounting to
DIN Rail
This device is intended to be mounted on a 35 mm stan-
dard DIN rail.
The DIN rail mounting clip on the device is
spring-loaded. No tool is needed to install or remove the
device.
A force of approximately 40 lbs (18 Kg-force, 180 N) is
necessary to compress the spring enough to allow the
DIN rail clip to be latched onto the rail.
The spring must be latched behind the edge of the DIN
rail to connect properly. See FIG. 3.
To remove the device from the DIN rail, pull down to
compress the spring, pull the bottom out to release it
from the rail, and lift it up off the top of the DIN rail.
FIG. 3: DIN Rail Mounting
Rail mounting
clip

Installation
10 3A5056B
Grounding
The G-Barrier must be bonded to an equipotential
grounding system capable of safely carrying any fault
currents with a total resistance from the barrier to the
grounding electrode not exceeding 1 ohm. The ground-
ing connection is not allowed to carry system supply
current in normal operation.
If the DIN rail is bonded to the system ground, then the
barrier connection through the DIN rail is adequate for
system ground.
NOTE: Always bond the G-Barrier to the ground screw.
The equipment must be grounded to reduce the risk
of static sparking and electric shock. Improper
grounding can cause electric shock. Grounding pro-
vides an escape wire for the electric current.
FIG. 4: Grounding, Example 1
HAZARDOUS LOCATION NON-HAZARDOUS LOCATION
TO FIELD APPARATUS CLASS 2
POWER
SUPPLY
TO FIELD APPARATUS
TO FIELD APPARATUS
Tabla de contenidos
Otros manuales de Equipo de seguridad de Graco


Manuales populares de Equipo de seguridad de otras marcas

Innova
Innova Xtirpa Manual de instrucciones

bolle SAFETY
bolle SAFETY B810 Manual de usuario

SHENZHEN FANHAI SANJIANG ELECTRONICS
SHENZHEN FANHAI SANJIANG ELECTRONICS A9060T Manual de usuario

Hiltron security
Hiltron security POWER8E Guía

Hatco
Hatco B-950P Manual de usuario

Sitec
Sitec TX MATIC Manual de usuario


