Grace Cutie Breeze Guía de configuración rápida

Assembly & Use Instructions
Copyright November 29, 2023 V1.5

My Frame Details
Use this page to record information about your frame. This will be helpful if you ever need to call a
Grace Company support technician.
Frame Type: ________________________________________
Date of Purchase: ____________________________________
What Machine are You Using? __________________________
Select Which Frame Accessories You Have Purchased:
Cutie Breeze
• Precision Cloth Leaders
• Quilter’s Creative Touch
(QuiltMotion)
• Pattern Perfect
• Power Strip Accessory
• Speed Control
• Gracie Laser
• SureStitch
• SureStitch Elite
• Luminess Light Bar
• Bungee Clamps
Save these instructions.
The last page of this booklet is for you to write any notes you want.

i
X
?
1-800-264-0644
The Cutie Breeze Quilting Frame has a one-year limited warranty on all parts. Grace
Company will repair or replace, at its discretion, any part with problems due to our
manufacturing or defects in materials. This warranty does not cover parts damaged
through misuse, improper storage, improper assembly, loss, natural events, and willful
destruction. Parts must be returned to Grace Company, shipping prepaid, before we
can repair or replace them. We will promptly return the repaired/replaced part at our
expense if done within a year of the purchase date.
Warranty Information

ii
We are pleased to introduce you to the newest part of your quilting setup. This frame has been
especially designed to help quilters like you have the tools available to create quality projects.
This manual is broken into four parts. Notications at the end of each part direct you to switch to
your machine manual or Quilter’s Creative Touch (QCT, formerly QuiltMotion) manual for instructions
on assembling those products. This creates a streamlined process of building a complete quilting
setup in the most ecient way. Use the following owchart to guide you in navigating multiple
manuals. If you are not using one of the products in the owchart, just move to the next item in
the chart.
Thank you again for choosing us to help your quilting projects. We look forward to working with you.
- Grace Company
Start Here: Frame Manual: Part One
• Assemble the frame’s tracks and sides.
• Install the carriage bumpers on the tracks.
• Align your tracks.
Quilting Machine Manual: Part One
• Install the lower encoder onto the bottom
carriage.
QCT Manual: Part One
• Prepare the bottom carriage.
• Install the long belt across the frame.
Quilting Machine Manual: Part Two
• Install your machine’s wheels.
• Align your wheels.
QCT Manual: Part Two
• Install the short belt.
• Tension the short belt.
Welcome to Your Cutie Breeze Frame

iii
Frame Manual: Part Two
• Prepare the top plate and wheel-less quilting
machine.
• Place the machine or top plate on the frame.
Quilting Machine Manual: Part Three
• Install the wheel covers, display, handles, and
thread mast.
• Install the upper encoder.
Frame Manual: Part Three
• Install the rails.
• Position and adjust the rails.
• Adjust the carriage stop.
QCT Manual: Part Three
• Install the tablet bracket.
• Plug in QuiltMotion.
• Use the quilting modes and settings in the
display.
• Maintain the machine and perform repairs.
Quilting Machine Manual: Part Four
Frame Manual: Part Four
• Attach the fabric.
• Prepare to quilt.
• Move zones.

iv
Warranty Information............................................................................................................. i
Welcome to Your Cutie Breeze Frame......................................................................................ii
Included Parts and Tools ........................................................................................................v
Part One .......................................................................................... 1
Task 1 - Attaching the Tracks to the Side Walls ....................................................................... 2
Task 2 - Aligning the Tracks with the Bottom Carriage ............................................................. 5
Part Two ........................................................................................ 10
Task 3 - Attaching the Handles to the Top Plate .....................................................................11
Task 4 - Installing Your Machine............................................................................................15
Part Three...................................................................................... 19
Task 5 - Adjusting the Rail Holders........................................................................................20
Task 6 - Attaching the Front Rail ...........................................................................................22
Task 7 - Installing and Adjusting the Take-Up Rail ..................................................................25
Task 8 - Managing the Foot Pedal Cable ................................................................................30
Task 9 - Changing the Location of the Carriage Stop Clip ........................................................35
Task 10 - Adjusting the Carriage Stops ..................................................................................37
Part Four........................................................................................ 39
Task 11 - Preparing Your Sewing Machine for Quilting ............................................................40
Task 12 - Preparing Your Quilt ..............................................................................................41
Task 13 - Attaching Your Quilt...............................................................................................43
Task 14 - Tacking Down Your Quilt ........................................................................................47
Task 15 - Marking the Safe Area ...........................................................................................48
Task 16 - Starting and Ending Your Designs...........................................................................52
Task 17 - Moving Your Quilt to a Dierent Zone .....................................................................58
Accessories - Encoder Installation .........................................................................................61
Notes..................................................................................................................................65
Table of Contents

v
Included Parts and Tools
Front Rail Front Fabric Clamp
(x2, on Front Rail)
Back Fabric
Clamp (x3)
Side Fabric Clamp
(x2, on Rail Holders)
Side Wall (Left) Bottom Carriage
Rail Holder (Left) Side Wall (Right)
Top Plate
Rail Holder (Right)
Handle Bracket
Handle (x2)
Take-Up RailTrack (x2)
QTT-09-17750 QTT-05-17695
QTT-05-17696
QTT-05-17697
QTT-09-17752 QTT-09-17753
QTT-09-17761 QTT-09-17760
QTT-09-17757
QTT-09-17758
QTT-09-17751
QTT-09-17762
QTT-04-17703QTT-09-17759
Main Box
Accessory Box 1
Mini Clips
(x3)
PLA-05-11593
L-Class Bobbin Holder
(in Handle Bracket)
QTT-05-17732

vi
Included Parts and Tools (continued)
SBHCS
M4 x 25 mm (x2)
Allen Wrench
2.5 mm
HDW-03-12240
HDW-03-10165
Socket FHS
M4 x 16 mm (x4)
HDW-03-12124
Socket FHS
M4 x 35 mm (x2)
HDW-03-17868
Threaded Rubber
Bumper M4 (x2)
HDW-03-17885
Securing Pin (x4)
QTT-05-17734
Sewing Machine
Clamp (x4)
QTT-09-17756
Coil Clamp (x3)
QTT-05-17733
Hardware Bag (in Accessory Box 1)
Accessory Box 2
Accessory Box 1 (continued)
M-Class
Bobbin Holder
QTT-05-17731
Zip Tie Mount
MIS-08-10805
Zip Tie (x2)
MIS-08-10804

1
Part One
Complete Part One of these instructions before assembling your quilting machine or any accessories.
At the end of each part, you will be instructed to switch to specic sections of your machine manual
or accessory manuals. If you’ve purchased those products and are preparing to install them, go
to the specied sections in those manuals. If you are not using those products, simply skip those
sections and continue in this manual.
Task 1 - Attaching the Tracks to the Side Walls.................................................................. 2
Task 2 - Aligning the Tracks with the Bottom Carriage ...................................................... 5
Part One
2
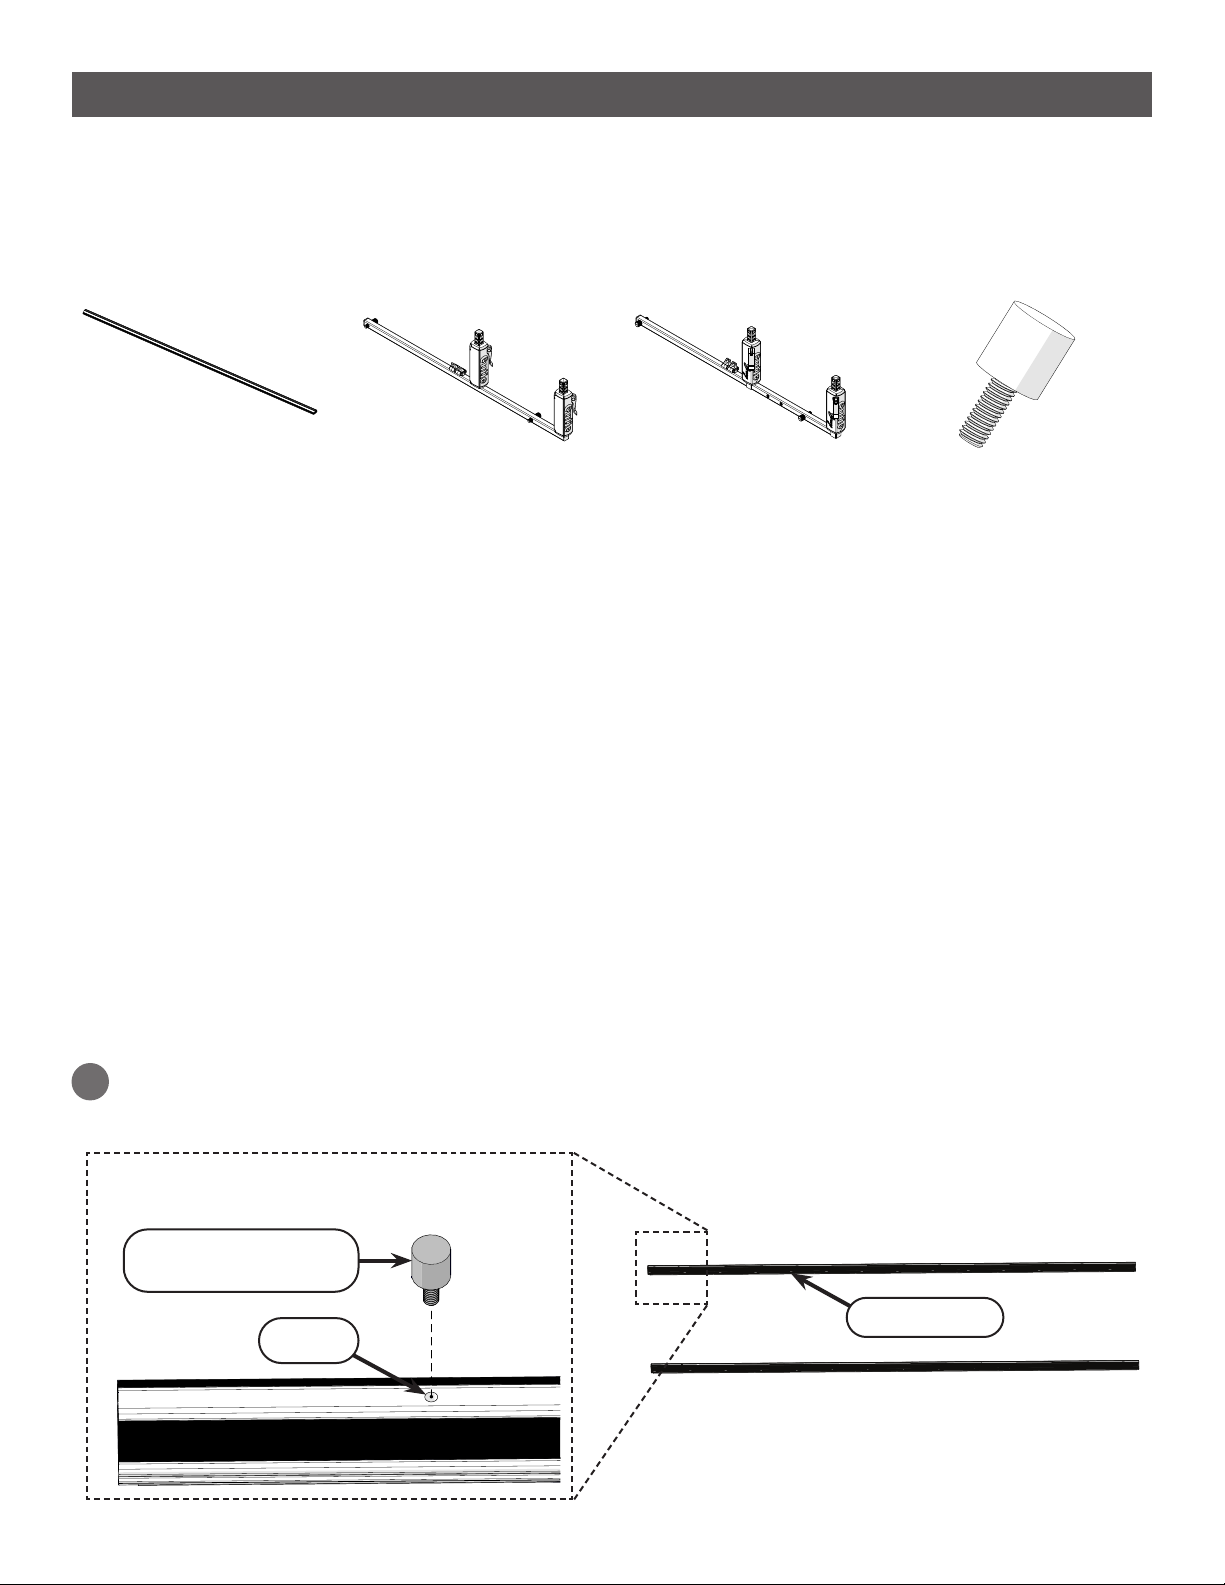
Task 1 - Attaching the Tracks to the Side Walls
Parts & Tools Needed
Tracks (x2) Side Wall (Right) Side Wall (Left) Threaded Rubber
Bumper M4 (x2)
Instructions
When fully assembled, the Cutie Breeze frame is 52 inches (4 feet 4 in.) across, and 27 inches deep.
However, you can use a work surface that is 23 inches deep, which is the distance between the two
tracks, as some of the frame can hang over the edge of your work surface without any issues.
After you nish task 1, you will know the size of the frame and can conrm that your work surface is
the correct size.
Take the following steps to attach the tracks to the side walls:
Locate the hole on each track. Use your hand to screw an M4 threaded rubber bumper
into both holes.
1
Part One
Track (x2)
Hole
Threaded Rubber
Bumper M4
Tabla de contenidos


