Gnet GF500 Manual de usuario

G-Net system DASH CAM
USER MANUAL
Read user manual carefully in order to protect
the user’s safety and ensure the accurate use of the product
2CH Wi-Fi Smart DASH CAM User Manual

WARRANTY
10. BEFORE WI-FI CONNECTION
11. WI-FI CONNECTION &
FUNCTION
··········· 34
··········· 35
WI-FI CONNECTION WITH iOS AND ANDROID
CAUTION FOR SAFE USE
CAUTION FOR MEMORY CARD
1. PRODUCT FEATURES
2. COMPONENT
3. NAME OF EACH PART
4. SPECIFICATION
5. INSTALLATION
BEFORE USE
BASIC FUNCTION
··········· 01
··········· 02
··········· 03
··········· 04
··········· 05
··········· 06
··········· 07
··········· 09
··········· 29
6. HOW TO USE
7. MEMORY CARD VIDEO FOLDER
PC VIEWER FUNCTION
··········· 30
··········· 32
8. PC VIEWER INSTALLATION
9. PC VIEWER FUNCTION
CONTENTS G-Net system DASH CAM

Do not shock and insert foreign material.
Video quality and GPS signal reception may be affected by dark tint or special windshield.
Refrain from dark tint or special windshield.
Do not control Dash cam while driving for safe driving.
Check always time. If don't use Dash cam for long time. Dash cam would be initialized except connecting External GPS.
If exposed by direct sunlight, temperature in car would be high. So Memory card error and camera image distortion are likely to happen.
In case that parking car outside for long period. We highly recommend that pull off power cable from power terminal of Dash cam.
Avoid high temperature and high humidity which exceed Dash cam specification.
Periodically check Dash cam operation.
Before driving, periodically check Rear cam operation through Live function on LCD. If Rear cam is defective,
Voice guide goes off once. And then, Rebooting dash cam, it only record front cam.
▶ All copyrights reserved to GNET SYSTEM.
▶ If you take illegal action(copy, modification, distribution) without prior consent by GNET SYSTEM.
GNET SYSTEM will apply legal sanctions.
CAUTION FOR SAFE USE
01
Check
G-Net system DASH CAM

There is the lifetime of memory card for writing & reading which is expendable product.
Please purchase genuine Gnet memory card for preventing incompatibility problem
Warranty of memory card is covered only when using genuine memory card which is designated and supplied by GNET SYSTEM.
When car accident, recommend get memory car out of Dash cam. Then save video data to your computer.
After time pass, video data will be overwritten. Accident video is likely to erase.
Please make sure to remove memory card, after turning Record LED off.
- Video data is possible to be damaged. It cause defective memory card or shorten lifetime of memory card.
If memory card has different data which isn't related data for Dash cam. The Dash cam automatically erase different data for keeping video data stable.
(Do not use memory card for different purpose.)
Don't need to format Memory card periodically. However, recommend formatting memory card over 1time every month for maintenance.
- Recommend you format or check memory card through SD formatter program (www.sdcard.org).
Recommend using Gnet genuine memory card.
If you use other brand Memory card, compatibility problem would be faced with Dash cam.
Support memory card Min: 4GB Max: 128GB.
In case that first use of Memory card or after format. Memory card will be standby mode for 3min ~ 5min to copy JDR File system and inspect
Memory card. Do not remove Memory card during standby mode and format.
CAUTION FOR MEMORY CARD
02
G-Net system DASH CAM

1. PRODUCT FEATURES
03
Voice Guide & Record Support
Built-in Microphone
Wi-Fi function : Communication with your
iOS & Android Device Check Video/
Save Video to your device/ Change setting
/Update latest Firmware
Communication distance: 3m~5m
Depending on environment,
communication distance would be affected
Sony EXMOR CMOS Sensor
Super Clear Image Quality
Front : Full HD 1080p
Rear : Full HD 1080p
Decent Video Quality
Keep Video safe.
In case of sudden power cut off
Touch Screen LCD for simple use
Auto Recovery System of Memory card
Auto Recovery for DATA error
SONY
EXMOR
SENSOR
Intelligent Security LED
Depending on recording
type Security LED shows different type of light flicker
Format Free Function
Don't need to format Memory card periodically
Keep Running Memory card safe
G-Net system DASH CAM
G-Net system DASH CAM
USER MANUAL
Read user manual carefully in order to protect
the user’s safety and ensure the accurate use of the product
2CH Wi-Fi Smart DASH CAM User Manual
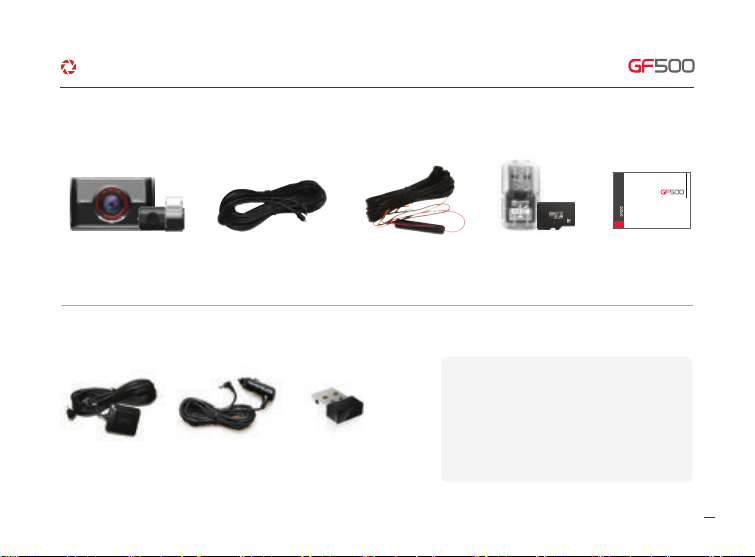
2. COMPONENT
04
Optional product is sold separately
Front cam / Rear cam
(Including bracket)
Rear cam connection cable
(Connecting between Front
cam and Rear cam)
Direct power cable USB Reader
Micro SD Memory card
User Manual
·Optional Product
External GPS Cigar jack power Cable Wi-Fi dongle
·Basic Components
※The image of components may be different from
the real components.
※Specifications and Components are subject to
change without notice for improving quality.
※Highly recommend using Gnet Genuine Memory
card that Gnet supplied.
G-Net system DASH CAM

3. NAME OF EACH PART
05
·Rear cam
·Front Cam
① Micro SD Memory card cover
② Power on off Bottom
③ Speaker ④ Camera lens
⑤ Security LED
1 2 3
① LED ② Camera lens
③ Front cam connection terminal
⑪ Rear cam connection terminal ⑫ External GPS connection terminal⑩ DC-IN
⑥ Wi-Fi USB
- Put Power Bottom for 3seconds → Power off
- After Power off. Put Power bottom → Power on
⑦ GPS LED
⑧ Record LED
⑨ LCD
4
5
3
1
6
10 11 12
2
7
8
9
G-Net system DASH CAM

4. SPECIFICATION
06
※Specifications and components are subjected to change without notice for improving quality.
Image Sensor
Audio input
Video Compression
Audio Compression
Resolution
FPS
Wi-Fi
G-Sensor
Voice Guide(Speaker)
External GPS Sensor
Lens Angle
Viewer
Power
Operation
Humidity
LCD(Touch)
Full HD SONY EXMOR Image Sensor
Built in Microphone
H.264
ADPCM
Front cam Full HD(1920x1080) / Rear cam Full HD(1920x1080)
Front cam : Max 30fps, Rear cam : Max 30fps
Communication with your iOS & Android (3m~5m)
3Axis Acceleration(3D,x,y,z) Event record by External Shock
Inform operational Status / Voice guidance
Synched with Google map, Keep track of location and Speed
160°
Windows10/ Support over OSX 10.7
DC 12V - 24V
-25℃ ~ 80℃
10~95%
480X320 IPS LCD Panel (Touch type)
Power buttony Put power button for 3sec → Power off / After power off. Put power button → Power on
G-Net system DASH CAM
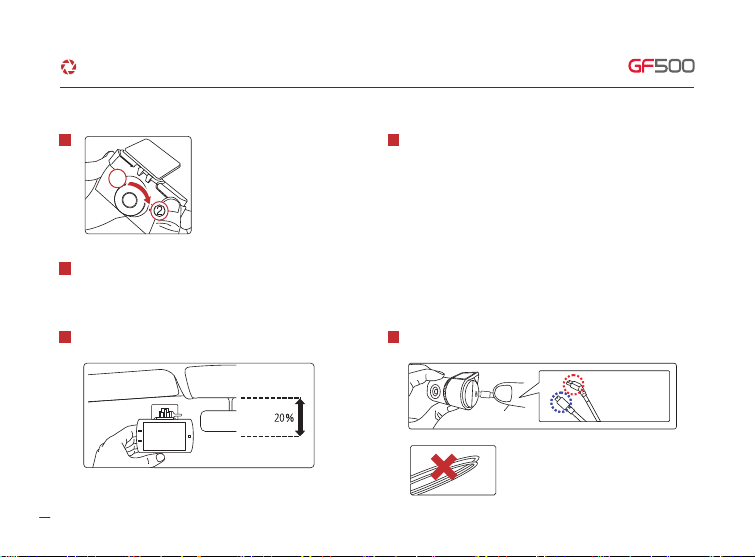
5. INSTALLATION
07
Put Memory card into Memory card slot then detach adhesive tape.
Install Front cam to Front windshield,then adjust the right angle position.
Connect direct power cable to Fuse box in car.
(Connect Power cable and Rear cam connection cable in each terminal.)
Continuous recording. even if turn off ignition
Black cable(Ground) : It should connect to ground in car
Yellow cable(VCC) : It should connect continuous power supply
of fuse in fusebox (ex : Boot, Emergeny light, Door lock)
Red cable (ACC ) : It should connect to power supply of fuse which
is supplied with power. when turn on ignition (ex : Cigar light fuse etc)
※ How to connect direct power cable (3way wire)
1 4
2
3
Detach Adhesive type from Rear cam bracket, then install Rear cam
to back windshield.
5
·How to install the Dash cam
※Caution. In case that Rear cam connection
cable completely is curved as left picture.
It causes Video data flow to interrupt.
Assemble the Front cam with a
bracket. Until come sound of click
according to the order (①, ②)
*Front cam (curved cable)
*Rear cam (straight cable)
G-Net system DASH CAM
①
②

08
5. INSTALLATION
Tuck Power cable and Rear cam connection cable to
roofline and pillar.
6
Misplacing memory card causes Dash cam to not record video data. Therefore, Insert memory in right position.
In case that first use Memory card or after format, memory card will be standby mode for 3min ~ 5min to Copy JDR File system and inspect Memory card.
After voice guide of "start recording" comes. Dash cam starts recording.
·Insert Memory card
Before use memory card,
you should be aware of
caution as below.
※ Caution of installing Dash cam.
▶
Do not install Dash cam outside.
▶
Do not place Dash cam on Driver's View.
·How to install the Dash cam
※Caution : few car navigations may face
GPS reception of interruption. When installing
Power cable and Rear cam connection
cable. Recommend installing each cable in
the opposite direction. For instance, Power
cable is toward driver seat and rear cam
connection cable is toward passenger seat.
G-Net system DASH CAM
Tabla de contenidos
Otros manuales de Cámara de salpicadero de Gnet


