Gira System 3000 Manual de usuario

Operating instructions
for the Gira Bluetooth app

Gira Bluetoorh app 2
1 User interface ....................................................................3
1.1 Structure of the user interface ............................................................ 3
1.2 Navigation bar ..................................................................................... 4
1.3 Action area .......................................................................................... 4
1.3.1 Tile view ......................................................................................... 5
1.3.2 Detail view ...................................................................................... 6
2 Settings in the system menu .............................................9
2.1 View configuration .............................................................................. 9
2.1.1 Select home .................................................................................. 10
2.2 Devices .............................................................................................. 10
2.2.1 Pairing devices ............................................................................. 11
2.2.2 Unpairing devices ......................................................................... 12
3 Setting device parameters ...............................................13
3.1 Timer ................................................................................................. 13
3.1.1 Creating a switching time ............................................................ 14
3.1.2 Setting the astro function ............................................................. 16
3.1.3 Deleting a switching time ............................................................. 18
3.1.4 Activating and deactivating all switching times for a function .... 19
3.2 Brightness and temperature sensor Bluetooth ................................. 20
3.2.1 Teach in ........................................................................................ 21
3.2.2 Setting dawn and dusk ................................................................ 22
3.2.3 Sun protection .............................................................................. 23
4 Warranty ..........................................................................25

Gira Bluetoorh app 3
1
User interface
1.1
Structure of the user interface
Note
Differences in the views
The figures in the tile or detail views may differ from the views in your project.
Different operating and control options are available according to the combina-
tion of insert and top unit. Accordingly, this document refers only to the basic
functions.
The user interface is divided into four areas:
[1] Status bar
[2] Navigation bar [see 1.2]
[3] Action area [see 1.3]
[4] Orientation guide
At the lower edge of the screen you will see a circle for every available func-
tion or page. The circle marked shows the current position. By swiping hori-
zontally, you can change the function or page. This also causes the marked
circle to shift.
Fig. 1
User interface
[1]
[2]
[3]
[4]

Gira Bluetoorh app 4
1.2
Navigation bar
The buttons in the navigation bar have the following functions:
[1] [Back] opens the previously opened page
[2] [Home] opens the home page of the action area
[3] [System] opens the [Settings] view
[4] [Change view] switches between tile and detail view
1.3
Action area
The action area is the central working area through which you can operate and
adjust the settings of the System 3000 Bluetooth devices. You can operate all
devices here.
The action area has two view options:
- Tile view
- Detail view
The first page of the action area is the [Home] page.
Fig. 2
Navigation bar
[1] [2] [3] [4]

Gira Bluetoorh app 5
User interface
1.3.1
Tile view
Tile view is one of the two view options of the action area, along with detail view.
In tile view you can display up to six small tiles per page.
Operation in tile viewCentral functions such as switching on and off, raising or lowering the blinds or
dimming in fixed steps can be operated directly in tile view. To do so, tap the
plus/minus or arrow buttons to dim the light or move the blinds/shutters.
When you tap a tile, the detail view of the function opens. There (depending on
the configuration) you can carry out additional operations in the function.
Note
Bluetooth connection in tile view
During operation in tile view, a Bluetooth connection must be established to the
device before an action is executed. You will therefore notice a delayed response
to your operation.
Fig. 3
Examples of tile view

Gira Bluetoorh app 6
User interface
1.3.2
Detail view
Detail view is one of the two view options of the action area, along with tile view.
Detail view is opened by tapping a tile in tile view. All operating elements of the
relevant function are then available on the entire display. Operation for most
functions is by tapping, with some functions, such as the blind control, distin-
guishing between a short and long press of the button. The following sections
deal with some special features of operation.
Horizontal swipingYou can switch from one function to the next with a horizontal swiping move-
ment of the finger.
Note
Bluetooth connection in detail view
If you switch to detail view, a Bluetooth connection to the device is already es-
tablished in the background. This is indicated by the illuminated blue LED. The
functions therefore run without any noticeable delay.
The symbols in the detail view have the following meanings:
[1] Set device parameters [see 3]
[2] Bluetooth connection active
[3] Timer (System 3000 Blind timer and timer Bluetooth)
Fig. 4
Operating elements in
the detail view
[1]
[2]
[3]

Gira Bluetoorh app 7
User interface
Adjustable scaleThe adjustable scale can be used in the [Dimmer] function. To adjust the bright-
ness, tap directly on the desired value in the scale or move the adjustable scale
to the desired position.
Fig. 5
Examples of detail
view

Gira Bluetoorh app 8
User interface
Blind/shutters
Operation using slide
control
You can control blinds or shutters in the detail view using the slide control or
rocker. To move blinds or shutters up or down or adjust the slats, slide the con-
troller to the desired position.
Stop buttonWhen you tap the [STOP] button, you can directly stop active movement of the
hanging or a slat adjustment. The hanging then stops immediately at its current
position.
Fig. 6
Detail view
Operation using slide
control
Fig. 7
Detail view
Operation using
rocker

Gira Bluetoorh app 9
Settings in the system menu
2
Settings in the system menu
Basic settings can be accessed in the system menu.
1 Open the system menu by tapping the gear symbol in the navigation bar.
The following functions are available in the system menu:
- View configuration [see 2.1]
- Devices [see 2.2]
- License agreement
2.1
View configuration
In the view configuration, you define the functions displayed and the order of the
functions for the action area.
1 Tap the [View configuration] button.
The [View configuration] page opens.
The following menu item is available:
- Select home [see 2.1.1]
Fig. 8
View [Settings]
Fig. 9
View configuration
Gira Bluetoorh app 10
Settings in the system menu
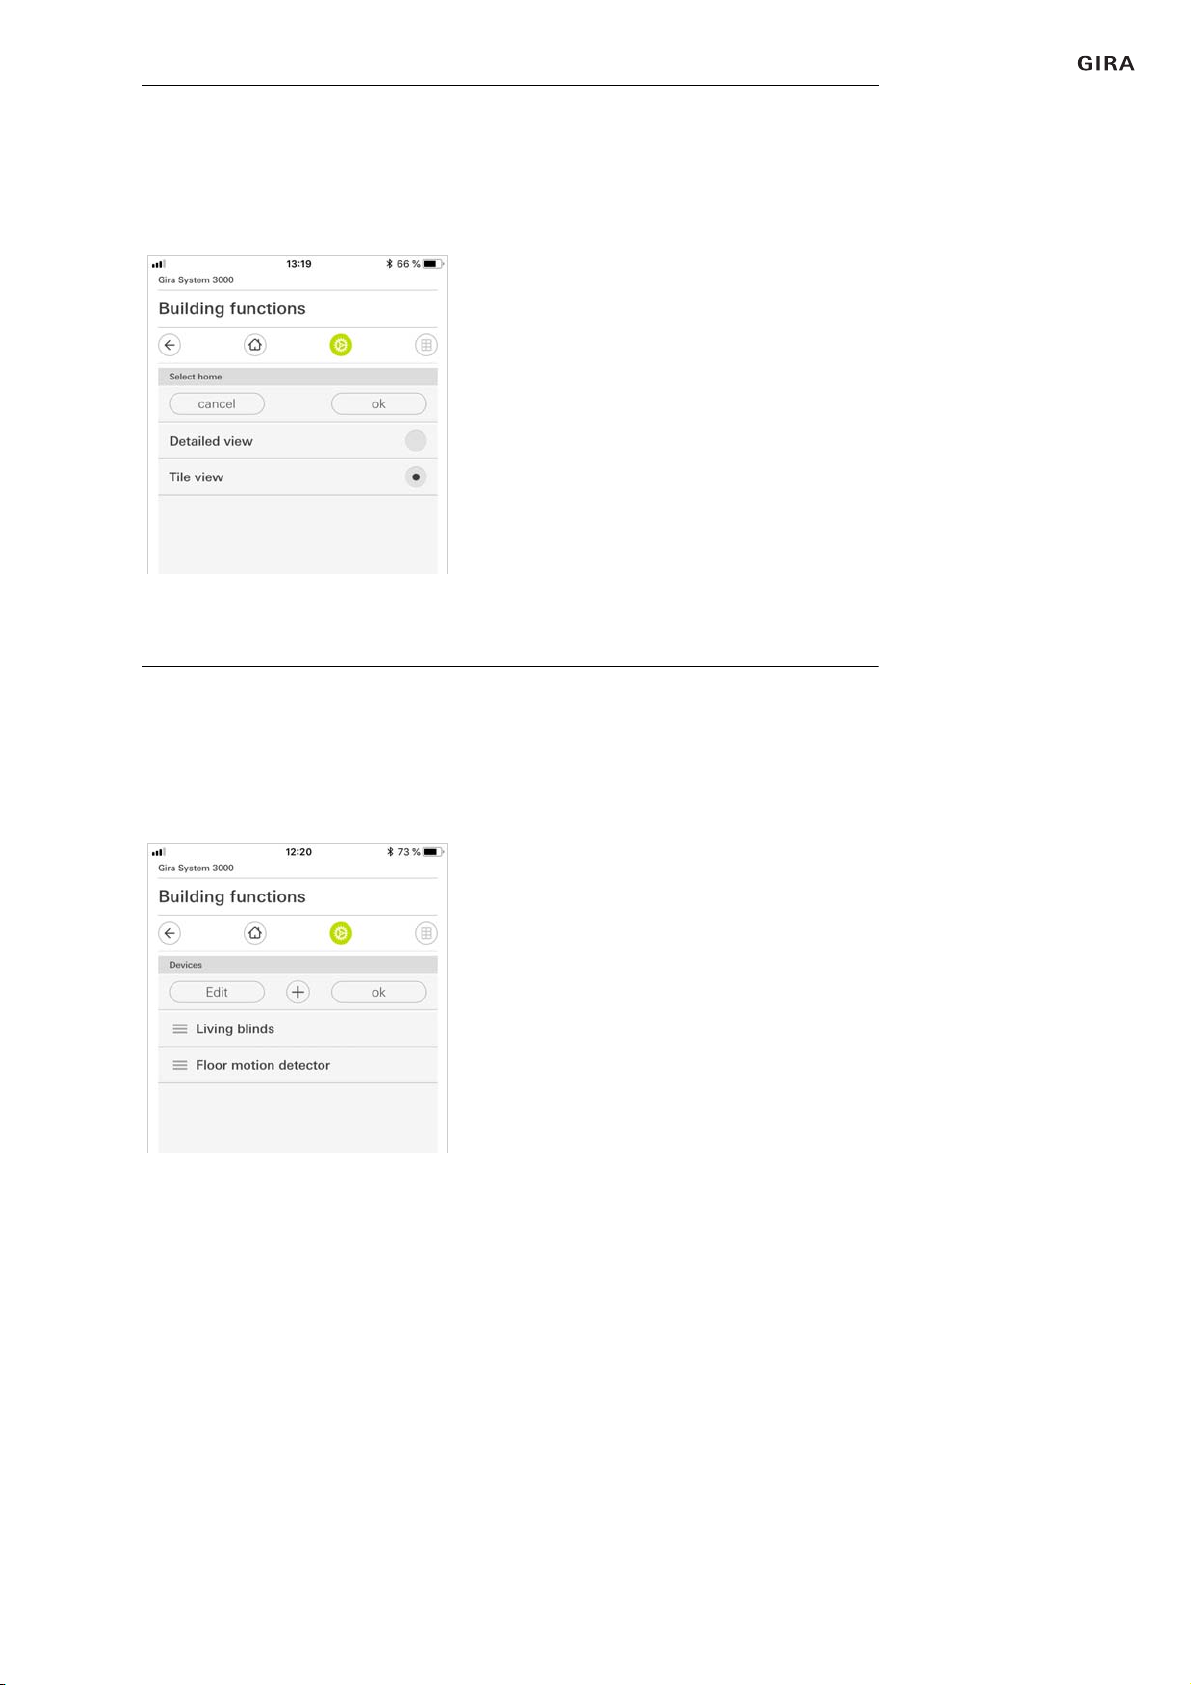
2.1.1
Select home
Here you can define whether the Home view is displayed in tile or detail view
when the Home button is tapped.
1 Select the desired view for the Home view.
2 Tap the [OK] button.
2.2
Devices
A list of your Gira System 3000 Bluetooth devices is displayed here. You can pair
new devices here or unpair existing ones.
The following options are available:
- Pair devices [see 2.2.1]
- Unpair devices [see 2.2.2]
Fig. 10
Select home
Fig. 11
Device menu
Otros manuales para System 3000
12
Tabla de contenidos
Otros manuales de Panel de control de Gira


