
Gima OGM-211 Manual de usuario

i
Blood Glucose Monitoring System
Self monitoring of blood glucose (SMBG) is an integral part of diabetes care, but
the high cost of testing can make this impossible. At GIMA, our goal is to provide
high quality glucose monitoring at a price that allows you to test as often as
necessary. Together, we can better manage your diabetes and help you live a
longer and healthier life.
Welcome, and thank you for choosing the GIMA Blood Glucose Monitoring
System. The GIMA Blood Glucose Monitoring System will give you accurate blood
glucose results from Capillary, Arterial, Venous and Neonatal blood samples in just
a few simple steps. GIMA may be used by people with diabetes at home and by
healthcare professionals for the quantitative measurement of glucose in capillary
whole blood from the finger, forearm, and palm. Only professionals may also test
neonatal, arterial and venous blood samples.
To ensure accurate results from your GIMA Blood Glucose Monitoring System,
please follow these guidelines:
Read instructions before use.
Use only GIMA Blood Glucose Test Strips with the GIMA Blood Glucose
Meter.
For in vitro diagnostic use only. Your blood glucose monitoring system is to be
used only outside the body for monitoring the effectiveness of diabetes control.
It should not be used for the diagnosis of diabetes.
For self testing and professional use.
Test only whole blood samples with the GIMA Blood Glucose Test Strips and
Meter.
For self-testers, consult your physician or diabetes healthcare professional
before making any adjustments to your medication, diet or activity routines.
Keep out of reach of children.
By following the instructions outlined in this User's Manual, you will be able to use
your GIMA Blood Glucose Monitoring System to monitor your blood glucose and
better manage your diabetes.

ii
Table of Contents
Getting Started .................................................................................................... 1
Component Descriptions ............................................................................ 2
GIMA Blood Glucose Meter ........................................................................ 3
Meter Display ............................................................................................. 5
GIMA Blood Glucose Test Strips ................................................................ 7
GIMA Glucose Control Solution .................................................................. 9
Installing the Battery ......................................................................................... 11
Meter Setup Before Testing ..............................................................................12
Performing a Quality Control Test ....................................................................19
Testing Your Blood ............................................................................................22
Step 1 – Getting a Drop of Blood ...............................................................22
Step 2 – Testing Blood Glucose ................................................................27
“HI” and “LO” Messages ............................................................................30
“Hypo” and “Hyper” Messages ..................................................................30
“Ketone” Message .....................................................................................31
Using the Meter Memory ...................................................................................32
Viewing Stored Records ............................................................................32
Clearing the Memory .................................................................................34
Transferring Records.................................................................................34
Maintenance .......................................................................................................36
Replacing the Battery ................................................................................36
Caring for Your GIMA Blood Glucose Monitoring System ..........................37
Suggested Testing Times and Target Goals....................................................38
Comparing Meter and Laboratory Results .......................................................39
Troubleshooting Guide .....................................................................................40
Specifications ....................................................................................................42
Warranty .............................................................................................................43
Index of Symbols ...............................................................................................44
Index ...................................................................................................................45
1
Getting Started
Before testing, read the instructions carefully and learn about all the components
of your GIMA Blood Glucose Monitoring System. Depending on the GIMA product
you purchased, some of the components may need to be purchased separately.
Please check the list of contents on the outer box for details on which components
are included with your purchase.
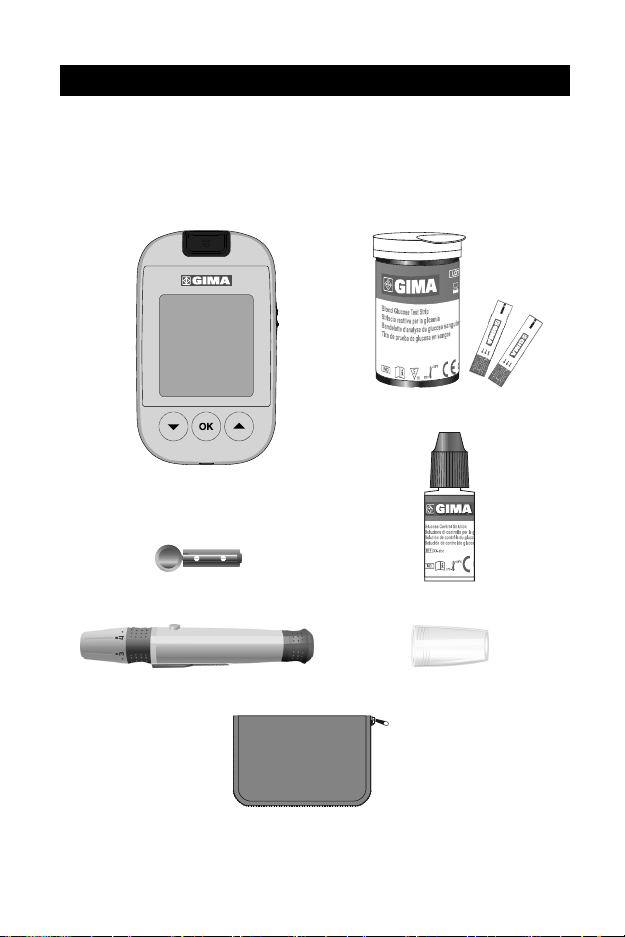
Lancing Device
Sterile Lancet
Carrying Case
Blood Glucose Meter
Clear Cap
Control Solution
Test Strips

2
Component Descriptions
1. Blood Glucose Meter: Reads the test strips and displays the blood glucose
concentration.
2. Test Strips: Strips with a chemical reagent system used with the meter to
measure glucose concentration in blood.
3. Lancing Device: Used with sterile lancets to prick the fingertip blood sample
collection. The packaged lancing device has multiple depth settings, allowing
users to adjust the depth of the puncture and minimize discomfort. It can also
eject the used lancets.
4. Clear Cap: Used with the lancing device and sterile lancet to draw a blood
sample from the forearm or palm.
5. Sterile Lancets: Used with the lancing device to draw a blood sample. Sterile
lancets are inserted into the lancing device with each blood draw and
discarded after use.
6. Control Solution: Verifies the proper operation of the blood glucose monitoring
system by checking the test strips and meter against a pre-calibrated control
solution. Control Solution 1 is all you need most of the time. If you want to do
additional levels of test, Control Solution 0 and Control Solution 2 are
available. The three levels of control solution, CTRL 0, CTRL 1 and CTRL 2
are available in the GIMA Glucose Control Solution package which is sold
separately.
7. Carrying Case: Provides portability for blood glucose testing wherever you go.
8. User's Manual: Provides detailed instructions on using the blood glucose
monitoring system.
9. Quick Reference Guide: Provides a brief overview of the blood glucose
monitoring system and testing procedures. This small guide can be kept in
your carrying case.
10. Warranty Card: Should be completed and returned to the distributor to qualify
for the 5-year meter warranty.
3
GIMA Blood Glucose Meter
The meter reads the test strips and displays the blood glucose concentration. Use
these diagrams to become familiar with all the parts of your meter.
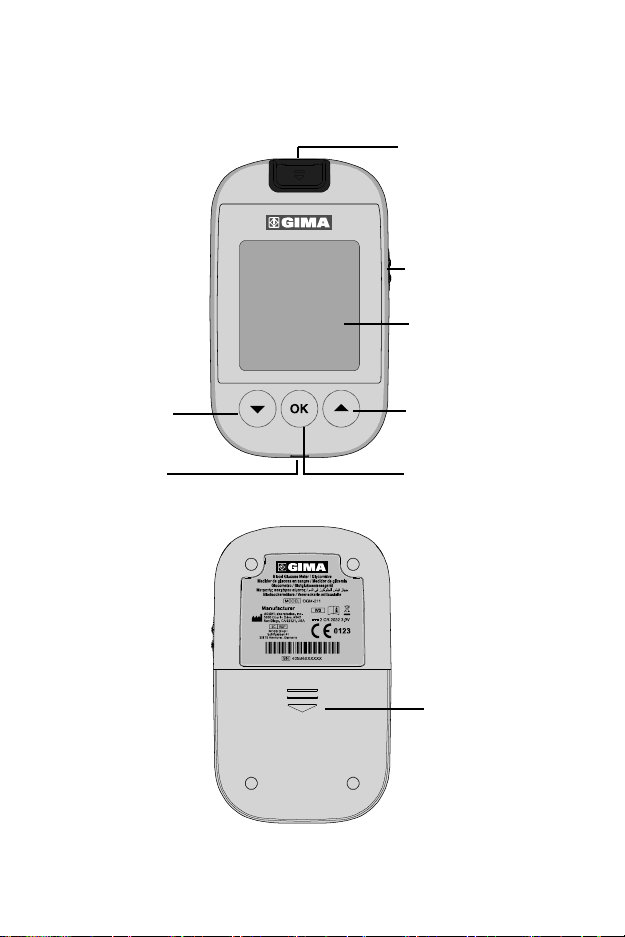
Strip Port
Strip Ejector
Liquid Crystal
Display (LCD)
▲Button
OK Button
▼Button
Data Port
Battery Cover

4
Strip Port: Test strips are inserted into this area to perform a test.
Strip Ejector: Slide the ejector forward to discard the used test strip.
Note: Dispose of blood samples and materials carefully. Treat all blood samples
as if they are infectious materials. Follow proper precautions and obey all local
regulations when disposing of blood samples and materials.
Liquid Crystal Display (LCD): Shows your test results, and helps you through
the testing process.
▼Button: Recalls previous test results from the meter memory and performs
other menu selection functions.
▲Button: Selects meter settings and performs other menu selection functions.
OK Button: Used to manually turn the meter on or off, check the display to
confirm that all the display segments turn on, and check the date/time.
Data Port: Sends information to a computer via an optional data transfer cable to
view, analyze and print stored data in the meter. The data transfer cable is
available for order as an optional add-on.
Battery Cover: Remove the battery cover to install two CR2032 coin cell
batteries.
5
Meter Display
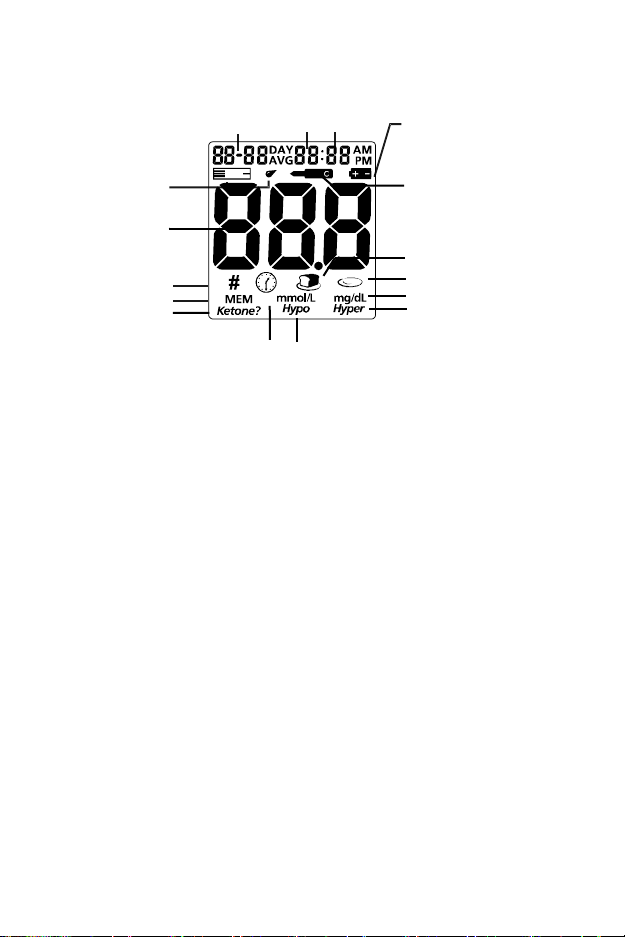
Battery Symbol: Warns when you should replace the battery.
Control Solution Symbol: Indicates a control test result. A pound sign (#) will
also be displayed when control solution symbol appears.
Before Meal Symbol: Appears when you mark the result as a before-meal test
results.
After Meal Symbol: Appears when you mark the result as an after-meal test
results.
Measurement Unit: Only one unit will be displayed on your meter and cannot be
adjusted.
Hyper Symbol: Appears when the blood glucose concentration is above the
target “Hyperglycemia” (high blood sugar) level that you have set.
Hypo Symbol: Appears when the blood glucose concentration is below the
“Hypoglycemia” (low blood sugar) target level that you have set.
Test Remind Symbol: Reminding you to test blood glucose.
Blood Drop / Strip Symbol: Wait for the Blood Drop / Strip Symbol to appear
before applying the sample. These two symbols appear at the same time to tell
you when to apply the sample.
Test Result Area: Indicates test result.
Pound Sign (#): Appears with the control solution test result or when you mark an
invalid result to prevent it from being included in the average.
MEM: Shows a test result stored in memory.
Ketone: Appears when the blood glucose concentration is above 16.7 mmol/L
(300 mg/dL). This simply suggests that a ketone test is recommended. Consult
Test Remind Symbol Hypo Symbol
Battery Symbol
Control Solution
Symbol
Before Meal Symbol
After Meal Symbol
Measurement Unit
Hyper Symbol
Date Hour Minutes
Blood Drop /
Strip Symbol
Test Result
Area
Pound Sign (#)
Memory
Ketone

6
your healthcare professional about testing for ketones.
Note:This symbol does not mean that the system has detected ketones. It
recommends that a ketone test should be taken.
Meter Use and Precautions
Wait for the Blood Drop and Strip Symbol to appear together before applying
the sample.
The meter is preset to display blood glucose concentration in either millimoles
per liter (mmol/L) or milligrams per deciliter (mg/dL) depending on which unit
of measure is standard in your country. This unit of measure cannot be
adjusted.
Meter will shut off automatically 2 minutes after inactivity.
Do not get water or other liquids inside the meter.
Keep the strip port area clean.
Keep your meter dry and avoid exposing it to extreme temperature or humidity.
Do not leave it in your car. Please use the meter indoor.
Do not drop the meter or get it wet. If you do drop the meter or get it wet,
check the meter by running a quality control test. Refer to Performing a
Quality Control Test on page 19 for instructions.
Do not take the meter apart. Taking the meter apart will void the warranty.
Refer to the Maintenance section on page 36 for details on cleaning the
meter.
Keep the meter and all associated parts out of reach of children.
Note:Follow proper precautions and all local regulations when disposing of the
meter and used batteries.
All Glucose Systems Preventive Warnings with Regard to EMC:
This instrument is tested for immunity to electrostatic discharge as specified in
IEC 61000-4-2. However, use of this instrument in a dry environment,
especially if synthetic materials are present (synthetic clothing, carpets, etc.)
may cause damaging static discharges that may cause erroneous results.
This instrument complies with the emission and immunity requirements
described in EN61326-1 and EN61326-2-6. Do not use this instrument in
close proximity to sources of strong electromagnetic radiation, as these may
interfere with proper operation of the meter.
For professional use, the electromagnetic environment should be evaluated
prior to operation of this device.
7
GIMA Blood Glucose Test Strips
The GIMA Blood Glucose Test Strips are thin strips with a chemical reagent which
work with the GIMA Blood Glucose Meter to measure the glucose concentration in
whole blood. After the strip is inserted into the meter, blood is applied to the
sample tip of the test strip. The blood is then automatically absorbed into the
reaction cell where the reaction takes place. A transient electrical current is
formed during the reaction and the blood glucose concentration is calculated
based on the electrical current detected by the meter. The result is shown on the
meter display. The meter is calibrated to display plasma equivalent results.
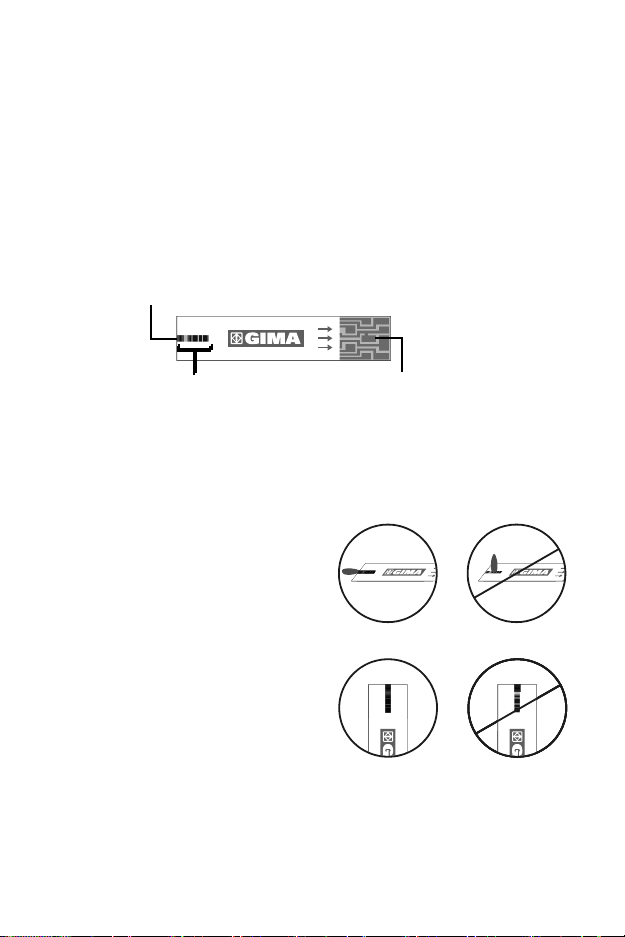
IMPORTANT: Apply the sample only to the sample tip of the test strip. Do not
apply blood or control solution to the top of the test strip as this may result in an
inaccurate reading.
Hold the blood drop to the sample tip
of the test strip until the check window
is completely full and until the meter
begins to count down. If you applied
blood but do not see the starting of the
count down, you may reapply a
second drop of blood within 3 seconds.
If the check window does not fill and
the meter starts to count down, then
do not add more blood to the test strip.
If you do then you may get an E-5
message or an inaccurate test result.
In this case if the meter begins to
count down and the check window
does not fill, discard the strip and begin the test again with a new test strip.
Sample Tip
Apply blood or control solution here.
Check Window
Check to confirm that a sufficient
sample size has been applied.
Contact Bars
Insert this end of the test strip
into the meter until it stops.
Incorrect
Correct
Correct Incorrect
Tabla de contenidos
Manuales populares de Medidor de glucosa en sangre de otras marcas

ReliOn
ReliOn Prime Manual del operador

AgaMatrix
AgaMatrix Presto Manual de usuario

Polymer Technology Systems
Polymer Technology Systems A1C Now Self Check Manual de usuario

Medisana
Medisana GlucoDock Manual de usuario

Arkray
Arkray ASSURE PLATINUM Manual de usuario

Dexcom
Dexcom G4 Professional Manual de usuario




LabStyle
LabStyle Dario Manual de usuario

ACONLABS
ACONLABS ON CALL EXPRESS Manual de usuario

Higi Technology
Higi Technology iGlucose Manual de usuario

Bayer HealthCare
Bayer HealthCare CONTOUR NEXT Manual de usuario

Accu-Chek
Accu-Chek ADVANTAGE Manual de usuario

Sanofi-aventis
Sanofi-aventis BG STAR Especificaciones técnicas