Geo Knight Digital DK20 16x20 Manual de usuario

1
Digital Knight
16x20 and 14x16
Digital Clamshell

2
Table of Contents
TableofContents.................................................. 2
Introduction.......................................................... 3
Setup&Suggestions............................................. 4
BasicUse.............................................................. 4
SettingTime.......................................................... 4
SettingTemperature .............................................. 5
SettingHeight / Pressure....................................... 6
Guidelines&Standard Settings............................. 7
ProgrammablePresets .......................................... 8
UserOptionsMenu............................................... 9
Fahrenheit/Celsius .............................................. 9
TimerCounter ...................................................... 9
RecordedPressings............................................... 9
Height Gauge - High Point ................................. 10
Height Gauge - Low Point .................................. 10
Pressure/HeightGaugeSensitivity .................... 10
DropSense ......................................................... 10
Beep ................................................................... 11
Alarms ................................................................ 11
InterchangeableTables ........................................ 12
Maintenance........................................................ 12
Troubleshooting.................................................. 13
Troubleshooting(cont.) ...................................... 14
LimitedWarranty ................................................ 15

3
Introduction
Congratulations on your purchase of the DK20 16x20 or DK16
14x16 clamshell press! This heat press machine has many exciting
features, all of which are meant to help make your heat transfer
pressing endeavors as successful and easy as possible. Please take
the time now to thoroughly read through this manual to become
acquainted with them. It will explain some key features, concepts
and methods that will save much time and effort in using this press
and in your heat pressing applications.
Throughout this manual, many areas and components of this
machine will be referred to by specific names. Please refer to the
illustrations below in order to become familiar with some of the
terminology used in this manual.
Controller
Pressure Knob
Gas Shock
Clamp/Linkage
Heat Platen
Handle
LowerTable
SiliconePad
Base
Temperature
°Far/°Cel Indicator
Ready Indicator
Heating Indicator
Open Indicator
Timing Indicator
Done Indicator
Time
TEMP Button
PRG Button
Up/Down Arrows
Default Operating Mode of Controller

4
Setup & Suggestions
• Locate the press on a firm, sturdy work surface. It is recommended
that the front two holes on the feet of the machine be bolted down for
best ease-of-use.
• The height of the bench/work space the press is located on would be
ideally 27” to 32” high.
• Attach the power cord from the rear to the backside of the controler.
There is a power inlet on the back panel of the control box for the
power cord.
• The press should remain in the unclamped/open position when not in
use. Do not leave the heater block closed on the table surface when
hot for long periods of time if not using. The top platen may either be
open, or fully retracted backwards when not in use.
Basic Use
Setting Time
Thetimesettingis always editable in thedefaultoperating mode
of the controller. The left two digits of the time display are minutes.
The right two digits are seconds. This can be changed to Hours/
Minutes in the User Options Menu.
• Use the Up & Down arrow keys to change the time.
• Hold the Up or Down arrow key down to increment the values quickly.
After a brief pause, the values will accelerate.
• Press the Up & Down arrow keys together to clear the setting to 00:00
• When the press is closed, the timing cycle starts. The “TIMING”
indicator will appear.
• When the timing cycle is finished, the “DONE” indicator will appear.
• Dependingon thetimer alarmchosen, thealarm may continueto sound
at the end of the timing cycle until the press is opened.
• When the press is opened up, the “OPEN” indicator will appear.

5
Setting Temperature
• The control will regulate the heat platen temperature based on the set
point temperature. When the temperature falls below the Set Point,
the “HEATING” indicator will appear.
• Whenthe temperaturereaches theSet Point, the“HEATING” indicator
will disappear and the “READY” indicator will appear.
• If the Set Point temperature is set to a temperature below the Current
temperature, the press will wait to cool down to that Set Point. At that
time, neither the “READY” or “HEATING” indicators will appear.
In the default operating mode of the controller, the displayed
temperatureisthe Currenttemperature.This is theactualtemperature
of the heat platen surface. Please note that the operating range of the
controller is from 150°F to 550°F (65°C to 288°C). During the first
heat up cycle of the press, the controller will display 150°F (65°C)
until the heat platen temperature rises above that temperature.
The Set Point temperature is the temperature the operator sets
the press for. This is the value the press will regulate the Current
temperature based on. The set point temperature may be changed
whenever necessary:
• When in the default operating mode, press the TEMP button.
• The Current temperature will be replaced by the blinking Set Point
temperature.
• Use the Up & Down arrow keys to change the Set Point temperature.
• Hold the Up or Down arrow key down to increment the values quickly.
After a brief pause, the values will accelerate.
• Press the Up & Down arrow keys together to set the temperature to
350.
• Whenfinished settingthe temperature,press the TEMPbutton toreturn
to the default operating mode.

6
TheDigitalHeight/Pressuregaugeisahelpfulindicatorofthecurrent
heightofthe top headasthe operator adjuststhepressure.
• To decrease the pressure, turn the
pressure knob to the right,
clockwise.
• The top head will rise away from
the lower table.
• To increase the pressure, turn the
pressure knob to the left,
counterclockwise.
• Thetop headwill lower towardthe
pressing table.
CAUTION: The heat platen will become
detached from the frame and drop onto
the table if it is adjusted too far. Please
use cation when turning the knob to the
left (unscrewing: counter-clockwise).
Setting Height / Pressure

7
Guidelines & Standard Settings
The following information covers some basic guidelines for
pressing, as well as some generic parameters for basic heat transfer
applications.
• Whenpressing shirts,it isoften recommended thatthe shirtsbe quickly
pressedfor 2seconds beforetransferring toremove wrinkles andwater
content.
• When pressing two sides of a garment, pull the garment over the table
so that the printed side drapes underneath the table. This will avoid
reheatingpreviously transferreddesigns on oppositesides ofgarments.
It will also avoid any bleed-through of inks on lighter fabrics.
• Avoid laying collars, cuffs, zippers, and other bulky parts of garments
on the lower table, as these can adversely affect pressing conditions,
and reduce the life of the silicone pad.
• When pressing rigid substrates (plastics, metals, woods, etc.), be sure
that any protective films or laminates are removed before heating.
• Always check that the transfer image is face down against the material,
to avoid sealing the image against the heat platen instead of the
substrate.
Always follow the transfer media suppliers instructions when
pressing. The information below is for general reference only, and
may not be as accurate as the instructions provided by the transfer
media & imprintable substrate supplier.
• Hot Split Supplier Transfers 350-375°F, 8-10 secs
• Puff Transfers 350-375°, 5-7 secs (extra heavy pressure)
• Ink-Jet Transfer Papers 360°, 15-18 secs
• ColorCopy/Laser Transfer Papers 375°, 20-25 secs
• Sublimation Inks (Polyester Fabrics) 400°, 35 secs
• Sublimation Inks (Plastics) 400°, 1 min, 15 secs
• Sublimation Inks (Metals) 400°, 1 min
• Sublimation Inks (Woods) 400°, 1 min, 15 secs
• Sublimation Inks (Ceramics) 400°, 4 min

8
Programmable Presets Normal Default Mode
Presets Mode
Edit Preset Temp
EditPresetPressure/Height
Programmable presets are stored
programs where commonly used
Temperature, Time and Height
(pressure) settings can be stored and
retrieved.
Presets can be recalled simply by
pressing the PRG key, selecting the
program desired with the arrow keys,
and pressing the PRG key again. This
will update the current settings on the
press with the settings in the preset.
Presets can be edited by pressing
the TEMP key while inside the programs.
When the display shows “SEt”, press
the TEMP key to change the
temperature, time and PRS (height)
settings for that preset. The TEMP key
moves the flashing value from Temp to
Time to PRS and back to “SEt”. The
arrow keys change the value.
So... the PRG key enters into the
presets, and also exits the presets. When
exiting the presets, the press’
temperature & time is updated with the
values that were stored in the preset,
and the PRS display tells the operator
what height level to adjust the pressure
to.
Press PRG
○○○○○○○○○○○○○○○○○○○○○○○
Edit Preset Time
Press TEMP
Press PRG Press TEMP Press TEMP Press TEMP

9
User Options Menu
Theuseroptionsmenu is a set offeaturesand calibration options
that are programmable and adjustable by the user. It consists of a set
of menu items that can be scrolled through. Each menu item is a
feature whose values can be veiwed and /or changed. To enter the
user options menu:
• From the default operating mode, press the TEMP & PRG keys
simultaneously.
• If the keys are not pressed exactly at the same time, you may enter the
temperature edit mode, or the presets mode. Exit either of those modes
and try again.
• To cycle from one menu item to the next, press PRG.
Fahrenheit / Celsius
The Current, Set Point, and Preset
temperature values can be displayed in
Fahrenheit or Celsius. To change the value to
F or C, use the arrow keys. Press PRG to move
tothenext menuitem.
Timer Counter
The timer displays as factory default
Minutes:Seconds. This can be changed to
Hours:Minutes. To change to value to HR
(hours:mins)orMIN (mins:secs),usethe arrow
keys. Press PRG to move to the next menu
item.
Recorded Pressings
The digital control records the number of
pressing cycles completed. This can be very
helpful when counting the number of full
pressings that have been performed. The value
will scroll from left to right. A “-” sign will
separate the beginning and end of the number.
To reset the count to Zero, press an arrow key.
Press PRG to move to the next menu item.
10
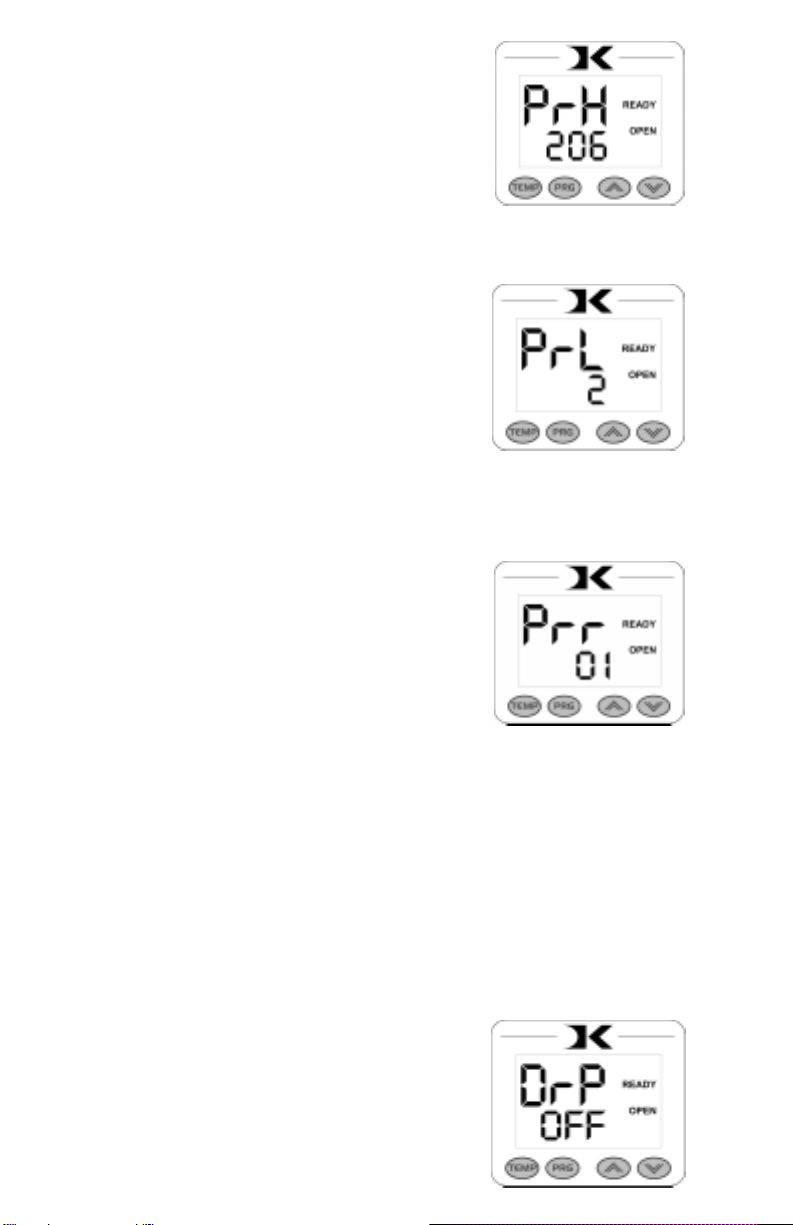
Height Gauge - High Point
Thisfeatureis notapplicableon thispress.
Press PRG to skip this menu item.
Height Gauge - Low Point
Thisfeatureisnotapplicable onthispress.
Press PRG to skip this menu item.
Pressure / Height Gauge Sensitivity
Drop Sense
Thisfeatureis notapplicableon thispress.
Press PRG to skip this menu item.
Atemperaturealarmisavailableforwarningtheuserofout-of-range
temperatureconditions.Theusercansetthismenuitemtosoundanalarm
iftheheatplaten drops below theSetPoint temperature by theamount
indicated. This can be helpful when pressing substrates that absorb an
unusuallylargeamountofheat, causingtheplatentofall intemperature
quickly. Ifthe resultsofthetransferbegin todeteriorate, theDropSense
featurecan helptheuseravoidthis.
Usethearrow keys tosetthe degrees orto
turnthisfeatureoff. If the Current temperature
dropsbelowtheSetPointbythisamountormore,
analarm willsound.ThedefaultvalueisOFF.
Este manual sirve para los siguientes modelos
1
Tabla de contenidos
Otros manuales de Herramientas eléctricas de Geo Knight

Geo Knight
Geo Knight JetPress 14 Manual de usuario

Geo Knight
Geo Knight JETPRESS 14 Manual de usuario

Geo Knight
Geo Knight DK7 Manual de usuario

Geo Knight
Geo Knight Maxi Press Air Manual de usuario

Geo Knight
Geo Knight Digital Knight DK3 Manual de usuario

Geo Knight
Geo Knight Digital Knight DK3 Manual de usuario

Geo Knight
Geo Knight Digital Combo DC16 Manual de usuario

Geo Knight
Geo Knight Digital Knight DK20 Manual de usuario

Geo Knight
Geo Knight DC16AP Manual de usuario

Geo Knight
Geo Knight Digital Knight DK20SP Manual de usuario


