General HT50 Manual de usuario


TABLE OF CONTENTS
Introduction . . . . . . . . . . . . . . . . . . . . . . . . . . . . . . . . . . 2 –4
Key Features . . . . . . . . . . . . . . . . . . . . . . . . . . . . . . . . . 4 –5
Safety Instructions . . . . . . . . . . . . . . . . . . . . . . . . . . . . . . . . 5
What’s in the Blister Pack. . . . . . . . . . . . . . . . . . . . . . . . . . . 5
Product Overview. . . . . . . . . . . . . . . . . . . . . . . . . . . . . . 6 –7
Setup Instructions . . . . . . . . . . . . . . . . . . . . . . . . . . . . 8 – 13
Installing/Replacing the Battery . . . . . . . . . . . . . . . . . 8
Install Software and Drivers. . . . . . . . . . . . . . . . . 8 –9
Configure the Unit . . . . . . . . . . . . . . . . . . . . . . 10 – 13
Operating Instructions . . . . . . . . . . . . . . . . . . . . . . . . 14 – 19
Deploy the Unit . . . . . . . . . . . . . . . . . . . . . . . . . . . . 14
Stop Logging and Import Logs . . . . . . . . . . . . . . . . . 15
Viewing, Printing and xporting Data Logs . . . . 15 – 17
Using the IR Thermometer . . . . . . . . . . . . . . . . . . . . 17
Other Indications . . . . . . . . . . . . . . . . . . . . . . . 18 – 19
Specifications . . . . . . . . . . . . . . . . . . . . . . . . . . . . . . 19 – 20
Maintenance Tips. . . . . . . . . . . . . . . . . . . . . . . . . . . . . . . . 21
Warranty Information . . . . . . . . . . . . . . . . . . . . . . . . . 21 – 22
Return for Repair Policy . . . . . . . . . . . . . . . . . . . . . . . . . . . 22
INTRODUCTION
Thank you for purchasing General Tools & Instruments’
HT50 USB RH/Temp/GPP Data Logger with LCD & IRT. Please
read this user’s manual carefully and thoroughly before using
the instrument.
2

The HT50 is a low-cost, compact, battery-powered thermo-
hygrometer capable of unattended logging (recording) of the
ambient temperature and relative humidity (RH) of an
environment for days, weeks or months. It can also measure
and optionally log surface temperatures spot-checked by a
technician using the unit’s integral infrared (IR) thermometer.
In addition, the HT50 can also calculate and display absolute
humidity levels in units of grains per pound (GPP) or g/kg.
Also called mixing ratio, GPP is a more useful moisture metric
than RH to water damage restorers. Using RH alone, a
restorer might unknowingly introduce moist air—with a low
RH but a high GPP—during a job’s drying phase).
Data logging can be started or stopped by pushing a button
on the unit, eliminating the need to bring a laptop to the
job site. After a data log has been captured and stored, it can
be uploaded as a .txt file to any PC running the Windows®7 or
Windows®XP operating system after plugging the HT50 into
one of the computer’s USB ports. The HT50’s internal flash
memory is large enough to store 16,300 pairs of RH and
temperature readings or nearly 10,000 sets of RH, ambient
temperature and surface temperature readings.
Included with the product is a mini-disc with the drivers
needed to interface the unit to the computer, as well as
software that can display a data log file as a table or graph
and/or export it to Microsoft xcel. xporting to xcel is
recommended for sophisticated trending and analysis of
humidity and temperature data and easy detection of
unexpected excursions.
3
Windows®7 and Windows®XP are registered trademarks of Microsoft Corporation.

Applications for the HT50 include:
• Water damage restoration—Because the HT50 is designed
to be deployed and left in place over the duration of the job,
it is always in equilibrium with the environment.
• Process control—The HT50 enables, simplifies and cuts the
cost of environmental monitoring of office buildings,
greenhouses, food and equipment storage facilities,
wineries, freezers, shipping containers, HVAC/R installations,
computer rooms, labs, libraries, museums and saunas.
• lectronics manufacturing—Alerts provided by the low-
humidity alarm function of the HT50 can mitigate the risk of
damaging high-voltage static discharges.
KEY FEATURES
• One button starts/stops data logging without a PC
• Plug-and-play USB 2.0 interface; no need for cables,
cradles or docks
• Large storage capacity: 16,300 pairs of RH and
temperature readings or nearly 10,000 sets of RH, ambient
temperature and surface temperature readings
• 3-1/2-digit LCD displays real-time temperature and RH
readings, absolute humidity readings—in grains per pound
(GPP) or g/kg—and device working and alarm status and
“memory full”
• Built-in IR thermometer with 2:1 Distance-to-Spot ratio and
measurement range of -4° to 482°F (-20° to 250°C)
• Included software is used to set: Sampling time from
10 seconds to 12 hours; Hi/Lo alarm setpoints for humidity,
ambient temperature and surface temperature;
Temperature unit (°F or °C)
4

• Software also calculates and plots GPP and dew point and
wet bulb temperatures and displays data logs as time-
based graphs synchronized to your PC’s clock
• One-click exporting of logs to xcel or Word
• Long battery life (up to one year)
• Includes USB extension cable
• One-year warranty
SAFETY INSTRUCTIONS
CAUTION - Use of controls or adjustments or performance of
procedures other than those specified herein may result in
dangerous radiation exposure. The HT50’s targeting laser is a
Class 2 type that emits less than 1mW of power at a
wavelength of 655nm. Avoid direct eye contact with laser
light radiation. U.S. law prohibits pointing a laser beam at
aircraft; doing so is punishable by a fine of up to $10,000 and
imprisonment.
Do not use the HT50 in the presence of flammable or
explosive gases.
WHAT’S IN THE BLISTER PACK
The HT50 comes in a blister pack that also contains
• One “1/2 AA” battery. Replacement batteries
(Part No. BA10) are available from General.
• A disc with software drivers for Windows7 and Windows
XP computers, the Lusb V1.21.1 program for capturing
data logs and displaying them as curves, and a PDF of
this user’s manual
• A USB extension cable
• A hard copy of this user’s manual (inside the fold-over card)
5

6
Fig. 1a.
The components, controls and connector of the HT50
PRODUCT OVERVIEW
Fig. 1a below shows the main components, controls and
connectors of the HT50. Fig. 1b (on the facing page) shows
all possible indications on the HT50’s display. Familiarize
yourself with their names and functions before moving on to
the Setup Instructions.
A. IR sensor window
B. Laser pointer window
C. Battery compartment (opens from rear of unit)
D.
3-1/2-digit LCD (displays real-time temperature, RH and GPP
readings; also indicates device working status and “memory full”)
. USB plug
F. Protective cap
G. ET and TO buttons (used to turn LCD on and switch
between GPP, temperature and RH readings and units; also
used to start/stop logging and check unit’s working status)
H. Meas button (when pressed and held, activates
IR thermometer and laser pointer)
I. Ambient temperature and humidity sensor window
J. Laser identification/certification/warning/safety labels
(see top of next page)
CJ
B
A
D
E
F
GH
I
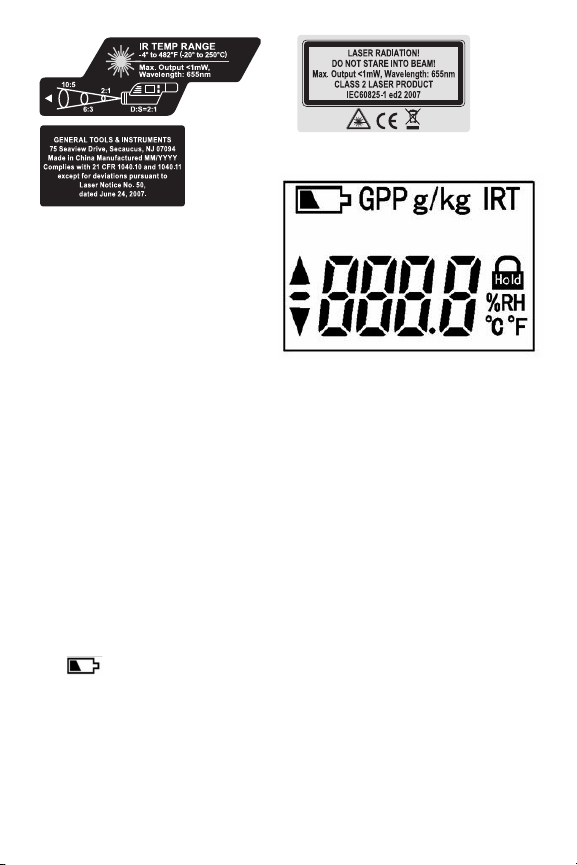
Display Legend
▲:indicates reading is
higher than high alarm setpoint for that parameter
▼:indicates reading is lower than low alarm setpoint for
that parameter
%RH: relative humidity unit
°C: Celsius temperature unit
°F: Fahrenheit temperature unit
IRT: Indicates operation in IRT mode
Hold: Indicates that IRT measurement is being held on the
display
GPP: Absolute humidity (mixing ratio) value in Imperial units
(grains per pound)
g/kg:
Absolute humidity (mixing ratio) value in metric units
:Low battery icon
[-]888.8: Humidity or temperature value or one of the following
four working status indications
LOG: Unit is logging data
- - -: Unit is in standby mode, ready to log data
FUL: Internal memory is full (and logging has been stopped)
CON: Unit needs to be configured by software 7
Fig. 1b. All possible
display indications
on the HT50

SETUP INSTRUCTIONS
INSTALLING/REPLACING THE BATTERY
The HT50 uses a 3.6VDC “1/2 AA” Lithium-ion battery.
To open the battery compartment, turn the unit over and
slide the battery compartment cover (which is clearly marked)
toward the front of the unit, in the direction opposite the
arrow on the cover. Remove the old battery and insert a fresh
battery in the correct orientation. Then replace the cover,
pushing it forward until you feel and hear a click.
After you replace the battery, the LCD will “wake up” and
begin displaying real-time readings. If the ET or TO button
is not pressed within 60 seconds, the LCD will be
automatically powered off.
Note: If the battery is removed from a unit before it has been
set up from software or while it is recording, the unit must be
reconfigured before it can be reactivated. If it is not
reconfigured, the unit will remain in standby mode.
INSTALL SOFTWARE AND DRIVERS
1. Place mini-disc in tray of CD/DVD drive, shiny side
down. Close tray.
2. When the AutoPlay window appears, click on
“Open folder to view files using Windows xplorer.”
3. Windows xplorer will indicate that there are two
“Files Currently on the Disc”. One is actually a folder
containing an electronic file of this user’s manual. Copy
the HT50 manual to your computer’s hard drive for
permanent storage. The other file is a Windows Installer
Package (.msi file) named “ L USB_V1.21.1.msi”.
Double-click its icon.
8

4. A window titled “Welcome to LUsb Installation Wizard”
will appear. Click Next to continue.
5. Within the Software License Agreement window that
appears next, click the I agree (T) box.
6. The next three windows advise that the Lusb application
will be installed in your computer’s C:\Program Files
folders in a new subfolder named < Lusb>, and that
shortcuts to the program will be created on your desktop
and Quick Launch bar. If you want to install the software
elsewhere, click Browse and choose another location.
Within each window, after selecting either the default
location or another location, click Next(N) to continue.
7. When the “Ready to install LUsb” window appears,
click Install to continue.
8. Before the installation begins, a User Account Control
window may appear and ask, “Do you want to allow
[ LUSB V1.21.1.msi] to make changes to this computer?”
Click Yes to continue.
9. The LUsb Setup Wizard will now install the program
on your computer. On the next window that appears,
click the Completed (F) box.
10. At the bottom of the Device Driver Installation Wizard that
appears next, click Next to continue.
11. The next window to appear is a Windows Security
window. Click on “Install this driver software anyway”
to continue.
12. The next Device Driver Installation Wizard window will
advise you that an HT10/20/50 driver from General Tools
or Kecheng Laboratories was successfully installed and
that your device is now “Ready to use.” Click Finish
to continue.
9

CONFIGURE THE UNIT
Note that the software installation has added a icon to
your desktop. To facilitate access to the program, right-click
on the icon and pin it to both your Start button and the Quick
Start area at the left of your taskbar. You can now eject the
installation mini-disc and store it with your other important
software.
Plug the HT50 into an available USB port of your computer. If
your computer is a laptop and the only available U B jack
does not have enough vertical clearance to accommodate
the HT50 without mechanically stressing its U B plug, do
not plug the HT50 directly into the jack. You do not want
the plug of the HT50 to support any of the weight of the
laptop. If that is the case, plug the HT50 into the jack of the
included USB extension cable and insert the plug of the
extension cable into the computer’s USB jack.
The first time you plug the HT50 into your computer, your
system tray will notify you that the computer is “Installing
Device Driver Software”. When the notification disappears,
open the Lusb program by selecting it via your Start button,
clicking on its icon on your taskbar, or double-clicking its
desktop icon.
If the software has installed correctly and you have plugged
the HT50 into a working USB port of your computer, the
following screen should appear on your computer’s display.
10
Tabla de contenidos
Otros manuales de Otro de General


