Gaabor GA-E5A Manual de usuario

Electric Oven (Air Fryer)
Thank you for purchasing our product. Please read this manual carefully before use.
Instructions
Model: GA-E5A


Model
Standard
Product Dimensions
Net Weight
Technical Parameters
GA-E5A
IEC: 60335-2-9:2019 in conjunction with IEC: 60335-1:2010
350x290x318mm
About 4.2kg
Rated voltage
Rated frequency
Rated power
Rated Capacity
220~240V
50-60Hz
1300W
5L
01
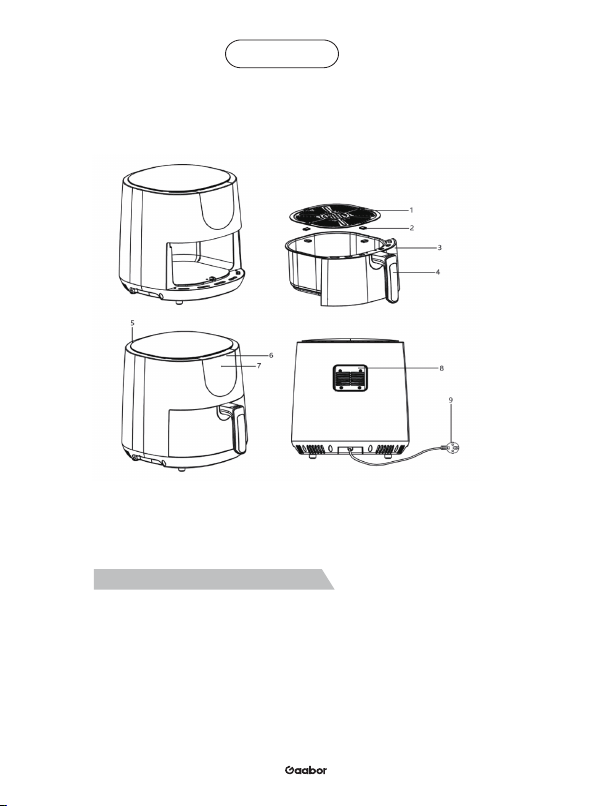
Introduction to Components and Functions
Serial No. Parts Name Function Introduction
Baking tray
Silicone case
Fryer
Handle
Used to contain food and place it in the fryer.
Sleeved on a baking tray to prevent from scratching the fryer.
Used to place the grill.
Used to push the fryer and take/place the grill.
To control temperature within 80℃-200℃
Surface film
To display the menu, time and temperature
The air flows in from the inlet and out from
the outlet to form a hot air circulation.
Main body
Menu surface film
Monitor
1
2
3
4
5
6
7
8Air outlet
Power line
9Power connection line.
02
GA-E5A
IEC 60335-2-9:2008
IEC 60335-1 :2010
EN 60335-2-9:2003 + A1 :2004 +A2:2006 +A12:2007 +A13:2010
EN 60335-1 :2012
EN 62233:2008
Test Specifications and Standards

1. Place the product on a level, smooth and stable surface.
2. The product is only for household use. It may not be used in the staff canteens for shops, offices, farms or other working
environments. It may not be also used by guests in hotels, motels, bed and breakfast accommodations and other accommodations.
3. If the product is used improperly, or used for professional or semi-professional purposes, or not used according to the instructions
in the user manual, the warranty will be invalid, and we will not be responsible for the damage therefrom.
4. Be sure to unplug the product plug after use.
5. Allow the product to cool for approximately 30 minutes before handling or cleaning the product.
6. Make sure the food materials cooked in the product are golden, but not black or brown. The burnt food should be discarded.
Notes
1. This product is not suitable for children, persons with unsound limbs, sensory or mental disorders or lack of relevant experience
and knowledge, unless they have been instructed to use the product safely and supervised to grasp the safe use method.
2. Before connecting the product to the power supply, please first check whether the voltage marked on the product is
consistent with the local supply voltage.
3. Do not use this product if the plug, the power line or the product itself is damaged.
4. If the power cord is damaged, it must be replaced by a professional from the manufacturer, its maintenance
department or similar department in order to avoid danger.
5. Look after children to ensure that they do not play with this product. Cleaning and maintenance shall not be
performed by children under 8 years old or shall be supervised.
6. When the product has been powered on or is cooling, keep the product and its power line out of reach of children under
8 years old.
7. Do not allow the power cord to come into contact with a hot surface.
8. Never insert the product plug or operate the control panel by wet hands.
9. The product must be plugged into a grounded socket, and be sure it is plugged correctly.
10. Do not connect the product to the external timer, so as to avoid danger.
11. Do not place the product on or near flammable materials such as tablecloth and curtain.
12. Do not place the product against the wall or against other products. At least 10cm free space shall be reserved behind the product,
on both sides of the product and above the product. Do not place items on the top of the product.
13. Do not use the product for any purposes other than those described in this manual.
14. The product must be taken care of when it is used.
15. During hot air frying, high temperature steam will be released from the air outlet. Keep hands and face a safe distance from steam
and air outlet, and be aware of hot steam and heat when removing the frying tray from the product.
16. When the product is used, its accessible surface may become very hot.
17. If the product emits black smoke, unplug the power cord immediately, and wait for the product to stop smoking before removing
the frying tray from the product.
Warnings
Before using this product, please read the operating manual carefully and properly keep it for future reference.
Precaution
1. Do not immerse the enclosure in water or wash it under the tap in case of fire, as electronic components and
heating components are installed in the enclosure;
2. Do not let water or other liquids into the product to avoid electric shock;
3. Always place the food materials in the frying basket to avoid contact with the heating components;
4. Do not cover the air inlet and the air outlet when the product is working;
5. Never pour oil into a frying tray as this may result in a fire hazard;
6. Do not touch the inside of the product while it is working.
Danger
03

1. Remove all packaging materials.
2. Remove adhesive sticker or label from the product.
3. Thoroughly clean the frying basket and tray with hot water, detergent and a non-abrasive sponge.
4. Wipe the inside and outside of the product with wet cloth.
Note: You can also use a dishwasher to clean these components.
Note: This air fryer is heated by hot air. Never add oil or grease into the frying tray.
7. The product includes a micro switch inside. If the frying tray is pulled out during use, the machine will be
powered off.
Before first use
The product has an overheating protection system. If the internal temperature control system fails, the overheating
protection system will start automatically. The product will no longer be used at any time, so pull out the plug first.
Only when the product is completely cooled down and the product is sent to a professional maintenance staff for
repair, the product can be reused.
The product is equipped with a timer. When the timer counts down to 0, the product will ring and be automatically
powered off. To turn off the product manually, turn the timer knob counterclockwise to 0.
The product complies with the relevant standards for the electromagnetic field (EMF). Based on the current
scientific evidence, the product is safe if it is used correctly and operated according to the operating instructions
in the user manual.
Note: The product can also be turned off automatically if the fryer is pulled out in use
(but the timer is still counting down).
Electromagnetic field (EMF)
Overheating protection
Automatic Off
04
1. Place the product on a firm, level and flat surface. Do not place the product on a non-heat-resistant surface.
2. Place the grill firmly in the fryer.
3. Push the fryer into the product correctly.
4. Pull the wire out and plug it into the grounded wall socket.
·Never add oil or other liquids to the fryer.
·Do not place items on the top of the product.
·Do not place any items in the side air inlet, which will block the airflow and affect the heating effect of hot air.
Note: The fryer must be properly pushed into the product, otherwise the product will not work!
Preparation for use
The air fryer can be used to cook many food materials. Please refer to the table "Settings" below;
Product use

05
(GA-E5A)
1. Insert the plug into a grounded power socket.
2. Carefully pull the fryer out of the air fryer. (Figure 1).
3. Place the food materials on the grill (Figure 2).
Note: Do not overfill or exceed the amount shown in the table below (see "Settings" in this chapter) as
this may affect the final frying quality.
4. Slide the fryer back to the air fryer. (Figure 3) Do not use the fryer until the grill is placed.
The fryer must be properly pushed into the product, otherwise the product will not work.
Note: Do not touch the fryer within a short time after use as it is very hot. You can only hold the handle to move
the fryer.
5. Adjust the temperature control knob to the desired temperature. See "Settings" in the chapter to determine
the appropriate temperature (Figure 4).
6. Determine the time required to cook the food materials (see Settings in this chapter).
7. To turn on the product, adjust the timer knob to the desired cooking time (Figure 5).
If the product is cold-started, the cooking time should be increased by 5 minutes.
Note: You may preheat the product without adding food materials if necessary. At this point, turn the timer
knob to 5 minutes or above and wait for the heating indicator lamp to turn off (about 5 minutes later). Turn the
timer knob to the desired cooking time.
Frying by hot air
a. At this point, the heating indicator lamp will be on.
b. The timer will count down from the set cooking time. (Figure 6).
c. In the process of hot air frying, the heating indicator lamp will be on and off from time to time. This means
that the heating components are turned on and off constantly to maintain the set temperature.
d. Excess oil from the food materials will be collected at the bottom of the fryer.
8. Some food materials are required to be turned over in the cooking process (see "Settings" in this chapter).
To turn the food materials over, hold the handle and pull the fryer out of the product, and then turn them
over. Slide the fryer back to the air fryer. (Figure 7, Figure 8, Figure 9).
Tips: If you set the timer to half the cooking time, the timer will ring when you need to turn the food materials over.
However, this means that you must set the timer again for the remaining cooking time after turning over.
Tips: If you set the timer to all cooking time, the timer will not ring before the set cooking time is completed.
You can pull out the frying tray in the cooking process at any time to check whether the food cooking degree is
satisfied. The power supply will be automatically turned off when you pull out the fryer and it will be
automatically turned off when you pushing the fryer. (In this case, the timer is always counting down).
9. The timer rings, indicating that the set cooking time has been reached. Pull the fryer out of the product and
place it on a heat-resistant surface.
Note: You can also manually turn off the product. To do so, turn the temperature control knob to 0.
10. Check whether the food materials have been cooked.
If the food materials are still required to be cooked, simply slide the fryer back to the product and set the timer
to a few minutes again.
11. To remove small food materials (such as French fries), (Figure 11).
do not turn the fryer upside down without removing the grill, which will cause excess oil collected at the bottom
of the fryer to leak onto the food materials.
After frying by hot air, the fryer and the food materials are still very hot. Depending on the type of food materials
in the air fryer, steam may be ejected from frying tray.
12. Remove all the food materials from the fryer with a clip and place them in a bowl or plate. (Figure 12)
Tip: Remove bulky or fragile food materials from the fryer with a clip.
13. After one batch of food materials is cooked, the air fryer can start cooking the next batch of food
materials at any time.

06
GA-E5A
12 3
4
OFF
80
120160
200
℃
200℃ 5 6
0-30min
30
25
20
15
Min
5
10
0
789
10 11 12

Menu Minimum - Maximum
(amount of food material/g)
Potatoes and
French fries
Thin frozen
French fries
Thick frozen
French fries
Home-made French
fries (8 x 8 mm)
Home-made
potato wedges
Home-made
potato pieces
Time
(min)
300-700
300-700
300-800
300-800
300-750
250
500
Steak
Hamburger
Sausage roll
Chicken drumstick
Chicken breast
Pastry
Spring roll
100-500
100-500
100-500
100-500
100-500
100-400
8-12
7-14
13-15
18-22
10-15
10-15
180
180
200
180
180
200 Turn over
9-16
11-20
16-10
18-22
12-18
15-18
15-18
200
200
200
180
180
180
200
Turn over
Turn over
Turn ove
Turn ove
Turn ove
Turn over
Turn over
Add 1/2
spoon of oil
Add 1/2
spoon of oil
Add 1/2
spoon of oil
Temperature
(°C)
Additional
Information
Turn over
Hash browns
Creamed potatoes
Meat and poultry
07

For best results, it is recommended that you use pre-baked French fries (for example, frozen French fries).
To cook home-made French fries, operate according to the following steps.
1. Peel and cut the potatoes into small strips.
2. Soak potato strips in a bowl for at least 30 minutes, remove and place them on the kitchen paper to drain off.
3. Pour 1/2 spoon of olive oil into a bowl, add the potato strips and stir well until all the potato strips are evenly
coated with oil.
4. Remove the potato strips from the bowl by hands or with a kitchenware, and leave any excess oil in the bowl.
Then pour the potato strips into the basket.
5. Fry potato strips according to the instructions in this chapter.
Note: If the air fryer is cold-started, the cooking time should be increased by 5 minutes.
Note: Do not put all the potato strips from the bowl into the fryer at a time. This will prevent from leaving too
much oil at the bottom of the fryer.
Home-made French fries
Menu Minimum - Maximum
(amount of food material/g)
Frozen chicken
nuggets
Frozen fish fillets
Frozen breadcrumb
cream pastry
Stuffed vegetables
Baking
Cake
Quiche
Puff pastry
Dessert
Time
(min)
100-400
100-500
100-400
300
300
300
400
100-500 6-10 200 Turn over
6-10
8-10
10
20-25
20-22
15-18
20
200
180
160
160
180
200
160
Temperature
(°C) Additional
Information
Turn over
08
Tabla de contenidos
Idiomas:
Otros manuales de Freidora de Gaabor


