FreegoEV DK200 Manual de usuario

We strongly recommend that you read this entire
manual before using your electric bike
DK200 User Manual

-1-
Tool Kit Charger
Greetings and Cautions
Thank you for choosing FreegoEV.
Before you use your FreegoEV it is important that you read this manual carefully.
If there is anything you do not understand completely, please contact us.
Please observe trac regulations, and do not lend your bicycle to anyone who
is unfamiliar with it.
We recommend your electric bike only be used by a person aged fourteen years
or older, always supervise children until they are competent riders.
When using any bicycle, it is important that you stay within safe limits; if you feel
as if you are travelling too quickly, you probably are.
Always test your brakes prior to using the bike, and remember the bike will not
stop as quickly in the wet as it would in the dry!
Always be careful of using the front brake when turning or on slippery surfaces
as locking of the front wheel can be dangerous and result in falling o.
Before you use the bike for the rst time, please make absolutely certain that
it has been correctly assembled. In particular, you must make sure that the
pedals, saddle, handle bars and any self assembled items have been fitted
correctly and tightened.
Avoid consuming alcohol before you ride your electric bike. The use of alcohol
greatly reduces reexes and limits your ability to ride safely. The legal limit and
penalties for operating a motor vehicle apply to cyclists.
If you need to replace your battery, please dispose of it properly.
Above all, enjoy your FreegoEV journey, happy cycling!
Package Check
Please carefully check whether the items in the packing box are complete and intact.
If there is any problem such as missing or damaged, please contact online customer
service
Bike

-2-
Motor
Rear Wheel
Pedal
Model
Color
Frame Material
Tire type
Department
Battery
Motor
Handle Grip
Brake Device
Braking Distance
Waterproof Rating
Motor Driven
Number of Speeds
Gradeability
Voltage
Battery Capacity
Motor Power (W)
Charging Time
Weight (lb)
Carrying Capacity
Range
Max Speed
Item Height
Item Width
Item Length
Tire Size
Folded size
Packing box size
DK200
Black
Steel
Fat Tire
Adult
960Wh Lithium
High Speed Brushless
Metal+TPU
Disc Brake - Hydraulic
5m
IPX5
Rear drive
None
30°
48V
20Ah
850W Nominal, 1200W peak
4-5 hours
78 lb
400 lb
25-45 Mile, 40-70 KM
30-35mph (Factory Setting as 30 mph)
36.6 inch
28.5 inch
66.9 inch
20"x4.0
None
57.8*12.99*33.85 inch
DK200 Parameter
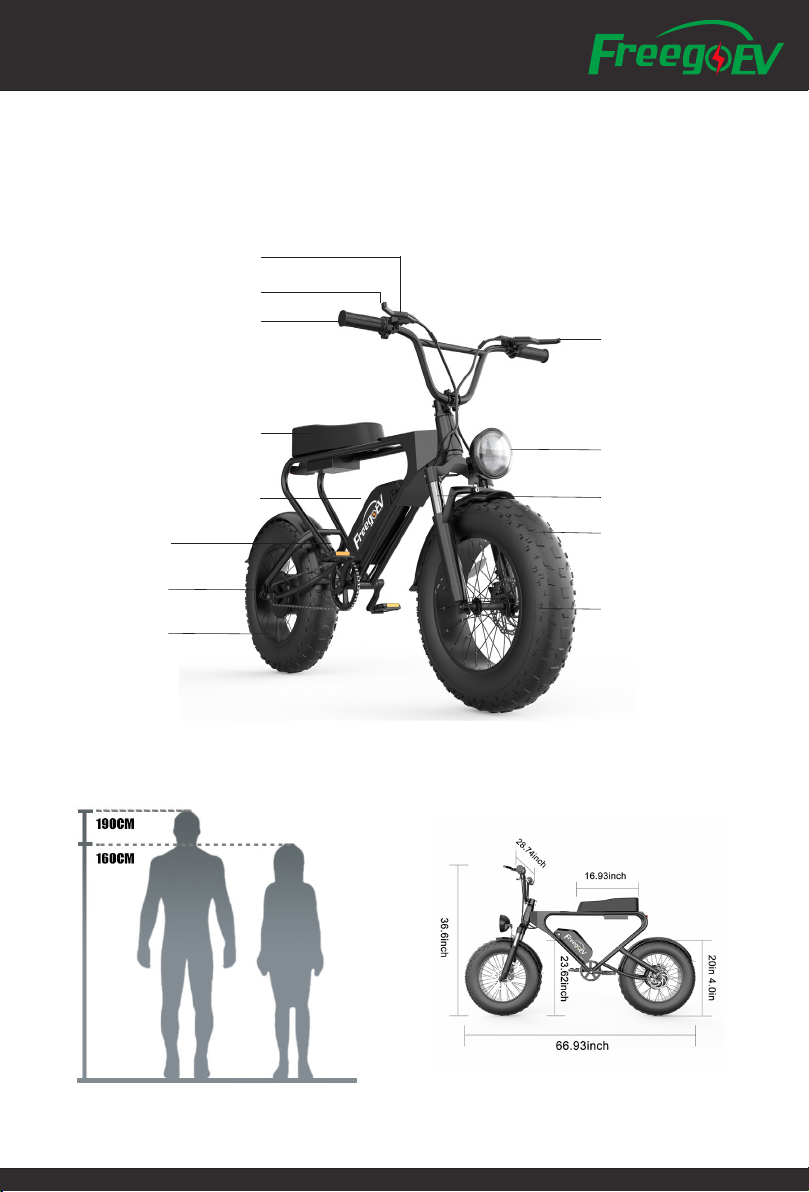
-3-
LCD Display Screen
Rear Brake Lever
Throttle
Seat Bag
Battery
Motor
Rear Wheel
Pedal
Front Brake Lever
Front Light
Fork Suspension
20"x4.0 Fat Tire
Disc Brake

-4-
Learn to Assembly
1. Open the carton and take out
the product
2. Take 4 Screws and plate o for
later use to fasten the handle bar
3. Align the Headbar and fasten
with the 4 screws and plate
4. Align the front wheel into the
front forks. Get brake in rst.
5. Install the Axle of fornt wheel
to x the wheel
6. Slide in the Battery to the
frame
7. Connect the Battery Wire
This icon indicates there is an
instruction video of relevant topic in
the YouTube

-5-
On/O
• Use Key and turn on/o the Battery Power.
Take key out when not in use.
• Press and hold "M" on the Display to turn on/o power.
• "+" to increase pedal assist.
• "-" to decrease pedal assist.
• Press and Hold "+" to turn on/o light .
• Press and hold "-" to start "walk mode" at 6KM/H until a brake lever is pulled or you
start pedalling, useful for walking beside the bike.
Learn to Drive
Battery and Charging
• Turn o the bike before connecting the battery charger.
• You can take the battery out from the frame to get it charged.
• Recharge your battery after every use if possible.
• Recharge your battery every month even if you are not using the bike.
***More Maintenance on Battery, please go to the section of Maintenance.
Error Code Indication
E02 Brake
E03 Pedal Assist Sensor
E04 6KM/H Cruise
E05 Real Time Mileage
E06 Battery Voltage
E07 Motor
E08 Throttle
E09 Controller
E10 Signal Receiver
E11 Signal Sent Out
E12 BMS
E13 Headlight
Display and P Setting
• There is no back to factory setting function, please mark down
the factory setting before changing any P settings.
• Press and Hold "+" and "-" together to enter/quit the P setting
• P Setting Code: 2020
• Press "M" to switch channel, "+"and "-" to change digit.

-6-
P01 Panel Brightness: 1 as darkest, 2 as medium, 3 as brightest
P02 KM or Mile: 0 as KM, 1 as Mile
P03 Voltage: 24V, 36V, 48V
P04 Sleeping Mode: 0-60
0 never sleep, other numbers stand for the sleep time (1-60 min)
P05 Pedal Assist System (PAS):
the smaller the number is, the less assistance.
0, 3 Grades Mode: 1 Grade 2V, 2 Grade 3V, 3 Grade 4V
1, 5 Grades Mode: 1 Grade 2V, 2 Grade 2.5V, 3 Grade 3V, 4 Grade 3.5V, 5 Grade 4V
P06 Wheel Diameter: Unit/inch, Precision/0.1
P07 Speed Measuring Magnet: 1-100
P08 Speed Limit: 0-50 or 0-100 (Dierent Batches may dier )
Notes: if yours ranges 0-50, please set 49 at most, indicating speed limit is 49km/h.
These data are based on KM. When changing KM to Mile, the speed value on the screen
would convert to correct Miles automatically, but if you do not change the setting of
speed limit from KM to Mile.
Warning: 50/100 means no speed limit, if you set the speed limit to 50/100, please be
careful when riding.
P10 Drive Method:
0: driven by PAS. Throttle is useless at this time.
1: driven by Throttle. PAS is useless at this time.
2: driven by PAS & Throttle. Throttle is useless at Zero Start status.
P11 PAS Sensitivity: 1-24
P12 PAS Start Power: 0-5
P13 PAS magnet type: 5, 8, and 12.
P14 Controller Amp: 12A as default. 1-20A.
P15 Not in Use
P16 ODOmeter Reset: press and hold "+" for 5 seconds to reset 0 of the meter.

-7-
Headlights
Power Status
Multi-function Display Area
Total Distance(ODO), Single Trip Distance(TRIP), Voltage(VOLT),
Current(CURRENT), Remain Mileage(RM)(Need the support of
Power Mode Speed
Display Area
Average Speed, Max Speed, AVG
Unit: MPH, KM/H
Vehicle status
display area
Power Brake
Controller Error
Current Power Status
This function need the support of
Under Voltage
PAS Status
(1-5 level)
6KM/H Cruise Marks

-8-
Pedal Assist System (PAS)
• You can nd the assist buttons (marked with + and -) on the LCD Display Panel.
Each time the + button is pressed, the LCD will move between 1 and 5 levels and the
corresponding power level increases in increments of 25%. Setting 5 provides 100% power.
• The default level is set to 1 when the bike is rst turned on. We recommend that you only
turn on the bike after you have mounted the bike so the motor is deactivated. Once on the
bike, press the on button for three seconds and the assistance will be turned on. You can
start o in any level, if you are on a hill for instance you may want to start in level 2,3,4 or
even 5.
• Setting 5 is generally used when you need the maximum amount of assistance from the
motor, but this will drain the battery the fastest. Lower settings are used when you do not
need the assistance at 100% power. In high trac situations or poor conditions such as ice
and snow, instant full power could be dangerous. Power settings can be changed when the
bike is stationary or when on the move.
Battery Capacity Meter, Riding Style and Aect on Range
• The range of the bike (distance covered between recharging of the battery) is greatly
inuenced by the level of assist selected, the amount of pedal assistance provided by the
rider and the use of the throttle.
If a high level of assist is selected, then the range of the bike will be reduced compared to
using a lower level of assist.
• The sensor system detects the speed the pedal cranks are turning and this information
is fed into the on board computer (controller) to give the rider the most natural riding
experience possible.
• The battery capacity indicator is provided to give an approximation of battery capacity
remaining. However, this indicator relies on sensing battery voltage that will rise and
fall depending on the amount of power being demanded at any given time, ambient
temperatures etc, hence the meter should only be used for indication purposes.
• Under heavy power situations (full throttle or high levels of assist) the battery voltage
will temporarily dip resulting in the capacity meter showing a lower level of charge. When
the heavy power usage is reduced, the capacity meter will rise again as the battery naturally
recovers its voltage.

-9-
Maintenance
IMPORTANT! Do not attempt to open the casings of the battery, motor or controller. It could
be dangerous and all warranties will become void. If you experience a problem, contact our
service department or your FreegoEV retailer.
Lubrication
• Lubricate all pivot points on the derailleur (if there is) and chain with light oil or chain lube
on a regular basis. Do not over oil, excess oil can get on tires or brake surfaces. Every 2 years,
re-grease the headset bearings, front wheel bearings and pedal bearings.
Brakes
• Brake levers should lock the wheels when compressed half way between their open
position and touching the handle bars.
•Regularly inspect the brake pads for wear. If the brake pads have reached the wear limit
of 1mm, replace them immediately. Steps: remove the caliper from the fork leg, complete
with the mount adapter by removing the Allen caliper xing screws. The pads can then be
removed by removing the split pin (which passes through the tabs of the brake pads) Then
lift the pads complete with the spring out of the rotor slot in the caliper body. Warning! Do
not loosen any other screws on the caliper. To ret the pads, hold the pads complete with
spring as an assembly and insert into the caliper slot with the metal backing towards the
pistons. Ret the pad retaining split pin ensuring it passes through the holes in the pad tabs
and through the hole in the spring and bend one side of the split pin to secure it in place.
Ret the caliper loosely using the Allen screws, apply the brake lever and tighten securely
whilst continuing to apply the brake lever.
Warning! If you are unsure about any part of the brake installation process you should seek
advice from a qualied mechanic.
Caution! The pads and rotor must be kept clean and free from oil. If the pads become
contaminated, you must discard them and replace them with a new set. A contaminated disc
should be cleaned with a proprietary brake cleaning solution.
• Mechanic brake is tted to the front wheel of some batches of FreegoEV DK200.
• Hydraulic brake is tted to the rear wheel (and some batch of the upgraded version of
front wheel), you need to check the brake oil level and add mineral oil sometime
Rims and spokes
• It is essential to have your spokes checked and tightened after 500 km. Just tap them
with a pen or pencil you will quickly tell if any are loose. Handlebar and saddle tubes should
never be raised beyond the maximum permissible, indicated by a safety line around the
tubes.
Tabla de contenidos


