
ForestAir A019-08KR Manual de usuario

FA-UM-PAC-5693 - v1.0 - 12/2018 © Copyright, ForestAir, 2018
IMPORTANT : Please read this manual carefully before running this unit, and save it for future reference.
OWNER’S MANUAL
PORTABLE AIR CONDITIONER
A019-08KR


3
Air conditioners, heat pumps and dehumidiers are pieces of high value. ln order to ensure your lawful
rights and interests, if you are not familiar with the installation of this type of appliance, please have a
professional technician do the installation for you. This instruction manual is the universal-purpose version
for this model manufactured by ForestAir. The appearance of the unit that you have purchased may differ
from the ones seen in this manual, however it does not change the basic instructions on how to operate
and use the appliance.
To ensure satisfactory operation for many years to come, this manual should be read carefully before
using the product. After reading, store in a safe place. Please refer to the manual for questions on use or
in the event that any irregularities occur.
1.0. SAFETY INSTRUCTIONS ........................................................................................................................4
2.0. COMPONENTS ........................................................................................................................................5
3.0. INSTALLATION GUIDE
3.1. Assembling the exhaust hose ................................................................................................................6
3.2. Assembling and installing the window kit ..............................................................................................7
3.3. Connecting the exhaust hose to the window kit....................................................................................8
4.0. OPERATION GUIDE
4.1. Control panel and remote control overview ........................................................................................10
4.2. Button functions ...................................................................................................................................12
4.3. Remote control operation ....................................................................................................................13
4.4. Other functions .....................................................................................................................................13
4.5. Water drainage .....................................................................................................................................14
5.0. CARE & MAINTENANCE
5.1. Cleaning the surface ............................................................................................................................15
5.2. Cleaning the air lter ............................................................................................................................15
5.3. Postseason storage .............................................................................................................................15
6.0. TROUBLESHOOTING ............................................................................................................................16
7.0. WARRANTY .............................................................................................................................................17
TABLE OF CONTENT
FOREWORD
Electrical products should be properly disposed.
Please recycle where facilities exist.
Check with your local authority or retailer for recycling.

4
Read the following safety instructions before installing the unit or doing service work.
To reduce the risk of re, electric shock, or personal injury when using this appliance, follow these basic
safety precautions.
PRECAUTIONS
▪ The air conditioner is only suitable for indoor use, no other applications.
▪ Follow local grid interconnection rules while installing the air conditioner and ensure that it is
properly grounded. If you have any question on electrical installation, follow the instructions of the
manufacturer, and if necessary, ask a professional electrician to install it.
▪ Place the unit on a at surface and in a dry area. Keep a clearance of at least 50 cm (20 in) around
the appliance and the surrounding objects or walls.
▪ After the air conditioner is installed, ensure that the power plug is intact and rmly inserted into the
electric outlet. Arrange the power cord so that no one accidentally trips over it or pulls it out of the
outlet.
▪ Do not put any object into the air inlet or outlet of the air conditioner. Keep the air inlet and outlet
free from obstructions.
▪ When installing the drainage hose, ensure that it is properly connected and not twisted or bent.
▪ While adjusting the horizontal and vertical shutters of the air outlet, handle gently to avoid
damaging any parts.
▪ When moving the appliance, make sure that it is in an upright position.
▪ Keep the appliance away from gasoline, ammable gas, stoves and other heat sources.
▪ Do not disassemble, overhaul or modify the air conditioner arbitrarily, it could cause a malfunction
or even personal injury and material damage. To avoid danger, if a failure occurs, ask the
manufacturer or professionals to repair it.
▪ Do not install and use the air conditioner in the bathroom or other humid environments.
▪ Do not pull the plug as a mean to turn the appliance off.
▪ Do not place any liquid containers on top of the unit to prevent water or other liquids from spilling
into the air conditioner.
▪ Do not use insecticide sprays or other ammable substances near the air conditioner.
▪ Do not wipe or wash the air conditioner with chemical solvents such as gasoline or alcohol. When
cleaning the appliance, make sure to disconnect the power supply, then clean the surface with a
soft damp cloth. If the unit is really dirty, scrub with a mild detergent.
▪ This appliance is not intended for use by persons (including children) with reduced physical,
sensory or mental capabilities, or lack of experience and knowledge, unless they have been given
supervision or instruction concerning use of the appliance by a person responsible for their safety.
Children should be supervised to ensure that they do not play with the appliance.
WARNING : Can cause serious personal injury or death.
CAUTION : Can lead to injury or structural damage under some conditions.
1.0. SAFETY INSTRUCTIONS

5
2.0. COMPONENTS
FRONT VIEW
8
7
5
10
REAR VIEW
1
2
3
4
9
6
Extendable
exhaust hose
Window adapter Hose connector Remote control
Wing nut and bolt
Type A screw (2)
Grill
1 Control panel 5 Air lter 9 Exhaust vent
2 Air outlet / Shutters 6 Continuous drain nozzle
10
Power cord and plug
3 Handle 7Drain port
4Castor 8 Rubber plug and drain cap
Window slider kit (2 panels)
6
3.0. INSTALLATION GUIDE
Caution : Before using the air conditioner, make sure
it has been in an upright position for at least two hours.
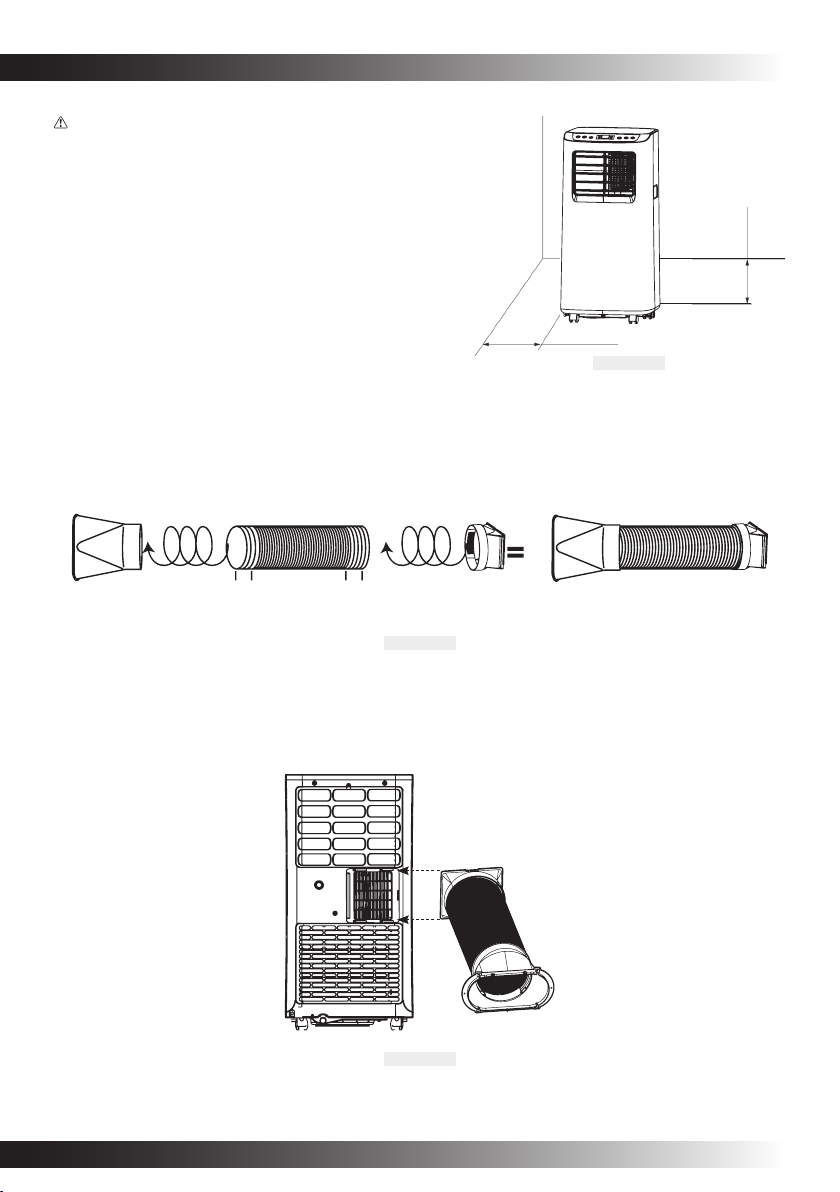
Position the air conditioner near a window, on a level
surface, in the upright position. For best performance,
leave at least 50 cm (20 in) of clearance all around the
unit to allow good airow (see Figure 1). Do not install
and use the appliance in a bathroom or other humid
environments.
█ 3.1. ASSEMBLING THE EXHAUST HOSE
1) Screw on the window adapter unto the extendable hose on one end, and the hose connector on
the other (as show in Figure 2). Ensure proper t on both ends. The supplied exhaust hose can be
extended to a maximum of 150 cm (59 in).
2) Align the hose connector with the exhaust vent, then push the connector on the slide rails all the way
to the left until it snaps into place (as shown in Figure 3). Keep the exhaust hose assembly horizontal
to avoid getting stuck.
5-10 cm (2-4 in)
Stretch both ends of the exhaust hose for 10 to 15 cm (4 to 6in)
5-10 cm (2-4 in)
FIG. 2
FIG. 3
Slide to snap
into place
FIG. 1
Min. 50 cm (20 in)
Min. 50 cm (20 in)

7
3.0. INSTALLATION GUIDE
█ 3.2. ASSEMBLING AND INSTALLING THE WINDOW KIT
Your window kit has been designed to t most standard vertical and horizontal window applications,
however it may be necessary for you to improvise or modify some aspect of the installation procedures
for certain types of window. Adjust the panels to the desired length and use provided metal wing nuts
and bolts to secure (see table for minimum and maximum window openings).
MAXIMUM : 130 cm (51 in)
MINIMUM : 23 cm (9 in)
Panel
Window length A B
23-65 cm (9-25 in) ●
46-130 cm (26-51 in) ● ●
Notes :
▪ If the window opening is less than 65 cm (25 in), the minimum length of the panel A, shorten the panel
by cutting off the exceeding length in order to t the window opening.
▪ Never cut out the hole from panel A.
A : 65 cm (25 in)
B : 65 cm (25 in)
FIG. 4 – For a 23-65 cm (9-25in) window opening
Panel A
Panel A
23-65 cm (9-25 in)
23-65 cm (9-25 in)
Panel A
Panel B
Panel B
66-96 cm (26-38 in)
66-96 cm (26-51 in)
FIG. 5 – For a 66-130 cm (26-51 in) window opening
Panel A

8
3.0. INSTALLATION GUIDE
█ 3.3. CONNECTING THE EXHAUST HOSE TO THE WINDOW KIT
Extend the exhaust hose, connect the end with the window adapter to the window kit then nally attach
the grill to prevent large insects and small animals from entering (as shown in Figure 7, 8 and 9).
Note : There may be poor sealing due to
gaps left by some non-standard windows.
Please purchase appropriate foam
weatherstripping (not included) in order to
enhance the cooling efciency of the air
conditioner.
FIG. 8 – Slide to lock
Insert
Slide
FIG. 9 – Fix the grill to the adapter with screws
FIG. 6 – Add foam weatherstripping
FIG. 7 – Connect to window panel A
Panel A
Type A screws

9
3.0. INSTALLATION GUIDE
Caution :
▪ The length of the exhaust hose is specially designed for the unit. Do not replace by any other hose, or
connect to an another one, as this this may cause malfunction.
▪ The exhaust hose should be free of any obstructions.
▪ An exhaust hose with sharp angles and bents will prevent the air from being evacuated properly
which could cause the unit to malfunction or shut-off.
NOT RECOMMENDED RECOMMENDED

10
4.0. OPERATION GUIDE
█ 4.1. CONTROL PANEL AND REMOTE CONTROL OVERVIEW
CONTROL PANEL INDICATORS
CONTROL PANEL KEYS
TIMER
SETTING
FAN SPEED
SELECTION
UP DOWN MODE
SELECTION
POWER
ON / OFF
MODE
RESERVOIR FULL
TEMPERATURE / TIME LCD DISPLAY
POWER ON / OFF
SLEEP MODE
TIMER
TEMPERATURE UNIT (°C / °F)
Tabla de contenidos
Otros manuales de Acondicionador de aire de ForestAir

ForestAir
ForestAir F001-MP8K Manual de usuario

ForestAir
ForestAir FGH-42ES-MZ Manual de usuario

ForestAir
ForestAir FA-H09-A20TL Manual de usuario

ForestAir
ForestAir F001-MP8K-B Manual de usuario

ForestAir
ForestAir MZ Series Manual de usuario

ForestAir
ForestAir 13-05022 Manual de usuario

ForestAir
ForestAir E23 Series Manual de usuario

ForestAir
ForestAir 13-04595 Manual de usuario

ForestAir
ForestAir FA-10PA Manual de usuario

ForestAir
ForestAir 13-04596 Manual de usuario


