FläktGroup CPD Series Guía

OPERATION, MAINTENANCE, INSTALLATION, COMMISSIONING, SPARE PARTS
COOKER HOOD CPD

Cooker hood CPD - Installation and Maintenance Manual
2
FläktGroup DC_8757GB_20190130_R2
Specifications are subject to alteration without notice
CONTENT
WARNING! THE DEVICE CAN BE USED BY CHILDREN FROM 8 YEARS UPWARDS AND PEOPLE (INCLUDING
CHILDREN) WITH REDUCED PHYSICAL, SENSORY OR MENTAL CAPABILITIES, OR LACK OF EXPERIENCE AND
KNOWLEDGE UNLESS THEY HAVE RECEIVED GUIDANCE OR INFORMATION ON HOW TO USE THE DEVICE SAFELY
AND UNDERSTAND THE RISKS THAT CAN OCCUR. CHILDREN SHOULD NOT PLAY WITH THE APPLIANCE. CLEANING
AND MAINTENANCE IS NOT CARRIED OUT BY CHILDREN WITHOUT SUPERVISION.
MAINTENANCE (FOR THE USER)
Cleaning .......................................................................................................... 3
Replacing of the low energy lamp....................................................... 3
General ............................................................................................................ 3
Operating of CPDA, CPDJ and CPDR.....................................................4
Operating of CPDB, CPDC, CPDG, CPDH, CPDK.............................. 5
INSTALLATION (FOR INSTALLERS AND SERVICE PERSONNEL)
Installation height ...................................................................................... 6
Main supply .................................................................................................. 6
General ............................................................................................................ 6
CPDA .................................................................................................................7
CPDB................................................................................................................. 8
CPDC ............................................................................................................... 8
CPDG ............................................................................................................... 9
CPDH ............................................................................................................. 10
CPDJ ............................................................................................................... 10
CPDK .............................................................................................................. 11
CPDR .............................................................................................................. 11
ELECTRICAL CONNECTIONS (FOR INSTALLERS AND SERVICE PERSONNEL)
CPDG and CPDR..................................................................................................12
ADJUSTMENT, COMMISSIONING (FOR INSTALLERS AND SERVICE PERSONNEL)
CPD(A, B, C, G, R)- Basic ventilation .................................................13
CPD(A, B, C, G, R) - Forced ventilation .............................................14
CPD(H, K) - Basic ventilation ................................................................15
CPD(H, J, K, R) - Forced ventilation ................................................... 16
GENERAL
Spare parts CPD(A, B, C, G, H, J, K, R)........................................................17
Declaration of conformity................................................................................18
Disposal of product and packaging materials...................................... 19
Cooker hoods CPDD and CPDL, see separate instruction (8759).

Cooker hood CPD -Installation and Maintenance Manual
3
FläktGroup DC_8757GB_20190130_R2
Specifications are subject to alteration without notice
MAINTENANCE
CLEANING OF COOKER HOOD
Do not use abrasive sponge or cloth.
alt.
1
2
33
CLEANING OF GREASE FILTER
REPLACING OF THE LOW ENERGY LAMP
Check the grease filter every week.
Clean if needed.
Note! Do not use the cooker hood
without grease filter fitted.
GENERAL
There is a fire risk if cleaning is not carried out
in accordance with the instructions.
Accessible parts may become hot when used
with cooking appliances.
Do not flambé under the cooker hood.
If the supply cord is damaged, it must be replaced by the
manufacturer, its service agent or similarly qualified persons
in order to avoid hazard.
8 W/E14

Cooker hood CPD - Installation and Maintenance Manual
4
FläktGroup DC_8757GB_20190130_R2
Specifications are subject to alteration without notice
MAINTENANCE
OPERATING OF CPDA, CDPJ AND CPDR
Handle for boosting Lighting

Cooker hood CPD -Installation and Maintenance Manual
5
FläktGroup DC_8757GB_20190130_R2
Specifications are subject to alteration without notice
NORMAL
MIN
MAX
MIN
1
2
MIN
1
2
MIN
1
2
MAINTENANCE
OPERATING OF CPDB, CPDC, CPDG, CPDH AND CPDK
Handle for boosting Lighting Handle for fan speed
MIN
1
2

Cooker hood CPD - Installation and Maintenance Manual
6
FläktGroup DC_8757GB_20190130_R2
Specifications are subject to alteration without notice
INSTALLATION (FOR INSTALLERS AND SERVICE PERSONNEL)
INSTALLATION HEIGHT MAIN SUPPLY
min 400 mm
All cooker hoods has to be connected directly or indirectly via the heat
recovery unit/exhaust fan to earth.
If the supply cord is damaged, it must be replaced by the manufac-
turer, its service agent or similarly qualified persons in order to avoid
hazard.
The distance between the stove and the lower edge of the cooker hood
has to be at least 400 mm, recommended distance 500 mm.
When the cooker hood is located above a gas appliance, this distance
shall be at least 650 mm. If the instructions for installation of the gas
hob specify a greater distance, this has to be taken into account.
GENERAL
The air must not be discharged into a flue that is
used for exhausting fumes from appliances burn-
ing gas or other fuels.
Regulations concerning the discharge of air have
to be fulfilled.

Cooker hood CPD -Installation and Maintenance Manual
7
FläktGroup DC_8757GB_20190130_R2
Specifications are subject to alteration without notice
INSTALLATION (FOR INSTALLERS AND SERVICE PERSONNEL)
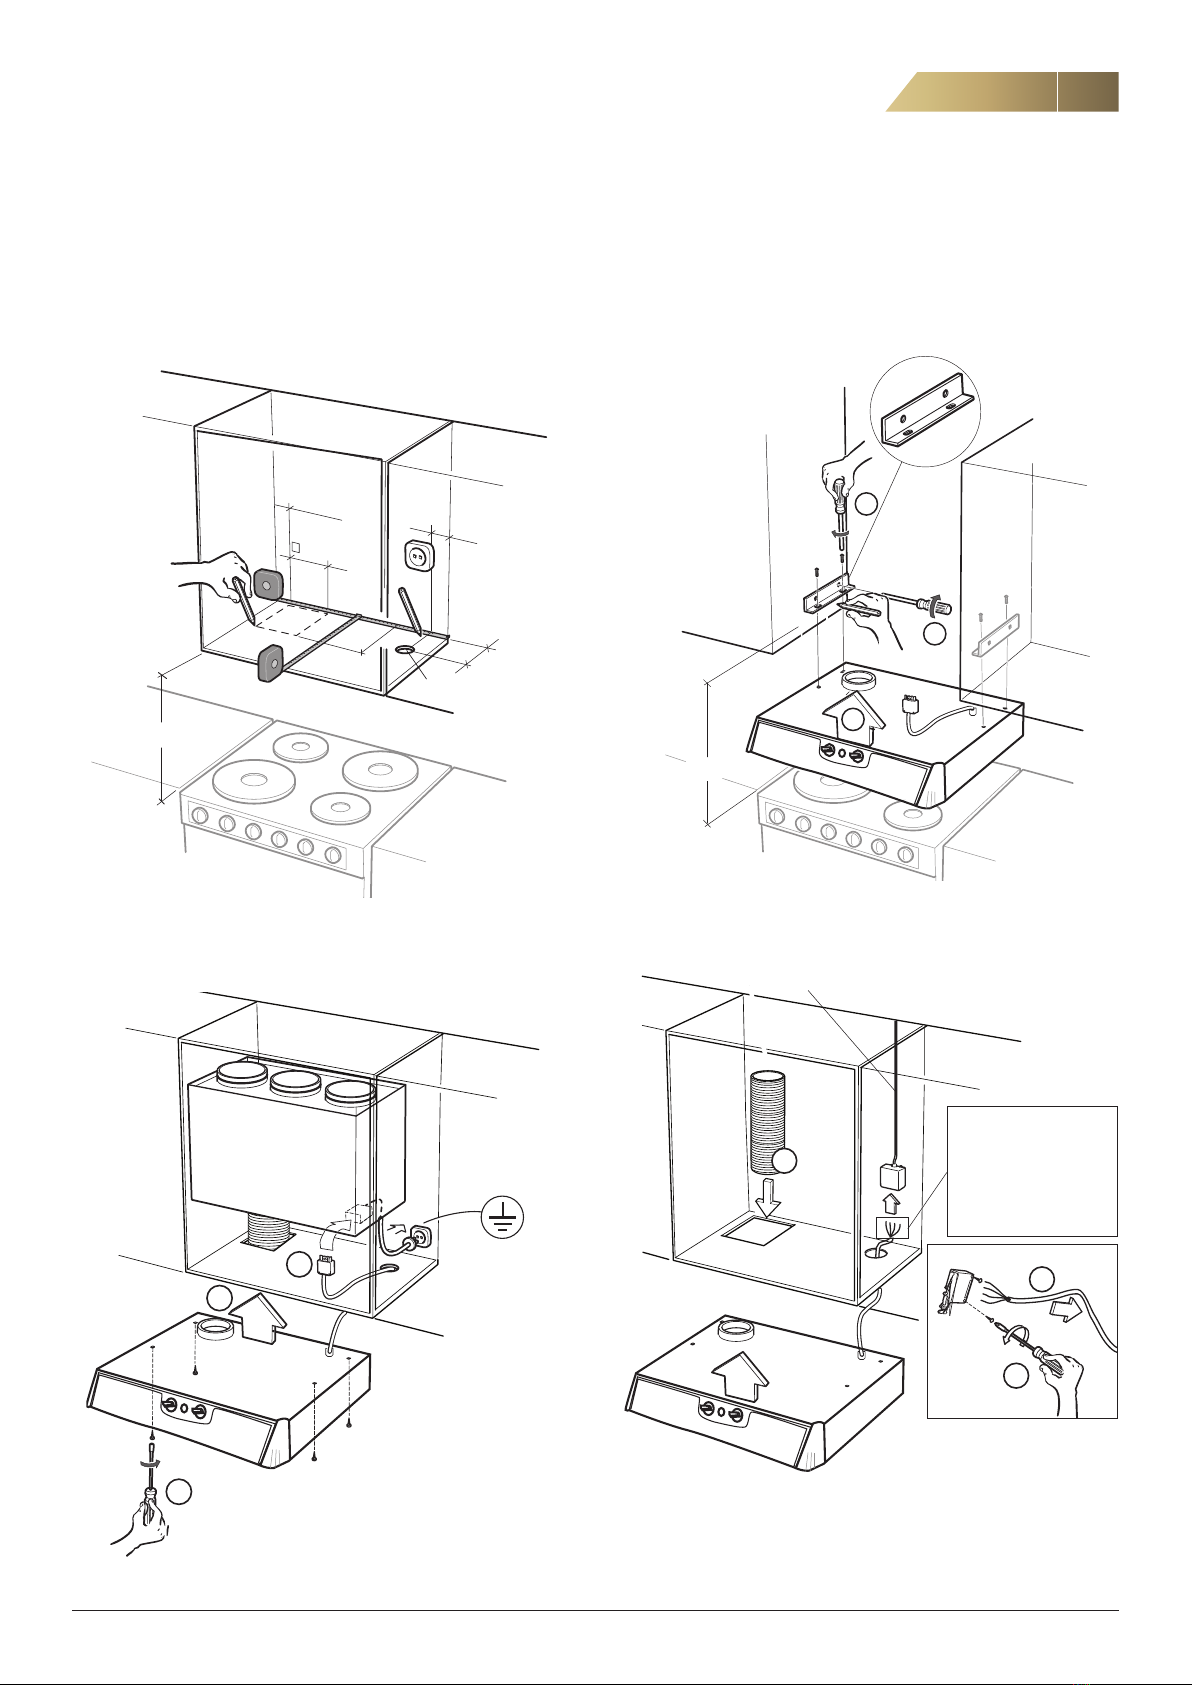
CPDA
Intended for multiple-unit dwellings with a central extract air fan or a heat recovery unit.
Suitable for both new production and replacement of older cooker hoods.
INSTALLATION BENEATH KITCHEN CABINETS
a
a
b
b
INSTALLATION BETWEEN KITCHEN CABINETS
min 500 mm
2
3
1
max
300 mm
1
2
3
54
max
300 mm
12mm
Ø 50
160 100
a
min 500 mm
a =700
a =600
a =500
200
100
100
415
365
365
255
205
205

Cooker hood CPD - Installation and Maintenance Manual
8
FläktGroup DC_8757GB_20190130_R2
Specifications are subject to alteration without notice
INSTALLATION (FOR INSTALLERS AND SERVICE PERSONNEL)
CPDB
Replacement hood for older exhaust air fan JBDD-aa with capacitor box, manufactured before 2007.
JBDD-aa
(earlier version)
CPCB
JBDD-aa
(earlier version)
a
a
b
b
CPDC
Replacement hood for older heat recovery unit RDKG without bypass (fits RDKG-a-1-c-d-1).
1
5
6
2
3
4
3.1 3.2
Remove the old
cooker hood.
It is important to seal the grommet by putting
back the small piece of sealing material.
Remove the old cooker hood.
Cooker hood CPD -Installation and Maintenance Manual
9
FläktGroup DC_8757GB_20190130_R2
Specifications are subject to alteration without notice
CPDG
With transformer, fits for example the new JBDH. (Fits JBDD-aa-1-2, JBFG and also as replacement
cooker hood for controlling older exhaust air fans and units, for example JBDB, JBDC and RDAA.)
INSTALLATION (FOR INSTALLERS AND SERVICE PERSONNEL)
1
2
1 = Orange - Supply
voltage
to fan
2 = Blue - Neutral
3 = Black - Phase
4 = Yellow/Green - Ground
3
2
3
1
min 500 mm
CONNECTION TO EXHAUST FAN JBDD, GENERATION 2
INSTALLATION BETWEEN KITCHEN CABINETS
CONNECTION TO OTHER FANS
For electrical installation, see wiring examples on page 12.
INSTALLATION BENEATH KITCHEN CABINETS
2
3
1
JBDD generation 2
JBDH
Ø50
176
115
33
96
min 500 mm
160

Cooker hood CPD - Installation and Maintenance Manual
10
FläktGroup DC_8757GB_20190130_R2
Specifications are subject to alteration without notice
CPDH
Replacement hood for older heat recovery units RDKG with bypass. (Fits RDKG-a-2-c-d-1).
INSTALLATION (FOR INSTALLERS AND SERVICE PERSONNEL)
Remove the old cooker hood.
ab
1
4
5
3
2
CPDJ
For heat recovery unit RDKR or RDKS.
ab
3
2
1
RDKS
RDKS
4
5
4.1 4.2
7
6
Demontera den gamla spiskåpan.
It is important to seal the grommet by put-
ting back the small piece of sealing material.
The picture illustrates a right hand unit.
Otros manuales para CPD Series
1
Este manual sirve para los siguientes modelos
8
Tabla de contenidos
Otros manuales de Campana de ventilación de FläktGroup


