Field Tuff ATV-CBP Manual de usuario

ACREAGE SEEDER / PLANTER
OWNER’S MANUAL
WARNING:
Read carefully and understand all ASSEMBLY AND OPERATION
INSTRUCTIONS before operating. Failure to follow the safety rules and other
basic safety precautions may result in serious personal injury
basic
safety
precautions
may
result
in
serious
personal
injury
.
Item# ATV-CBP
12242013

Thank you very much for choosing this product! For future reference, please complete the owner’s
record below:
Model: ___ATV-CBP__ Purchase Date: _______________
Save the receipt, warranty and these instructions. It is important that you read the entire manual to
become familiar with this product before you begin using it.
This machine is designed for certain applications only. The manufacturer cannot be responsible for
issues arising from modification. We strongly recommend this machine not be modified and/or used
for any application other than that for which it was designed. If you have any questions relative to a
particular application, DO NOT use the machine until you have first contacted us to determine if it
can or should be performed on the product.
For technical questions please call 1-218-943-6296.
INTENDED USE
Planter is designed for planting small feed plots or hobby farm.
TECHNICAL SPECIFICATIONS
Manual lift for raising and lowering
13" Pneumatic tires
Adjustable row width from 14"-36"
Ground Driven
Measurements of hopper: 12"x6" at top, 10"x2" at bottom, 8" deep
.22 bushels/hopper, 32 cups/hopper, 1.75 gallons
WARNING: Read and understand all instructions. Failure to follow all instructions listed below
may result in serious injury.
CAUTION: Do not allow persons to operate or assemble this planter until they have read
this manual and have developed a thorough understanding of how the planter works.
WARNING: The warnings, cautions, and instructions discussed in this instruction manual
cannot cover all possible conditions or situations that could occur. It must be understood by the
operator that common sense and caution are factors which cannot be built into this product, but must
be su
pp
lied b
y
the o
p
erator.
2
pp y p
SAVE THESE INSTRUCTIONS

WORK AREA
•Keep work area clean, free of clutter and well lit. Cluttered and dark work areas can cause
accidents.
•Keep children and bystanders away while operating the planter. Distractions can cause you to lose
control, so visitors should remain at a safe distance from the work area.
control,
so
visitors
should
remain
at
a
safe
distance
from
the
work
area.
•Be aware of all power lines, electrical circuits, water pipes and other mechanical hazards in your
work area, particularly those hazards below the work surface hidden from the operator’s view that may
be unintentionally contacted and may cause personal harm or property damage.
•Be alert of your surroundings. Using the planter in confined work areas may put you dangerously
close to cutting tools and rotating parts.
PERSONAL SAFETY
•Stay alert, watch what you are doing and use common sense when using the planter. Do not use the
planter while you are tired or under the influence of drugs, alcohol or medication. A moment of
inattention while operating the planter may result in serious personal injury.
•Dress properly. Do not wear loose clothing, dangling objects, or jewelry. Keep your hair, clothing and
gloves away from moving parts. Loose clothes, jewelry or long hair can be caught in moving parts.
•Use safety apparel and equipment. Use safety goggles or safety glasses with side shields which
comply with current national standards, or when needed, a face shield. Use as dust mask in dusty
w
o
rk
co
n
d
i
t
i
o
n
s
. Thi
s
app
li
es
to
a
ll
pe
r
so
n
s
in
t
h
e
w
o
rk
a
r
ea
. Al
so
use
n
o
n-
s
ki
d
sa
f
ety
s
h
oes,
h
a
r
d
h
at,
o co d t o s s app es to a pe so s t e o a ea so use o
s d sa ety s oes, a d at,
gloves, dust collection systems, and hearing protection when appropriate.
PLANTER USE AND CARE
•Do not modify the planter in any way. Unauthorized modification may impair the function and/or
safety and could affect the life of the equipment. There are specific applications for which the planter
was designed.
•Always check of damaged or worn out parts before using the planter. Broken parts will affect the
plante
r
operation. Replace or repair damaged or worn parts immediately.
•Do not exceed the planter load capacity.
•Distribute the load evenly. Uneven loads may cause the planter to tip, resulting in personal injury to
the operator or others.
•Use the planter on flat and level surfaces capable of supporting the planter and its maximum load.
Pulling or pushing a load on a slanted or uneven surface can result in loss of control.
•Store idle planter. When planter is not in use, store it in a secure place out of the reach of children.
Ins
p
ect it for
g
ood workin
g
condition
p
rior to stora
g
e and before re-use.
pg g p g
3

HOBBY SEED PLANTER
(Patent Pending)
ASSEMBLY AND OPERATING MANUAL
PRE-ASSEMBLY:
Approximate assembly time of this product is 1 hour.
Helpful Tip: Read all instructions before starting to assemble.
WARNING: TG will not be held liable for any damages, losses
or injury, due to the misapplication or misuse of this product or
for any other reason. Proper eye and hand protection must be
worn at all times
TOOLS REQUIRED FOR ASSEMBLY
(2) 14mm Wrenches
(1) 24mm Wrench
(2) 19mm Wrenches
REMOVE ALL PARTS FROM CARTONS
Remove the hardware packs and all parts from the cartons
worn
at
all
times
.
Remove
the
hardware
packs
and
all
parts
from
the
cartons
.
Layout and identify parts included in carton contents. (see parts listing below)
Layout and identify parts included in the hardware pack. (see parts listing below)
IF ANY PARTS ARE MISSING FROM PACKAGING
Contact TG at 1-218-943-6296 for missing hardware or instructions.
4

Carton Contents
5

STEP 1: Planter Assembly
Attach the right planter assembly to the right side of the
frame assembl
y
usin
g
M10 x 85 Hex Bolt
,
lock washer
yg ,
Ø10, flat washer and rectangle plate as shown in Figure
1. Repeat above procedure for the left planter assembly.
Figure 2. shows the final assembly for this step.
6

STEP 2: Tire/Wheel Arm Assembly
Install flat washer onto the right axle shaft, then install
tire arm assembly onto axle shaft. Install M 12 x 80 Hex
Bolt M12 lock nut and tighten (Shown in Figure 3)
Bolt
,
M12
lock
nut
and
tighten
.
(Shown
in
Figure
3)
Repeat above procedure for the left side.
Figure 4 shows completed step.
7

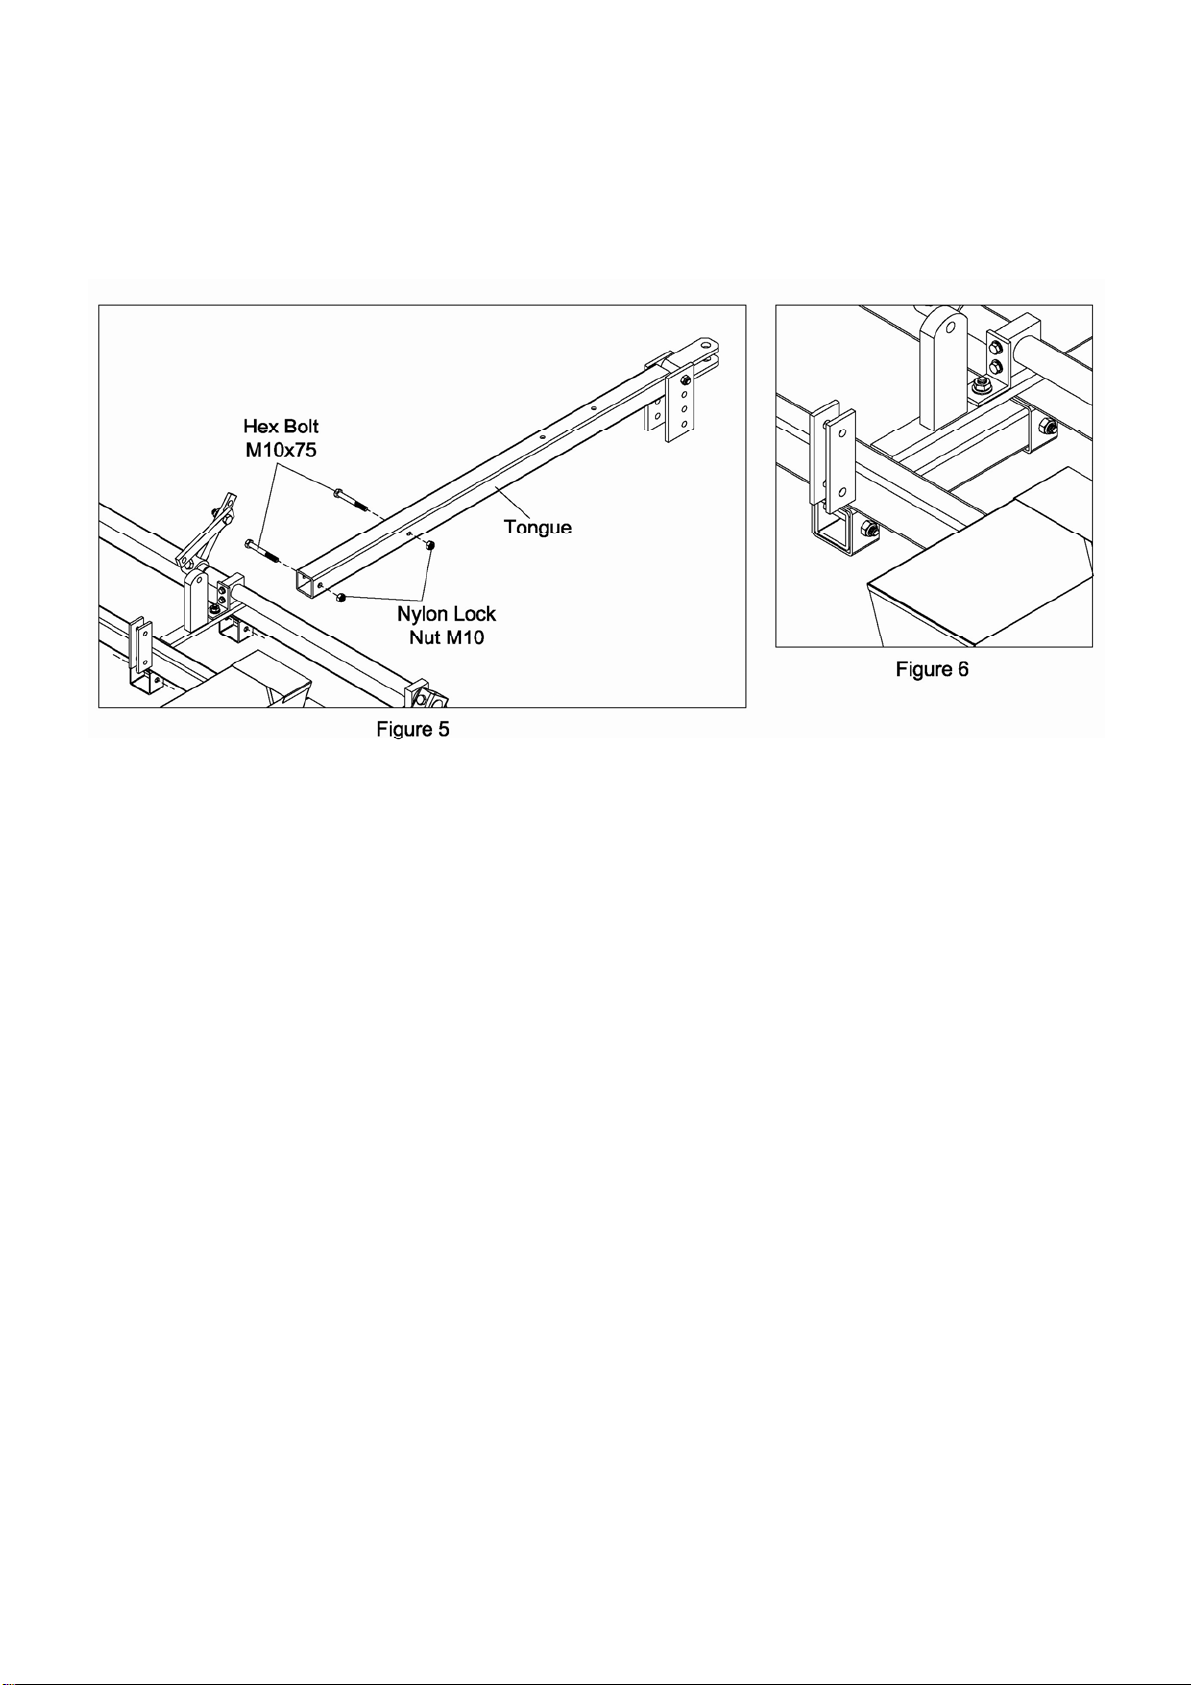
STEP 3: Tongue Assembly
Insert square tongue into the square mounts on the
frame assembly, install M 10 x 75 hex bolts, M10 lock
nuts and tighten. (As shown in figure 5)
Figure 6 shows the assembled step
Figure
6
shows
the
assembled
step
.
8

STEP 4: Lift Handle Assembly
Connect handle to the handle pivot mount using M12
flathead bolt , flat washer and M12 nut . (Shown in figure 7)
Note: Flat washer is installed between handle and handle
pivot mount
pivot
mount
.
Figure 8 shows the assembled step.
9

Note:Installlockpin(showninFigure10)whentowing
planterlongdistances.
10
Tabla de contenidos
Otros manuales de Sembradora de Field Tuff