evapolar evaSMART Manual de usuario

PRODUCT GUIDE
2O17 Evapolar Ltd.
All rights reserved, including any and all copyrights and rights on Evapolar`s
trademarks and service marks, if any. Subject to change without notice.
www.evapolar.com
evaSMART Personal Air Cooler
At the end of its service life period
the product should be recycled according
to the recycling procedures in your region.
RECYCLING

CONTENTS
Introduction
Safety regulations
First start
Daily use
Placing the device
Filling the reservoir
Moving and transportation
Temperature parameters
Usage mode
Tuning
Mobile application
Smart Home
Device Maintenance
Control panel and menu
Start screen
Control elements
Menu points
Cleaning and maintenance
Reservoir
Storage during long periods of no usage
Replacing the cartridge
Troubleshooting
Warranty
Tech specifications
Legal Information
4
4
7
9
9
10
10
13
14
14
14
15
15
16
16
17
18
20
21
21
22
24
25
26
27

— For personal safety and proper functionality of the device use only clean,
untainted tap water. If the source of water is polluted and you are not sure
about its safety, please use distilled water. It is recommended to perform
the cleaning and technical maintenance of the device according to the
“Cleaning and maintenance” section of this product guide.
— The device is not intended for use in a highly polluted environment.
Large dust particles, dirt, etc., can seriously affect the longevity of the
device’s evaporative cartridge lifecycle.
— Make sure that water does not spill onto the external parts of the device.
Do not use it near water, in a swimming pool, bathroom, laundry room,
outdoors when raining or at any other location with high humidity levels.
— In the case of a leak or if water spills onto the surface of the device,
immediately disconnect the power cord and let the device dry for at least
24 hours.
— Do not place the device under direct sunlight.
— If you do not plan to use the device for a long time, empty the water
reservoir and let the device run at maximum power for at least 4 hours
to allow the cartridge to dry out.
— Use only the original power supply from the package.
— Do not touch the power supply or power cord with wet hands.
— Unplug the device during the following actions: cleaning, technical
maintenance, removing/replacing elements and moving the device.
— To maximise the effect the device should be placed on an elevated
surface, e.g. a table or a cupboard.
— Do not place the device next to a heater or within proximity of any
electrical equipment.
— Do not place the device in passageways or any other location from
where it will cause obstruction and can be accidentally knocked over.
— Do not let any foreign objects enter the device.
— Do not place heavy items on top of the device.
INTRODUCTION
Congratulations!
You have bought your own personal evaSMART air cooler from Evapolar.
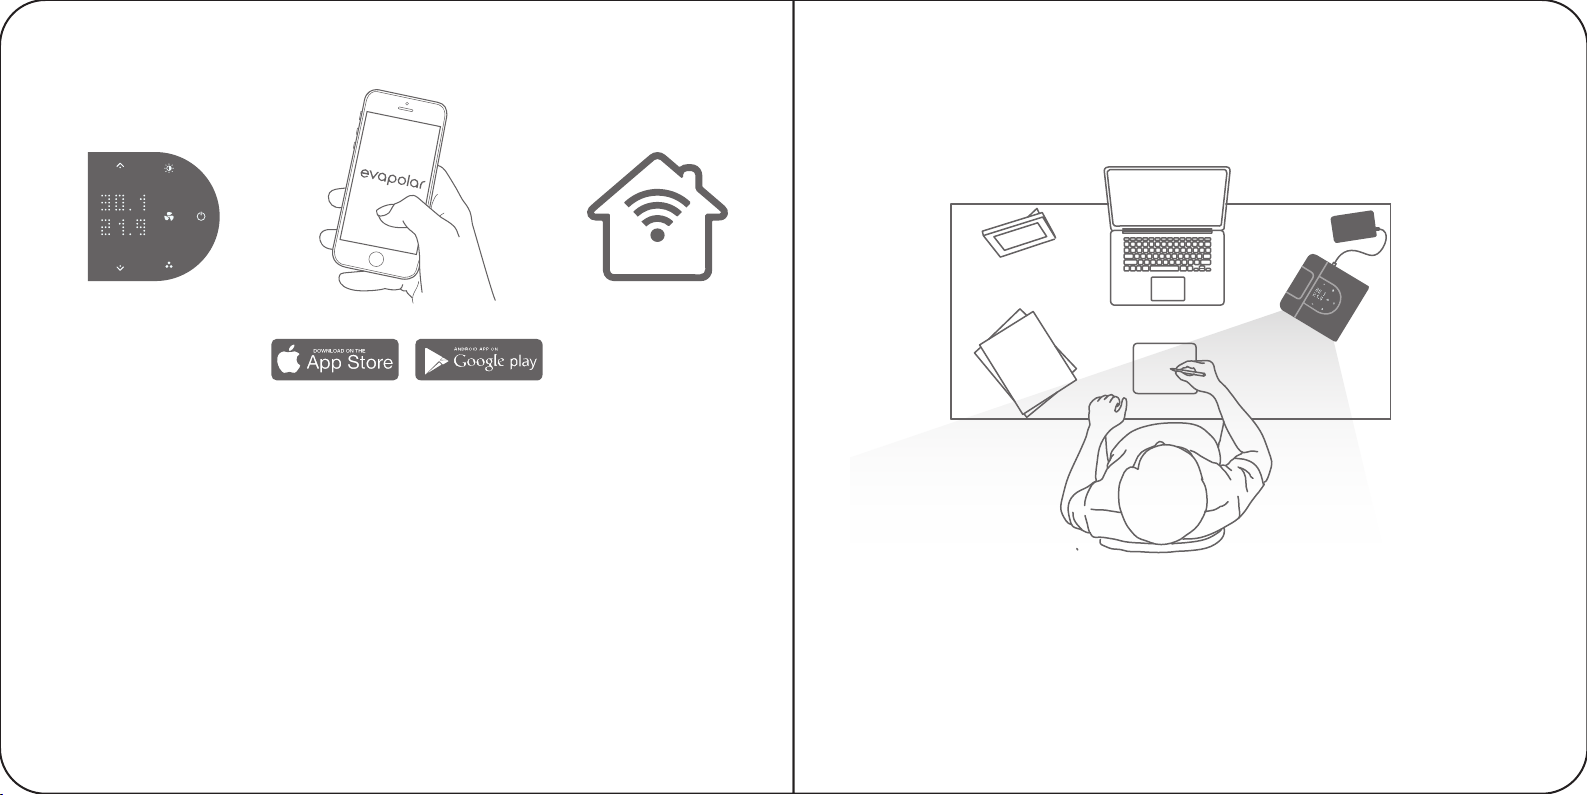
To take full advantage of the device, please install the Evapolar Mobile
Application and read the product guide before you start using it.
Intended use:
The evaSMART air cooler is designed to cool and humidify the personal
zone around you by creating a local microclimate within an area of 3 - 4 m2
(30 - 45 ft2). It also has a purification effect; filtering large dust particles
from the air. evaSMART is operated through the mobile application, Smart
Home integrations or via the device menu. The best effect can be achieved
indoors and in well-ventilated rooms.
Safety regulations:
— The device must be placed onto a smooth horizontal surface.
Tilting it may cause a water leak and damage the device.
— Do not carry the device when it is filled with water. Even after you empty
the reservoir, some water will still remain in the internal compartment.
Please refer to the section of this manual about device transportation.
4 5

1. Slide the water reservoir up.
2. Open the lid to fill up the reservoir. Fill with water.
3. Place the reservoir back onto the base. Make sure it is installed properly.
4. Use the cable to connect the device to the power source.
Press the Power button.
5. The device will switch on. The Power button on the top of the device
will light up and a short vibration will follow.
— Do not block the front and back grills of the device.
— Do not turn the device upside down; this will disrupt its functionality.
— Do not submerge the device in water or any other liquids; see cleaning
guide below.
— Do not place open fire sources (candles, etc.) on top of the device.
— People with limited physical, visual or mental abilities or lacking proper
experience and/or knowledge should never use the device without the
supervision of those responsible for their safety or those capable
of assistance in using the device.
— The device can be switched off completely only when it is disconnected
from the power supply.
— The manufacturer does not bear any responsibility for any damage arising
from failure to comply with this product guide.
— A replaceable evaporative cartridge is designed specifically for this product.
To maximise the effect of the device the cartridge should be changed
every 3-6 months depending on air and water conditions. If your cartridge
has been broken or damaged, you can purchase a replacement at
Evapolar.com or with your local retailer.
FIRST START
1 2
4 5
3
6 7

We have made sure that setting up your air cooler is quick and easy.
evaSMART is almost ready-to-use right after you unpack it. All you have to do
is connect your device to Wi-Fi, and add it to the mobile app and Smart Home.
During the following sessions your device will attach to your selected
connections automatically. Following a few simple recommendations can help
to ensure that your experience as smooth as possible.
6. Use the top panel of the device to adjust device parameters.
7. Install the Evapolar Mobile App to extend the evaSMART management
experience via Wi-Fi connection.
8. Connect evaSMART to Smart Home and use the full voice experience
for managing the device.
The temperature of the outgoing air will start decreasing in a few minutes.
You can vary the airflow using the mobile app or with the arrows on the upper
part of the device. Enjoy your personal microclimate!
Important: During the first use you may notice a technical smell.
This is normal and it will vanish completely after several hours of use.
When the first cartridge starts to fill, the evaporative pads will become rapidly
saturated with water. This is normal and will enable your device to work properly.
DAILY USE
6 7 8
SMART
8 9

1. Disconnect the device from
the power source.
2. Remove the reservoir by sliding it up
and drain the water from it.
The air cooler creates a personal comfort zone. To be in the centre of that
zone, place the device within one metre (3 ft) of your position with its front
grill facing you. To keep the device from causing any obstructions, place it
slightly to one side of your position. In this way, you will always have room
for your laptop, book or anything else needed for your activities.
Filling the reservoir
The device only needs water to work properly. You should remove the reservoir
from the left side of the device, fill it with water and then place it back.
The water will start flowing automatically.
Depending on the quality of the air in the room, the full reservoir should provide
from 6 to 8 hours of uninterrupted cooling. To extend this time you need
to fill up the reservoir, place it in the device, wait until the cartridge is full
of water and then refill the reservoir. After this operation, the running time
will be extended by 1 to 3 hours. For instance, this may be useful if you want
to use the device whilst you sleep. The transparent reservoir lets you assess
the water level instantly. It is worth mentioning that the evaporative cartridge
will absorb up to 400 ml of water which means that once the reservoir is empty,
the device will continue cooling for another few hours. The default mode
will have the device notify you by illuminating the reservoir in red when the water
runs out. You can turn off these notifications at any time via the mobile
application. When the water runs out completely, the device will continue
working as a regular fan. You can use the replaceable reservoir whilst the
device is working as it will not affect its operation.
Moving and transportation
Before any kind of transportation, the device should be disconnected
from the power source. In addition to the water in the transparent reservoir,
the device also stores some water in the internal tank so that the evaporative
cartridge can absorb it. Before transportation, it is highly recommended to
empty the reservoir and set the device to run on the maximum fan speed
for at least one hour to dry the water out from the internal reservoir.
Transportation without drying the water out the internal reservoir is to be
attempted at your own risk. Water leakage during the transportation is not
covered by the warranty. In order to avoid leakage, the device should be
positioned horizontally and moved slowly.
In order to remove the water instantly from the internal reservoir and prepare
device for transportation, please complete the following:
1
2
11

3. Put the reservoir back in place.
4. It is highly recommended to connect the device to power source again
and set the device to run on the maximum fan speed for at least one
hour afterwards to dry the water out from the internal reservoir.
5. Disconnect the device from the power source. The device is ready
for transportation.
Important: Even if there is no water in the internal reservoir, the evaporative
cartridge could still be wet. Do not transport the device on long distances with
a wet cartridge; please see section “Storage during long periods of no usage”.
For shorter distances, make sure that the device with a wet cartridge is not
isolated in a box or bag with no air flow.
Temperature parameters
evaSMART Air Coolers work by using natural evaporative cooling so its
power level can change in various climates. The charts below summarise
the cooling power approximates in different aerial conditions in both
Centigrade and Fahrenheit.
3 4
5
MAX
60 min
13

Usage modes
The device is created to be used at any location that meets the humidity
and temperature prerequisites from the previous paragraph. Minimal power
requirements allow the device to run even from a portable power bank.
Required electricity parameters: voltage 5 V, current 2 A and up.
Important: Due to outside conditions varying greatly, Evapolar is not responsible
for the way that the device functions outdoors.
Tuning
You can alter the colour and brightness level of the lighting, temperature
measurement units and water level indications. All of the above is done
through the Menu or mobile application; see paragraph on Control Panel
and Menu.
Mobile Application
The full list of device features, including humidifier and sleeping mode, is
available through the mobile application that is connected to the device
via Wi-Fi. All of the instructions for Evapolar mobile application usage
are available in the application.
Smart Home
All of your evaSMART devices are accessible through Google Home, Amazon
Alexa, Samsung Smart Things and Apple Home Kit. To do so, please read
the manual of the Home Assistant that you wish to reach.
Device Maintenance
Depending on how often you use the device, it needs cleaning.
Important:
— Make sure that the air cooler is placed on a smooth horizontal surface
to avoid leaks and spills.
— Do not use the device in temperatures exceeding 60° C (140° F). Failing
to do so can damage both the body and internal components of the device.
— The Air Cooler performs at its best in well-ventilated premises.
— Take care when using aromatic oils or incenses. The device evaporates
water intensively so even a small amount of odourous substances can
oversaturate the air around you which is potentially dangerous to your health.
— To avoid water spillage, do not move the device whilst it is filled with
water; see paragraph on Transportation.
— Take care when pouring water into the reservoir that is still attached
to the device; do not spill water onto the body of the device.
14 15

Start Screen Control elements
CONTROL PANEL & MENU
Temperature of
incoming air
Temperature of
outgoing air
Power button
During the first use evaSMART runs with preset default parameters.
After being used and inputting your own personal settings, the device
should run with those settings automatically.
Brightness
Up button
Previous button
Down button
Next button
Colour mode/
Colour playlist
Fan speed button
17

Brightness
In this mode you can change the water reservoir brightness
to your liking. Press the sun button and use the arrows
to change the values between 1% and 100%. To decrease
or increase the brightness quickly, press and hold the
arrow button. To adjust the night mode setting, use the
mobile application.
Fan speed
In this mode you can change the fan speed to your liking.
Press the fan button and use the arrows to change the
values between 1% and 100%. To decrease or increase
the speed quickly, press and hold the arrow button.
Power button
To switch the device on or off, press the power button. To switch to the
Access point mode for Wi-Fi, press and hold the button for 3 seconds.
Measurement units
For your convenience, units may either be in Centigrade or in Fahrenheit.
To change the units, please use the mobile application.
Notifications
When the evaporative cartridge dries out, the device notifies you by
changing its colour and showing the problem on the main screen. When
the device requires more water, it will also display this info on the main screen.
These notifications are supplemented with a long vibration of the device.
Colour button
You can choose your preferred lighting colour for the water
reservoir or you may also turn off this feature. To enable
a colour playlist mode, press the colour button and hold
for 3 seconds.
Factory settings
To restore the factory settings, press a combination
of the arrow buttons and power button all at once
and hold for 5 seconds.
Menu points
PRESS HOLD
3 SEC
+ +
HOLD
5 SEC
18 19
Otros manuales para evaSMART
1
Tabla de contenidos
Otros manuales de Acondicionador de aire de evapolar

evapolar
evapolar evaSMART EV-3000 Manual de usuario

evapolar
evapolar evaLIGHT plus EV-1500 Manual de usuario

evapolar
evapolar evaCHILL EV-500 Manual de usuario

evapolar
evapolar evaLIGHT Guía de instalación y uso

evapolar
evapolar evaLIGHTplus EV-1500 Manual de usuario

evapolar
evapolar evaSMART Manual de usuario


