Euro Appliances EIC90BGR Manual de usuario

USAGE AND
CARE GUIDE
PRODUCT
CODE:
EIC90BGR
rangehoods

Content
SAFETY INSTRUCTIONS 1
INSTALLATION 3
Start Using Your Cooker Hood 7
TROUBLESHOOTING 10
MAINTENANCE AND CLEANING 10
ENVIRONMENTAL PROTECTION 13

1
SAFETY INSTRUCTIONS
This manual explains the proper installation and use of your cooker hood,
please read it carefully before using even if you are familiar with the product.
The manual should be kept in a safe place for future reference.
Never to do:
●Do not try to use the cooker hood
without the grease filters or if the filters
are excessively greasy!
●Do not install above a cooker with a
high level grill.
●Do not leave frying pans unattended
during use because overheated fats or
oils might catch fire.
●Never leave naked flames under the
cooker hood.
●If the cooker hood is damaged, do not
attempt to use.
●Do not flambé under the cooker hood.
●CAUTION: Accessible parts may
become hot when used with cooking
appliances.
●The minimum distance between the
supporting surface for the cooking
vessels on the hob and the lowest part
of the cooker hood. (When the cooker
hood is located above a gas appliance,
this distance shall be at least 65 cm)
●The air must not be discharged into a
flue that is used for exhausting fumes
from appliances burning gas or other
fuels. Range hoods and other cooking
fume extractors may adversely affect
the safe operation of appliances
burning gas or other fuels (including
those in other rooms) due to back flow
of combustion gases. These gases
can potentially result in carbon
monoxide poisoning. After installation
of a range hood or other cooking fume
extractor, the operation of open flued
gas appliances should be tested by a
competent person to ensure that back
flow of combustion gases does not
occur.
Always to do:
●Important! Always switch off the
electricity supply at the mains during
installation and maintenance such as
light bulb replacement.
●The cooker hood must be installed in
accordance with the installation
instructions and all measurements
followed.
●All installation work must be carried
out by a competent person or qualified
electrician.
●Please dispose of the packing material
carefully. Children are vulnerable to it.
●Pay attention to the sharp edges
inside the cooker hood especially
during installation and cleaning.
●Make sure the ducting has no bends
sharper than 90 degrees as this will
reduce the efficiency of the cooker
hood.
●Warning: Failure to install the screws
or fixing device in accordance with
these instructions may result in
electrical hazards.
●Warning: Before obtaining access to
terminals, all supply circuits must be
disconnected.

2
Always to do:
●Always put lids on pots and pans
when cooking on a gas cooker.
●When in extraction mode, air in the
room is being removed by the cooker
hood. Please make sure that proper
ventilation measures are being
observed. The cooker hood removes
odours from room but not steam.
●There shall be adequate ventilation of
the room when the cooker hood is
used at the same time as appliances
burning gas or other fuels.
●Cooker hood is for domestic use only.
●If the supply cord is damaged, it must
be replaced by the manufacturer, its
service agent or similarly qualified
persons in order to avoid a hazard.
●This appliance can be used by
children aged from 8 years and above
and persons with reduced physical,
sensory or mental capabilities or lack
of experience and knowledge if they
have been given supervision or
instruction concerning use of the
appliance in a safe way and
understand the hazards involved.
Children shall not play with the
appliance. Cleaning and user
maintenance shall not be made by
children without supervision.
Always to do:
●Caution: The appliance and its
accessible parts can become hot
during operation. Be careful to avoid
touching the heating elements.
Children younger than 8 years old
should stay away unless they are
under permanent supervision.
●There is a fire risk if cleaning is not
carried out in accordance with the
instructions.
●Regulations concerning the discharge
of air have to be fulfilled.
●Clean your appliance periodically by
following the method given in the
chapter MAINTENANCE.
●For safety reason, please use only the
same size of fixing or mounting screw
which are recommended in this
instruction manual.
●Regarding the details about the
method and frequency of cleaning,
please refer to maintenance and
cleaning section in the instruction
manual.
●Cleaning and user maintenance shall
not be made by children without
supervision.
●When the cooker hood and
appliances supplied with energy other
than electricity are simultaneously in
operation, the negative pressure in the
room must not exceed 4 Pa(4 x 10-
5bar).
●WARNING: Danger of fire: do not
store items on the cooking surfaces.
●Asteam cleaner is not to be used.
●NEVER try to extinguish a fire with
water, but switch off the appliance and
then cover flame e.g. with a lid or a
fire blanket.

3
INSTALLATION (VENT OUTSIDE)
MOUNTING OF THE V-FLAP
If the cooker hood does not have an assembled V-flap 1, you should mount the half-
parts to its body. The images only show an example of how to mount the V-flap,
because the outlet may vary according to different models and configurations.
To mount the V-flap 1 you should:
• Mount two half-parts 2 into the body 6;
• the pin 3 should be top oriented;
• the axis 4 should be inserted into the holes 5 on the body;
• repeat all the operations for the 2nd half-part.
INSTALLATION
If you have an outlet to the outside, your cooker hood can be connected as below
picture by means of an extraction duct. (enamel, aluminum, flexible pipe or non-
flammable material with an interior diameter of 150mm)
1. Before installation, turn the unit off and unplug it from the outlet.
2. The cooker hoods should be placed at a distance of 65-75cm from the cooking
surface for best effect. See pic 1.

4
3. The ceiling must can bear at least 120kgs weight, and the thickness of the ceiling
must be ≧30mm, drill 1*170mm round hole in the ceiling.
4. According to the hanging board, drill 12 holes in the ceiling, see pic 2. 12 pcs of
ST6*40mm big flat screws will be used to fix the hanging board on the ceiling, and
then 8 pcs of M4*10 screws and M4 nut with gasket will be used to connect the
angle iron into the hanging board, see pic 1, calculated the length of the angle iron,
and 16 pcs of M4*10mm big flat screws and M4 nut with gasket will be used to
connect the angle iron and another angle iron ( the overlap length of angle iron can
not less 100mm)
5. Let the one side of the expansion pipe go outside through the hole of 170mm, see
pic 3& 4.

5
6. 4 pcs ST4*8mm of big flat screws will be used to connect the inside chimney into
the hanging board, then put on the outside chimney, a hook will be used to put up
the outside chimney in order to the next installation, see pic 5. Install the v-flap to
the outlet. See pic 6.
7. Hold up the hood, 16 pcs of M4*10mm big flat screws will be used to connect the
hood body into angle iron, see pic 7.
8. Install the expansion pipe to the outlet and connect the power supply. See pic 8.Put
the expansion pipe on the outlet; after ensure all the things are ok, put down the
hook, take from the outside chimney, see pic 9.

6
HINTS FOR EXHAUST DUCT INSTALLATION
The following rules must be strictly followed to obtain optimal air extraction:
• Keep expansion pipe short and straight.
• Do not reduce the size or restrict expansion pipe.
• When using expansion pipe always install the pipe pulled taut to minimize pressure
loss.
• Failure to observe these basic instructions will reduce the performance and increase
noise levels of the cooker hood.
• Any installation work must be carried out by a qualified electrician or competent
person.
•Do not connect the ducting system of the hood to any existing ventilation system
which is being used for any other appliance ,such as warmer tube, gas tube , hot wind
tube.
•The angle of the bend of the expansion pipe should not be less than 120º; you must
direct the pipe horizontally, or, alternatively, the pipe should go up from the initial point
and should be led to an outer wall.
•After the installation ,make sure that the cooker hood is level to avoid grease
collection at on end.
•Ensure the expansion pipe selected for installation complies with relevant standards
and is fire retardant.

7
WARNING: For safety reason, please use only the same
size of fixing or mounting screws which are
recommended in this instruction manual.
Failure to install the screws or fixing device in
accordance with these instructions may result in
electrical hazards.
Start Using Your Cooker Hood
Touch control with LED display
1. Press the “Power” button, the button control the “on” & “off ” of the hood.
2. Press the button “Speed” time after time, the motor runs as low / mid / high / low /
mid…, the speed runs circularly; and the LED display will indicate as 1-2-3-1-2…
circularly.
3. Press “Lamp” button, the light is on, press this button again, the light is off. Please
note the Lamp is not under control of the on/off button.
4. When the hood is working, if press the “Timer” button, the hood will go into the
status of acquiescent working (acquiescent time is 9mins), and then, LED display
will be shown 9.8.7.6 ...decreasing by 1,when time is up, the hood will be off
8
automatically and the lamp will extinguish. If pressing “Timer” button, the hood will
go in or go out “Timer” function.
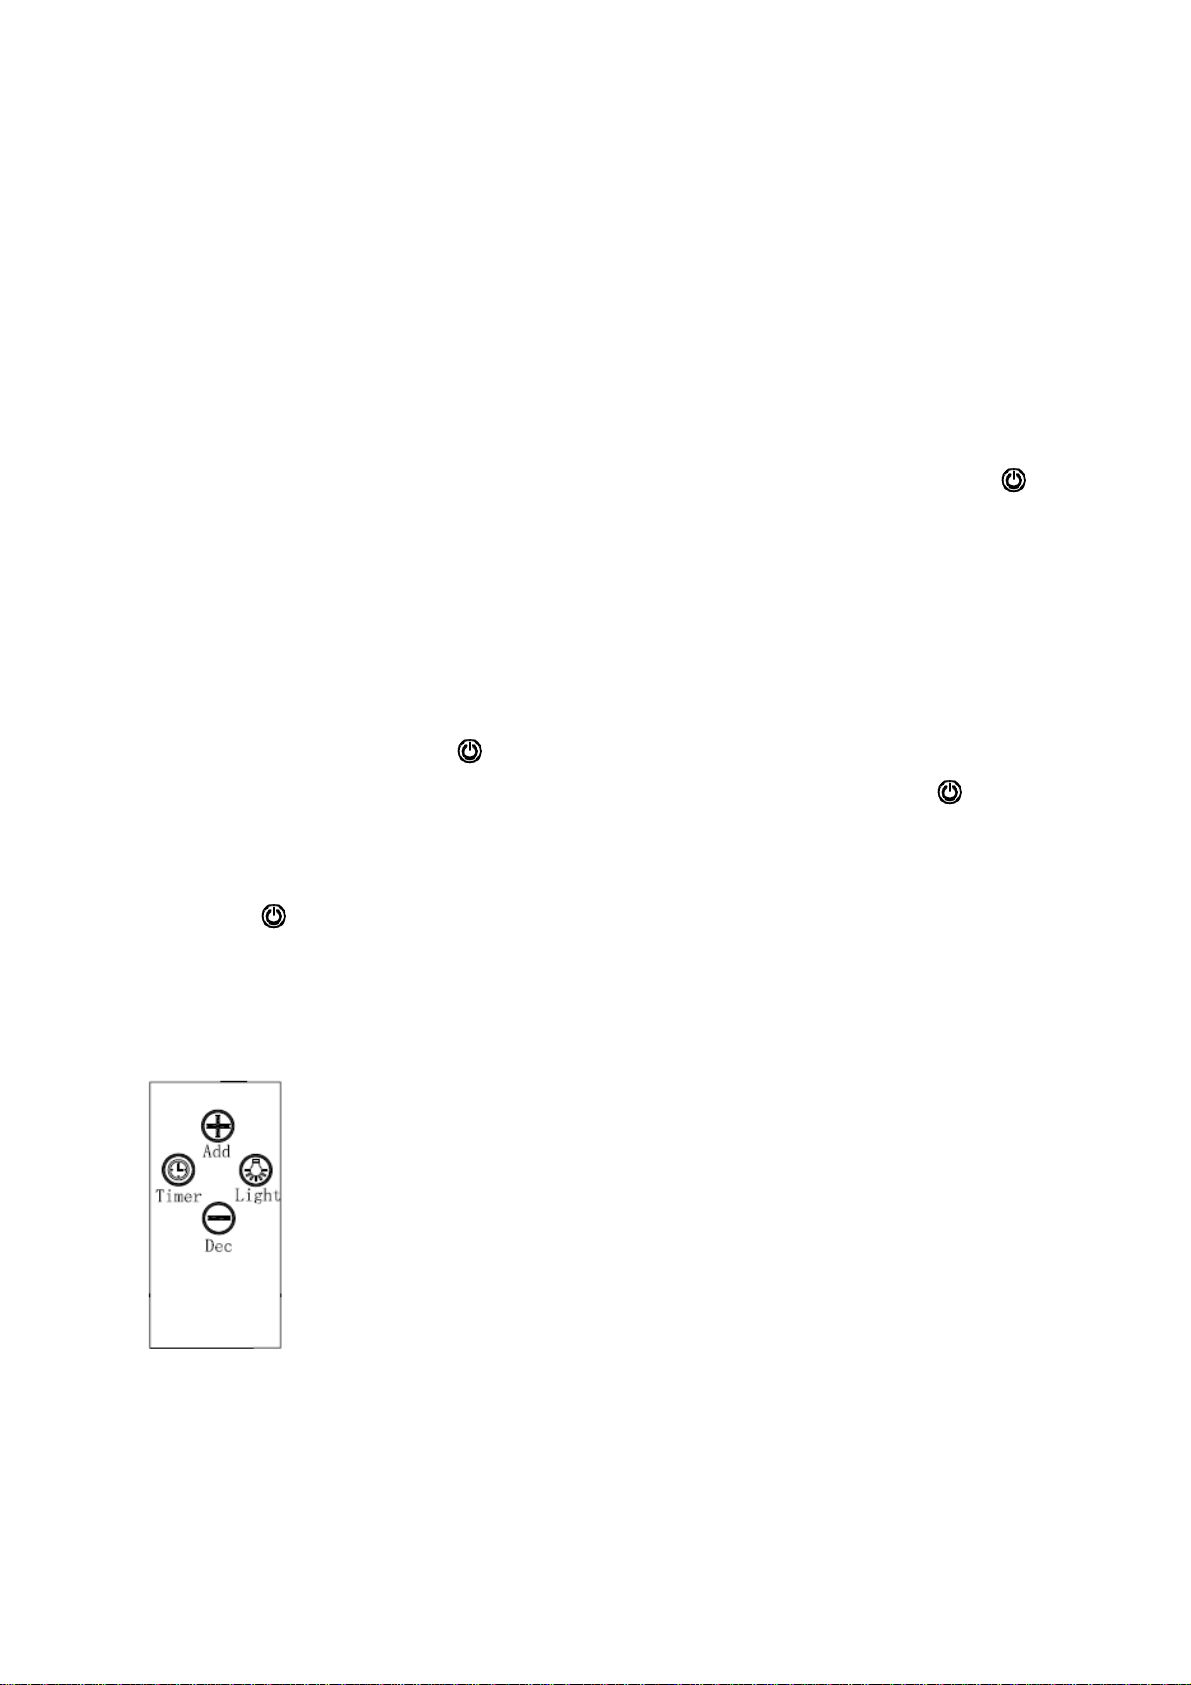
Connecting the remote control
A New remote control has to establish a new connection to the cooker hood when
used for first time. One remote control could possibly control several cooker hood
at the same time.
Connection process between remote control and cooker hood
Within 15S after the cooker hood connects to the power supply, long press for
5 seconds, the indicators light begin flashing from one button to another ,the
cooker hood is in connection mode, press any button on remote control to confirm
the connection. The connection process finished and the remote control can be
used for speed selection, lighting and timer setting.
If you want to connect again, you will need to clear the code that has been set up
previously.
To clear the code, press for 5 seconds, the indicators light begin flashing from
one button to another, the cooker is in connection mode. Then, press again for
5 seconds, the previous connection code is cleared.
When the previous code has been cleared, the cooker hood back to standby mode,
press for 5 seconds, the indicate light flashing from one button to another ,the
cooker hood is in connection mode, then, press any button on remote control to
confirm the connection.
Remote control
1. Lighting
Tabla de contenidos
Otros manuales de Campana de ventilación de Euro Appliances

Euro Appliances
Euro Appliances ER90UMBG Manual de usuario

Euro Appliances
Euro Appliances ERH85UMS Manual de usuario

Euro Appliances
Euro Appliances ES602SS2 Manual de usuario

Euro Appliances
Euro Appliances EBB900SS Manual de usuario

Euro Appliances
Euro Appliances EBB900BK3R Manual de usuario

Euro Appliances
Euro Appliances ES3H60S Manual de usuario

Euro Appliances
Euro Appliances EP70UMS Manual de usuario

Euro Appliances
Euro Appliances ESD60RS Manual de usuario


