Epson BrightLink Pro 1430Wi Manual de usuario


About This Installation Guide
This guide describes how to install the Control Pad and Touch Unit (BrightLink® Pro 1430Wi) when using the
ELPMB28 wall mount with the BrightLink Pro 1420Wi/1430Wi ultra-short-throw projectors.
Safety Instructions
For your safety, read all the instructions in this guide before using the wall mount. Incorrect handling that
ignores instructions in this guide could damage the wall mount or could result in personal injury or property
damage. Keep this installation guide on hand for future reference.
Read the safety instructions in the online User's Guide for your projector and follow the instructions in this
document.
Explanation of Symbols
The warning marks shown below are used throughout this installation guide to prevent personal injury or
property damage. Make sure you understand these warnings when reading this installation guide.
Safety Precautions for Installation
This symbol indicates information that, if ignored, could possibly result in personal injury or even death
due to incorrect handling.
This symbol indicates information that, if ignored, could possibly result in personal injury or physical
damage due to incorrect handling.
This symbol indicates related or useful information.
Symbol indicating an action that must not be done
Symbol indicating an action that should be done
Follow the instructions in this guide to install and operate the Touch Unit.
If the Touch Unit is not installed and operated properly, the light emitted from the laser could cause injury to
eyesight.
When you mount the projector on the wall with the wall mount, the wall must be strong enough to hold the
projector, the wall mount, as well as the Control Pad and the Touch Unit, if necessary.
The wall mount should be installed on a concrete wall. Confirm the weight of the projector, the wall mount,
the Control Pad, and the Touch Unit before installation, and maintain the strength of the wall. If the wall is
not strong enough, reinforce the wall before installation.
Never modify the wall mount, Control Pad, or Touch Unit.
Do not apply optical devices such as a magnifying glass or telescope to the laser light diffused from the
Touch Unit.
If such optical devices are applied, it could cause personal injury or fire.
Do not look into the Touch Unit’s laser diffusion ports.
This could cause injury to eyesight. Extra care should be taken when children are present.
Warning
Caution
Warning

English
Installation Location
•When powering the Control Pad using batteries, verify that the installation location meets the following
conditions:
•Install the Control Pad on the same surface as the projection screen. If the projection screen and the
Control Pad installation point are uneven, install the Control Pad approximately 8 in. (20 cm) from the
edge of the screen.
•Make sure there are no obstacles between the Control Pad and the projector (not including the Touch
Unit).
•Use the optional Remote Control Cable Set (model ELPKC28, part number V12H005C28) to supply power
to the Control Pad in the following situations:
•The required conditions above are not met.
•The projection screen and the Control Pad installation point are uneven and the difference in height is
more than 2 in. (5 cm).
•Multiple projectors are being used.
•Before installing the Touch Unit, verify that the installation location meets the following conditions:
•The Touch Unit can be secured to the surface with magnets or screws.
•The surface is flat, smooth, and unwarped with no more than 0.2 in. (5 mm) of unevenness in any
direction on the screen surface.
Do not view the laser light using optical devices such as a magnifying glass within a range of 2.75 in. (70
mm).
Viewing at close range could cause injury to eyesight.
Connect the Touch Unit to the BrightLink Pro 1430Wi model only. Do not connect it to any other projectors
or devices.
Do not use the Touch Unit if you are using or near medical equipment such as a pacemaker.
The magnet within the Touch Unit generates electromagnetic interference which could cause medical equipment
to malfunction.
Keep magnetic storage media (for example, magnetic cards or electronic devices such as computers,
digital watches, or cell phones) away from the Touch Unit.
The magnets within the Touch Unit generate electromagnetic interference which could corrupt data or cause the
media or device to malfunction.
Warning
Caution
0.2 in. (5 mm)

•When installing on a whiteboard, install the Touch Unit within the frame of the whiteboard.
Make sure there are no obstacles, such as cables, or protruding objects such as whiteboard trays, pen
holders, or thick frames in the shaded areas in the following figure. The Touch Unit will not operate
correctly if anything is obstructing the infrared signal.
Correct position Incorrect position
0.8 in. (20 mm)
4.0 in. (100 mm)4.0 in. (100 mm)

1 Package Contents
Touch Unit
The following parts are packaged with your projector and are necessary when attaching the Touch Unit. When
installing the Touch Unit on a non-magnetic surface, you will also need three M4 screws.
Control Pad
The following parts are packaged with your projector and are necessary when attaching the Control Pad.
When installing the Control Pad on a wall, you will also need four M4 × 20 mm screws.
Tape (approx. 2.4 in [6
cm]) for securing the
markers (×12)
Label (×4)
Touch Unit and markers
(markers are inside the unit)
Touch Unit connection cable Infrared deflector (approx.
11.2 in [28.5 cm]) (×8)
Spacer for screw hole (×3)
AA size batteries (× 2) Port protection
stickers
Control Pad
Rubber feet

English
2Specifications
Touch Unit
External dimensions and weight
The Touch Unit weighs approximately 16 oz (450 g).
Attached labels
The Touch Unit is a Class 1 laser product that conforms to the JIS C 6802:2011 standard. There are warning
labels affixed to the Touch Unit to indicate that it is a Class 1 laser product. The labels contain the following
information:
•Invisible laser radiation
•Do not view the beam directly with optical instruments
•Class 1 laser product
Laser diffusion port
The laser beam is diffused from the laser diffusion ports on the back of the Touch Unit.
8.3 in. (210 mm)
3.7 in. (95 mm)
2.0 in.
(51 mm)
Laser diffusion ports
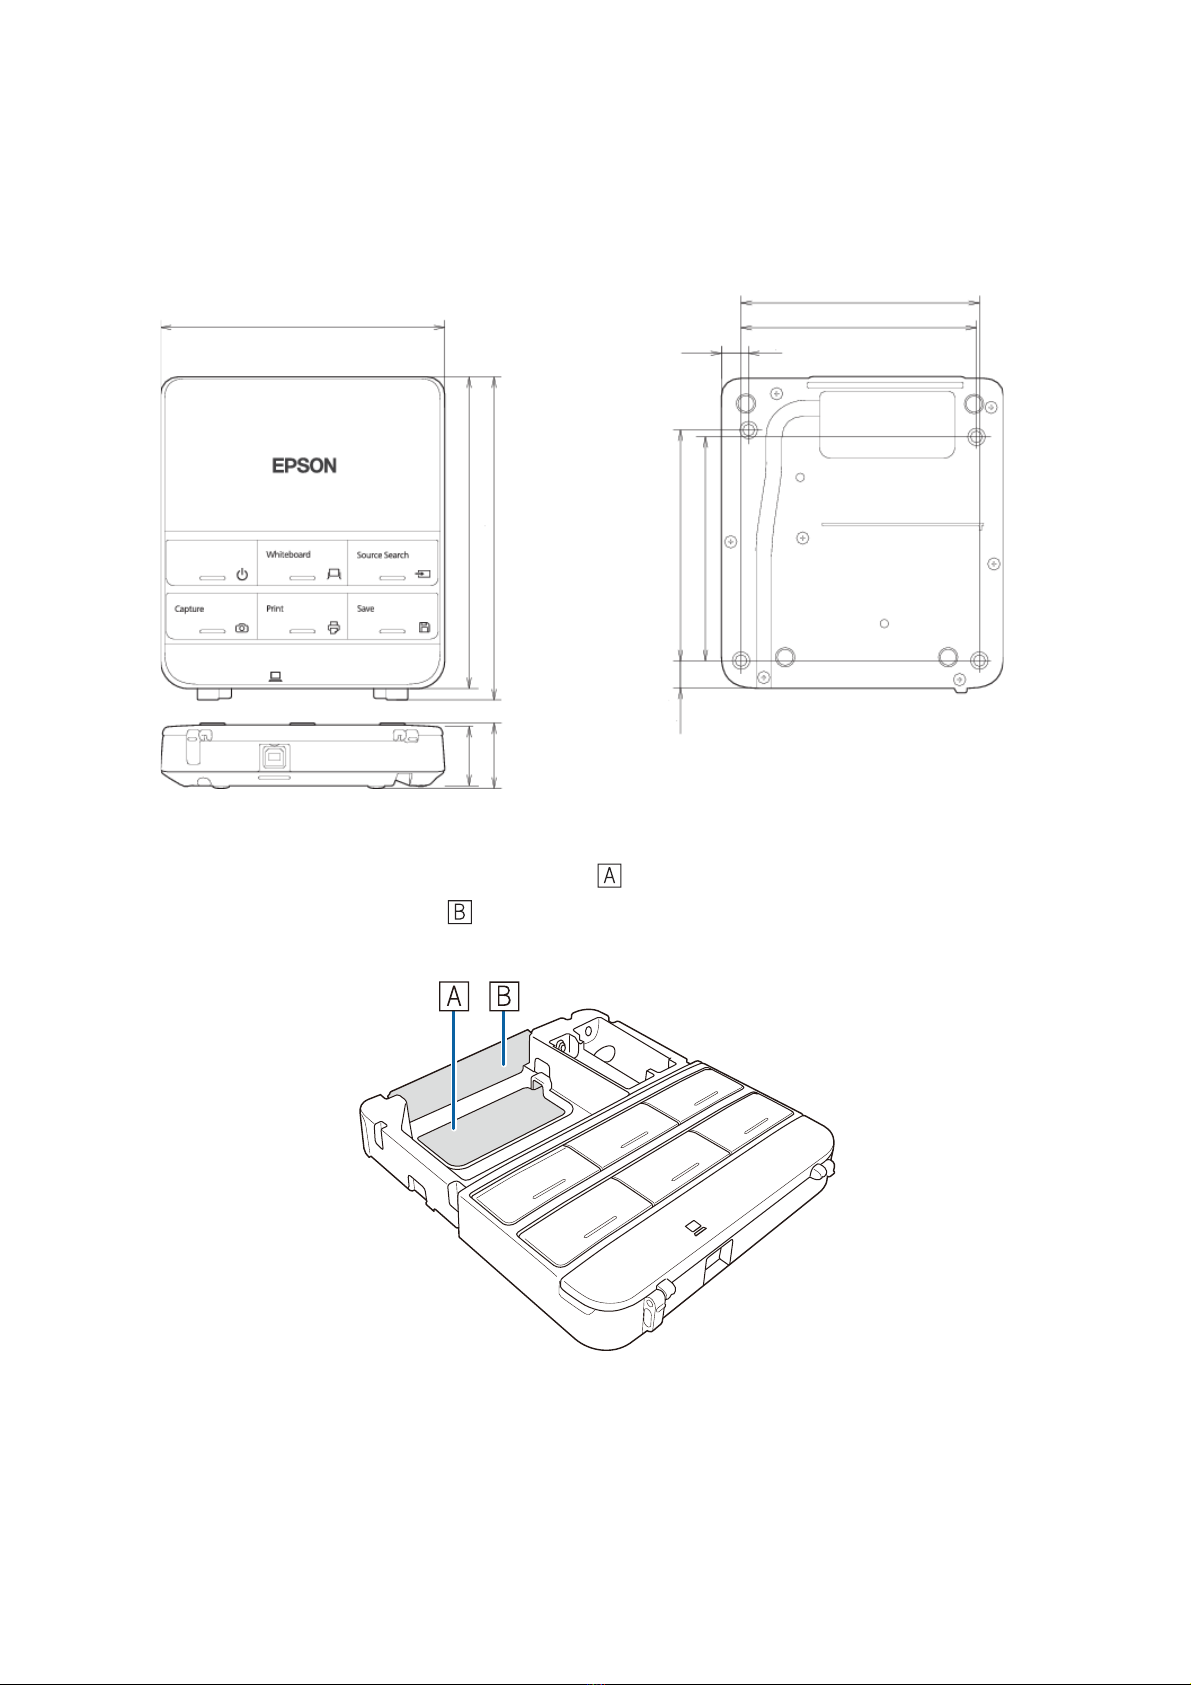
Control Pad
External dimensions and weight
The Control Pad weighs approximately 8.5 oz (240 g).
Cable routing holes
When routing cables through a wall, use the position ( ) in the following figure as the cable routing hole.
Otherwise, remove the cable cover ( ) and route the cables through the opening. Route the printer cable
along the groove on the back of the Control Pad.
5.4 in. (135.9 mm)
0,6 in
(15.47 mm)
0.1 in. (3.5 mm)
5.9 in. (149 mm)
1.1 in
(29 mm)
4.2 in. (107 mm)
4.0 in. (104 mm)
1.2 in
(30.9 mm) 6.0 in. (153.5 mm)
0.4 in
(11.5 mm)
4.3 in. (109 mm)
4.4 in. (111 mm)

English
3ConnectingDevices
Make sure you have the power cord, computer cable, and other parts at the location where the wall mount is
to be installed.
Make sure you also have all necessary cables for the Touch Unit and other devices, such as a document camera
or microphone, that you will connect to the projector. Your projector’s connection panel may differ slightly
from the displayed model. For details, refer to the online User’s Guide for your projector.
External speakers LAN device
Microphone
USB cable (for Easy
Interactive Function)
Document camera
(Epson DC-06)
Computer
Computer cable
(for computer video
output)
Connection Example
Dedicated USB cable
(supplied with document camera)
Audio cable
(not included)
LAN cable
(not included)
Touch Unit connection
cable
Touch Unit
When interacting with a computer, you need a USB cable. However, when using the projector's
built-in toolbar, you do not need a USB cable.
For Interactive Use

4 Installing the Touch Unit (BrightLink Pro 1430Wi)
The following procedures must be completed before installing the Touch Unit:
•Installing the projector (see the ELPMB28 Installation Guide)
•Adjusting the projected image (see the ELPMB28 Installation Guide)
•Calibrating the interactive pen(s)
sRefer to your projector User's Guide or Start Here folder for detailed instructions.
Follow the steps below to install the Touch Unit and connect to the projector. Some menus may differ slightly
from the illustrations, but the installation instructions are the same.
ATurn on the projector
BDisplay the installation pattern
1. Select Easy Interactive Function from the Extended menu.
❏There are magnets built in to the back of the Touch Unit. Typically, the Touch Unit
should be installed by attaching the magnets to the screen or whiteboard.
❏If the magnets cannot be attached, use commercially available M4 screws (×3).
❏Install the Touch Unit on a flat, smooth, unwarped surface that is the same level
surface as the screen surface. If there is unevenness on the screen surface of more
than 0.2 in. (5 mm) in any direction, your fingers may not be detected and finger
touch operations may not be performed correctly.
Using the Remote Control Using the Control Panel
The Touch Unit should only be connected to the BrightLink Pro 1430Wi. Do not connect the
Touch Unit to any other projectors or devices.
Caution

English
2. Select Touch Unit Setup.
3. Select Installation Pattern.
The Installation pattern is displayed on the projected image.
CRemove the markers
1. Loosen the screw at the bottom of the dial cover.
Otros manuales para BrightLink Pro 1430Wi
2
Tabla de contenidos
Otros manuales de Pizarra blanca de Epson


