Envig Solo Manual de usuario

Envig Direct Connect Undersink Water Filter
System
Model: Solo / Solo Clear

Installation
Before Start
Precaution
Please read carefully before installation.
Do not use it with water that is microbiologically unsafe or of
unknown quality without adequate disinfection.
For cold water line only.
Connect to 3/8” supply lines.
Do not freeze the filter, as this can cause cracking and water
leakage.
Do not allow children under 3 years old to have access to small
parts during installation of this product.
This installation must comply with all applicable state and local
regulations.
Turn off the water supply while replacing the filter.
Required Tools
Adjustable wrench, pliers
Screwdriver
Flashlight
Towel or drain bucket
Specification
Operating Temperature
40 –80 °F
Working Pressure
20 –60 PSI
Flow Rate
2.5 GPM
Flow Capacity
8,000 Gallon
Contact
If you have any problem during purchase or installation, please contact Envig
customer service:
by phone: 1-919-964-0901 Mon –Fri 8:00AM –5:00PM (EST).
by email: cs@envig.cc
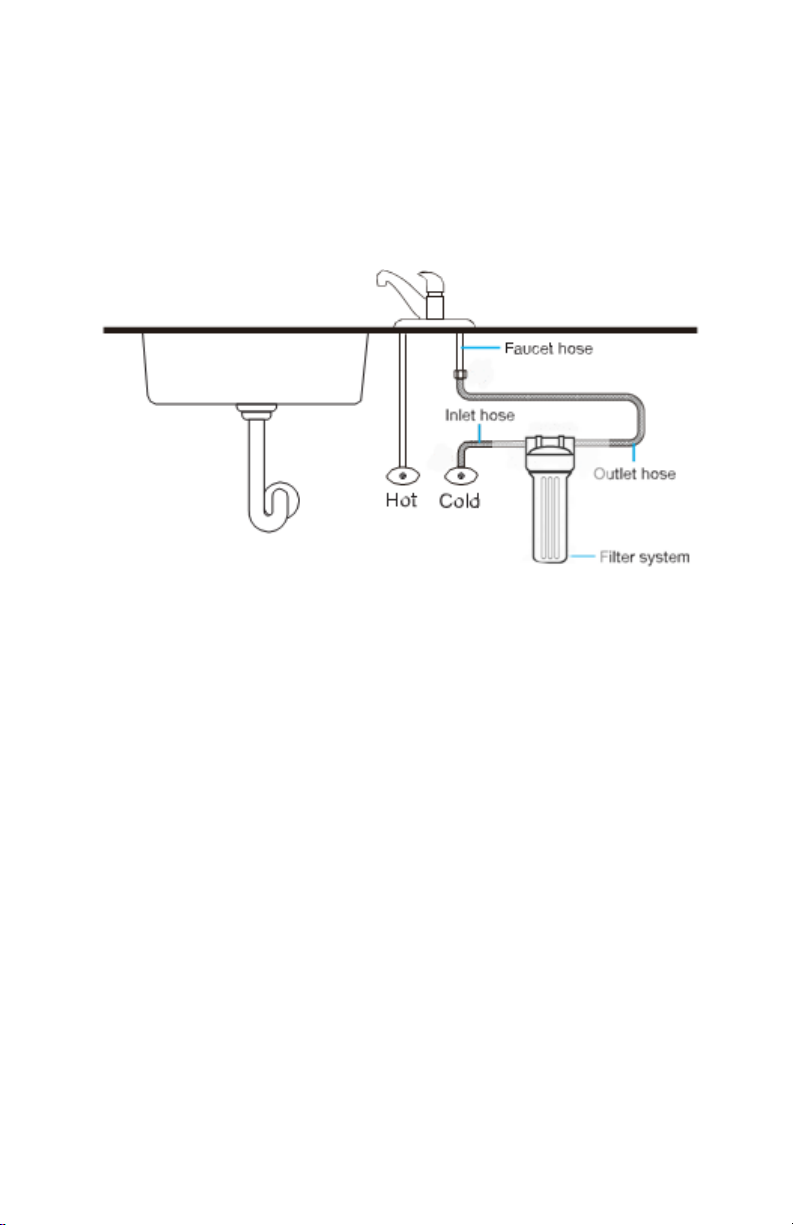
Connection Diagram
Installation Steps
Note:
Step 1: Fix the filter head and the filter
1. Find the under sink location where you want to place the filter
system for easy installation and filter change, and where the length
of hose is sufficient for connection. We suggest it to be as close to
the cabinet door as possible on the side of the under sink cabinet.
2. Install the braided filter hose onto the filter cap. The hose with 3/8”
female connector should be installed to the “IN” side. The hose with
3/8” male connector should be installed to the “OUT” side.
Note: Apply Teflon tape clockwise to the connector head in five
wraps.
3. Install the mounting bracket to the filter cap with the provided
machine screw.

4. Unwrap the filter and place it in the filter housing. Screw the filter
housing onto the filter head. Use filter housing wrench to tighten it.
5. Place the filter system vertically on the floor of the cabinet and
against cabinet wall. Mark the screw hole on the side of the cabinet.
6. Install the provided self-driving screws. Hang the filter system onto
the screws.
Step 2: Connect the water supply
1. Shut off the cold water supply. Turn the kitchen faucet to release the
water pressure.
Note: Make sure the water has stopped running before proceeding
to the next step.
2. Remove the faucet hose from cold water valve.
3. Connect the inlet hose to the cold water valve.
Note: Apply Teflon tape clockwise to the male connector of the
water supply valve for five to six times.
4. Connect the faucet hose to the outlet hose of the filter system.
Note: Apply Teflon tape clockwise to the male connector of the
outlet hose in five wraps.
5. Turn on the water supply slowly and check for leaks.
Step 3: Flush the system
Turn on the faucet to flush the system for five minutes or until black
carbon fine is no longer presented in water.
Maintenance
Filter Life

The filter system is rated for 8,000 gallon capacity. You can estimate the filter
life based on your daily water use through the filter. However filter life
depends on water quality. If the flow rate is significantly reduced or if the
water has a peculiar smell, we suggest that you replace the filter.
Filter Replacement
Note: Use a tray to hold the water that will usually come when filter housing
is open.
1. Shut off the cold water supply. Turn the kitchen faucet to release the
water pressure.
2. Use filter housing wrench unscrew the filter housing.
3. Remove the used filter and place a new filter.
4. Use filter housing wrench to screw and tighten the filter housing.
5. Turn on the water supply slowly and check for leaks.
Frequent Ask Questions
Q: What should I do if water leaks after installation?
A: In the event of water leakage, turn off the water supply. If leakage is
occurring at the connections you put at installation, disconnect and wrap
more Teflon tape on the external thread. If the water leakage is occurring at
the top of the filter housing, unscrew the filter housing and check the o-ring at
the top of the filter house to avoid any cracks or misalignment. Screw the filter
housing tight with the filter housing wrench. If the water leakage is occurring
at the joint of hose and filter head, use an adjustable wrench to unscrew the
hose from the filter housing. Wrap more Teflon tape on the external thread of
the hose and screw it back to the filter head. Contact us for solutions if the
water leakage persists.
Q: Why didn’t the TDS value lower after filtration?
A: The main purpose of this filter is not to remove TDS. TDS stands for total
dissolved solids, and it is basically composed of inorganic salts and a small
amount of organic matter. The filter can remove harmful substance while
keeping beneficial trace elements. Please choose Envig RO system if you are
looking for removal of TDS.
Q: What substances can the filter remove?

We have four different filter cartridges to choose from for the Solo filter
system. Please refer to the information to a specific filter cartridge model. If
you have question, please contact customer service.
Q: Why does black water come out during flushing?
A: It’s normal that black water may come out when flushing. The purpose is to
remove carbon powder remaining on the surface of filter materials. You can
normally use it after flushing for 5 minutes.
1-Year Limited Product Warranty
Product warranty will only be effective after the purchase is registered for
warranty through Envig’s website: https://www.envig.cc/pages/warranty.
The warranty of our product covers defects in materials and workmanship
from the original date of purchase. During the warranty period, we will replace
or repair any part which is deemed to be defective at our discretion, provided
the product has not been subjected to tampering, alteration, negligence of
regular maintenance or improper use after delivery. The cost of repair or
replacement under those excluded circumstances shall be borne by the
consumer. This limited warranty does not cover filters and all other parts or
components that require regular replacement as a result of ordinary usage
under specified conditions. This limited warranty only applies if the system is
installed, used, and maintained in compliance with all instructions and
requirements enclosed with the system.
The manufacturer or reseller shall assume no liability for the determination of
the proper equipment necessary to meet your water quality requirements,
and we do not authorize others to assume such obligation on our behalf. You
must verify and test on your own risk the suitability of any information with
respect to the product for your specific application.
This limited warranty shall only be void if:
1. the system is not used under the specified conditions,
2. the cartridge filters are not replaced as recommended, or
3. the product is purchased from someone other than our official
website or authorized resellers.

Our sole obligation under this warranty shall be repair or replacement of a
non-conforming product or parts of this product, or at our discretion, return of
the product and a refund of the purchase price.
The warranties set forth herein are the only warranties made by us with
respect to the product. We make no warranties, expressed or implied,
including, but not limited to, any warranties of fitness or merchantability,
except as expressly set forth above.
In case some states do not allow limitations on how long an implied warranty
lasts, you may choose to return the system. If you choose to keep it, you
agree that the above limitations shall apply to you.

Thanks for your business
Este manual sirve para los siguientes modelos
1
Tabla de contenidos
Otros manuales de Sistema de filtración de agua de Envig


