Emtec Movie Cube S900H Manual de usuario

Quick installation guide ................................................................................................................................................. 3
Guide d’installation rapide ...................................................................................................................................................... 6
Schnellinstallationhandbuch................................................................................................................................................... 9
Guía de instalación rápida ...........................................................................................................................................12
Guida di installazione rapida .................................................................................................................................................15
Guia de instalação rápida ........................................................................................................................................................18
Installatieprocedure ..................................................................................................................................................................21
Przewodnik szybkiej instalacji ...............................................................................................................................................24
Movie Cube S900H

3
Quick installation guide
1. Connect to Computer
(1) Make sure the player is powered on;
(2) Plug in the squarish connector of the USB cable to this player’s USB DEVICE port;
(3) Plug in the rectangular connector of the USB cable to computer.
2. USB Mass Storage Device (like USB stick, MP3, USB HDD etc.) Connection
(1) Make sure the player is powered on;
(2) Plug in the USB stick or USB HDD etc. to one of the USB host ports of this player.
3. TV connection
3.1. A/V IN
(1) Follow the picture and plug in the 3 color connector to the player’s A/V IN jack;
(2) Follow the picture and plug in the 3 color connector to the A/V OUT jack of the TV/IPTV Set-Top Box (STB).
In this way, you can record TV programs from the TV/IPTV Set-Top Box.
3.2. A/V OUT
(1) Follow the picture and plug in the 3 color connector to the player’s A/V OUT jack;
(2) Follow the picture and plug in the 3 color connector to the TV’s A/V IN jack.
In this way, you can enjoy the content in the player on TV or other display devices.
EN

4
3.3. SCART OUT
(1) Follow the picture and plug one connector on the SCART cable to the player’s SCART socket;
(2) Follow the picture and plug the other connector on the SCART cable to the TV’s SCART socket.
3.4. Y/Pb/Pr Component OUT
(1) Follow the picture and plug in the 3 color connector to the player’s Y/Pb/Pr jack;
(2) Follow the picture and plug in the 3 color connector to the TV’s Y/Pb/Pr jack.
(3) Select the appropriate TV input source.
Y/Pb/Pr cable connection only output video, you will need AV cable or S/PDIF optical cable for audio output.
Follow the Audio Connection method as below:
First method: Use the audio output from the A/V OUT jack;
Second method: Use the audio output from the S/PDIF optical jack.
In this way, you can also enjoy videos, music, and photos in the player on TV.
3.5. HDMI OUT
(1) Follow the picture and plug one connector on your HDMI cable to the player’s HDMI jack;
(2) Follow the picture and plug the other connector on your HDMI cable to the TV’s HDMI jack.
In this way, you can have the highest quality video and audio via a single cable.
3.6. ANT. / RF IN
Follow the picture and plug a TV Aerial to the ANT. / RF IN socket;
3.7. ANT. / RF OUT
(1) Make sure the player is powered on;
(2) Make sure a TV Aerial is connected to the ANT. / RF IN socket;
(3) Follow the picture and plug a TV cable to the ANT. / RF OUT socket then plug the cable to a TV or other TV receiver.
EN

5
The player can loop out the DVB-T signal to other TV receiver device. In this way, you can watch the TV programs with another
TV receiver while recording
4. Digital Audio Device connection
(1) Follow the picture and plug in the Toslink connector of your optical ber to the player’s S/PDIF Optical jack;
(2) Follow the picture and plug in the other connector of your optical ber to the digital audio device (digital ampli er
or decoder).
(3) Select the appropriate input source in the digital audio device.
Note: Optical ber cable is an optional accessory sold separately.
5. Power connection
(1) Follow the picture and connect the AC adaptor to the player’s DC IN jack;
(2) Follow the picture and plug in the AC adaptor to the power outlet.
6. Ethernet connection
To connect to a LAN (Local Area Network) you require a cat5, cat5e or cat6 network cable (not supplied).
(1) Connect one of the crystal plugs on the cable to the player’s RJ45 LAN socket;
(2) Connect the other crystal plug on the cable to a RJ45 LAN port on your router, switch, or hub devices.
7. WLAN connection
(1) Make sure the player is powered on;
(2) Plug the Wireless LAN USB Adapter (i.e. Wi-Fi USB Dongle) to the USB HOST port of the player.
EN

6
FR
Guide d’installation rapide
1. Connexion à l’ordinateur
(1) Assurez-vous que le Movie Cube soit mis sous tension.
(2) Branchez le mini connecteur du câble USB au port mini USB du Movie Cube;
(3) Branchez l’autre extrémité du câble USB à l´ordinateur.
2. Connexion avec un périphérique USB (Clé USB, MP3, Disque dur, etc.)
(1) Assurez-vous que le Movie Cube soit mis sous tension.
(2) Connectez le périphérique USB à l´un des 2 ports USB intégrés du Movie Cube.
3. Connexion TV
3.1. Entrée A/V
(1) Insérez le câble avec les 3 connecteurs dans l’entrée A/V du Movie Cube.
(2) Insérez le câble avec les 3 connecteurs dans la Sortie A/V de votre TV ou décodeur.
De cette manière, vous pouvez enregistrer les programmes de votre TV ou décodeur.
3.2. Sortie A/V
Insérez le câble avec les 3 connecteurs dans la Sortie A/V du Movie Cube;
Insérez le câble avec les 3 connecteurs dans l’entrée A/V de la TV.
Grâce à cette connexion, pro tez du contenu de votre lecteur sur votre TV ou autres appareils.
7
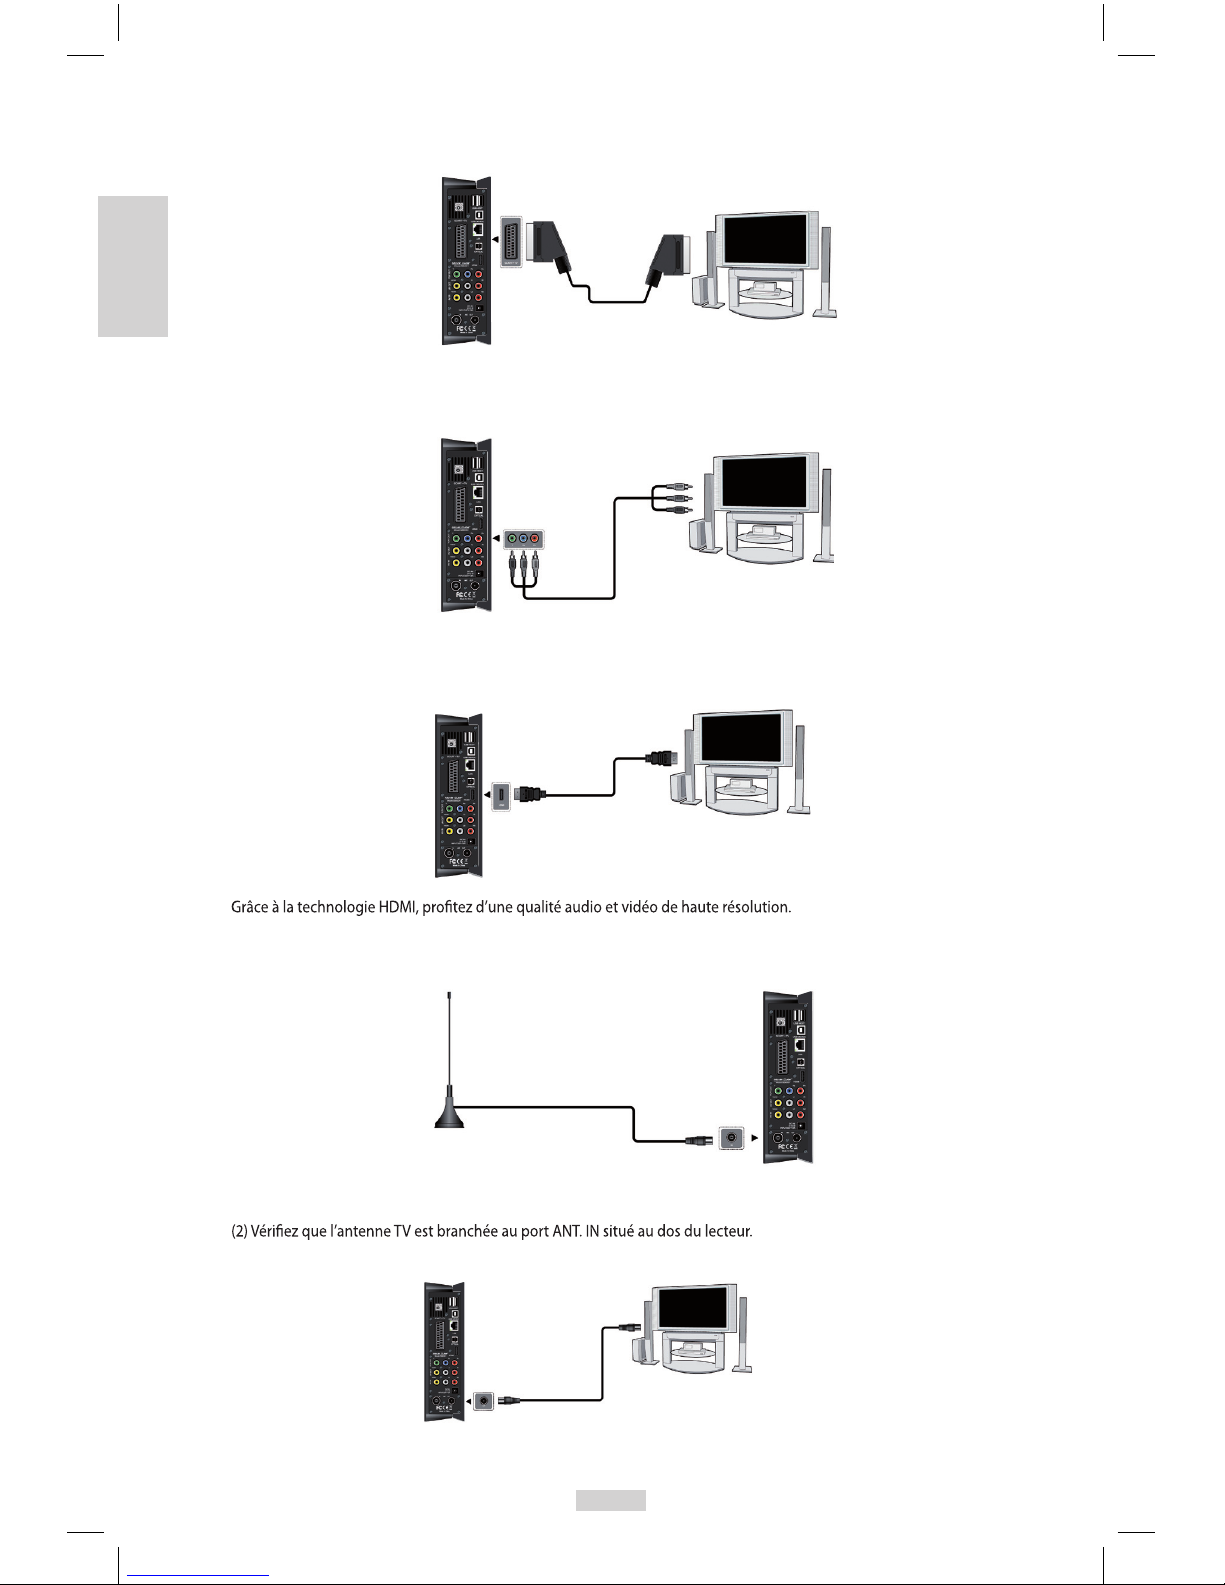
3.3. Sortie Péritel
Insérez une des prise de la Péritel sur votre téléviseur et l’autre sur le Movie Cube comme indiqué sur l’image.
3.4. Y/Pb/Pr Sortie Image Composant
(1) Insérez les connecteurs tricolores du câble Y/Pb/Pr dans les connecteurs correspondants du Movie Cube,
(2) Insérez les connecteurs tricolores du câble Y/Pb/Pr dans les connecteurs correspondants de la TV.
3.5. Sortie HDMI
Comme indiqué sur l’image ci-dessous, branchez le câble HDMI (non fourni) dans le port HDMI situé à l’arrière du Movie Cube
et à l’entrée HDMI de votre TV.
3.6. Entrée antenne TV
Comme indiqué sur l’image ci dessous, branchez la mini antenne ou votre câble d’antenne murale au port TV IN situé à l’arrière
de l’appareil.
3.7. Sortie antenne TV
(1) Assurez-vous que le lecteur est sous tension,
(3) Branchez un câble TV au port ANT. OUT situé au dos du lecteur et reliez l’autre bout à votre TV ou autre appareil.
De cette manière, vous pouvez enregistrer un programme et en regarder un autre en parallèle.
FR

8
FR
4. Connexion à un matériel audio
(1) Branchez le connecteur de votre câble optique sur le port coaxial du lecteur comme indiqué sur l’image;
(2) Branchez l’autre connecteur de votre câble optique à votre matériel audio (ampli cateur digital ou décodeur).
(3) Sélectionnez l’entrée appropriée sur votre matériel audio.
Note: Le câble optique est un accessoire en option vendu séparément.
: Le câble optique est un accessoire en option vendu séparément.
5. Connexion à l´alimentation électrique
(1) Veuillez connecter l’adaptateur AC au connecteur jack entrée DC du lecteur comme indiqué sur l’image.
(2) Branchez l’adaptateur AC à la prise électrique.
6. Connexion à un réseau (Ethernet)
Pour connecter le Movie Cube à un réseau, il vous faut avoir un câble de réseau Cat5, Cat5e ou Cat6 (non fourni).
(1) Veuillez connecter le câble réseau au port RJ45 du Movie Cube
(2) Connectez l’autre extrémité du câble à un port RJ45 de votre routeur ou modem.
7. Connexion de l’adaptateur USB sans l WiFi
(1) Assurez-vous que le Movie Cube est mis sous tension;
(2) Branchez l’adaptateur USB sans l WiFi sur l’un des ports USB situé à l’arrière du lecteur.

9
Schnellinstallationhandbuch
1. Verbindung mit dem PC
(1) Vergewissern Sie sich, dass der Player eingeschaltet ist;
(2) Stecken Sie den kleineren Stecker des USB-Kabels in den USB-Geräteport dieses Players.
(3) Stecken Sie den großen Stecker des USB-Kabels an den Computer.
2. Verbindung mit externen Daten-Speichern (USB oder Festplatten)
(1) Vergewissern Sie sich, dass der Player eingeschaltet ist;
(2) Schliessen Sie die U disk oder USB HDD an einen der USB Host-Port dieses Players an.
3. Verbindung mit dem Fernseher
3.1. A/V EIN (A/V IN)
(1) Folgen Sie der Abbildung und Stecken Sie den dreifarbigen Anschluss in die A/V IN Buchse des Players.
(2) Folgen Sie der Abbildung und stecken Sie den dreifarbigen Anschluss in den A/V OUT Buchse des Fernsehers/IPTV Set-Top-
Box Box.
Auf diese Weise können Sie Fernsehprogramme vom Fernsehen/IPTV Set-Top-Box aufzeichnen.
3.2. A/V OUT
(1) Folgen Sie der Abbildung und stecken Sie den dreifärbigen Anschluss in die A/V OUT Buchse des Fernsehers.
(2) Folgen Sie der Abbildung und stecken Sie den dreifarbigen Anschluss in die A/V IN Buchse des Fernsehers.
Auf dieser Weise können Sie die Inhalte auf dem Player mit Ihrem Fernseher oder anderen Wiedergabegeräten anschauen.
DE

10
DE
3.3. SCART OUT / Scart Ausgang
(1) Bitte befolgen Sie die bebilderte Anleitung und verbinden Sie den Movie Cube mit dem Scartkabel.
(2) Bitte befolgen Sie die bebilderte Anleitung und verbinden Sie das andere Ende des Scartkabels mit Ihrem Fernseher.
3.4. Y/Pb/PR Komponente OUT
(1) Folgen Sie der Abbildung und stecken Sie den dreifarbigen Anschluss an die Y/Pb/Pr OUT Buchse des Fernsehers.
(2) Folgen Sie der Abbildung und stecken Sie den dreifarbigen Anschluss an die Y/Pb/Pr Buchse des Fernsehers.
Über Komponentenausgänge werden keine Audiosignale übertragen. Um trotzdem Audiosignale zu übertragen gibt es
zwei Möglichkeiten:
- Verwenden Sie den Audio-Ausgang der A/V OUT Buchse.
- Verwenden Sie den digitalen optischen Audio-Ausgang (S/PDIF).
Auf diese Weise können Sie auch Videos, Musik und Photos, die sich auf dem Player be nden, auf dem Fernseher anschauen.
3.5. HDMI OUT
(1) Folgen Sie der Bebilderung und verbinden Sie einen Stecker des HDMI Kabels mit dem Player.
(2) Folgen Sie der Bebilderung und verbinden Sie das andere Ende des Kabels mit dem HDMI Anschluss des TV’s.
Auf diesem Weg haben Sie höchste Audio und Video Qualität mit einem einzelnen Kabel.
3.6. Antenneneingang
Folgen Sie der bebilderten Anleitung und stecken Sie das Antennenkabel der Antenne oder des analogen Kabelfernsehens in
die TV IN Buchse.
3.7. Antennenausgang
(1) Stellen Sie sicher, dass der Player angeschaltet ist.
(2) Prüfen Sie, ob die Antenne mit der Antenneneingangsbuchse verbunden ist.
(3) Folgen Sie der bebilderten Anleitung und stecken Sie das eine Ende eines Antennenkabels in die Antennenausgangsbuchse
des Players und das andere Ende in einen TV oder anderen TV-Receiver.

11
Der Player schleift das Antennensignal zu einem anderen Receiver durch. Auf diesem Weg können Sie ein TV-Programm
aufnehmen, während Sie sich ein anderes ansehen.
4. Verbindung mit einem Digitalen Audiogerät
Folgen der Abbildung und verbinden Sie den Movie Cube mit Hilfe eines optischen Kabels (Toslink) mit dem Digitaleingang
an Ihrem Verstärker.
Jetzt müssen Sie nur noch die Toneingangsquelle an Ihrem digitalen Verstärker wählen.
Hinweis : Das Glasfaserkabel (Toslink) ist nicht im Lieferumfang enthalten.
5. Netzstromverbindung
(1) Folgen Sie der Abbildung und schließen Sie den Wechselstromadapter an die Gleichstrombuchse (DC IN) des Players an;
(2) Folgen Sie der Abbildung und stecken Sie den Wechselstromadapter (AC Adapter) in die Steckdose.
6. Netzwerkverbindung
Für die Verbindung mit einem Netzwerk benötigen Sie ein cat5, cat5e oder cat6 Netzwerkkabel
(nicht mitgeliefert).
(1) Schließen Sie einen der durchsichtigen Stecker des Kabels an die RJ45 LAN Buchse des Players an;
(2) Schließen Sie den anderen durchsichtigen Stecker des Kabels an einen RJ45
LAN-Anschluss auf Ihrem Router, Schalter oder HUB-Gerät an.
7. WLAN USB Adapter anschließen
(1) Stellen Sie sicher, dass der Player angeschaltet ist;
(2) Stecken Sie den WLAN USB Adapter in eine der USB HOST Steckplätze des Players.
DE
Otros manuales para Movie Cube S900H
1
Tabla de contenidos
Idiomas:
Otros manuales de Decodificador de Emtec


